Home »
Misc »
How to tape ankles for basketball
How to tape ankles for basketball
How to Correctly Wrap an Ankle for Basketball
How to Tape a Foot for Soccer
Calf Exercises Without the Ankles
by Scott Cavanagh
Taping your ankles for basketball requires practice. Doing it properly can be the difference between sustaining and avoiding an injury. If you need to tape your ankles, it is best to have someone help you, but it can be done on your own.
Prepare the Ankles
In preparation for the tape job, shave the ankle region at least 12 hours in advance to avoid painful removal of the wrap. Products known as prewraps, which allow easier removal of tape, are readily available and can be used as an alternative to shaving. Elevate the foot and place it on a comfortable surface, keeping the ankle at a 90-degree angle, with the toes pointing upward.
Creating the Anchor
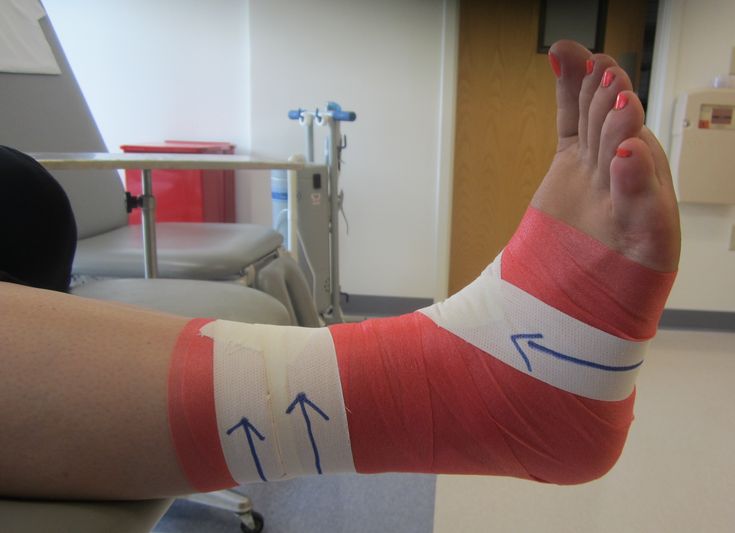
The first section to complete, the "anchor," is created by wrapping a piece of athletic tape around the lower shin just above the ankle area.![]() This anchor serves as a base point where other ascending pieces of wrap tape will be attached later in the process. Make sure the anchor is not wrapped too tightly so that it does not restrict circulation.
This anchor serves as a base point where other ascending pieces of wrap tape will be attached later in the process. Make sure the anchor is not wrapped too tightly so that it does not restrict circulation.
Attaching the Stirrup
The stirrup forms a brace based under the heel. Begin at the anchor by applying a long piece of tape to the side of the leg; run the tape under the heel and back up the other side of the leg to the other side of the anchor. The tape should form a "U" resembling the stirrup of a horse saddle.
Creating a Heel-to-Toe Segment
To brace the ankle from front to back, wrap a piece of tape around the back of the heel and continue it up either side of the foot until it reaches the base of the toes. This piece should run at a 90-degree angle to the tape that forms the stirrup.
Building the Second Wave
The second wave of taping consists mostly of repeating many of the steps already taken. Wrap a piece of tape under the heel slightly in front of the first stirrup and run it up the sides of the leg to the anchor in the same manner as the original. Make sure this piece is as close as possible to the protruding knob of the ankle bone. Repeat the process of the original heel-to-toe--taping directly over the first piece.
Applying the Overwrap
Complete your tape job by creating the overwrap. This requires applying one to three layers of tape around the entire ankle area, starting at the front base of the foot and using a crisscross diagonal pattern until you reach the anchor. Leave the heel exposed for easier movement.
References
- Mueller Sport Care: Taping and Bracing Techniques
- Marshfield Clinic: Athletic Taping the Ankle
- Sportstek: How to Tape an Ankle
Writer Bio
Scott Cavanagh has been a writer, reporter, editor and photographer for more than 20 years. His work has appeared in newspapers, magazines, business publications and websites including ThisWeek Newspapers, "The Columbus Dispatch," "The Historian," "Wired," "The Delaware Gazette," and "The Columbus Messenger.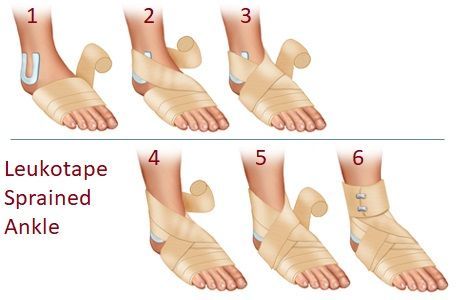 " Cavanagh was the co-creator and editor of Wired.net and is the editor and publisher of BarkBackNews.com.
Image Credit
Brian Bahr/Getty Images Sport/Getty Images
SHARE SHARE TWEET EMAIL
More Articles
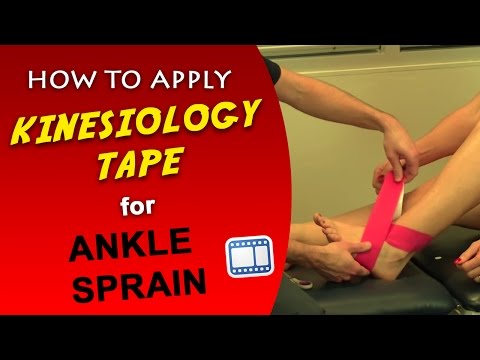
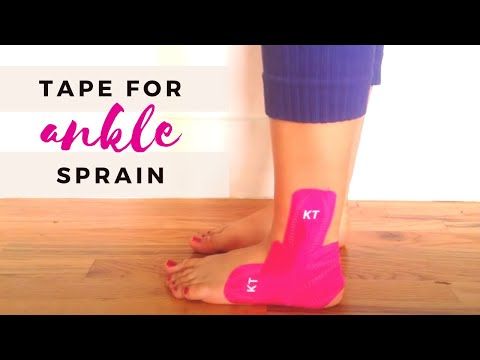
How to Tape an Ankle with Medical Tape or Kinesio Tape
Share on Pinterest
We include products we think are useful for our readers. If you buy through links on this page, we may earn a small commission. Here’s our process.
Ankle tape can provide stability, support, and compression for the ankle joint. It can help reduce swelling after an ankle injury and prevent reinjury.
But there’s a fine line between a well-taped ankle, and one that’s taped too tight or doesn’t provide the needed support.
Keep reading for our step-by-step guide on how to effectively tape an ankle.
Tape
You have two main options for taping your ankle: They are athletic tape, which an athletic trainer may also call strapping or rigid tape, and kinesio tape.
Athletic tape
Athletic tape is designed to restrict movement. The tape doesn’t stretch, so it’s usually best-suited for stabilizing an injured ankle, providing significant support to prevent injury, or otherwise restricting movement.
You should only wear athletic tape for a short period of time — roughly less than a day unless a doctor suggests otherwise — as it can affect circulation.
Shop for athletic tape online.
Kinesio tape
Kinesio tape is a stretchy, moveable tape. The tape is best-suited for when you need range of motion in the ankle, but want additional support. You may want to wear kinesio tape if:
- you’re back to physical activity after an injury
- you’re back on the playing field
- you have unstable ankles
Kinesio tape can stay on much longer than athletic tape — usually up to 5 days. The stretchy nature of the tape doesn’t usually restrict blood flow and is waterproof, so you can still shower or bathe with the tape on.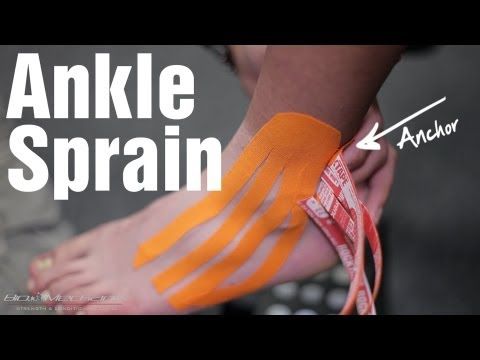
Shop for kinesio tape online.
Support accessories
Some people may also use special accessories to increase the tape’s effectiveness and reduce blistering or discomfort that it can sometimes cause. Examples include:
- heel and lace pads, which are applied on the top of the foot and over the heel
- taping base spray, which helps reduce friction while also allowing the tape to better adhere to the skin
- prewrap, which is a soft, stretchy wrap that’s applied before athletic tape and makes the tape easier to remove
Shop for heel and lace pads, taping base spray, and prewrap online.
Since using athletic tape involves a different approach than kinesio tape, there are a few separate steps for each approach. Both approaches will start with clean, dry skin. Be sure to avoid taping over open wounds or sores.
Desired, but not required, first steps
- Apply a base spray to the ankle, spraying on top of the foot and on the ankle.
- Then, apply a heel pad to the back of the foot, starting just behind the ankle (where shoes often rub), and a lace wrap on the front of the foot (where shoelaces often rub) if desired.
- Apply prewrap to the foot, starting just underneath the ball of the foot and wrapping upward until the ankle (and about 3 inches above the ankle) is covered.
- Take the athletic tape and apply two anchor strips at the top-most part of the prewrap. This involves starting at the front of the leg and wrapping until the strips of tape overlap by 1 to 2 inches. Apply an additional strip halfway past where the first strip is located.
- Create a stirrup piece by applying the tape against the top of one anchor strip, advancing it over the ankle, going over the heel, and ending at the same place on the opposite side of the leg. This should look like a stirrup.
- Repeat and place an additional stirrup piece slightly more in the center of the top part of the foot, going around the ankle, and having the tape adhere to the anchor strip.
- Place another anchor strip over the stirrup tape, wrapping about halfway from the start of the last anchor strip. This helps hold the stirrup piece in place. Continue wrapping in this fashion until you reach the top of the foot.
- Wrap the heel using a figure-eight technique. Starting on the inner aspect of the arch, bring the tape across the foot, angling down toward the heel. Cross over the foot and ankle, continuing the figure-eight for two complete wraps.
- Finish by placing pieces of tape from the front of the lower leg, around the arch or heel to the other side. You may also need additional anchor strips. You shouldn’t have any open areas of skin.
Kinesio tape doesn’t cover most of the foot and ankle as athletic tape does. While different methods exist, here’s an example of a common kinesio ankle taping approach:
- Take a piece of kinesio tape, and start on the outside of the ankle, about 4 to 6 inches above the ankle. Create a stirrup-like effect as you take the piece of tape over the heel, pulling the tape to the opposite side, over the inner aspect of the ankle, and stopping at the same level as the first piece of tape.
- Put another piece of tape on the back of the foot, centering it with your Achilles (heel) tendon. Wrap the tape around the ankle to circle it around the foot. The tape should be tight enough so the foot bends, yet still feels supported.
- Some people don’t circle the tape around the ankle, but instead cross it like an X. This involves centering a piece of tape under the arch and bringing the two ends across the front of the lower leg to create an X. The ends of the tape are secured behind the leg.
Be sure to remove any tape you may have applied if at any time your toes appear discolored or swollen. This could indicate the tape is too tight and may be affecting your circulation.
According to an article in the journal Best Practice and Research: Clinical Rheumatology, 28 percent of people treated with tape report the most common adverse effects are discomfort from too-tight tape or an allergic reaction or sensitivity to the tape.
Steps for removing athletic tape
- Use a pair of bandage scissors (scissors with blunt ends and an extra blunt edge on the side) to slide the scissors under the tape.
- Cut the tape gently until you have made a large cut over most of the tape.
- Slowly peel the tape away from the skin.
- If the tape is especially persistent, consider using an adhesive remover wipe. These can dissolve the adhesive and are usually safe for skin as long as they’re labeled as such.
Shop for adhesive remover wipes online.
Steps for removing kinesio tape
Kinesio tape is intended to stay on for several days — therefore, it takes some extra effort to remove sometimes. Steps include the following:
- Apply an oil-based product, such as baby oil or cooking oil, to the tape.
- Allow this to sit for several minutes.
- Gently roll the edge of the tape downward, pulling the tape away in the direction of the hair growth.
- If you have residual glue from the tape after removal, you can apply the oil to further dissolve it.
Ankle taping can help prevent injuries and reduce discomfort following an injury. The approaches to taping depend on the type of tape you use.
If you’re having trouble taping your ankle, talk to your doctor or a sports medicine professional. They can recommend injury- or body-specific taping approaches that may help.
Ankle Sprain Elastic Bandage - Application
Ankle Sprain Elastic Bandage is an indispensable tool that allows you to fix an injured limb without disturbing normal blood circulation. The product stretches well, does not deform and has many advantages over a conventional gauze accessory. The bandage is hygienic, affordable, can be used several times without losing its properties.
When elastic bandages are needed
For various skin injuries, bleeding, wounds, standard gauze dressings are used. They lie tightly, securely holding sterile materials, preventing the entry of microbes, accelerating the healing of damaged areas. However, in many cases, gauze products are practically useless. They impede movement, interfere with normal blood circulation, and cannot be used for long periods of time. There is an excellent alternative to classic gauze - modern bandages made of hygroscopic elastic materials.
Elastic bandages are indispensable for:
- limb injuries;
- dislocations and sprains;
- recovery after operations;
- muscle pain;
- swelling and general discomfort during active sports.
Bandages made of elastic materials are recommended for professional athletes and amateurs who experience increased stress on the ankle. They will be needed by people who are fond of hiking, preferring traumatic team games (football, basketball, hockey). Without elastic bandages, weightlifters and representatives of other sports associated with a load on the joints do not go through training. Products should be kept in the home first aid kit, they may be needed for any bruises, lacerations of the limbs, sprains or swelling. It is better to use a bandage as prescribed by a doctor, you can buy it without a prescription.
Bandaging of extremities may be prevented by:
- atopic dermatitis or other severe skin lesions;
- autoimmune diseases;
- diabetes mellitus;
- suspected malignant tumors.
In the presence of severe chronic diseases, a consultation with a doctor is obligatory.
Advantages and disadvantages
Elastic bandages have many advantages and successfully replace traditional gauze products. Benefits include:
- softness and density, making it possible to securely fix the injured limb;
- high hygienic qualities, breathability;
- durability;
- ease of care;
- availability;
- the ability to use the accessory not only for the ankle, but also for other parts of the body.
The right bandage will last a long time. It can be washed and dried, while the product will not lose its shape, retain its density and elasticity. High-quality material allows you to make a tight bandage that does not interfere with normal blood circulation. At night, the bandage can be removed, and in the morning it can be used again for fixation. No special skills are required for bandaging a limb; a simple art can be mastered by the victim himself or any of his family members.
Reliability is a big advantage of the product. A properly made bandage lasts all day without slipping or pulling on blood vessels. If necessary, a bandage can fix the movable joint. The bandage can be used when applying compresses, as well as in the presence of a variety of wounds. The product is very economical, it will successfully replace 20 gauze bandages.
Despite the many advantages, the medical accessory also has disadvantages:
- Improper application can lead to circulatory problems.
- Insufficient tension of the elastic material cannot guarantee optimal support for injured ligaments.
- A poorly tied bandage can cause irritation and even damage to the skin.
- Insufficient care of the product will quickly make it unusable.
If the degree of elasticity of the bandage is chosen incorrectly, the joint will not receive the necessary support. Despite the fact that the product is considered universal, you should not buy the first copy that comes across. An experienced traumatologist or pharmacist will help you choose the right bandage.
How to choose a bandage
You can buy the product in any pharmacy or orthopedic salon that sells various fixators, orthoses, medical bandages and other medical supplies. When spraining the ankle joint, it is most convenient to use a bandage 1.5-2 m long. If the desired size was not found, you can buy a product about 5 m long, and then cut it in half. The product must be securely packaged, not torn or damaged. A high-quality bandage has a uniform width and density, the manufacturer, date and storage conditions, and other important information are indicated on the package.
When choosing a product, it is necessary to take into account not only the length, but also the degree of elasticity. On sale there are both denser and well-stretched accessories. If there is a predisposition to varicose veins, it is better to buy bandages with a low degree of elasticity. They fit tightly, support the affected veins well, normalize blood flow and prevent pain. The same bandage will be needed after surgery on the lower extremities.
For normal sprains and dislocations, softer, more stretchable products are recommended. They do not interfere with movement, a patient with a properly applied bandage can lead a normal life without experiencing pain and without risking further damage to the ligaments.
How to bandage an ankle
The general rule is to bandage in the morning or after a long rest with the limbs elevated. This technique helps to avoid swelling, the bandage can be fixed as comfortably as possible. An orthopedic doctor or a nurse can explain how to bandage a leg, the necessary instructions will be given in a pharmacy or orthopedic salon.
If the bandage has been used before, carefully roll it into a tight roll. The product begins to unfold from the inside out, and the bandage is applied directly to the skin. Do not bandage the limb over stockings, socks or other clothing. Any fabric will interfere with the normal fixation of the elastic material and can cause severe irritation.
Before bandaging, you can apply an ointment or gel recommended by your doctor to the injured limb. Any product applied to the skin should be well absorbed. If it is planned to apply a compress, wet gauze, cotton wool or other pad soaked with medicine is covered with waxed paper or film. Only after that the compress is fixed with a bandage. If you neglect the polyethylene protection, the bandage will quickly get wet and the effectiveness of the procedure will decrease.
Bandage the ankle should be uniform, moving from the narrowest part of the leg to the wider one, from the ankle to the knee. In this case, the degree of tension of the material varies. In the ankle area, it should be as tight as possible, in the calf area, the fixation is reduced. Do not overtighten the leg under the knee, this interferes with normal blood circulation. You can check the degree of tension by sticking your fingers under the bandage.
The bandage is applied neatly, without folds or unnecessary thickening. Each turn overlaps the previous one by about a third, no gaps are left. When moving from under the bandage, the skin should not be visible. Maximum fixation is necessary in the lower part of the bandage, in the ankle area, this will keep the bandage from slipping.
The ankle sprain must cover the leg 15 cm below and above the affected area. The bandage is applied from the phalanges of the toes to the middle of the lower leg. With proper fixation, the toes can turn pale and even turn blue. After a few minutes, they should return to their normal color. This is a sign that the bandage is applied correctly. If the feeling of squeezing and numbness in the fingers does not pass after 30 minutes, it is better to bandage the bandage. This will have to be done if the patient feels blood pulsing, pulling pain or other unpleasant sensations. The bandage should relieve negative symptoms, and not provoke them.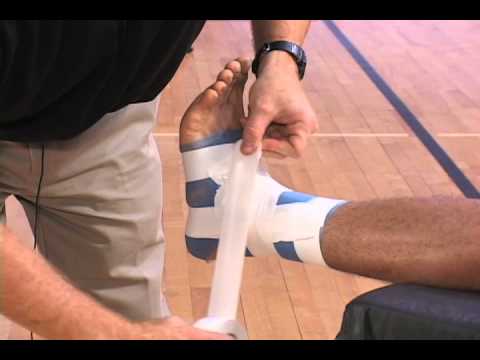 Over time, it will become clear what degree of tension of the elastic material is optimal for a particular patient.
Applying a fixator is necessary when the patient is actively moving. During rest, the bandage is removed, and the affected limb is gently massaged in the direction from the ankle to the knee. Movements should be soft, it is better to postpone active self-massage until complete recovery. To improve blood circulation, you can use any cream or light gel. To relieve swelling, legs are raised during sleep, for example, by placing a folded blanket or a thick towel under them.
Bandage chart: beginner's guide
To apply the elastic bandage on the ankle correctly, you need to proceed in stages. Strict adherence to the scheme will help to securely fix damaged ligaments, reduce pain and prevent the formation of edema. Instructions:
- The bandage is applied to the leg in a spiral, each new layer covers the previous one by a third.
- A bandage is wrapped around the ankle, then the bandage is applied to the foot, tightly wrapping around the heel.
- Wraps around the instep twice to secure the foot.
- Further turns lie crosswise, from the foot to the lower leg and back to the foot.
- The final step involves wrapping the lower leg with another layer, then wrapping the ankle and tying the bandage. The knot is not tightened too tight, because before going to bed the bandage will have to be removed.
Watch this video on YouTube
It's easy to learn how to properly bandage injured limbs. By strictly following the instructions of the orthopedist, you can learn how to make a tight bandage in just 10 minutes. The attending physician should explain how much to wear an elastic bandage. Usually, the procedures continue until the unpleasant symptoms disappear completely: pain, swelling, inability to step on the injured limb.
Bandage care and life extension
Elastic bandage can be used for a long time.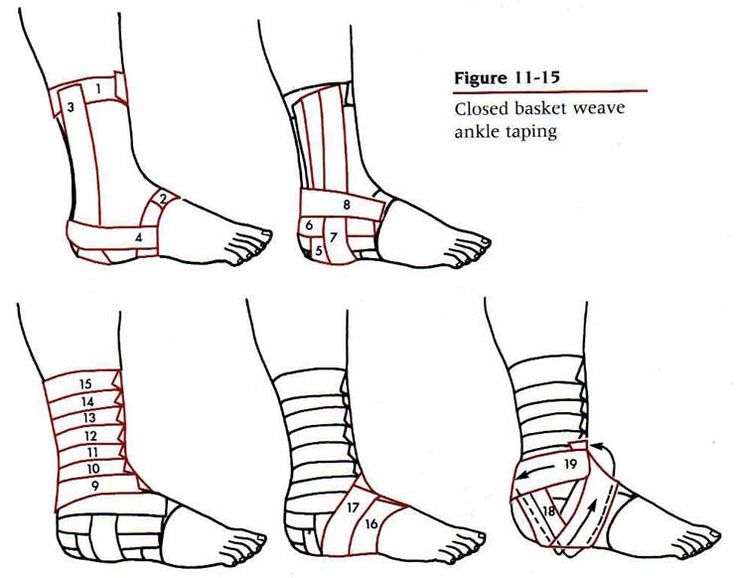 The material from which it is made is hygroscopic, does not deform or tear. Wash the product every 7-10 days. With frequent ankle sprains, it is recommended to have 2-3 bandages in the first-aid kit so that at any time there is material for creating a bandage.
Do not throw bandages into the washing machine, aggressive synthetic powders are also undesirable. It is best to wash the product by hand using warm water and regular soap. Gentle gels suitable for processing baby clothes are also suitable. The elastic material cannot be rubbed, it is gently compressed in soapy water without disturbing the structure of the fabric. Washing lasts only a few minutes, soaking the product is not worth it.
Clean bandages are gently squeezed out by hand, being careful not to pull or twist. It is better to dry them on a terry towel or other cotton fabric that absorbs moisture well. Drying in a horizontal position is preferable, hanging on batteries and ropes deforms a strong but delicate elastic material.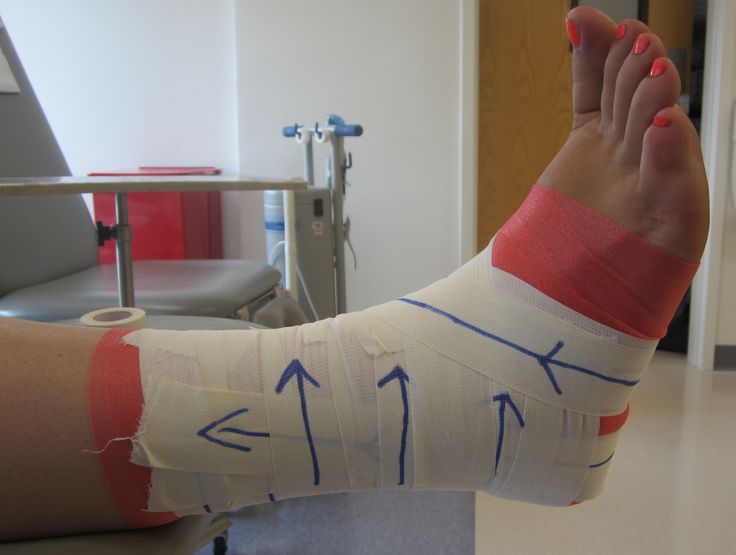
Watch this video on YouTube
Compliance with the rules for use and care significantly extends the life of elastic bandages.
The product can be used as long as it remains flexible. When the material stretches, breaks, or ceases to securely fix the limb, you will have to replace the bandage with a new one.
How to properly apply an elastic bandage?
October 4, 2019
An elastic bandage should be in every first aid kit. It is useful for first aid for sprains, dislocations, bruises.
In addition, an elastic bandage is indispensable for varicose veins: it keeps the veins in good shape, eliminates heaviness in the legs, relieves swelling and pain. And athletes use it during intense workouts to reduce stress on the joints.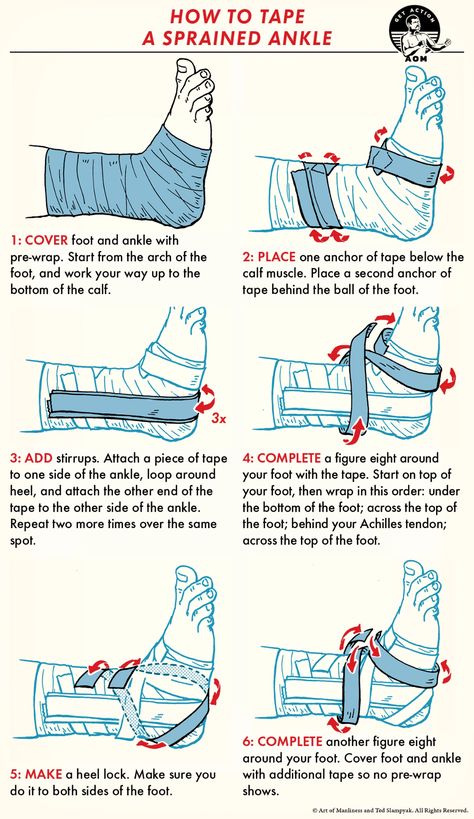
When buying an elastic bandage, pay attention to the degree of its extensibility: the higher it is, the less pressure the bandage exerts on the body. So, for first aid, keep a low stretch bandage in the first aid kit to securely fix the injured limb. And with varicose veins or with intense sports, choose bandages with a high or medium degree of extensibility.
In order for the elastic bandage to perform its function, apply it correctly! Our infographic will tell you how to do this with injuries. But remember that the use of an elastic bandage may be contraindicated for certain types of injuries. Be sure to consult a doctor for a correct diagnosis.
Ankle bandage
-
Turn two circles over the ankle to secure the bandage.
-
After that, pass the bandage obliquely over the back of the foot and make a double turn.
-
Next, the bandage must be passed on the other side of the back of the foot and circled around the ankle again.
-
Repeat the eight steps several times until the joint area is completely covered. Secure the bandage over your ankle.
Wrist bandage
-
Apply the bandage to the inside of the wrist and rotate.
-
Pull the bandage diagonally down the outside of your arm between your thumb and forefinger. Through the palm, return to the wrist.
-
Turn around at the wrist, pull the bandage down through the palm of your hand and return to the wrist again.
-
Repeat the eight-fold several times, then continue to bandage the arm towards the elbow. Having reached the elbow, start bandaging in the opposite direction. Secure the elastic band over your wrist with clips.
Knee (or elbow) bandage
-
Relax the affected knee, bend to a comfortable position
-
Place the bandage below the joint and make a double turn.
-
Pull the bandage over the back of the leg above the knee joint, securing with a double twist.
-
Repeat one turn overlapping the previous layer above and below the knee, gradually approaching the middle of the joint. Secure the end of the elastic bandage.
-
There is also a reverse version of bandaging: start with a double turn in the middle of the joint, then apply the bandage one turn below and above the knee several times.
General rules
-
Apply each next layer of bandage, overlapping the previous one by a third of its width.
-
Tighten the bandage at the beginning of bandaging, and slightly loosen the tension with each new wrap.
-
The maximum pressure should be in the narrowest area, the minimum in the widest one.


.jpg)