Home »
Misc »
How to decorate a basketball cake
How to decorate a basketball cake
Basketball Cake Tutorial {Easy Round Layer Cake with M&M Candies}
Learn how to make a basketball cake from orange and brown M&M candies. This easy 2 layer round cake is perfect for a basketball theme party.
Whether it is for March Madness, a birthday party or a basketball season year end party, this easy basketball cake is fun for kids to make and colorful to serve at a party.
M&M Basketball CakeAlthough there are many ways to decorate a basketball cake, one of the easiest ways is with M&Ms. Start with your favorite chocolate cake and vanilla frosting, then use orange and black M&Ms to “draw” the lines on the cake and fill them in. No special cake decorating skills required! Here are some hints to make the cake.
Favorite Layer Cake RecipesIf you are short on time, use your favorite box cake mix brand to make a 2 layer round cake. If you’d like to make a from scratch cake, here are our favorites:
- Dark Chocolate Cake
- White Cake
- Yellow Cake
- Gluten Free Chocolate Cake
Favorite Frosting RecipesWe think that vanilla frosting tastes best on this cake.![]() You can color it orange if you’d like to give a more solid orange background.
You can color it orange if you’d like to give a more solid orange background.
Here are our favorite recipes:
- Vanilla Buttercream
- White Chocolate Frosting
- Cream Cheese Frosting
How to Make a Basketball on a CakeLet your cake cool and frost with white frosting.
Use the brown M&M’s to make a vertical line down the center of the cake and a horizontal but slightly curved line across the cake.
Now make one vertical curved line with the brown M&M’s on each side of the straight vertical line to create the basketball lines.
Fill in the remaining areas on the top of the cake with orange M&M’s.
And that’s it! You’ll end up with a cake looking something like this. If you have more M&Ms you could decorate the sides or put an M&M border around the bottom edge of the cake.
Do I have to refrigerate cake?Once the cake is fully covered in frosting, it is best if you do not refrigerate the cake. The frosting will act as a seal to keep that cake moist.
After the cake is cut, store it in an airtight container.
Where to Buy Colored M&MsTo make sure you have enough M&Ms, you’ll need to purchase a 42 ounce bag of M&M candies (purchase here).
Another option is to purchase all brown and all orange M&Ms. This is a more expensive option, but you won’t have as much waste. (As if M&Ms were a waste! 🙂 )
Purchase orange M&Ms or brown M&Ms.
Servings 15
Prep Time 30 minutes
Cook Time 30 minutes
Total Time 1 hour
- 2 round white or chocolate cake layers (baked)
- 4 cups Favorite white frosting
- 42 ounces bag of M&M’s candies (to make sure there’s enough orange and brown)
Bake your favorite cake in 2 8″ or 9″ round cake pans. Turn the cakes out onto a wire rack to cool completely.
Place one cake layer on a cake plate. Top with frosting.
Place the second layer of cake on top.
Frost the top and sides of the cake with frosting, making it as smooth as possible.
Use the brown M&M’s to make a vertical line down the center of the cake. Then make a horizontal but slightly curved line across the cake.
Now make one vertical curved line with the brown M&M’s on each side of the straight vertical line to create the basketball lines.
Fill in the remaining areas on the top of the cake with orange M&M’s.
Store the cake at room temperature.
Once the cake has been cut you’ll need to store it in an airtight container.
Course Dessert
Cuisine American
Keyword basketball cake, birthday cake, round cake
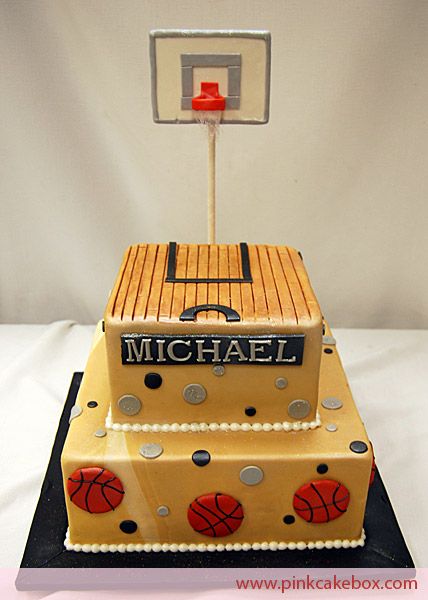
How to Make a Personalized Sphere Basketball Cake
Home » Recipes » Cakes » How to Make a Personalized Sphere Basketball Cake
Leave a Comment · As an Amazon Associate I earn from qualifying purchases.
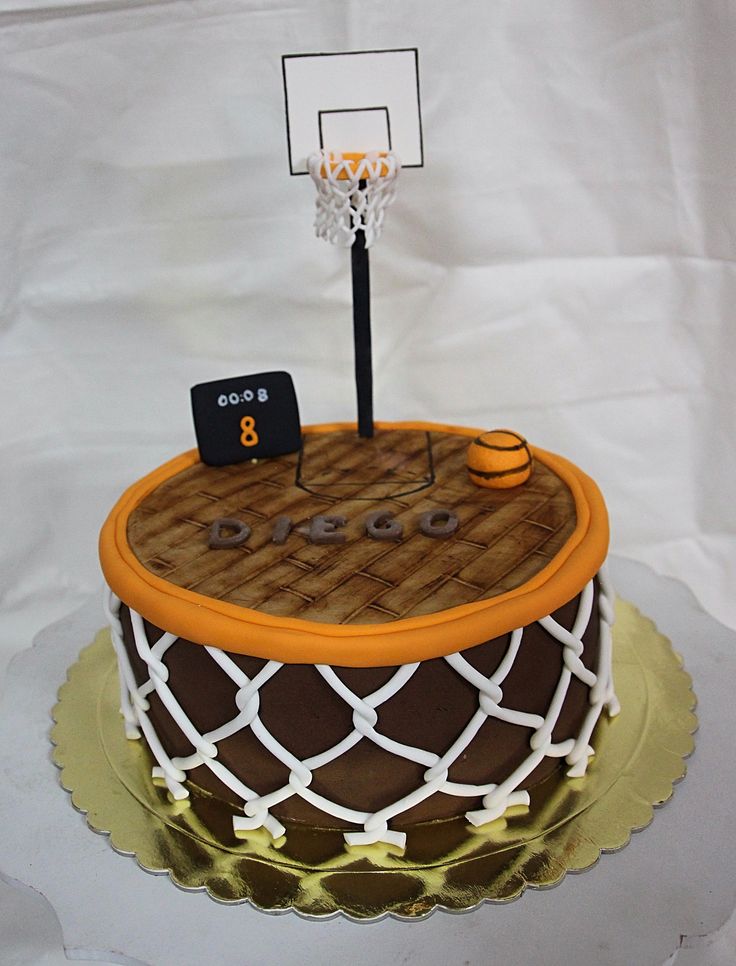
You are most likely here because you are wondering how to make a personalized sphere basketball cake. You have come to the right place. This is a step-by-step tutorial so you can make a basketball cake for your team or player.
This sphere ball cake is mostly covered in frosting, although there are fondant elements.
Cake making is a hobby of mine, and I love to try and replicate real life objects. You might enjoy seeing my banjo cake, Ninjago cake and firefighter cake if you enjoy the art of cake design.
However, that’s not your main purpose for being here, is it? You are wondering how to make a personalized sphere basketball cake. Let’s get started.
How to Make a Personalized Sphere Basketball Cake
As with any project, it’s important to gather your supplies. Being prepared for the cake decorating experience is half the battle.
Materials Needed to Make a Personalized Sphere Basketball Cake
Note: Amazon affiliate links are provided for your convenience. Anything you purchase goes to support the free resources I provide at Meaningful Mama. Thank you for your support.
- Black Fondant (I would not consider making your own. You want to buy it black. Trying to make black from white is impossible. You use loads and loads of black food coloring, and in the end it looks purple.)
- 2x 8″ glass bowl or 8″ cake sphere pan
- 8 inch cake pan
- Cake Recipe: red velvet, white velvet or chocolate are classics. I did 1.5x the red velvet recipe (coloring it orange instead), to fit my two glass mixing bowls and one 8″ cake pan.
- Frosting Recipe: My favorite vanilla buttercream is amazing and pipes out beautifully. If you don’t want a frosting that contains cream for allergy reasons orbecause the cake will be sitting out for prolonged period of time, this is a great alternative.
- Orange and Copper Food Coloring
- 8 inch cake board
- Bubble Tea Straw – I always use wide bubble tea straws or wide smoothie straws to dowel my cake.
 They are easier to cut than the wooden dowels and are just as strong. I’m not convinced this cake needed a center support, but I still did it as precaution.
 - Decorating Tip Number 7
- Coupler
- Pastry Bag
- Cake Spatula
- Serrated Knife
- Pizza Cutter
- Fondant Roller
- Fondant Mat
- Yard Stick or alternate straight edge
- Small Plastic Tupperware
- Parchment Paper
- 1.5 inch Letter Cookie Cutters – I got mine from this 100 piece cookie cutter set, which I have loved having on hand
- Powdered Sugar
Fat Daddio's PHA-8 Cake HemisphereFondarific Buttercream Fondant, Black, 8Wilton Performance Aluminum Pan 8-InchFOYO 8-inch Round Tempered GlassWilton 610-205 Icing Gel, 1-Ounce,Wilton Copper Icing Color Pattern,Wilton 8-Inch Cake Circle, 12-PackALINK 100 Extra Large PlasticWilton #7 Round Decorating TipWilton 411-1989 Coupler Set, STD,Ateco 4712 Disposable Decorating Bags,Wilton Icing Spatula, 13-Inch, AngledJ. A. Henckels International 16906-201 ForgedOXO Good Grips 4-Inch PizzaWilton Large Fondant Roller withNon-slip Silicone Pastry Mat ExtraSwanson Tool AE141 36-Inch Yardstick,
Step-by-Step Instructions for Making a Perfectly Round Sphere Cake
The first goal is to make a sphere cake. Mine was not a perfect sphere. The bottom was flat for two reasons. I wanted it to stand secure. The glass bowl I used was flat bottomed.
The final step in this making a sphere cake tutorial shows how to trick the eye so that the cake appears perfectly round.
To make this sphere ball cake I used two 8 inch glass mixing bowl and one 8 inch circular cake pan.
Prepping the Cake
- Grease pans and bowls and then dust with flour.
- Cut out parchment paper the size of the bottom of your bowl. Do the same for your circular pan. Put these pieces of parchment paper in the bottom of the bowls and circular pan. These first two steps ensure your cake doesn’t stick.

- Fill your bowls and cake pan with batter. One whole red velvet recipe was poured into the two bowls. 1/2 recipe was poured into the circular cake pan. I baked these separately because I knew they’d cook at different rates. The bowl takes longer to cook. I would not fill it completely because to cook a half a bowl of cake would take too long and much of the cake would taste burned.
- Once baked and cooled, remove your cake from the cake pan.
Stacking the Sphere Cake
- Using a serrated knife, level off the dome shape of your cake. Reserve one of the domes to be the top of the ball since your baking bowl had a flat spot.
- Cut a cake circle to the size of the bottom of your cake. Add one of the half circle cakes to the cardboard cake circle, wide side up.
- Stick one of your straws in the center as a dowel.
- Make frosting, and add it to the first layer. I added a combination of orange and copper food coloring to get my end color.
- Stack as follows – small cardboard cake circle, half bowl cake (wide side up), frosting, cardboard cake circle cut slightly smaller than 8 inch round, 8 inch round cake, frosting, half bowl cake (wide side down), small amount of frosting, top dome piece you had cut off your cake to level.
 Now you have a ball shape.
 - Using a serrated knife, trim off some of the 8 inch circle and shape top of the cake to make it into a perfect ball.
Frosting a Sphere Ball Cake
Every good frosted cake starts with a crumb coat. Read my Cake Making 101 post to read more. Follow up with my Cake Making 201 post if you plan to use fondant on your sphere cake or just want to learn more about cake decorating.
A crumb coat is a real thin layer of frosting (pictured upper left) that basically grabs the crumbs and adheres them to the side so that you don’t have crumbs in your outer layer.
To make a crumb coat, take your cake spatula and apply frosting, in a thin layer, to the outer edge of your cake.
Pro tip: Separate the crumb coat frosting from the batch of frosting so you are not dipping your crumb-coated spatula into all of your frosting.
You will see cake and crumbs in your crumb coat. That’s OK. Stick your cake in the refrigerator to solidify those crumbs into that first layer of frosting.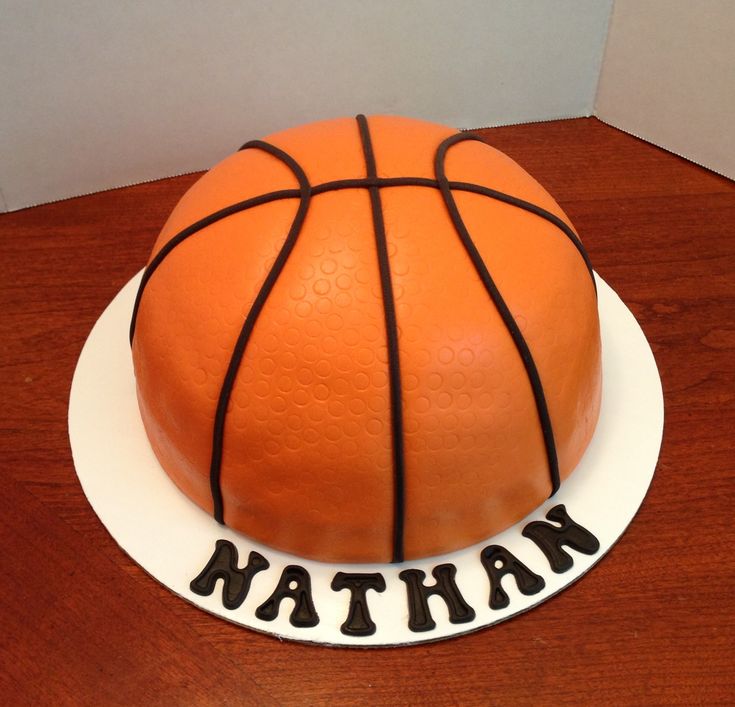
Once set, pull out the cake and do your second layer of frosting. You’ll be covering the cake with piped dots, so this doesn’t have to be perfect, but just try and make the ball look evenly round. I had a plastic frosting smoother that bent so I could go around the ball more evenly with the curves.
Decorating a Personalized Sphere Basketball Cake
- Cover your work surface in a light layer of powdered sugar. Take a piece of black fondant and roll it into a snake. Then, using your fondant roller with the purple band setting, roll out the fondant into a long strip. The bands help ensure you are rolling to an even level.
- Using a clean straight edge and pizza cutter, cut one side of the fondant straight.
- Use your straight edge to make sure the cut side remains in a straight line.
- Measure 1/2 inch from that edge in a few different places and make with a toothpick.
- Use your straight edge again, laying it in line with the toothpick holes.
 Take your pizza roller and make another cut.
 - Use your strips to make a line all the way around the center of your cake. I went over the top first and then used two different pieces for the two different sides.
- Use the back of a butter knife to try and make these initial lines as straight as possible.
Quick side note: Sorry for the discrepancy in the coloring in the photos. Different lighting yielded different results. Your coloring will be dependent on both lighting and color of frosting. Our final result was more orange than all of these prep-photos suggest.
- Cut more black fondant strips for the four curved lines on the basketball.
- I just used my eyes as well as a ruler at points to try and get the curves even on both sides. Cutting out a template is another option.
- Using letter cookie cutters, cut out the name of your child. I cut my end two letters shorter by hand so they’d fit. Do their name on both sides of the ball.

- Time to do dots, dots and more dots. Using a size 7 tip, add dots to all of the parts of the cake basketball that is not covered in black fondant.
- Pro Tip: To shine up black fondant so that the powdered sugar disappears, use a little bit of shortening on a paper towel and very lightly rub on the fondant.
- Once all the dots are done, put the cake in the refrigerator to let the frosting stiffen a bit. Pull it out, wash your hands and use your finger to press down all of the dots so they look a bit flat rather than like little Hershey kisses.
The question of the hour: How long did it take to do all those dots?
How long does anything take as a mother? Probably twice as long as it needed to. I tried to keep track, but there were interruptions. My guesstimate would be 2 1/2 hours to do the dots.
- The final step, which I promised to reveal, was how to make a sphere cake with a flat base look perfectly round. The way to trick the eye is creating a base or a stand.
 I used a plastic piece of Tupperware and covered it in fondant. You could also use something like a container for shredded parmesan or goat cheese.
There you have it – Instructions about how to make a personalized sphere basketball cake.
After you have read all the instructions, you might be ready to jump in and tackle a fun but challenging project.
However, you might feel overwhelmed and have decided you’d like an easier project. If that’s the case, maybe this is your solution:
Basketball Cupcakes
While my son wanted the cake for his birthday, we made these basketball cupcakes for his classroom celebration.
This is his first year playing basketball, and he is pretty excited about it.
Decorating these cupcakes were fairly simply. The edible basketball cupcake topping I bought at Hobby Lobby. An alternative would be to stick in plastic basketball rings instead. I applied the black sprinkles in a swirl pattern using my Wilton sugar writer. These cupcakes were baked in black and white cupcake liners.
Below showed some of the products used or an alternative. The Wilton Sugar Writer was a Christmas gift from my husband. The 3-tier cupcake carrier has been so wonderful to have on hand. These would make great gifts for the baker in your life.
CakeSupplyShop Black and White StripeWilton 710-762 Black Sugar Sparkles,Basketball Cupcake Rings - 24Wilton Sugar Writer Sanding SugarBest Choice Products 3-Tier Cake
Want More Cake Inspiration?
Cute Snowman Cake
Superhero Cake
Race Car Birthday Cake
Filed Under: Cakes
ABOUT JODI
Wife of the perfect partner for me. Mother of Three. Lover of fun, creativity, cooking, adventure, puzzles, games, family but most importantly Jesus. I run the blog Meaningful Mama. The heart of my blog is the character development series for teaching kids. The icing on the top consists of parenting tips, crafts, recipes, cakes and more. Read more...
Become a part of the Meaningful Mama community to receive encouragement, ideas, tips and tricks.
cake basketball without mastic (74 photos)
1
Basketball player cake
2
Cake basketball ball mastic
3
Basketball cake GSV
4
Basketball cake
9000 5
Basketball cake
Basketball cake
7
Basketball cake without mastic
8
Basketball cream cake
9
PLASTILINE basketball
10
Basketball cake
11
Cake with a basketball for a boy
12
Basketball ball MK
13,0002 cream cake for basketball player 9000 basketball ball
16
Basketball cake master class
17
Basketball cake
18
Basketball print on the cake
19
Cake on the topic of basketball for a boy
20,0002 Cake for basketball player
21
Basketball player cake
22
Basketball Lakers
23
Cake in the form of basketball 9000 24
cake in the form 25
Basketball cake
26
Basketball field cake
27
Basketball cake
28
Basketball cakes Lebron James
29
Cake Basketball Field
30
Basketball Cake
31
Basketball Cake
32
Cake Basketball 9000 35
Simple Basketball Cake
36
Boy Basketball Cake
37
Basketball Cake
38
Basketball cake
39
Basketball cake
40
Basketball cake
41
Basketball birthday cake
Football-basketball cake
44
Basketball-themed cake
45
Basketball-themed cake
46
Basketball-themed cake
47
Basketball-themed cake0003
48
Basketball Cake
49
LeBron James Basketball Cakes
50
Basketball Cake
51
Cake in the form of basketball
52
Cake with basketball theme
53
Basketball birthday
54
Cake Basketball Lakers
003
57
Sports Cake
58
Basketball Cake
59
Cake with a basketball ring
60
Basketball cake for a boy
61
Cake in the form of a basketball ball
62
Cake Basketball player
63
Cake for basketlists
64 9000
Volleyball cake
66
Birthday cake for a child without fondant
67
Cream basketball cake
68
Basketball cake
69
70
71
72
73
74
Basketball cake.
Details
A salad called "Football" can be a real salvation for any woman who needs to lay a festive table for her beloved man for one reason or another. In particular, it will be relevant if the man is a fan of football. After all, this dish looks like a real soccer ball. At the same time, the salad itself is not only a spectacular and simply unusual decoration of the festive table, but also an appetizer with an exquisite and even spicy taste, which is achieved through a combination of chicken with walnuts and prunes.
Football ball salad with tuna
Ingredients needed:
- canned tuna in oil - 2 cans;
- tomatoes - 350 g;
- potatoes - 400 g;
- chicken egg - 3 pcs.;
- leek - 1 pc.;
- olives, herbs and mayonnaise.
Preparation process:
First you need to open a can of tuna in oil and carefully drain all the oil from it. Next, the entire contents of the jar is transferred to a fairly deep plate and kneaded with a fork.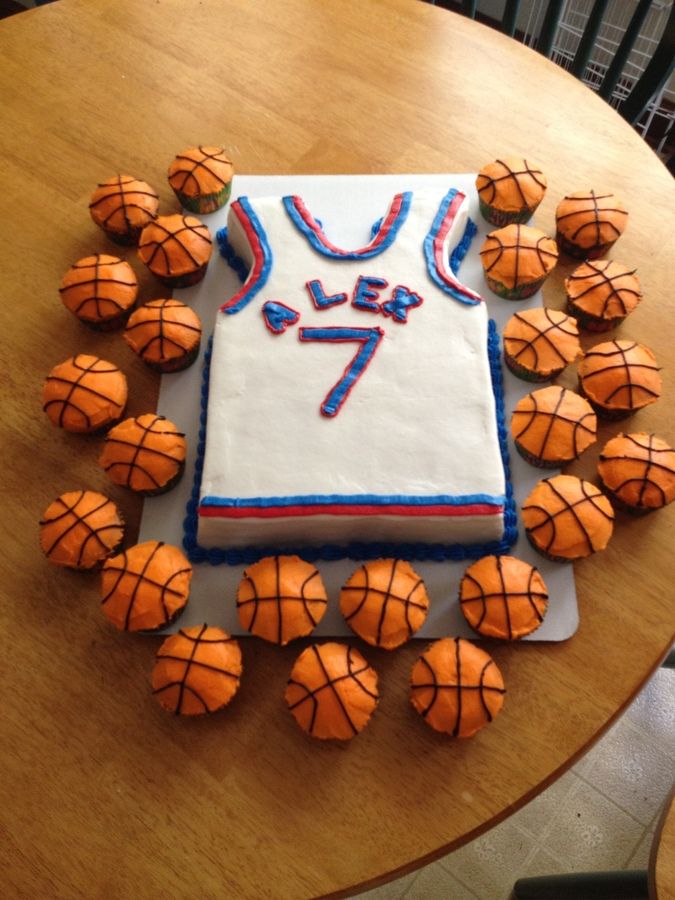
Tomatoes are washed in running water and then cut into small cubes.
Potatoes are also washed and boiled, once they have cooled, they can be peeled and cut into small pieces.
Eggs must be hard-boiled, even in lightly salted water. When ready, they are cooled by moving them into cold water. As soon as they cool down, they are cleaned and cut into small uniform pieces, although you can also grate them on a coarse grater. It is better to leave a couple of proteins for subsequent decoration of the finished salad.
The onion is peeled and cut into fairly thin rings, which then need to be broken. At the end, all the prepared ingredients are mixed in a suitable bowl, mixed and slightly salted. Also at this stage, the salad should be seasoned with mayonnaise and mixed thoroughly.
Now the salad should be transferred to a flat dish and shaped into a ball. Its upper part is sprinkled with deferred grated proteins. Now you need black canned olives. It is they who need to be laid out at the top of the salad in the shape of a pentagon. The finished dish will be beautiful and original. It is best to serve a soccer ball on the "green field".
Football ball salad with chicken
Ingredients needed:
- large chicken eggs - 6 pcs.;
- large chicken breast - 1 pc.;
- walnut kernel - 120 g;
- pitted prunes - 200 g;
- hard cheese - 180 g;
- mayonnaise, dill greens.
Preparation process:
Chicken breast is washed in running water, then transferred to a pot filled with cold water and boiled. As soon as the water boils, with the help of a slotted spoon, all the resulting foam is removed from the pan. As soon as the water boils, it is salted, and then they continue to cook until the chicken breast is fully cooked.
When ready, the meat is removed from the pan and cooled. Next, it is separated from the bones and skin, and then cut into small cubes.
Eggs are hard-boiled in a pot filled with water.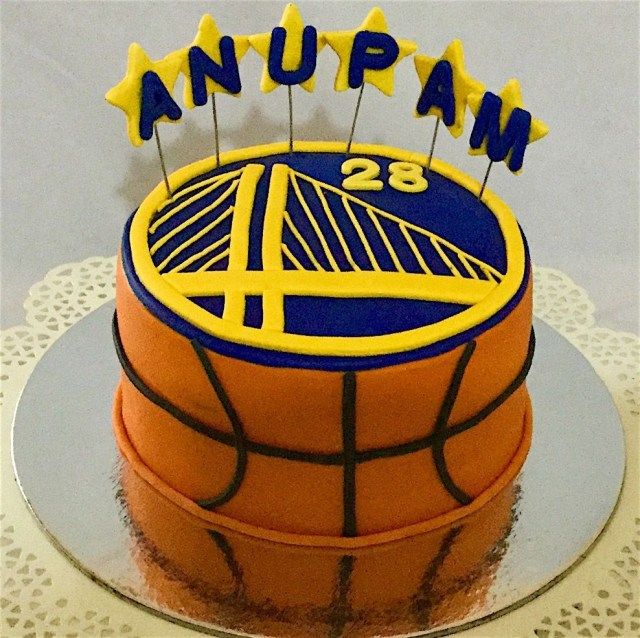 To do this, after boiling, they are cooked for about 6-8 minutes. Cool the eggs in cold water and then peel them. Next, their yolk is separated from the protein. After that, both of them are separately rubbed on the smallest grater.
Lettuce will be laid out on a flat dish in the following sequence: first boiled chicken, then a layer of yolks, then prunes. It will be followed by chopped walnuts, grated cheese. The salad will be completed with a layer of boiled protein. In addition, each of the layers should be smeared with mayonnaise. When ready, the ball is finally formed. You can decorate it with prunes.
Bon appetit!
Step 1: Boil salad ingredients.
Place thoroughly washed potatoes and carrots in a large saucepan. Add
0.5 teaspoon salt. We put on fire and cook after boiling
minutes 20 , until ready. We check the readiness of vegetables by piercing with a toothpick - it should go in easily and without a crunch. We put ready vegetables on
for 10-15 minutes in cold water.

We boil the eggs separately. Put the eggs in a saucepan and cover with cold water, add
1 tablespoon salt, put on fire, after boiling the eggs, cook
10 minutes , and immediately move to cold water.
Step 2: cut salad ingredients.
We cut all the components of the salad separately. Drain the liquid from canned food, and knead the contents with a fork almost to the state of minced meat. I took canned sardines. And cheap and delicious. Hard cheese is strongly cooled and rubbed on a fine grater. We clean the eggs from the shell and separate the protein from the yolk. To do this, we make a neat incision along the protein and remove it from the yolk. We rub the protein and yolk into separate piles on a fine grater. We wash the tomatoes, let drain with water or wipe with a paper towel. Cut the tomatoes into small cubes. Cut the leek into very thin half rings. If there is no leek, you can use ordinary onion, only you need to chop it very finely (you can even chop it in a blender) and pour over boiling water.

Step 3: assemble the Football salad.
In a deep oval bowl, lay out the salad ingredients in layers, coat each layer with mayonnaise. In order to make it easier to form a salad later, we cover the bowl with cling film. The first layer is carrots, lightly distributed along the bottom and walls of the bowl. Coat with a thin layer of mayonnaise. The second layer is grated yolks, we also distribute and coat with mayonnaise. The third layer is grated cheese, mayonnaise. The fourth layer is chopped tomatoes. More mayonnaise. The fifth layer is chopped onion. Quite a bit of mayonnaise. The sixth layer is canned food. Mayonnaise. The top layer is potatoes, level to a flat surface, DO NOT smear with mayonnaise. Cover the salad bowl with cling film and refrigerate for
2 hours for impregnation.
Step 4: Shape and Decorate the Football Salad.
After the salad has soaked, we take it out of the refrigerator. We unfold the film and bend it over the edges of the salad bowl.

We take a large serving dish, cover the salad bowl with it upside down. Gently, in one motion, turn the salad bowl over. Holding the edges of the film, remove the salad bowl. With us, the film should remain on the salad, and the salad should move in a beautiful slide to the center of the dish. Gently, with your hands, through the film, give the lettuce slide a rounded ball shape. We're filming. Coat the top of the ball with mayonnaise. To turn an ordinary ball into a football, we need a stencil. To do this, cut out of paper a few
(7-10) hexagons, like cells on a ball. We evenly lay out the hexagons on the surface of the ball, carefully fill all the places free from paper with protein grated on a fine grater. This will be the white honor of our ball. It remains to make black. To do this, drain all the liquid from black olives, and chop the olives themselves with a knife or in a blender. We remove paper hexagons from the ball. And instead of them, carefully, without going beyond the borders, we fall asleep chopped olives.
That's it, we got a soccer ball! Now we move it to the field. To do this, finely chop the fresh herbs with a knife and cover the entire remaining surface of the serving dish in a circle from the ball.
Step 5: Serve the Football salad.
The salad is ready to serve. It is best to cut the salad on the stele with a knife into slices and arrange on portioned plates with a spatula. This salad is perfect even with a glass of beer. Enjoy your meal!
In order for the eggs not to crack during the cooking process, you need to follow a few simple rules. Use only whole eggs for cooking, the integrity of the shell can be checked very lightly by tapping one egg on the other - the sound should be sonorous. Eggs should be filled with water of the same temperature as the eggs, i.e. if the eggs are from the refrigerator, then fill with cold water. Immediately after the eggs are ready, it is better to place them in ice water - the shell will easily fall behind the eggs.
Potatoes cook much faster than carrots, this should be taken into account when cooking together, especially if the potatoes are small or the carrots are large.
All layered salads with mayonnaise dressing are stored in the refrigerator until serving. Otherwise, they may "leak" and lose their layered structure.
No matter what country wins the championship title in football competitions, and no matter how things are in domestic football, this wonderful game always has a lot of fans, fans and just people who themselves are not averse to kicking the ball.
If your family has football fans or real athletes, then for the holidays you can please them with "football" salads. Such a salad - in the form of a soccer ball or even a whole football field - will decorate any holiday table, and it will bring a lot of joy on a daily basis.
And if your favorite team won the game, then the "football" salad is exactly what will help you celebrate the victory!
Use a deep round bowl or a bowl with a small bottom to make your salad look voluminous and beautiful.
Line the bowl with cling film and fold the edges outwards.
Then pack the prepared salad or the ingredients for the layered salad in the appropriate order into it. Pack well so that the salad keeps its shape well.
Wrap the loose ends of the cling film over the salad and cover the top of the bowl with a lid or flat plate. Place the salad in the refrigerator to soak if the recipe calls for it.
If you are going to serve the salad immediately after cooking, then simply fold the edges of the film outward, cover the salad bowl with a flat plate and tip the salad onto it, as is usually done with a salad "turnover".
Then carefully remove the bowl and remove the film - you will have a blank in the form of a hemisphere on your plate, which will only need to be decorated to make it look like a ball.
To make it easier to lay out pentagons and so that olives or other products do not fall off a salad slide, use a template rather than a stencil.
Cut out a pentagon to the desired size from heavy cardboard and wrap it in cling film or foil.
Place the template on the lettuce and press lightly to make a small indentation (you can also use the flat end of a rolling pin or the bottom of a suitable size glass if you don't care about the pentagonal shape). Press very carefully so as not to spoil the design.
Lubricate the resulting recesses with mayonnaise, and only then fill with pieces of olives, carrots or something else.
To decorate a salad, you can use not only grated vegetables, but also cut out whole pentagons, for example, from large tomatoes, bell peppers, cucumbers or the same boiled carrots. In this case, your "ball" will turn out bright and cheerful.
If you decide to make a salad with sausage or meat, pentagons can be cut out of plastics of sausage, ham or cheese.
Additional decorations in the form of stripes and ribbons can be cut with a shaped knife, and a bow with cookie cutters.
On the "grass" around the "ball" you can plant vegetable flowers, various "insects" or depict figures of players from suitable products. Especially this decor will appeal to the kids.
In addition to the usual salad, in the form of a ball, you can prepare a jellied salad by mixing chopped ingredients with a gelatin solution. In this case, you can first lay the pentagons of vegetables or other products in the form by dipping them in a gelatin solution. Then keep the workpiece in the refrigerator for some time so that the gelatin grabs, and then fill the form with salad and send the dish back to the refrigerator.
When the aspic has set, tip it onto a plate and decorate as desired. You can cut the jellied salad into portions right on the festive table, after the guests have admired your culinary masterpiece.
Do not forget that the Football ball salad can also be prepared in portions, putting the “balls” on separate plates, or arranging dishes with a variety of cuts with them.
Another serving option is a salad in rounded glass goblets. Lay out the bottom and walls of the glass with products prepared for decoration (they can also be dipped in a gelatin solution so that the fragments stick to the glass and do not slip).
Then fill the glass with finely chopped lettuce, dome the surface and decorate with the remaining decor.
This design of the salad will take time and painstaking work, but the "balls" in the glasses will look very original.
Salad "Football" with carrots
If for some reason you do not want to use olives or you are making a salad for a children's party, then you can decorate the salad with boiled carrot applications.
To do this, boil large carrots and cut them into long strips-ribbons. Wrap these strips around a slide of lettuce and make a bow out of small pieces.
Grate the rest of the carrots and place on the salad in the form of pentagons.
You can also arrange a sweet salad or curd mass with fruit for children.
As you can see, the appearance of different salads "Football" and "Football Regiment" is quite the same. But you can make more original options if you look at photos of real balls - their colors are not always black and white and do not always have a classic "football" pattern. If fans of certain football clubs live in your family, then the decor of the salad can be styled according to the colors of these clubs.
Chopped dill greens are, of course, ideal for the Football Field, but in addition to dill and peas, you can use other greens, lay out the surface with flat cucumber slices, green onions, etc. The field markings can be made from egg white or cheese - cut into long narrow strips, or grated on a fine grater and sprinkled with “paths”. You can also post a picture of Korean carrots, corn, boiled spaghetti, etc. Do not forget that you are not making a mini-copy of a real sports facility, but decorating a salad, so the design colors may well be different (especially if the salad is for kids).
"Ball" on the salad field can be not only from the yolk, but also from any snack that is traditionally rolled into balls. In addition to the ball, you can place "players" (and not necessarily in the form of people) on the football field by cutting and assembling them from vegetables, cheese, eggs and other suitable products.
And in the center of the "football field" you can lay out the national flag, a sports pennant, numbers (score, anniversaries) or some other sports-related elements.
And of course, any other salad can be prepared in the form of a soccer ball or a field, because the point is in the design, not in its composition.
Biscuit: 200 gr softened sl. Whip the butter until fluffy with 1.5 tablespoons of sugar, beat in 1 3 eggs, alternately beating each beaten. (20-30 minutes before the start of the preparation of the biscuit, take
1 tablespoon of milk and add 2 tablespoons of lemon juice to it, let it stand for 20-30 minutes.) Sift
2.5 tablespoons into a separate bowl. flour. Now, alternately (starting and ending with flour), we introduce the milk mass and flour into the butter-egg mass, with constant stirring. Grind on a grater
4 ripe bananas and zest of 1 lemon or orange (I liked it better with orange). Knead and pour into pre-prepared forms (buttered and sprinkled with flour, you can simply lay parchment). I used form No. 21, but 22.23 is also suitable. Bake in an oven preheated to 180C until cooked. Check with a skewer, it should stay dry. Do not open the oven for the first 30 minutes.
We cool the finished cake well, it is better to do it on the wire rack (I use the wire rack from the oven). Cut the cooled cake into 2 parts (a total of 4 are obtained). Again we take the form, we cover it with cling film (so that without gaps, and with free edges coming out). We put one part of the cake in the form (we carry out this procedure with 2 parts in total), lightly grease it with cream (mix 4 proteins with a whisk with 200 g of sugar, put on a steam bath (water should not touch the dishes with proteins) and, with vigorous stirring, bring the sugar to complete dissolution ( it takes me about 3-4 minutes). lightly beat with a mixer and 1 tbsp each add oil to the proteins, with the mixer constantly running. The cream will first separate, but you need to beat further and our mass will turn into a beautiful, tasty bright white glossy cream. jelly (I used purchased, prepared according to the instructions on the bag, only poured 100 ml less water). Put in the refrigerator until completely solidified.
Assembling the cake: take a cake with jelly (carefully removed from the mold), grease with cream, put a regular cake on top, again cream, jelly cake, cream, regular cake. We send it to the refrigerator for an hour. Then we cut it off, giving it the appearance of a hemisphere and Coat the sides of the cake with the rest of the cream, well isolating the wet jelly edges, and send it to the refrigerator for 2-3 hours. I decorated the frozen cake with sugar mastic: put the marmyshkas in a flat dish, add lemon juice and butter and send it to the microwave for 50 seconds. The sweets should increase in size. Sift on the table with a glass of powdered sugar (depending on the marmyshka, the powder can take from 1 to 2 glasses), put the heated marmyshki in the middle, add red, yellow and brown dyes (ratio 1 * 4 * 1), to obtain the desired color, sprinkle powder and start kneading.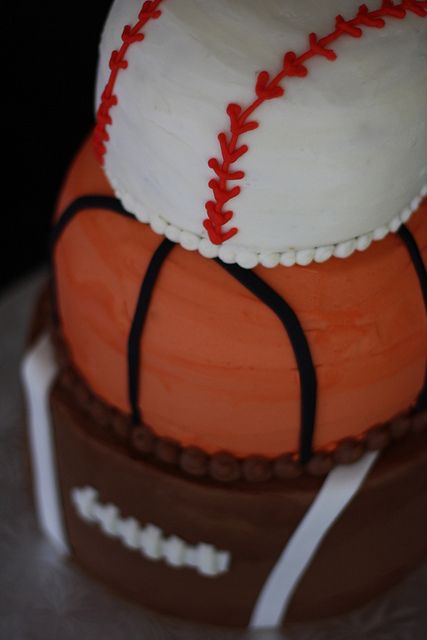 I kneaded with gloves, it is very uncomfortable, the mastic sticks strongly, but my hands remained clean. Knead until soft plasticine, the mass should not stick to your hands. We send the mastic in a plastic bag.
We roll out the mastic with a thickness of about 5 mm and a width of the layer "with a margin". Lubricate the cooled cake with apricot jam or liquid honey whipped until smooth. Cover it with mask. Cut off excess fondant with a knife around the perimeter of the cake. From the rest of the mastic, I made a ribbon for the inscription.
Then, with the help of a tailor's tape measure and a brush, I beat off the locations of the "meredians", rolling the recesses for the stripes with the brush. So everything started beautifully, but for some reason I decided to make meridians from melted chocolate, it didn’t work out very well. You need to make them from shocomastics, rolling flagella out of it.
Making the icing: beat the egg white with a fork, gradually adding powdered sugar.