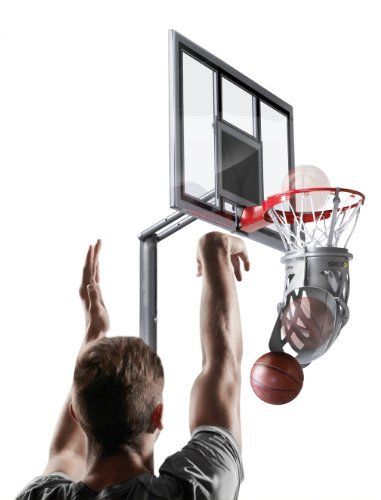
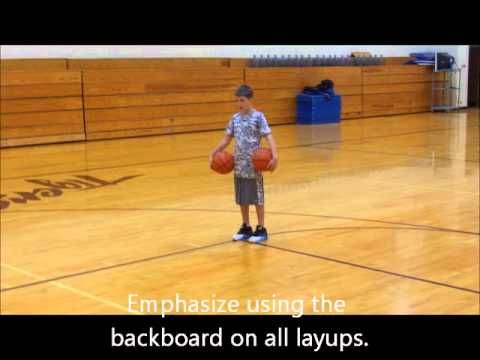
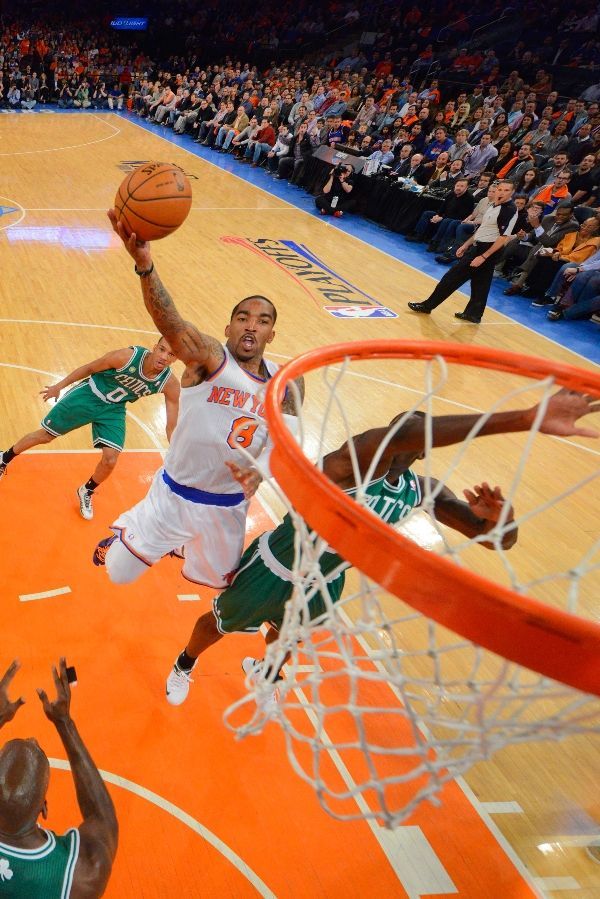
Approach the hoop while dribbling. Grab the ball with both hands, jump into the air and flick the ball onto the backboard and into the hoop. The lay up is one of the most fundamental offensive basketball manuevers and can be performed by beginners and professionals alike.
Due to the short distance to the basket, the basket lay up is a sure way to score points.
With the lay up, the correct step sequence and jump are most important.
Did you know? The lay up and jump shot are the oldest shooting techniques in basketball.
How does a lay up work in basketball?
To learn the sequence of movements and steps, we recommend starting your lay up from a standing position with a single dribble.
Ad
Here's how a basketball lay up works with your right hand:
Step 0: Positioning, 10 feet from the right of the basket
Position yourself about 10 feet from the basket, half way to the 3 point line, and run to the basket at a 45° angle.
Assume the starting classic shooting position.
Hold the ball close to your body with both hands at hip level.
Step 1: Dribble the ball with your right hand and place the left foot on the ground
Dribble with your right hand, the ball one step ahead of you. At the same time, step with your left foot.
Step 2: The right foot in front
Grab the ball with both hands, and hold it close to the right side of your body. Then take a step forward with the right foot.
3. Jump off with your left foot
Now take a step forward with your left foot and jump up and towards the basket.
At the same time, pull the right knee up. This helps stabilise your shot and accelerate you to the basket.
Important: When jumping off, focus on jumping upwards more than forwards.
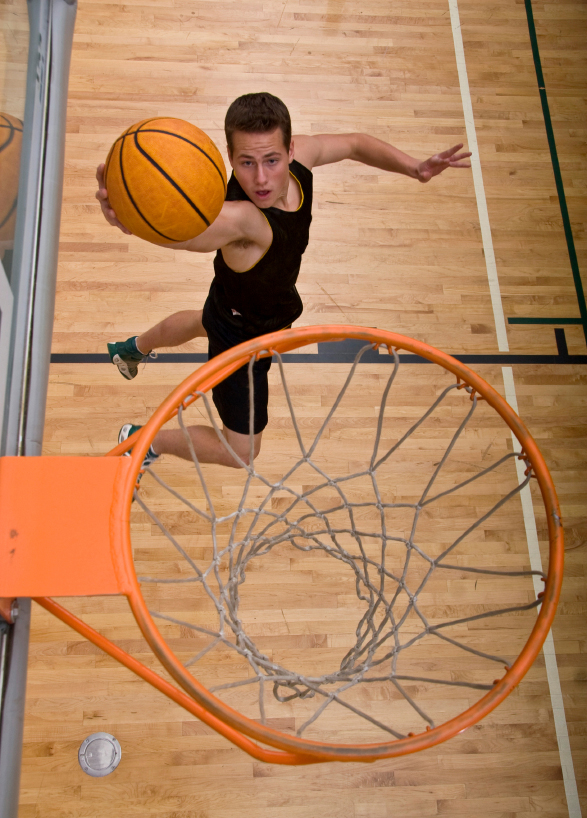
Step 4: Guide the ball towards the basket and shoot
When taking to the air, bring the ball from the waist on the right side of your body. In one fluid motion, your right hand should be under the ball. Your left hand is kept to the side of the ball.
Once in the air, stretch out your right arm. At the apex, straighten your arm and elbow to shoot the ball towards the backboard. Your goal is the upper right corner of the square on the backboard.
In this video, you can see how a fluid lay up looks:
The lay up with the left hand works exactly the same but inverted, so start with your left foot, jump off with your right leg, and lay up with your left arm.
Our tip: Be sure to train both hands. This will help step up your game.
The following exercise helps beginners practice and internalise the lay up:
Here's another step by step guide on how to perform the lay up.
Step 1: Catch the ball landing with your left foot Step 2: Step forward with your right foot Step 3: Jump off with your left foot Step 4: Drive forward with your right knee Step 5: Simultaneously, bring the ball up with your right hand Step 6: Lay it up softly
The 4 different types of lay ups
There are four different lay up techniques. The technique we've mentioned is simple and well suited for beginners. The other lay up techniques are more difficult and suited for experienced basketball players.
The overhand lay up
The original and simplest version of the basketball lay up is suitable for children and beginners.
The ball is thrown from the hand onto the backboard. The basketball lay up can be done with or without the backboard.
Underhand Lay Up
This lay up variation is also called the finger roll and suited for experienced basketball players.
When laying up, the whole arm is stretched out. The hand is placed under the ball. Snap your wrist upwards so that the ball rolls off the fingertips. This will help the ball rise and fall softly into the basket.
The underhand lay up is:
easier to block,
for lay ups farther from the basket,
only possible with a strong jump.
The following video shows how to do the finger roll with the underhand lay up:
The Power Move
The only difference between the overhand lay up and the power move is that you jump with both legs. This is where a strong jump is a necessity.
Ad
The Up and Under
The most difficult lay up variation is the up and under. Here, the lay up is faked to bring the opponent out of position.
The player starts by jumping past the opponent, fakes the throw, bringing the ball around, and then lobbing the ball just before landing. In action, here's how the up and under lay up looks:
How do I practice the lay up?
The lay up is a very elaborate technique and can best be trained methodically in a series.
This means: For the lay up, first practice the individual steps and start with the simplest part. If you manage these steps individually, connect the steps in the correct order one by one.
Here's how the process works: Step 1: Perfect your accuracy on the back board. Stand 45° from the backboard and practice. Step 2: Practice the two-contact rule: Right - left - jump - back board shot. Step 3: Add in a single dribble then repeat step 2. Step 4: Add more dribbling in to feel more comfortable transitioning from dribbling to shooting. Then repeat step 2. Step 5: Practice these steps with your weaker hand.
It takes a few training sessions before the basketball lay up can be used in a game.
Common lay up mistakes
Since the lay up is quite complex, problems are sure to arise in the beginning. Perfect practice makes perfect execution. Here's how to counteract typical mistakes:
Jumping with the wrong leg or approaching the basket with the wrong sequence of steps
Go through the steps slowly, one at a time.
Have your coach or teammate tell you right leg during the step sequence.
Missing arm extension with the standing shot
t
Train the standing throw for a while.
Jump is not high enough
Pull the non-jumping knee actively up.
Do excercises that isolate your jump.
Strength and jumping exercises for a better lay up
A strong jump is vital for a successful lay up. We'll show you how to practice this.
Important before starting your lay up exercises: Warm up to get your muscles and joints ready for the strain. Be sure to plan sufficient breaks while practicing your jumping. Take care of your body to prevent injuries.
Genetically speaking, you can increase your jump height by a maximum of 10 to 20 percent. In addition to leg strength, a stable core is a necessity. A stable core allows you to better catapult yourself upwards, as your jump and core then work together to throw yourself up.
Along with jumping excercises, you can strengthen the core with the following excercises:
Plank
Push up
Sit ups
We recommend the following excercises if you'd like to train your jump.
Lunge Jumps
The jump lunge trains your explosive power:
Place your feet hip wide.
Take a large step back with your right foot.
Knee is just over the ground.
Jump and change legs.
Half squats
Half squats train your jumping power from a squating position. This excercise is helpful because many basketball manuevers involve jumping.
.
Place feet hip wide apart.
Bend your knees to go into a squating position.
Expload upwards into the air.
Half deadlift
As with the last excercise, perform this exercise from a half squat. Place the weight on two boxes.
Note: Only perform this exercise once you've mastered the dead lift. If not, you could injure your back.
Box Jumps
To do box jumps, you'll need a stable box or bench.
Stand upright with feet hip-wide in front of the box.
Bend the knees until your thighs are parallel to the floor.
Jump upwards and swing your arms forward.
Land as gently as possible on the box in a squatting position.
Jump back down gently to the ground.
Ball catching
This exercise trains your reflexes as well as your jump.
Throw the basketball against the backboard and try to catch it at the apex of its flight path.
One legged jumps
For this exercise, put one leg in the air, bend your knees and explode upwards. Once your leg is exhausted, switch legs. We recommend this excercise at the end of your training session.
Even more ideas for your next basketball practice
Still looking for more tips for your training? Sport psychologist and performance coach Sebastian Altfeld shows you how to effectively plan a basketball practice session. Or take a look at our other articles on the same topic:
The Dunk
Basketball Rules
The Jump Shot
If you're still looking for the training jersey for you or your team, we recommend taking a look at our Online Shop. Or design your own jersey with our 3D Designer.
If you want to win basketball games, your players must be able to finish at the rim consistently.
While knowing “how to do a layup” will sound easy to most players, it’s actually much more difficult than most people realize.
Think about it:
Players attack the hoop at varying speeds...
Players attack the hoop from many different angles...
And when they do get to the hoop, there’s usually a second defender waiting who will attempt to swat their layup into the 5th row.
Despite these challenges, players must learn how to score layups in a variety of situations if they want to experience individual and team success.
In this article, I’ll show you how.
I’ll start by teaching you (1) exactly what a layup is, (2) the six steps for how to do a layup, (3) the process for teaching layups to young kids, (4) the seven layup variations all players must master, before finishing with (5) some important layup tips.
Let’s get started…
What is a Layup?
Here’s the general definition most coaches would use:
“A layup is the action of a player dribbling towards the hoop, taking two steps, and then laying the basketball into the hoop off the backboard. ”
For a traditional layup — this is correct.
With that said…
There are MANY variations of a layup (I’ll share 7 of them with you later in this article) and no two in-game layups are identical.
There’s an endless number of situations a player will face when they attack the hoop in a 5-on-5 game.
The two things all layups do have in common:
(1) All layups are shots close to the basket
(2) All layups are worth two points
How to Do a Layup (6-Steps)
Now, let’s talk about how to do a layup correctly.
Learning correct footwork and layup technique is crucial for young players.
We don’t want players to develop poor habits that will be difficult to break out of as they get older and advance to higher levels of basketball.
For the purposes of this beginner’s guide, I’ll assume players are executing a regular right-handed layup.
Here we go:
1.
Eyes Up
The very first thing a player must do when they decide to attack the defense and finish with a layup is get their eyes up.
This is important for two main reasons:
a. To Lock onto the Target
The target they aim for will be either the hoop or the backboard depending on the player’s angle and speed.
Knowing which target to choose as the ball is released from the shooter’s hand is something players will get used to as they gain more experience.
b. To Read the Defense
Every time a player attacks the hoop, multiple defenders will step across to provide help and challenge the layup.
Players need to get their eyes up and use their peripheral vision to read these defenders.
This will help the player decide which layup variation will give them the best chance of scoring (or which teammate is now open to receive a pass).
2.
Outside Foot Step (Long)
Remembering that we’re using a traditional, unguarded layup as the example for this blog post…
The first step a player makes as they pick up the basketball should be with their “outside” foot (closest to the sideline).
For right-handed layups, this is the right foot.
For left-handed layups, this is the left foot.
There are two important coaching points you should emphasize to players when you’re teaching them this step:
(1) Long Step
We want players to gain distance with the first step, and a long step also helps with the second point…
(2) Controlled
Players MUST be in control of their body as they perform their layup.
Too often we see young players sprint towards the hoop out of control and then launch the ball hard off the backboard.
Encourage them to slow down to increase their chances of scoring.
3.
Inside Foot Step (High)
The second step of a traditional layup should be with the inside foot (closest to the middle of the court).
For right-handed layups, this is the left foot.
For left-handed layups, this is the right foot.
The key coaching point for the second step is the following:
“High Jump”
Along with ensuring players slow down and are in control of their layup, the emphasis to jump high will give young players the upward momentum they need to complete the layup.
This is done by driving the shooting-side knee up into the air as they jump off their opposite foot.
(Right knee on right-handed layups. Left knee on left-handed layups)
4.
Protect the Ball
It’s crucial that a player protects the ball while attempting their layup.
Two things to watch out for:
a. Getting Stripped
Smart defenders will look to strip (steal) the ball from the offensive player during their two steps.
To prevent this from happening, the offensive player needs to (1) have strong hands and (2) keep the ball close to their body.
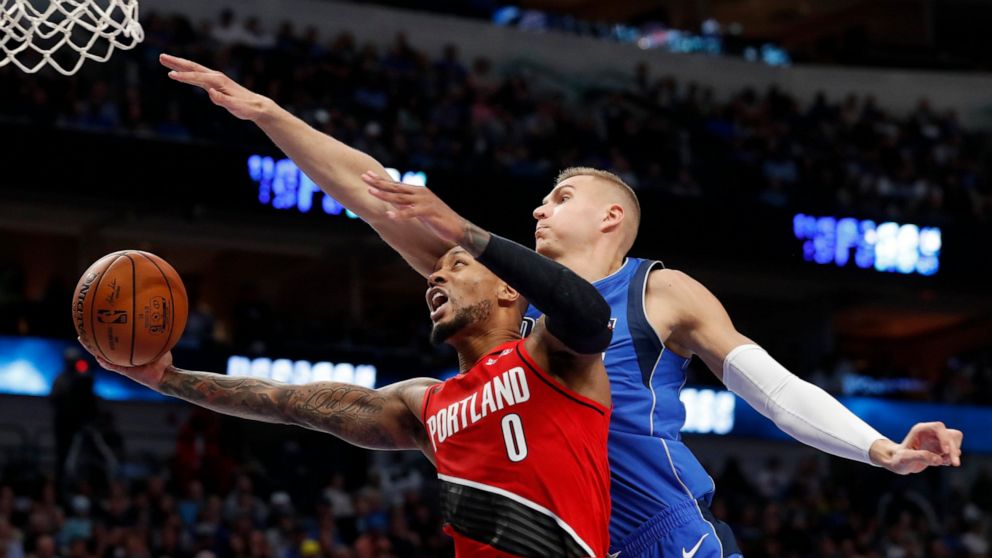
b. Getting Blocked
Tall defenders will attempt to block the shot during the upward shooting motion or as the ball leaves the offensive player’s hands.
To prevent this, the offensive players must use their non-shooting hands to protect the ball and increase the likelihood of getting fouled.
5.
Follow Through
The fifth step when learning how to do a layup…
Teach your players to bring the ball up above their head, extend their arm, and then flick their wrist to guide the basketball into the hoop.
The traditional overhand layup is very similar to a regular jump shot when it comes to this part of the layup technique.
Important Note:
If you’re coaching very young players, you might find they push the basketball up from their chest instead of bringing the ball above their head before shooting… this is due to a lack of strength.
This isn’t a big issue while they’re young, but make sure they’re growing out of this habit as they get older and stronger.
6.
Practice!
Now that your players understand correct layup technique, it’s time they start doing some serious layup practice!
A few important things for coaches to think about:
a. Different Angles and Speeds
Run layup drills that involve players attacking the hoop from different angles and at different speeds.
Left / right side
Front of the rim
Along the baseline
It’s important that they’re comfortable and confident driving to the hoop from anywhere on the court.
b. Right Hand and Left Hand
Allow players to mainly use with their dominant hand when they’re first learning how to perform a layup…
But make sure they start practicing with both hands once they understand correct technique and develop the strength to do so.
This is important to help them protect the ball and finish around good defenders as they get older and play against tougher competition.
c. Competition!
Almost immediately you should start running drills where players are required to attack the defense and finish with a layup against live defense.
Add both layup technique and layup competition drills to every practice.
For example:
Spend 10 minutes using a layup technique drill and then spend 10 minutes playing half court 2-on-1.
Your players might struggle against competition at first — they might commit a travelling violation, jump off the wrong foot, or rush their two steps — but they’ll benefit from the struggle in the long run.
Teaching Layups to Kids - The Process
I’m guessing that most people reading this article are youth basketball coaches wanting to know the best way to teach layups.
If so, you’re in the right place.
I’m going to provide you with the step-by-step instructions.
These steps should be used to teach “overhand” and “underhand” layups to all players who have signed up to learn the game of basketball.
One final piece of advice before we get started:
Be patient.
These steps might seem simple to you… but to a young kid who’s trying to understand footwork, ball pickup, where to focus, distance, etc… it’s hard!
Let’s get stated…
1.
One-Step Layup
The first step is to start players on the low block.
Since most players are right-handed, I recommend starting on the right block since this will be most comfortable for them.
Give everyone a basketball, line everyone up behind the low block, and then get them to execute the following:
a. Start with feet together
b. Take one step with their left foot (inside foot)
c. Jump off the left foot and shoot a layup off the backboard
2.
Two-Step Layup
Next, let’s add a second step…
Get everyone to start one step back from the low block.
Reminding them that they don’t need to dribble the basketball yet, ask them to do the following:
a. Start with feet together
b. The first step is with their right foot (outside foot)
c. The second step is with their left foot (inside foot)
d. Jump off the left foot and shoot a layup off the backboard
Players grab their own rebound before joining the end of the same line.
3.
One-Dribble Layup
Now let’s take another step back…
For the third step in this process, we ask players to take one dribble before completing their two steps and finishing with a layup.
Here are the instructions:
a. Start with feet together
b. The initial step is with their left foot. As this foot touches the ground, the player should take one dribble with their right hand.
c. As the player catches the ball, they take their first layup step with their right foot (outside foot)
d. The second layup step is with their left foot (inside foot)
e. Jump off the left foot and shoot a layup off the backboard
4.
Multiple Dribble Layup
The final step when learning to shoot off the dribble requires players to retreat back behind the three-point arc.
From here, players will before multiple dribbles before gathering the ball, taking their two steps, and laying the ball in off the glass.
Here’s how it works:
a. Start behind the three-point line with a basketball.
b. Take multiple dribbles towards the hoop (eyes up!)
c. At the low block, take the first step with the right foot (outside foot)
d. The second layup step is with their left foot (inside foot)
e. Jump off the left foot and shoot a layup off the backboard
5.
Catch and Layup
Another thing players must learn to do is receive the basketball while on the move and then finish with a layup without dribbling.
Players are put in this situation often during games…
They might make an off-ball cut to the hoop, receive a pass from a teammate on a fast break, or pass to a player in the post then cut off them.
My recommendation is to set up a quick “give and go” drill.
As follows:
a. Put one player on the free-throw line without a basketball.
b. Line everyone else up behind the three-point line with a basketball.
c. The player with the ball passes to the middle of the floor, sprints towards the hoop, and then receives the ball back for a no-dribble layup.
d. Change the “passer” every minute or two.
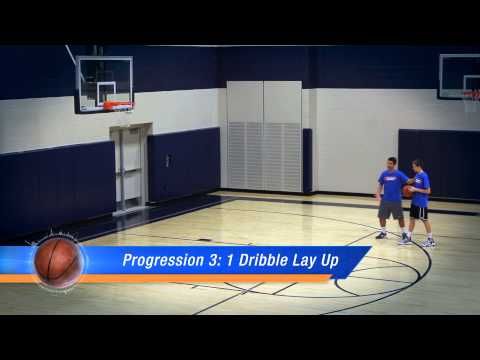
Video:
To help you better understand the whole process, check out this brilliant video from FIBA that shows the first four progressions:
Seven Layup Variations
As I spoke about in the step-by-step section, it’s important for players to master more than one type of layup.
When you’re playing a real 5-on-5 game, there will be help defenders trying to block / alter your shot when you get to the hoop.
Being comfortable with a variety of layups will allow players to finish around any kind of defense that’s thrown at them.
Here’s the must-know list:
1.
Overhand Layup
This traditional layup is often the first one we teach young players. It’s similar to a regular jump shot in that a player gets their hand under the ball and “shoots” it off the backboard.
2.
Underhand Layup (Finger Roll)
Also known as the “finger roll”. This involves players putting their shooting hand under the ball with their fingers facing forward, and then rolling the ball off their fingertips as they extend their arm to the hoop.
3.
Floater
The floater is a great way for smaller players to score inside against bigger defenders. It involves a player “pushing” the ball up over the defense.
4.
Off-Foot Layup
If you really want to catch the defense by surprise, an off-foot layup should be in your bag of tricks. This involves jumping off the same foot you’re shooting with. For example, jumping off the right foot for a right-hand layup.
5.
Euro Step Layup
The Euro Step involves taking your first step in one direction, and then changing directions for your second step. This is a great way to step around defenders and change the angle as you complete a layup.
6.
Reverse Layup
A reverse layup allows the offensive player to attack the hoop and finish on the opposite side of the rim. For players at high levels, the rim acts as protection from shot blockers.
7.
Power Layup
A power layup involves performing a 2-foot jump stop before raising up to shoot. The benefit of this variation is it will give the player a stronger base, which is essential if you’re anticipating contact.
Advanced Layup Tips
Before you go, here are a few extra layup tips that will help players be more successful when attacking the hoop.
Some of the tips I’ve mentioned already throughout the article (but they need repeating), and some of them I’ve saved for this section.
Onward:
a.
Slow Down!
One of the main reasons for missed layups at the youth basketball level is players are going way too fast.
If you were to spend just 2 minutes sitting on the sidelines of an U10’s game, and I guarantee you’ll see a 100mph fast break that results in the shooter slamming the ball off the backboard.
Encourage players to slow down, use a long first step to gain control of their body, and then jump high off the second step to finish.
Control is key.
b.
Create Space to Finish
Once a player gets past their defender off the dribble, teach them to step in front of the defender to “lock them behind”.
This creates space in front to finish with a floater or to draw the defense before dropping the basketball off to a teammate.
c.
Swish or Backboard?
Coaches will often get players asking whether they should aim to swish the ball or use the backboard on their layups…
This is an impossible question to answer as every situation is different.
The best advice you can give players is to practice finishing with a swish and off the backboard from all angles and at all speeds.
The more finishes a player is comfortable with, the more options they’ll have when confronted by a defender during games.
d.
Keep the Ball Tight
This is something I spoke about in the “protect the ball” section above…
When going through the two-step motion of a layup, keep a strong grip on the ball and hold it close to your body.
Smart defenders will attempt to strip the basketball before you go up into the shooting motion of the layup.
e.
Don’t Be Scared of Contact
Getting fouled on a layup will give you a chance at a three-point play (or free throws) and will push your opponent one step close to foul trouble.
But many young players are scared of contact.
To avoid contact or getting blocked, they angle away from the defense giving themselves a much more difficult shot attempt.
Encourage players to embrace contact and attack the defender!
f.
Practice Against Real Defenders
Learning layup technique is important, but all the individual layup practice in the world isn’t going to make you an elite finisher at the rim.
You must practice scoring against live defenders.
Once you’re comfortable with technique, it’s time to add defense take your finishing skills to the next level.
1-on-1
2-on-2
2-on-1
etc
These will all help build the skills you need.
Conclusion
Learning how to do a layup is crucial for all young players.
Because they lack strength to make outside shots consistently, 90% of points scored in youth basketball are from layups.
Start by using the four progressions outlined in this article to teach them the basics, and then progress to teaching them the seven layup variations and also adding defenders.
If you do this well, your team should have no trouble attacking the hoop and scoring against any defense.
KP top 10 rating
Basketball originated in Massachusetts as an attempt to make physical education classes more fun and varied. Then this sport began to gain popularity in educational institutions in the United States. At the beginning of the 20th century, basketball was formed into a professional sport with the formation of club teams. Gradually, this game is gaining worldwide popularity and stands out as an independent sport in other countries. Basketball's evolution culminates in its inclusion in the 1919 Summer Olympics.36 and around it grows a whole industry.
Modern basketball is divided into amateur and professional. The main attribute of the game is the ball. What does he represent? The ball must be in the form of a sphere of a certain shade of orange with a classic pattern and black seams. Standard has eight inserts. In competitions, it is customary to use balls of the 7th size, the mass of which ranges from 567-650 grams, and the circumference ranges from 749 to 780 mm. But in other cases, balls of other sizes are used. Also, basketballs are universal (can be used indoors and outdoors), only for the street and only for playing indoors. Today there are many brands that produce balls. They differ in quality and price. Our top 10 best basketballs of 2022 will help you navigate this variety. And our expert Artem Samsonov will give some recommendations on choosing a ball that suits your goals.
Top 10 rating according to KP
1. Wilson Reaction PRO
Wilson Reaction PRO. Photo: market.yandex.ru
Wilson Reaction PRO is a professional basketball. Suitable for indoor and outdoor play. Production material - high quality composite leather based on polyurethane. This ball is characterized by a soft hit and good grip. The camera is made of butyl, a fairly high-quality material. The size of the ball is 7. There are eight glued panels in total. The advantage of this model is the original ball, officially approved in England.
Pros and cons
Grippy, good rebound, material quality
May stain leather a bit with black paint
2. TORRES Block
TORRES Block. Photo: market.yandex. ru
This model was originally created for amateur games. The design of the ball is traditional, but the coloring is different from the usual standard. But there is no problem in this. But the ball is great for training passes and shots. Can be used for both outdoor and indoor play. The top layer is made of durable rubber, resistant to all sorts of negative impacts. The ball will also work well on hard surfaces. The chamber is made of butyl. The ball itself belongs to the 7th size category. A nice bonus: the kit includes a needle for pumping.
Pros and cons
Light, bright design, needle included
Not everyone likes the color scheme
3. Spalding TF-250 All Surface
Spalding TF-250 All Surface. Photo: market.yandex.ru
The Spalding TF-250 All Surface basketball has a classic look. A great option for training and local competitions. The ball is declared by the manufacturer as universal: that is, it can be used for games in the hall or in the open air. The tire is made of polyurethane, the model is quite wear-resistant. The camera, already quite familiar, is made of butyl. The ball has been certified by FIBA. The standard size - 7 - is optimal for the game.
Pros and cons
Price, workmanship, good option for beginners
Heavy wear from asphalt
4. Molten BGF5X
Molten BGF5X. Photo: market.yandex.ru
Molten BGF5X is a size 5 ball specially made for training in sports facilities. According to the manufacturer, the surface of the ball is made using a revolutionary technology that makes it as comfortable as possible to hold in the hand and improves rotational stability, which increases the accuracy of throws and passes. The top layer of the ball made of polyurethane securely closes the butyl chamber. The purpose is universal: you can play in the hall and on the street.
Pros and cons
Workmanship, production material
High price
5. Jogel JB-400 #7
Jogel JB-400 #7. Photo: market.yandex.ru
Jogel JB-400 No. 7 - this ball model is designed for training basketball players. It has good grip and interesting design. The material of the upper layer is synthetic leather, which allows you to use the ball in the hall and on the street. Regarding the camera: everything is standard here - it is made of butyl. The model complies with FIBA size and weight requirements. Size category - 7.
Pros and cons
Price, brand
Ripped off on asphalt
6. Larsen RBF7
Larsen RBF7. Photo: market.yandex.ru
Larsen RBF7 is an outdoor ball model. The upper material is made of foam rubber, which allows you to adequately withstand the wear and tear from playing on hard surfaces. However, the ball may behave unpredictably when played indoors. Size category - 7. The camera is also made of rubber. A good option for a beginner who wants to get acquainted with basketball.
Dobest PK-884 is more suitable for amateurs, both indoors and outdoors. The tire is made of polyurethane, gives the ball a good margin of safety. Standard butyl chamber without unique techniques. Ball size 7. It is worth noting the eye-catching design and coloring.
Pros and cons
Play comfort, material quality
Hardness
8. WELSTAR BR2814D-7
WELSTAR BR2814D-7. Photo: market.yandex.ru
This basketball has the most colorful color, unlike the rest in our rating. Optimal for the amateur level - it's fun to play outside with friends and warm up in the hall. The top layer of rubber makes the product durable, and the butyl chamber gives elasticity and reliability. A good price is one of the advantages of this ball. Size category - 7.
Pros and cons
Price, bright appearance
Not suitable for professional use
9. ATEMI BB500
ATEMI BB500. Photo: market. yandex.ru
ATEMI BB500 is a budget ball, the purpose of which is to play in the hall or on the street, subject to the presence of a special rubberized coating. Playing on pavement will shorten the lifespan quickly. The material of the upper layer was rubber, with a good indicator of strength and resistance to mechanical damage. The butyl chamber is reinforced with nylon thread for greater reliability. The ball has good aerodynamic properties. Pros: nice color scheme in appearance. A good option for the amateur level.
Pros and cons
Price, material
Not suitable for asphalt
10. Petra BB-042
Petra BB-042. Photo: market.yandex.ru
Petra BB-042 — a basketball at a low price. The most budget option of our rating. Suitable for amateur play. A good solution for a beginner - will allow you to master the basics of basketball. The size of the ball is 7. The material of the tire and the chamber is rubber.
Pros and Cons
Slippery
How to choose a basketball
When choosing a basketball, you should pay attention to the following characteristics: very important factor in its selection. It is customary to divide the balls into three classes:
for the street (Outdoor),
for the hall (Indoor),
universal (Indoor/outdoor).
Outdoor balls with maximum wear resistance. As a rule, they are made from synthetic materials. Sharpened for hard surfaces such as asphalt or rubber. A feature of this type is the rigidity at tactile contact.
Indoor models show good adhesion to parquet. Leather and synthetic materials are used for manufacturing, balls with a composite coating are especially good. But playing on the street with him is a rash decision, as the ball will quickly become unusable.
General purpose basketballs made of rubber. Suitable for indoor and outdoor use. They are quite tolerant of wear and feel good on the parquet flooring of the hall. Often they have an additional coating of synthetic or composite material.
Size
The officially approved ball size for men's competitions is number 7, which is characterized by a weight of 567-650 grams and a circumference of 749-780 mm. Size 6 is the standard size for a women's basketball and has a mass in the range of 510-567 grams and a circumference ranging from 724 to 737 mm. For mini-basketball games, a size 5 ball is used. It can be determined by the circumference within 690-710 mm and weight 470-500 grams. Usually such competitions are held for children no older than twelve years. And size 3 is used in basketball training to hone dribbling. The ball of this size category has a weight in the region of 300-330 grams and a circumference of 560-580 mm.
Material of manufacture
The material used to make the ball is a significant factor to consider when purchasing. Professional balls are usually made from composite materials. Universal balls must have high strength, because they are made from synthetic raw materials. For the hall, the best solution would be a ball made of genuine leather. If a basketball is marked "Supreme Leather", then this indicates the use of extra-class leather.
Quality
The easiest way to check the quality of a ball is to bounce it. A well-made and properly inflated ball should bounce to a height of about 130 centimeters. But there is another way: raise the ball to the level of your head and let it go. Then he should bounce to the level of the belt. It is also important to inspect the nipple. The durability of the ball depends on its performance. Flexibility is another sign of quality. After a short play, the ball should not become soft. It is important to remember that a special nozzle is needed when pumping, a football needle is not the best option. Also, do not kick and sit on a basketball. Careful operation significantly extends the service life and contributes to the adequate "behavior" of the ball during the game.
General recommendations
If you need a basketball for playing outdoors, then the best solution would be an Outdoor type ball in size 6. In order to get really high-quality sports equipment, it is better to buy balls from well-known brands, they are responsible for the reputation of their product . Optimally, if the material of manufacture is synthetics. In the case of a modest budget, a universal rubber ball will perform quite well.
Teaching tricks in basketball: types, technique, tips
In teaching basketball tricks, the main aspect is practice: the longer you practice the technique, the better it gets. Feints are effective techniques that are used on the court to confuse an opponent. A good reception not only hides the intentions of further actions, but also looks spectacular for the audience. Every famous basketball player has their own set of favorite false maneuvers. Even an amateur who recently picked up a ball can learn the simplest of them. This article lists the feints that you need to master first, as well as recommendations for their implementation.
Basketball feints are most often used during throws and passes, while dribbling. The most common are changes of the supporting leg and the leading hand to the opposite one, turns 180 and 360 degrees, deceptive swings. If you started playing recently, then you will have to study them first of all. It also does not hurt to study the basic principles of the game, they are presented in the material “How to learn to play basketball?”.
How to master strokes?
All techniques improve with time and practice, in this sport it is very important to train regularly, without missing classes. Feints should not be underestimated as something extra. This is not just a trick, but a serious tactical decision, in order to implement it correctly, strategic thinking, lightning speed of reaction, and excellent technique will be required.
Experience plays an important role, the more often a movement is practiced, the sooner it will be brought to automatism.
Not only his statistics depend on the agility and reaction of the player, but also the success of the team for which he plays. This even affects the impression of the audience, they like to watch spectacular meetings with unexpected twists. For high-quality performance you will need:
operational analysis of the distribution of forces at the current moment, their position relative to the basket, members of both teams;
the correct choice of the type of reception depends on whether you have possession of the ball and how far from the ring of the other team;
daily improve their skills, both in the gym and at home. To practice many movements, special conditions and a large amount of space are not required. It is worth doing it yourself as often as possible in order to improve your personal technique;
practice actions with the limbs and head with and without a projectile, on the move and in a stationary position. Mentors advise to train the throw with the ball, and the ability to catch - without it;
deal with the projectile bouncing off the shield. This is convenient to do with an assistant who will throw it at the shield. Your task will be to catch him in a jump and make deceptive landing maneuvers, make passes and escape from under the ring.
Universal recommendation
Tricks can be extremely simple or very complex. To fulfill each of them, the observance of these principles is obligatory:
promptness and accuracy;
analysis of their actions. After each maneuver, you need to make sure that it was a success. If the opponent was able to resist him, then understand how he did it, what could give you away;
with the help of tricks, you can recognize the weaknesses of opponents, this is worth using;
you can't use the same tricks all the time, in which case the behavior will become predictable. It is necessary to combine different actions, choosing the most effective sets depending on the situation;
do not use too many tricks, the game consists of more than just them;
do not resort to those movements that you do not know how to do perfectly. Before resorting to some kind of manipulation on the site, you need to make sure that you own the technique in training.
Best Tricks
Consider the most popular basketball tricks. They are also used in street basketball, which is a separate game discipline. You can learn more about the direction from the material “How does street basketball differ from ordinary basketball?”.
Ball tricks
Dexterous manipulations are used by players when they are in an advantageous position relative to their own defender or are covered by representatives of the other team. To implement it, you need to make a lightning-fast movement of the ball along one trajectory, and then throw it in a completely different direction, for example, into the ring or make a pass to a teammate. The calculation is that the opponent will tune in to rush for the ball in the other direction. The trick to a successful implementation is that the planned true move should be a really abrupt change in trajectory, not worth doing it after returning to the starting position after the deception.
Leg movements
Foot feints are very common in basketball, in order for them to be successful, you should try to keep the feint step as short as possible. The shorter the step length, the more opportunities to perform a swift movement in order to break away from the pursuit of an opponent. After performing, you must immediately transfer the weight to the supporting leg and immediately step to the other side.
Performed in several variations:
a short and fast false step in a direction where no movement is planned;
a rapid back and forth step followed by a throw from the same place or a feint imitating such a throw or passing to the opponents' shield;
Bend the legs abruptly and perform an action simulating a throw jump, followed by a real throw jump or pass.
When making a false step, you should not transfer the weight of the body to the leading leg, it should not become a supporting one. The faster the step is completed and the shorter it is, the better. The supporting leg does not rise, it remains fixed until the ball is passed.
Head holds
The essence is that before moving along one trajectory, a sharp movement of the head and shoulders is made in the opposite direction. Applicable before the throw and to get closer to the opponent's basket from a position with your back to the opponent's basket. The action will be effective if the athlete can do everything sharply enough and does not lose balance, you need to be very dexterous. To do this, you need to make movements very short, as well as develop the skill of controlling your body and coordinating movements with special exercises in training.
Eye movements
A powerful distraction maneuver can be performed without expending energy or any movement. This is done by changing the direction of the gaze. Basketball players of all levels actively use this opportunity. Professionals have time to follow not only the hands and feet of opponents, but also facial expressions, in particular, eyes. It is important to learn to notice changes in the gaze of opponents, but at the same time remember that the eyes can deceive, and also use this technique to your advantage.
Hands and arms
The best time to perform a hand or arm feint is when passing the ball. For example, an athlete simply keeps his arms outstretched on the sides of the body, while seeing the ball with peripheral vision and at the last second sharply directs his hands towards the projectile and catches it when it has already passed over the defender's head.
Combined
The combination of different techniques is aerobatics, this is how the most powerful and effective deception maneuvers are performed. In one chain of actions, feints with arms, legs, ball, head, shoulders can be combined. To learn how to connect complex actions and create strong combinations, you need a perfectly developed technique for each of them individually and in combinations. This is how leading players confuse opponents, make the position of a defender or another representative of the other team unprofitable. This skill also comes with experience and practice.
Special feints
Despite the name, there is nothing complicated in them, they are practiced like any other actions. Such feints are performed from a position next to the opponents' shield, everyone needs to learn how to perform both standing facing the basket and with their backs to it. Do not neglect these techniques, even if you play basketball for your own pleasure and do not pretend to be a professional. They are also relevant in amateur basketball, if you are interested in getting acquainted with the features of a non-professional direction, then they are presented in the material “Amateur basketball - how and where to play?”.
Up and down
After receiving the pass, the player quickly lifts the ball up, taking such a stance as if he intends to immediately send it into the ring. The defender must react to this and rush to the attacker, his task is to intercept the throw.


 This helps stabilise your shot and accelerate you to the basket.
 The basketball lay up can be done with or without the backboard.
 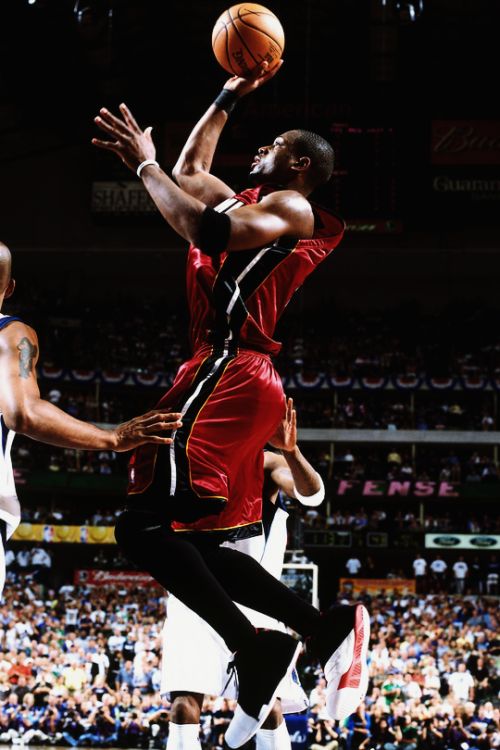 Here, the lay up is faked to bring the opponent out of position.
 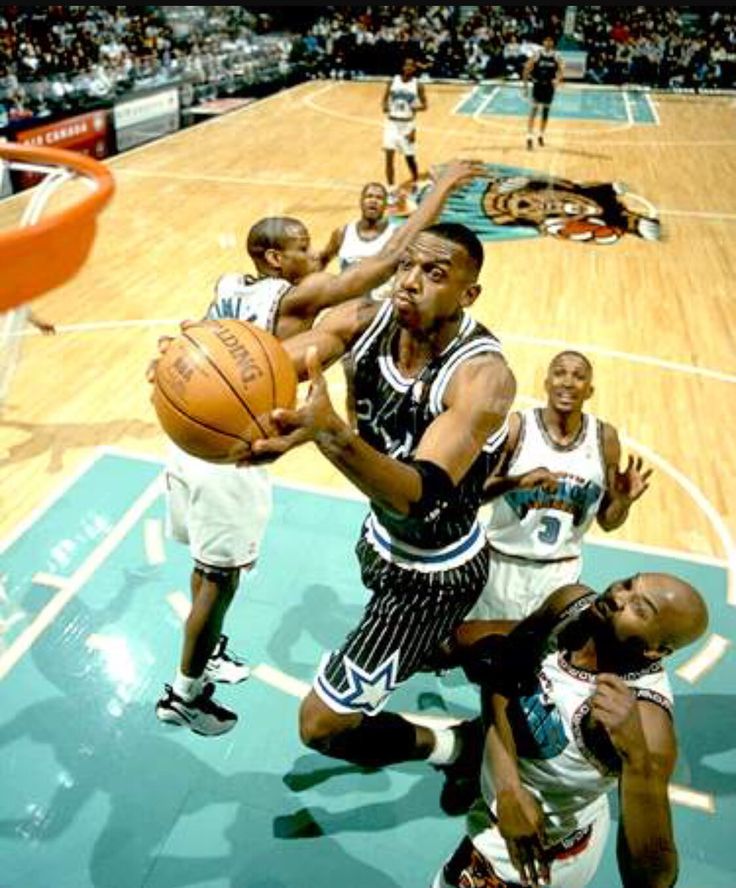 Then repeat step 2.
 ”
”


 Start with feet together
 As this foot touches the ground, the player should take one dribble with their right hand.
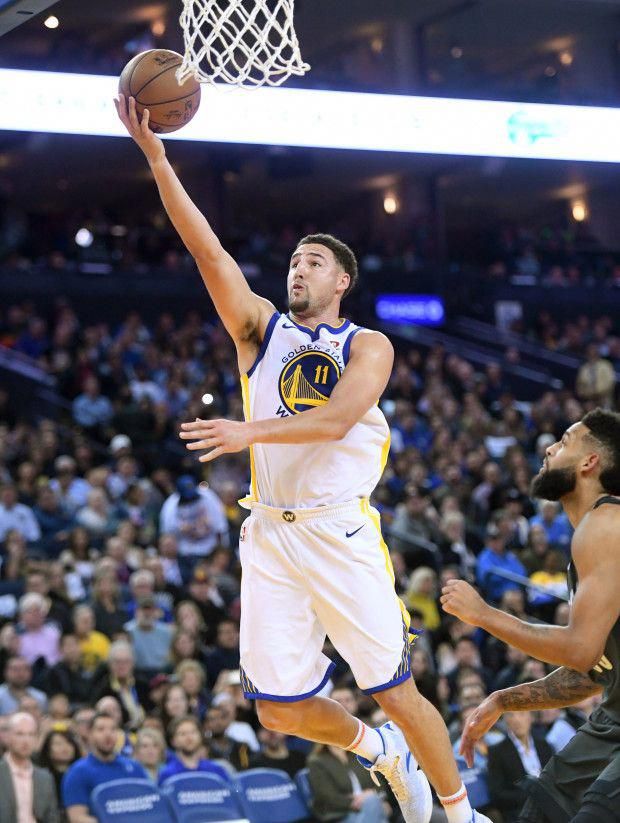 Catch and Layup
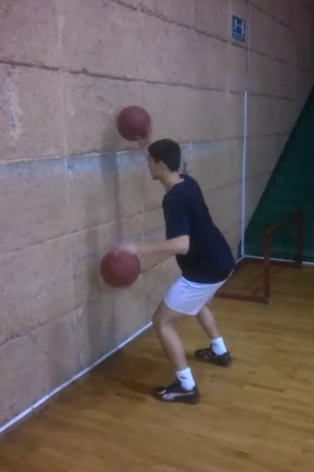
 This involves jumping off the same foot you’re shooting with. For example, jumping off the right foot for a right-hand layup.
 Practice Against Real Defenders
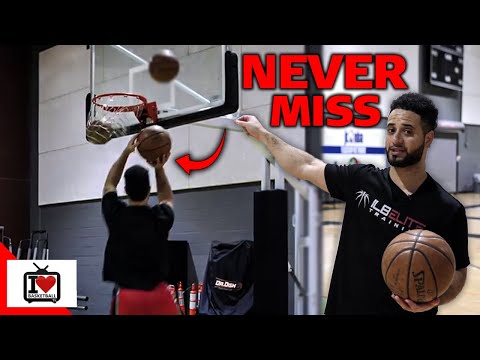 Then this sport began to gain popularity in educational institutions in the United States. At the beginning of the 20th century, basketball was formed into a professional sport with the formation of club teams. Gradually, this game is gaining worldwide popularity and stands out as an independent sport in other countries. Basketball's evolution culminates in its inclusion in the 1919 Summer Olympics.36 and around it grows a whole industry.
 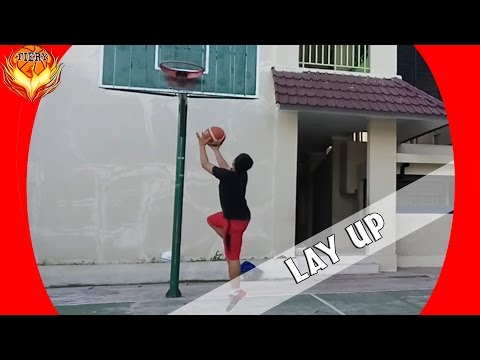 Today there are many brands that produce balls. They differ in quality and price. Our top 10 best basketballs of 2022 will help you navigate this variety. And our expert Artem Samsonov will give some recommendations on choosing a ball that suits your goals.
  ru
ru  The tire is made of polyurethane, the model is quite wear-resistant. The camera, already quite familiar, is made of butyl. The ball has been certified by FIBA. The standard size - 7 - is optimal for the game.
 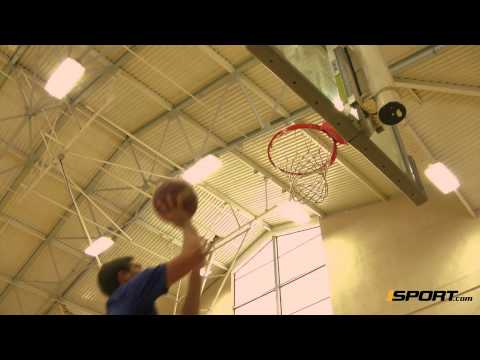 Photo: market.yandex.ru
  Dobest PK-884 Dobest PK-884. Photo: market.yandex.ru
  yandex.ru
  It is customary to divide the balls into three classes:
  Size 6 is the standard size for a women's basketball and has a mass in the range of 510-567 grams and a circumference ranging from 724 to 737 mm. For mini-basketball games, a size 5 ball is used. It can be determined by the circumference within 690-710 mm and weight 470-500 grams. Usually such competitions are held for children no older than twelve years. And size 3 is used in basketball training to hone dribbling. The ball of this size category has a weight in the region of 300-330 grams and a circumference of 560-580 mm.
  A well-made and properly inflated ball should bounce to a height of about 130 centimeters. But there is another way: raise the ball to the level of your head and let it go. Then he should bounce to the level of the belt. It is also important to inspect the nipple. The durability of the ball depends on its performance. Flexibility is another sign of quality. After a short play, the ball should not become soft. It is important to remember that a special nozzle is needed when pumping, a football needle is not the best option. Also, do not kick and sit on a basketball. Careful operation significantly extends the service life and contributes to the adequate "behavior" of the ball during the game.
  If you started playing recently, then you will have to study them first of all. It also does not hurt to study the basic principles of the game, they are presented in the material “How to learn to play basketball?”.
  For high-quality performance you will need:
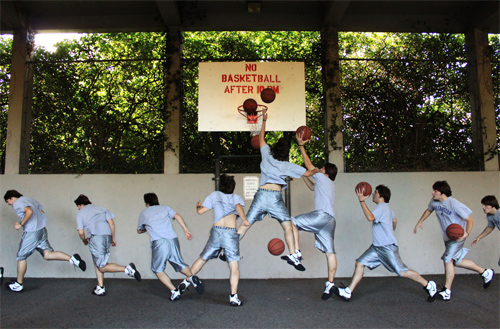
 The faster the step is completed and the shorter it is, the better. The supporting leg does not rise, it remains fixed until the ball is passed.
  It is important to learn to notice changes in the gaze of opponents, but at the same time remember that the eyes can deceive, and also use this technique to your advantage.
  This skill also comes with experience and practice.