Home »
Misc »
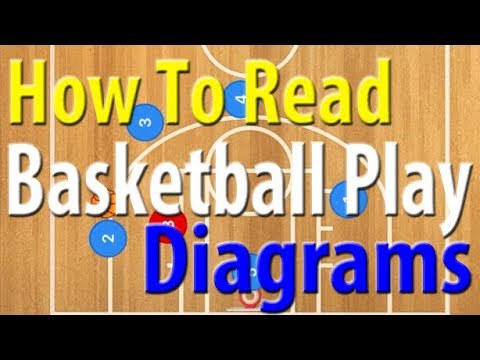
How to diagram basketball plays
How to diagram basketball plays
How to Draw & Read Basketball Plays
If you pay attention during basketball timeouts you’ll often see the coaches drawing up plays on a clipboard. Done right, this is the easiest way to communicate the next play to your players, and make sure that everyone knows exactly what to do. Done wrong, you’ll have a bunch of confused players that are not on the same page, often leading to broken plays.
To avoid misunderstandings on the court it is important that coaches know how to draw basketball plays, and equally important, players must also be able to read the play. This article will explain in detail everything you need to know about how to diagram basketball plays.
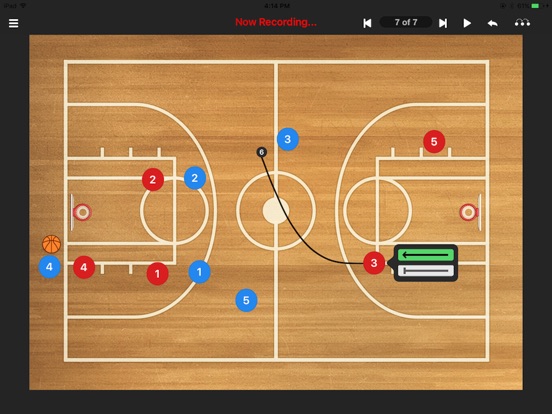
Drawing Basketball Plays
Step 1: Draw The Players
Players are drawn as numbers 1 to 5 according to their position.
- 1 = Point Guard
- 2 = Shooting Guard
- 3 = Small Forward
- 4 = Power Forward
- 5 = Center
Player with ball:
Highlighted by a circle around the number of the player
Offensive Player without ball:
Shown as a simple number
Defensive Player:
Defensive Players are marked using a large X
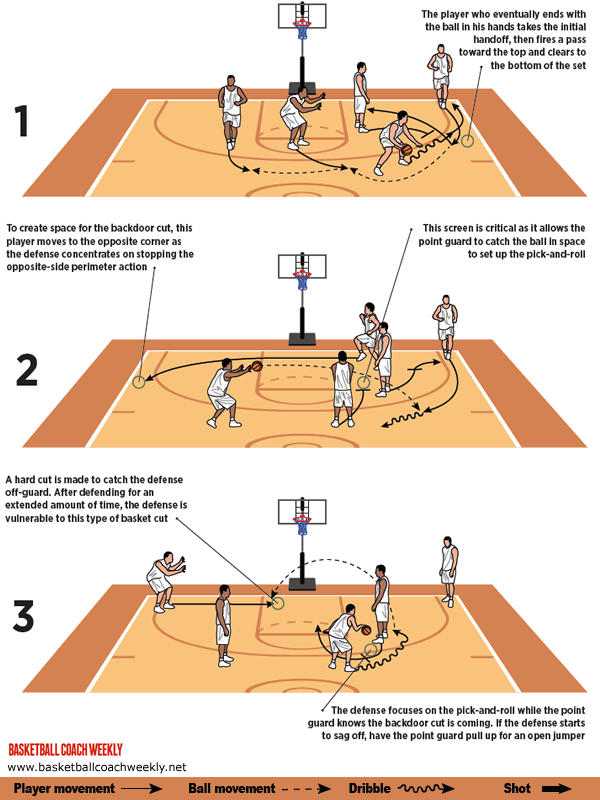
Step 2: Draw Actions
Screen: A screen is drawn as a solid line with a T-shaped end in the direction of the screen.![]()
Cut / Player Movement: A cut is drawn as a solid line with an arrow pointing into the direction of the player movement.
Pass: A pass is drawn as a dashed line pointing from the player with the ball towards the receiver of the pass.
Dribble: A dribble is drawn as a wavy line originating from the player with the ball and ending at the end of the dribble.
Handoff: A handoff is drawn as a a line crossed by two other lines at the position where the handoff is to occur.
Apps to Draw Basketball Plays
The easiest way to draw up basketball plays (other than using a clipboard) is using a play creator app.
The most popular and widely used app is Fast Draw. However, this app has been around since the early 2000’s and it’s clearly showing its age. It can’t be used on the web, instead you are forced to download a pretty clunky desktop app (or an iPad version that hasn’t been updated since 2016!).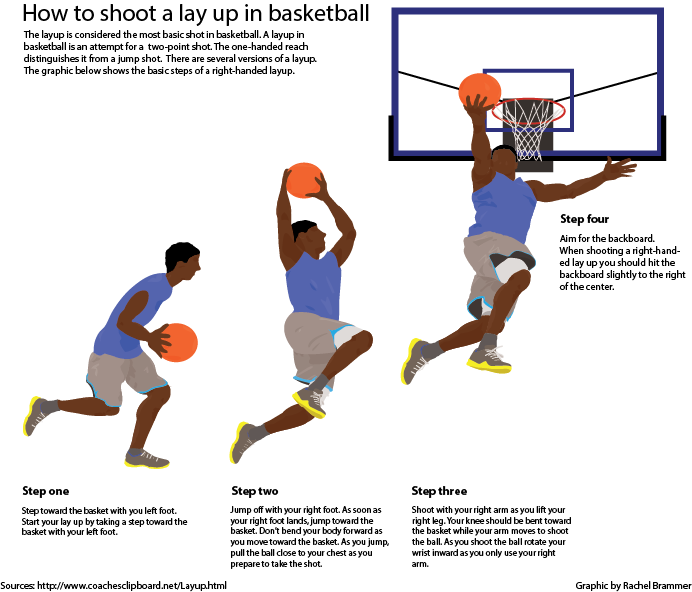
Alternative to Fast Draw
On thehoopsgeek.com, we have created an easy web app that allows you to create plays using an intuitive drag & drop interface. You can also print your plays and share them with players and coaches using shareable links.
Watch this video on YouTube
The diagram app is free to use and doesn’t require a sign up, you can literally start creating your plays within seconds!
Any questions?
If you have any questions about how to draw up basketball plays in general or about how to use the Play Creator app feel free to ask in the comments!
12 Simple Basketball Plays for Kids (2022 Update)
If you’ve ever coached young kids before, you’ll understand the need to keep basketball as simple as possible.
When you overwhelm kids with information and send them out onto the basketball court, it can develop into a chaotic mess very quickly.
This is especially important when it comes to basketball plays.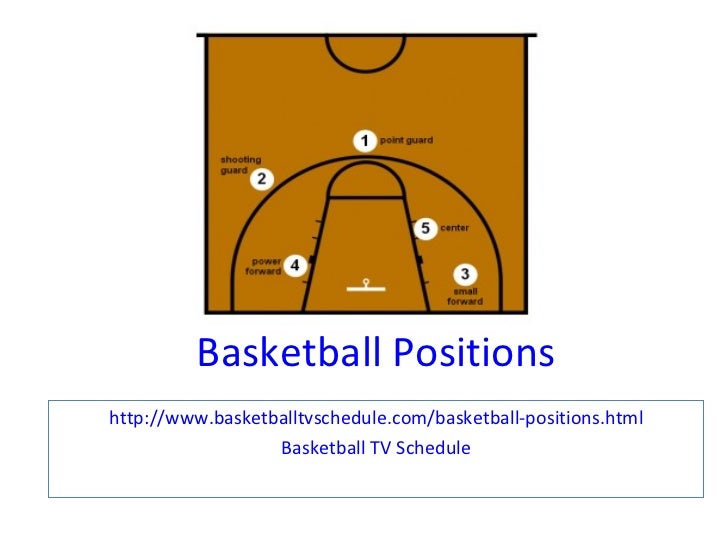
When plays are too complex there is very little chance kids will be able to execute them effectively during a game.
When coaching kids you need simple basketball plays.
I don’t recommend coaches run plays often (it’s better to have a base decision-making offense), but there’s nothing wrong with memorizing a couple of plays to draw up near the end of a game when your team desperately needs a score.
Below I’ll share 7 simple basketball plays that are easy to teach, very effective, and simple for your players to execute during games.
Here we go!
1. GhostOverview of the Play:This play involves an up-screen for the guard leading to an open key. This can often lead to a simple pass inside and easy layup. If that option isn’t available, the post player sets a screen on the wing.
Key Personnel:- 5 should be a post player or the best screener on the team.
- 2 should be the player you want dribbling in a pick-and-roll.

- 1 should have the ability to finish at the rim with pressure.
Instructions:Setup: The play begins in a 4-out 1-in formation with the 4 perimeter players above or in-line with the free-throw line.
1. The play starts with the point guard (1) making the pass to 2 on the wing.
2. As this pass is made, 5 sprints up and sets a strong screen on the back of 1’s defender as 1 cuts off the screen towards the rim.
3. If this pass is open, 2 will make the pass inside the key to 1 for the layup.
4. If the layup isn’t available, 1 clears out to the weak-side corner.
5. 5 will then immediately set an on-ball screen for 2 on the wing.
6. 2 attacks the rim off 5’s screen as 5 rolls to the rim looking to create an opportunity to score.
7. As 2 is driving to the rim, 3 and 4 slide up and into open passing lanes for the potential open shot and also to play safety.
Coaching Points:- It’s crucial that 5 ‘hunts’ for the 1’s defender and then sets a strong screen if there’s going to be a chance for the pass inside and open layup.
- 1 can cut ball-side or weak-side of the screen and should direct themselves towards the ball-side block looking to receive the basketball.
- 2 must be able to make smart decisions out of the wing spot.
2. BlackOverview of the Play:A quick play to catch the defense off-guard give the wing player an opportunity to attack the baseline. Also involves the opposite post flashing to the key to counter the defense stepping across to help.
Key Personnel:- The player who first receives the basketball on the wing (2) should be the player you want attacking the rim.
- 4 can be any player as long as they can set a strong screen.
Instructions:Setup: The play starts in a 5-out formation with the post players in the corners.
1. The play starts with the point guard (1) passing to either wing. In this case, passing to 2.
2. As soon as this pass is made, the corner steps up and sets a strong screen on the wing player’s defender.
3. 2 immediately rips the basketball through and attack the baseline.
4. If the defense is set up correctly, 5’s defender will be in help position. To take advantage of the help, 5 flashes into the key and creates an angle for the correct pass.
5. 2 should either finish the drive or drop the pass to 5 for the score inside. 3 will be open on the perimeter if the defense rotates down correctly.
Coaching Points:- It’s incredibly important that 4 steps up to set the screen as soon as the pass is made to the wing. The timing of this screen is very important.
- The angle of the screen that 4 sets is very important too. If the screen is set too high, 2’s defender can easily slip under and prevent the drive.
 The screen must be set on the backside of 2’s defender.
- This can be an easy play for the opponent to pick up on if ran too many times, but it’s great for a quick score when your team needs one occasionally.
3. IsolateOverview of the Play:This play involves isolating your best mismatch on the low post and then keeping the 4 other offensive players active above the free-throw line to keep the defense busy. Great play against youth teams as most players don’t understand help defense and will stay with their player.
Key Personnel:- 5 should be the player you want to isolate inside.
Instructions:Setup: Players start in a 4-out 1-in formation with the 4 outside players above the free-throw line on the wings and in the slots.
1. The play begins with the basketball being passed either wing. For this example, 1 passes the basketball to 3 on the ball-side wing.
2. 5 immediately flashes to the basketball to take advantage of their mismatch inside.
3. When the pass is made into the low post, the wing players both screen up for the slot players and they both replace each other. This keeps the defenders occupied.
4. 5 can back down in the post or face up and attack to the middle or baseline.
Coaching Points:- This play can be used to take advantage of any mismatch in the post. This doesn’t necessarily mean a post player and can even be your point guard if they have a favorable mismatch inside.
- This is a great play to use against a player who is in foul trouble. Put their match up on the block and have your offensive player attack them off the dribble and they’ll likely foul.
- Unless it’s completely open, players should refrain from passing into the post from the slot position as this can be easier for the defense to deflect or steal.
4. WhiteOverview of the Play:This is the perfect play to achieve a basic pick-and-roll with good spacing on the floor. The simplicity allows the play to be run effectively by teams of any age.
Key Personnel:- The player who will have the screen set for them (3) will be the first player to receive a pass on the wing. Ensure this is who you want in the pick-and-roll.
- The screener (4) will always be the post player on the opposite block.
Instructions:Setup: The play starts in a 3-out 2-in formation.
1. The play begins with the point guard (1) making a pass to either wing. Preferably to the player who you want to be the dribbler in the pick-and-roll (3).
2. 1 will immediately cut through to the opposite corner after making the pass to the wing.
3. The post player on the ball-side low block (5) will step out to the corner dragging the post defender out of the key.
4. 4 will then sprint off the weak-side low block and set a screen on the correct angle for 3.
5. 3 attacks the rim looking to score and 4 rolls to the hoop.
6. 2 slides to the top of the key for safety.
Coaching Points:- The main scoring options will be for 3 to finish at the rim, pass to 4 rolling to the hoop, or kick out to 1 in the corner if their defender helps.
- 4 must sprint off the low block before setting the screen. It’s important for 4 to create separation between themselves and their defender.
- 3 should attack the rim looking to score first as that’s the option that will most often be open.
- If possible, put the player who you want to dribble off the screen on the correct side so that they’ll be attacking and finishing with their dominant hand.
5. FlipOverview of the Play:An incredibly simple play that often leads to an open layup under the basket. Involves a cross-screen at the top of the key and then two players attacking the rim.
Key Personnel:- 1 should be the team’s best passer.
- 4 and 5 should be players with the ability to finish at the rim under pressure.
Instructions:Setup: The play begins in a box formation with the two bigs on the elbows and the two guards on the low blocks.
1. 1 slaps the basketball to star the play and the 2 and 3 immediately flash out to the corners calling for the ball to drag their defenders out.
2. The post player on the ball-side (5) sets a cross screen for 4.
3. 4 immediately flashes towards the ball-side low block calling for the basketball.
4. After screening, 5 seals off 4’s defender and then flashes to the basketball on the opposite side of the rim calling for the basketball.
5. 1 reads the defense and makes the correct pass in for the layup.
Coaching Points:- 5 must set the screen on the correct angle that doesn’t allow 4’s defender to slip under the screen and beat 4 to the rim. The screen should be set on the back hip.
- The post players must have target hands where they want the basketball as they’re flashing towards the rim.
- 3 can cut to the top of the key and receive the lob pass over the top if the pass to 4 or 5 isn’t available.
6. Yo-YoOverview of the Play:This simple basketball play begins in a box formation and is designed to get the basketball to either of two post players cutting off up-screens to the basket for a layup.
Key Personnel:- 5 and 4 should be the players most capable of finishing at the rim with tight defense and will most likely be the post players of the team.
- 2 and 3 must be able to set strong screens and will most likely be the guards.
Instructions:Setup: The play starts in a box formation with the bigs on the elbows and guards on the low blocks.
1. The play begins with 2 and 3 stepping up and setting screens for 4 and 5.
2. 4 and 5 both immediately cut to the outside of the screen and explode to the basket.
3. 1 will make the pass to 4 or 5 for the finish.
4. If the pass in unable to be made to 4 or 5, 3 cuts to the wing and receives the pass for the midrange shot or to bring the basketball back out and set up.
Coaching Points:- The two players on the low blocks planning to set screens should not start the play facing the direction they’re going to screen. Instead, they should face each other in order to not give away that play the team is in.
- The screeners must seek out the defenders and set strong screens.
 The screen should be the only thing on the screener’s mind.
- 4 and 5 must do their best to stay to their own sides when cutting to the rim. If they get too close, one defender will be able to deflect a pass to either offensive player.
7. ProwlOverview of the Play:A quick sideline out of bounds play that begins in a box formation and ends with a ball-screen at the top of the key with good spacing.
Key Personnel:- 2 should be the player you want as the dribbler in the pick-and-roll.
- 5 should be the player you want as the screener in the pick-and-roll.
Instructions:Setup: The play starts in a box formation.
1. The play begins with the post players (4 and 5) setting down screens for the guards (2 and 3).
2. 2 cuts to the top and receives the basketball while 3 pops out to the weak-side wing.
3. After making this pass, 1 steps inbounds to the wing.
4. 5 immediately sprints up and sets an on-ball screen for 2 who attacks the rim.
5. 2 can either finish at the basket or drop the pass down to 4 for the finish if 4’s defender helps on the drive.
Coaching Points:- 5 must set the screen on the correct angle to prevent 2’s defender from slipping under the screen.
- 5 should also aim to create as much separation as possible between themselves and their defender by exploding out to set the screen. This prevents their defender from hedging.
- 2 must be a good decision maker when attacking. If 4’s defender steps up to help, pass. If they don’t, finish at the rim.
8. Cross BLOBOverview of the Play:Simple inbounds play that includes an inbound pass to the weak side, then a cross screen for a player able to score inside the paint.
Key Personnel:- 5 should be the team’s strongest post player.
- 3 should be a player capable of setting a strong screen.
Instructions:Setup: The play begins in a box formation, with the post players on the ball side.
1. The play starts with 2 cutting towards the inbounder then turning and sprinting to the weak-side corner of 3’s screen.
2. 1 inbounds the ball to 2, then fills the opposite corner.
3. Now 3 sets the cross screen on 5’s defender, and 5 looks to receive the pass close to the basket and finish.
Coaching Points:- 3 must aim for 5’s defender, set a strong screen and hold as long as possible.
- Since the inbound pass to the opposite side can sometimes be difficult to execute, the inbounder should not give away where the inbound pass will go – advise them to fake a pass to the ball side before passing to the opposite corner.
- This play is designed to catch the defense by surprise – if you use it too often the defense will catch up and defend more easily.
9. Cross SLOBOverview of the Play:This play will work great for teams with a dominant post player. The play involves two quick passes to get the basketball to the opposite wing, then a cross screen for a player able to score inside the paint.
Key Personnel:- 5 should be the team’s strongest post player.
- 3 should be a player capable of setting a strong screen.
Instructions:Setup: The play begins in a box formation, with the post players on the ball side.
1. The play starts with 4 setting a screen on 2’s defender, and 2 pops out towards the inbounder to receive the inbound pass.
2. After setting the screen, 4 immediately continues to the weak-side wing.
3. 2 passes the basketball to 4, and about the same time 3 sets a cross screen for 5, who looks to receive the pass from 4 and finish at the basket.
4. If the defense helps and manages to prevent the pass to 5 inside, 3 should look to receive the pass around the high post position for a midrange shot.
Coaching Points:- 3 must set a strong screen on 5’s defender.
- After setting the screen on 5’s defender, 3 must look to receive the pass around the free-throw line for an open midrange shot if 5 is closed down.
10. Guard Isolation
Overview of the Play:This simple play involves good spacing and an isolation for the team’s best guard, and then a quick solution if nothing develops out of 1-on-1 play.
Key Personnel:- 1 should be a player able to find scoring opportunities out of a 1-on-1 play.
- The play works best if both 2 and 3 are decent outside shooters.
Instructions:Setup: The play starts in a 5-out formation, with shooters in the corners of the court.
1. In this play, 1 attempts to exploit the space and score 1-on-1 against the defender.
2. If either of the defenders helps on the drive, one of the players around the perimeter will be open for a shot.
3. If 1 passes to 4 or 5 on the wing, the corner player on this side of the floor moves up and around the receiver for a handoff pass, and then immediately attacks the middle of the floor looking to score.
Coaching Points:- 2 and 3 should be ready to shoot on the catch.
- This play is designed to get your best scorer a chance to play 1-on-1 with good spacing, but you shouldn’t use it too often because the other four players on the floor are quite stagnant.
11. Quick StaggerOverview of the Play:This play involves a staggered screen at the beginning of the play, where there should be an opportunity for either a layup or a midrange shot.
Key Personnel:- 1 should be the team’s best decision maker.
- 4 should be a player able to hit midrange shots at a high percentage.
Instructions:Setup: The play starts in a 3-out 2-in formation.
1. 1 dribbles towards the wing on 4’s side of the floor, and 2 slides towards the corner.
2. Now 5 and 4 set a staggered screen for 3 on the weak side, and 3 cuts off the screen towards the basket looking to receive a pass and finish.
3. 4 tries to hold 3’s defender as long as possible, and then flashes towards the ball-side elbow looking to receive the pass from 1 and take a midrange shot if their defender helps on the screen and prevents a pass to 3.
Coaching Points:- 4 and 5 must set strong screens on 3’s defender.
- 1 must look for 3 cutting to the basket as a first option, and if this option isn’t available, 4 should be open at the high post position.
12. Screen & RollOverview of the Play:A quick and simple play that involves a pick-and-roll right away at the start of the play, but with a back screen for the screener who rolls towards the basket.
Key Personnel:- 5 should be a player able to roll to the basket quickly and finish strong.
- 4 can be any player as long as they can set a strong screen.
Instructions:Setup: The play begins in a 1-4 high set.
1. 1 dribbles towards 5’s side of the floor, and 5 moves up to set the ball screen.
2. The intention of this screen is to engage 5’s defender more than we expect to actually provide an advantage, and while 5 moves up to set the ball screen, 4 moves towards the middle of the floor to create a good angle and set a strong back screen on 5’s defender.
3. 5 rolls off the 4’s back screen and looks to receive a pass from 1 and finish at the basket.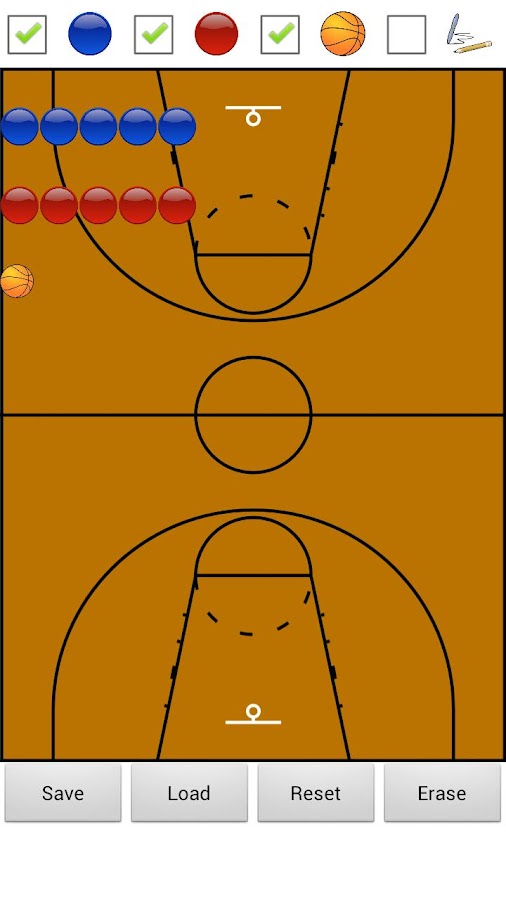
4. After setting the screen, 4 pops up to the top of the key to receive a pass – more often than not both 4’s and 5’s defender will focus on preventing 5 from cutting completely open, and 4 can be open for a shot.
Coaching Points:- Timing of 4’s back screen is crucial for the play to be successful. It should occur immediately after 5 sets the ball screen on 1’s defender and begins rolling to the basket.
- 1 shouldn’t rush the pass to 5 inside the paint. In case 5 is not in a good position to receive the pass and score, 4 could be open at the top of the key.
- This play can be run on either side of the floor, in case both 4 and 5 are able to set proper screens and finish strong at the basket.
How to draw a basketball hoop and ball step by step Easy Drawing Tutorials
Basketball is an iconic American sport. Its legendary players such as Michael Jordan and LeBron James are considered heroes.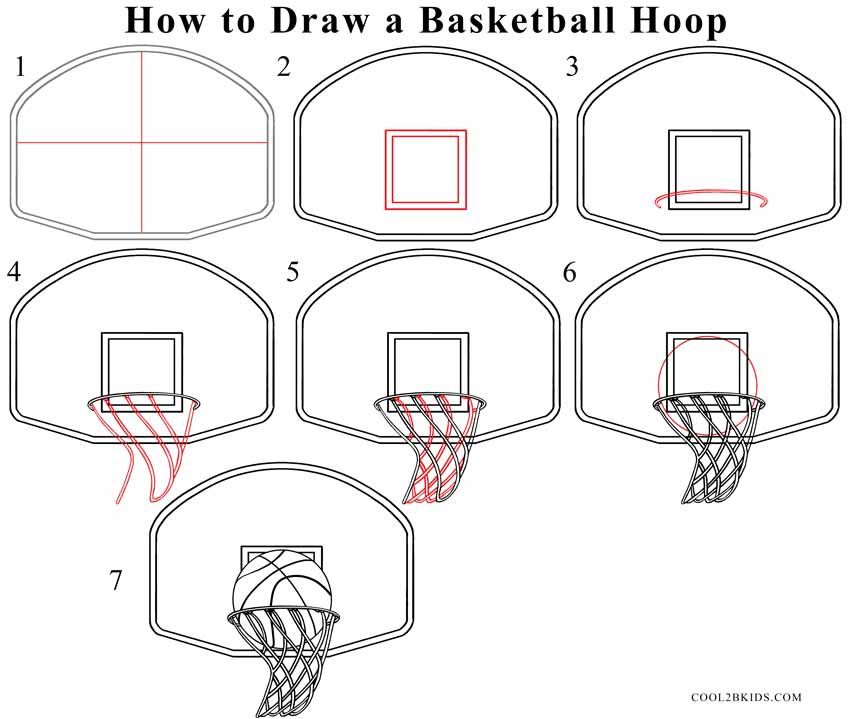 Today it is the only sport whose origin lies exclusively in America.
How did basketball start? It was a rainy day in 1891. James Naismith taught physical education at the YMCA in Massachusetts. Stuck inside, what was his class supposed to do? With a soccer ball and two hemisphere peach baskets, Naismith invented the game we now call basketball.
School football teams helped popularize the sport; when the weather was too cold to practice outside, they would go inside and play basketball.
Did you know? Early basketball baskets had a bottom, so each time a point was scored, the ball had to be retrieved from the basket. The bottom of the basket was later removed, but the balls were too big to fall through. Instead, a long pole was used to push the ball out of the top of the basket.
Actual baskets were used until 1906 when a metal rim and backplate was introduced. The rear shield also prevented fans with balcony seats from getting in the way of shots and allowed for rebound.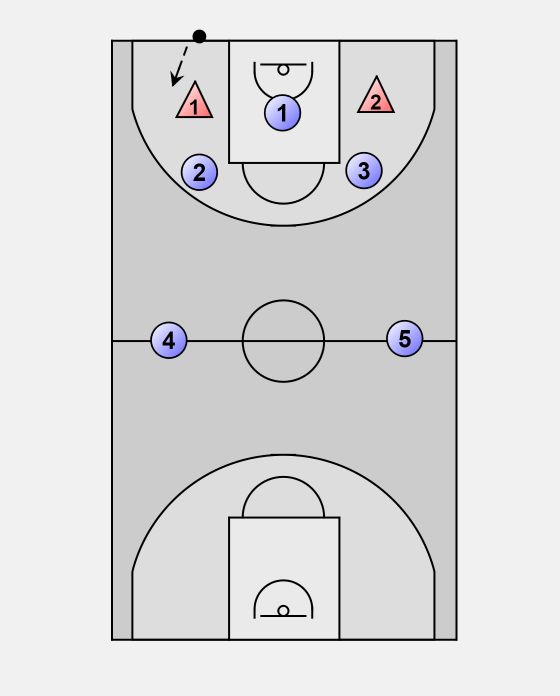
From its humble roots, basketball has spread throughout the world. Not only do professional teams exist in many countries, but public parks often have outdoor basketball courts.
Recreational basketballs can be seen outside houses and on the streets. This half-court version of the game is often referred to as "streetball". Other side effects of the game, including a beach version that allows you to carry a ball, have been invented.
Would you like to draw a basketball? Doing so is easier than ever with this easy, step-by-step drawing guide. All you need is a pencil, pen or marker and a sheet of paper. You can also color your finished drawing.
If you liked this tutorial, see also the following drawing guides: Baseball Bat, Baseball Cap, and Basketball Player.
Basketball Hoop Step by Step Instructions
1. Start by drawing a flattened oval. Then draw a smaller oval inside the first one. This forms the rim of the basketball hoop.
2. Extend two straight lines horizontally from one side of the rim. The top line should be longer than the other. Then extend lines down from the ends of those lines. Connect them at the bottom using a straight line. This connects the rim to the back panel.
3. Draw a curved line down one side of the rim. This starts the outline of the network.
4. Draw a curved line down from the other side of the rim. Connect the lines at the bottom using a wavy, irregular line. Then draw diagonal parallel lines across the net. Follow them in parallel lines on the opposite diagonal. The result will be a hatch or checkerboard pattern that indicates the lines of the network.
OTHER EASY DRAWING GUIDES:
5. Draw perpendicular diagonal lines in the inner oval of the hoop, indicating the opposite side of the mesh.
6. Draw a circle covering the bottom of the net. This will become basketball.
7. Draw a curved line across the basketball. Perpendicular to this line, draw three additional curved lines. These are basketball stitches.
8. Draw a four-sided shape using four straight lines. The extension from the rim should be in the center of this shape. It's a basketball shield.
OTHER EASY DRAWING GUIDES:
9. Draw a smaller four-sided shape inside the first one. Extend a pair of straight lines from the rim to the point where it attaches to the backrest, providing additional support for the rim.
Whoosh! It was nothing but a network. Check out our drawing guides for tips on how to put together your team.
The Complete Basketball Hoop Drawing Tutorial in One Image
Like this Drawing Guide?
Leave a comment below or follow on Pinterest.
How to Draw a Basketball - Step by Step Drawing Tutorials
Basketball is the only mobile equipment needed to play the game of the same name. Basketball has become an American icon; in fact, it is the only major sport that originated entirely in America.
Basketball is a relatively young sport. In 1891, a physical education teacher at a college in Massachusetts was instructed to develop a new game "for the amusement of schoolchildren in the winter." The teacher organized eighteen young people into two teams and appointed team captains for each.
The first basketball game was played with a soccer ball; the targets consisted of half-bushel-sized peach baskets that hung at each end of the gymnasium. During the game, the guys scored only one point.
The first basketball baskets had bottoms; The referees were supposed to pick up the balls when the basket was made. By the early 1900s, the first string nets were being used. Early basketballs were made from leather, which worked well on indoor courts but was damaged by the asphalt surface of outdoor courts. By the 1990s, most consumer basketballs were made from rubber or other durable materials to alleviate this problem.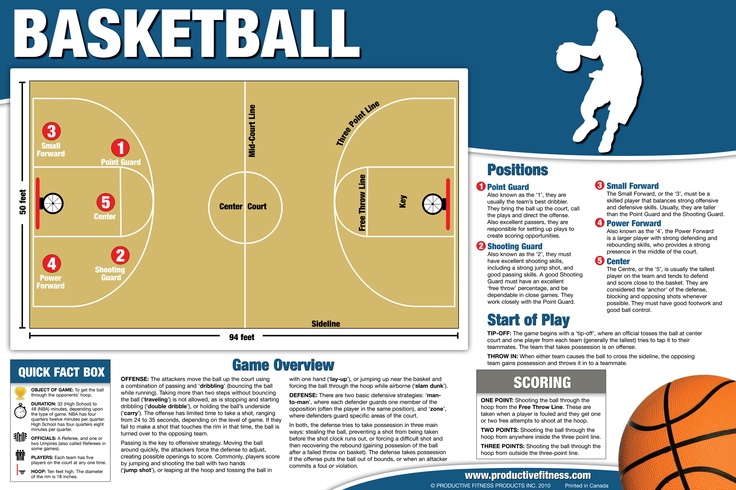
Did you know? Warm basketballs bounce better than cold ones because materials are more flexible in warm conditions. Professional basketball should be able to bounce about four feet when dropped from a height of six feet. Today, basketball is a symbol of both the sport and athletics in general.
Dive into the game and hone your skills with this easy, step-by-step basketball lesson. All you need is a pencil, a piece of paper and an eraser. You can also use markers, crayons, crayons or whatever to shade your finished basketball!.
If you liked this tutorial, see also the following drawing guides: Guitar, Soccer Ball, and Teddy Bear with Heart.
Basketball Step by Step Instructions
1. Start by drawing a circle. This outlines the shape of basketball.
2. Draw a curved line across the basketball, not in the center but close to one side. This is the first edge of the ball or recessed lines.
3. Draw another curved line going in the opposite direction and intersecting the first one at a perpendicular angle. This is the second edge of the ball.
4. Draw a curved line from the side of the basketball to a vertical curved line, forming another edge.
OTHER EASY DRAWING GUIDES:
5. Continue the edge drawn in the previous step on the other side of the vertical line, attaching it to the edge of the ball on the opposite side.
6. Next, draw a curved rib line below the horizontal line, extending from the side of the ball to the vertical rib line.
7. Continue the line on the other side of the vertical rib, continuing towards the ball.
8. Next, you'll specify the depth of the recessed lines, giving the ball a three-dimensional look. To do this, draw a curved line parallel to the vertical and horizontal lines of the ribs.
OTHER EASY DRAWING GUIDES:
9. Draw curved lines parallel to those of the upper and lower ribs. Then, carefully erase the guide lines from the dots that the lines intersect each other with.