Home »
Misc »
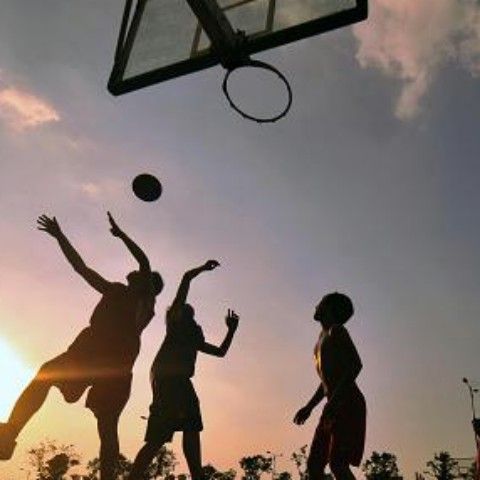
How to find your shot in basketball
How to find your shot in basketball
Proper Basketball Shooting Technique, Fundamentals, Form, Mechanics
By Jeff Haefner
Home > Player > Basketball Skills > Shooting > Proper Basketball Shooting Technique, Fundamentals, and Form
It's often said that great shooters have a place on any team.
Even if you aren't blessed with tremendous speed, strength or athleticism, great shooting is one of the surest ways you can stand out on the basketball court.
If you spend the time developing and practicing your shot, it will pay off in:
- Making the team
- Getting more playing time
- Scoring consistently
- Feeling confident and having fun every time you step on the floor
Now, let me start with some good news!
Yes, you do need very good shooting form and technique to shoot consistently well.
But it does NOT need to be "perfect".
If you watch enough great shooters, you'll see that their form varies quite a bit based on what's comfortable (and what works) for them.![]()
But almost all great shooters follow the principles I'll explain in this article. So keep reading for (all the good stuff)!
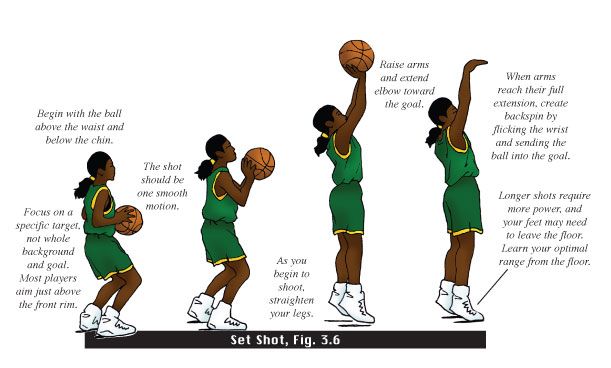
In this section, we give you the raw form and mechanics of stationary shooting.
In other words, this section does NOT address the fundamentals of shooting on the move and more advanced footwork you'll need for game situations.
Here's a quick roadmap of the stationary shooting fundamentals that we'll be covering:
- Eyes on Target
- Stance and Balance
- Shot Pocket
- Grip
- Balance Hand
- Delivery
- Upforce and Landing
- Follow Through
- Correct Shot
EYES ON TARGET- To improve accuracy, locate the target (rim) as early as possible.
- Keep your eyes on the target and do not follow the flight of the ball.
 - Keeping your target focus is very important!
|
STANCE AND BALANCE- Feet are shoulder width apart for good balance.
- Feet should be in a slightly staggered stance that is consistent and comfortable for you. Your shooting foot is slightly ahead of the non-shooting foot in a comfortable position.
- Point your feet in the general direction of the basket, but not necessarily directly at it. We prefer an open stance, but you can also use the closed (squared) stance if that's more comfortable for you. With an open stance, your feet point towards one side of the basket. For example, a right handed shooter will point his or her feet just to the left of the rim for a more natural position and shooting motion.
- Once you develop a comfortable stance, line up your feet the exact same way on every shot. Whatever stance you use, consistency is critical.
- Flex/bend your knees on every shot.
|
SHOT POCKET- As you catch the ball, move it quickly into the shot pocket.
- Line everything up so the ball and your shooting eye form a straight line to the basket. This is VERY important.
- Position the ball several inches above your waist.
- Grip the ball properly and be ready to shoot.
- Position the ball in your shot pocket the SAME way every time you catch it.
|
GRIP- Place the air hole between the middle and index fingers.
- Line up your fingertip pads parallel to the long seams of the ball, so you can monitor the back spin.
- Leave space between the ball and the middle of your palm. You should be able to insert a pencil between the ball and your palm area.
|
|
- Spread your fingers far enough apart to comfortably balance the ball in one hand.
 - The ball should sit on your finger pads.
|
|
BALANCE HAND- Your non-shooting hand should be on the side of the ball.
- Your balance hand should not add force or spin to the shot.
|
|
- Your non-shooting hand should not move on delivery and should ALWAYS come off the ball FIRST.
|
|
DELIVERY- The ball should start motion directly upwards from the shot pocket.
- Your elbow should be positioned comfortably under the ball.
- The ball stays in front of you and should not go behind your head.
|
|
- Uncoil your body with your legs, core, and arm power all coordinated.
- Your elbow and wrist should extend in a straight line to the basket.
|
|
- Your shooting hand should extend in a straight line to the rim.
- Hand position on delivery is very important. The ball should come off the hand with perfect symmetrical backspin.
- As shown in the picture to the right, your guide hand stays to the side and does not influence the flight of the ball.
|
|
UPFORCE AND LANDING- Release the ball on the way up, just before the top of your jump.
- Use your legs to generate upforce.
- You should land in the same spot that you jumped, which shows that you have good balance on your shot.
|
|
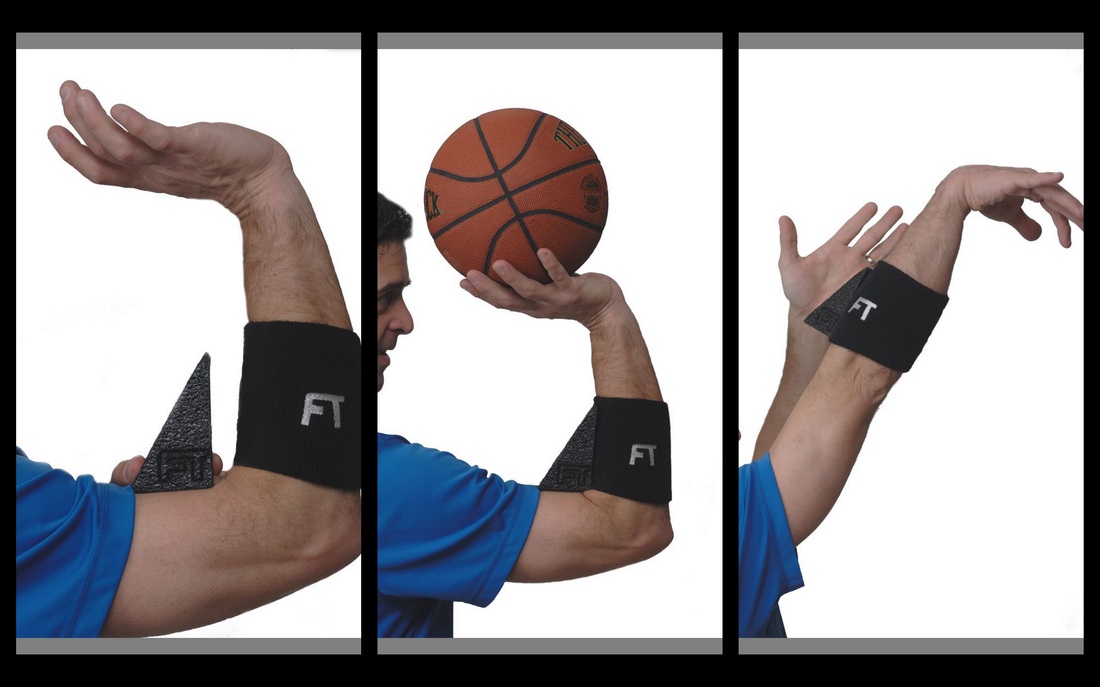
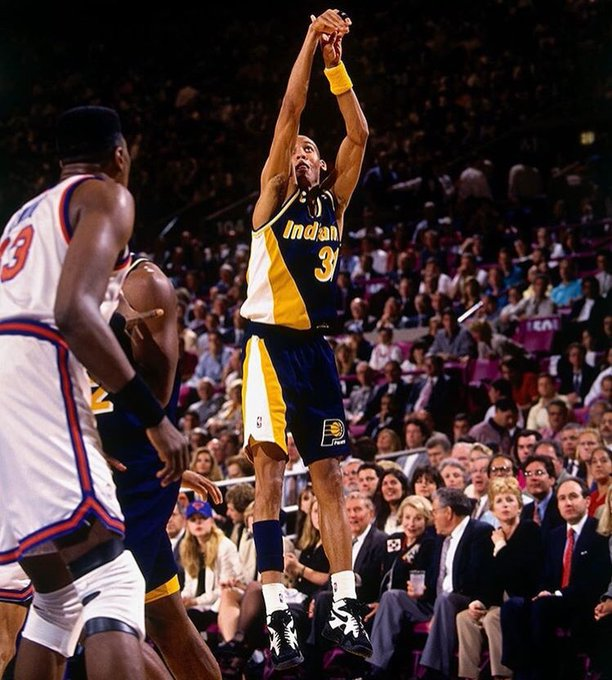
FOLLOW-THROUGH- Your wrists should be floppy (relaxed).
- Fingers should be pointed at the target (rim).
- Finish high. You should see your fingers at the top square of the back board.
- Hold your follow through position until the ball hits the rim.
|
NOTE: If youd like specially-designed workouts for shooting and scoring, download our FREE Breakthrough Shooting Workout. It includes over 30 drills you can do by yourself or with a partner all you need is a ball and a hoop!
Click here to get your FREE Shooting Workout.
Related Products & Helpful Resources
Basketball Shooting Camps
Free Basketball Shooting Workouts
Basketball Workout App - Shooting Workouts, Guard Play Workouts, Post Workouts, etc.
How to Correct Your Shooting Form – Swish Hoop
Basketball Training Tips: How to Correct Your Shooting Form
How To Correct Your Shooting FormNot all players that can shoot have good form. All players that have good form can shoot. Agree or disagree? Think about all the good shooters you’ve ever watched and ask yourself - is there something that they all have to be able to do in order to be a knockdown shooter?
Yes - practice. The reality is that you can have some imperfections in your shot, but if you practice your shot all the time, you’ll still be able to become a great shooter. But, there are definitely certain aspects of a shooting form every player should strive to have, so that they can maximize their consistency for every type of shot that they take.
If your form is fundamentally the same on your catch and shoots as it is off the dribble, from three point as it is from mid-range - you’ve mastered your shot.
There are many common mistakes players make in their shooting forms and it usually comes as a result of habits they started when they were younger. Some players may have been too weak to get the ball to the hoop with good form. Others may have tried to change their shot as they got stronger and developed a habit that they could never really break from.
One thing you should know though is that even if you have one of these “mistakes” in your form, it does not necessarily mean you're a bad shooter or that you're going to be a bad shooter.
But, if you want to develop maximum consistency and you feel like your current form isn’t where you need it to be, let’s jump into how you can go about correcting your shooting form.
Start In CloseAny time you have an issue with your shot, get your confidence back by shooting from in close and then working your way out. So, for every mistake we talk about fixing, the drill will always be form shooting or close shooting from right in front of the hoop to about 8 feet out, respectively.
Video Your ShootingThere’s a lot you can gain from videoing your shot so that you can pinpoint exactly what is going on. When I’m using the Swish Hoop Player App, I record my shots so that if I have a bad session or a really good session I can go back and see what my form looked like.
Record from multiple angles. Let’s say you’re shooting from the free throw line. When you record from in front or behind you, you get a great view at making sure your elbow is in, your guide hand isn’t affecting your shot and that you’re landing straight with good balance.
When you record from the sideline, you get a great view to see if your follow through is fully extended, if you’re balanced and if you have good posture.
From any angle, you get to see the rhythm of your shot. Are you in one fluid motion or are you hitching at the top of your shot? There’s a lot you can observe just by videoing your shot, so even if you don’t have a Swish Hoop, use your phone camera to record your shooting every now and then to study yourself.
4 Common Shooting MistakesYour shot mechanics is the start-to-finish motion that you shoot the ball. It’s what you do in your shot. Four common mechanical issues are:
1) Thumb of your guide hand
2) Shooting hand elbow is out
3) Hitch in your shot
4) Footwork Causing Imbalance
Here’s what you should do if you find any of these to be an issue in your shot:
Thumb of Your Guide HandWhat You’re Doing:
The thumb in your guide hand is gripping on the ball for a little too long causing a sideways backspin.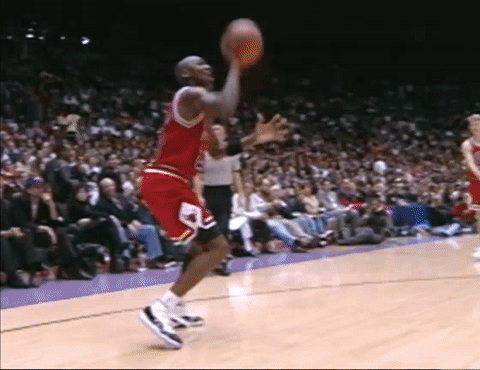 When you’re following through, your guide hand finishes open with your palm facing the rim.
How to Fix it:
Shadow form shooting. As if you were shooting with two hands, remove your guide hand slightly, so that it’s just barely off the ball. You may need to adjust your shooting hand placement to make sure your wrist is directly under the middle of the basketball and your fingers are spread to evenly hold the basketball.
Keep your guide hand vertical. Don't put inwards pressure on the ball. Your "guide" hand is not meant to help you do anything other than balance the ball, so if it's helping you push the basketball, go back to working on getting your shooting hand wrist under the middle of the basketball.
Shooting Hand Elbow Is Out
What You’re Doing:
If your elbow is out, it could be because your shooting hand is not under the middle of the basketball at your set point. Whether you're a 2 motion shooter that stops at your set point or a 1 motion shooter that keeps the ball moving through your set point, your hand is not under the middle of the ball at this point in your shot. Rather, your fingers are pointing inwards, not to the basket and your elbow is not under your wrist.
How to Fix It:
You need to isolate your ability to hold the basketball properly with just your shooting hand. Do 1 handed form shooting, get your wrist under the basketball and your elbow under your wrist.
A lot of great shooters shoot with their elbow slightly out, so this is not a dealbreaker for having good form, but it's important to understand that these shooters have put in an incredible amount of repetitions shooting the way that they shoot. For younger players or anyone looking to shoot more efficiently, building a more effortlessly, repeatable shot with your wrist under the middle of the basketball and your elbow under your wrist will allow you to not have to be as perfect in all of your jump shots.
If tucking the elbow under your wrist is uncomfortable, allow your elbow to be slightly out. Again, we don't need our elbow to be completely under our wrist, it's just the textbook way we teach it to keep good alignment. On your follow through, emphasize finishing with your hand straight toward your target.
Hitch In Your ShotWhat You’re Doing:
The ball is being pulled back and stopping in its flight path at the top of your shot, also known as your set point, before going forward. You’re focused on getting it above or to the side of your head, but then you lose the power from your legs and now have to rely mostly on your upper body strength to get the shot to the rim.
Because of this, your shot is likely to be flat.
If you can jump high or are a bigger player in general, it isn’t necessarily an issue to have that two-motion shot as you can get your shot off above the defense. But, when you start holding the ball a little too long - you’re hitching, losing the momentum you generated in your shot and decreasing the potential of your shooting range.
How to Fix It:
I want you to think about pushing vs. pulling the basketball. If you want to develop a fluid one-motion shot, your ball's flight path is going to go straight up through your body to your set point and forward. This means you're not going to pull the basketball up, but rather push - up and forward.
This also means you're not going to let the ball stop in your shot. It is all one fluid motion. When you’re practicing this, start by dropping your hips and loading the basketball in your mid section area. Then raise the ball to get your wrist under it and start to push through your hips and arms to extend up. The ball travels first, then your base gives you that added power as you extend up.
Footwork Causing Imbalance What You’re Doing:
Balance issues start from the ground up, so something with your feet placement needs work. Your feet could be too close together, your dominant foot could be pointed inward, or you’re leaning back on your shot altogether. Any of these can cause you to be off-balance and worse - keep you from being as consistent a shooter as you can be.
How to Fix It:
Make sure you’re landing in the same direction you jumped from. If your feet are perfectly square to the hoop on your jump, you should land perfectly square. If your feet are slightly pointed in one direction, they should land slightly pointed in that same direction. Landing forward is OK as a lot of great shooters have a feet sweep motion, but landing backwards or with your non-shooting hand foot forward means you're having balance issues, so be aware of where you’re landing in relation to where you take off from.
Focus on doing these three things in your shot with your footwork:
1. Keep the same distance between your feet (about shoulder width)
2. Point both of your feet in the same direction
3. Land straight up and down or forward, not backwards or leading with the non-shooting foot
Best Time to Fix Your ShotThe best possible time to start fixing your shot is the day after your winter season ends.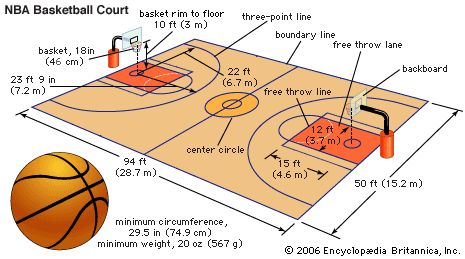 I would not recommend anybody try changing their shot in the middle of a season because you may overthink everything, mix your current habits with what you’re trying to develop and also lose confidence in yourself in the process.
Wait until the offseason to make any major changes to your shot.
Stay In CloseIf you really want to fix your form, it all starts in close and you stay there for a long time. Thousands-of-shots a long time.
As much as you’re going to want to move back, think about the long-term. By rushing this process, you may create issues in other parts of your shot and as a result spend more time trying to fix multiple issues.
If you stay patient, put in a lot of perfect, intentional reps and stay committed, you’ll build the muscle memory in your shot needed to be a consistently good shooter.
Every Rep Counts I can’t stress this point enough. It’s one thing to get 500 shots up a day, it’s another thing to be completely locked in and shoot 500 intentional shots.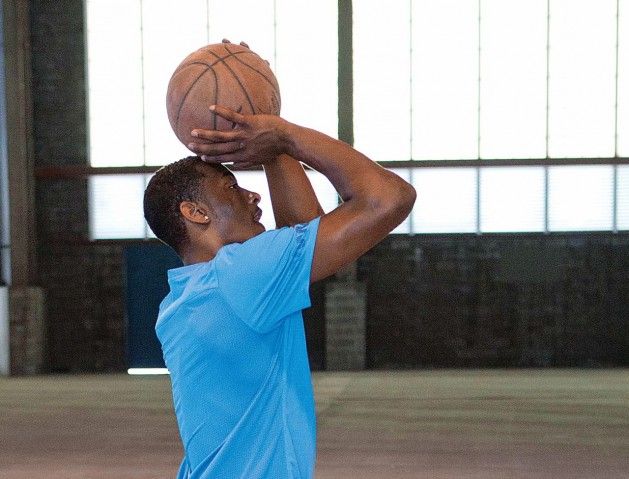 While you’re shooting, you should focus only on how your body is shooting the basketball. Process how you're shooting the basketball so that you know how to repeat what you're doing or detect when you've made a mistake.
By doing this, you’re not just getting shots up, you’re really working on your shot and your mind to develop the right muscle memory. Every rep counts.
If you’re doing all of these things right and you feel like something is still wrong, leave a comment below!
by Rocky DeAndrade
6 Comments
9 ways to increase the effectiveness of shots without changing their structure - All about basketball
9 ways to increase the effectiveness of shots without changing their structure.
Jay Wolf
(Basketball Shot Specialist)
To be honest, it's not a good idea to change the mechanics of shooting during the season, if only because it entails a decrease in performance. What can be done to prevent this from happening? Here are a few tried and tested recommendations.![]()
Improving short distance and basket shots
1. Require all short distance shots to the right and left of the basket to have a bounce and point of aim.
This forces the striker into position to use the shield when throwing. The upper half of the vertical line to the right and left of the basket is the aiming point for these types of shots. The ball should touch the line softly and bounce straight into the basket. Misses that occur when throwing from these positions are the result of insufficient concentration. To increase attention to the aiming point during training, draw a dollar sign - $, or some other sign, on a piece of adhesive tape, and attach it to the line.
2. Practice CLEAN basket shots and CLEAN bounce shots from the second mustache.
CLEAR throws require the ball to drop into the basket without touching the metal hoop. To achieve this, the ball must touch the backboard very gently. This requires a much greater concentration of attention and calculation of the trajectory.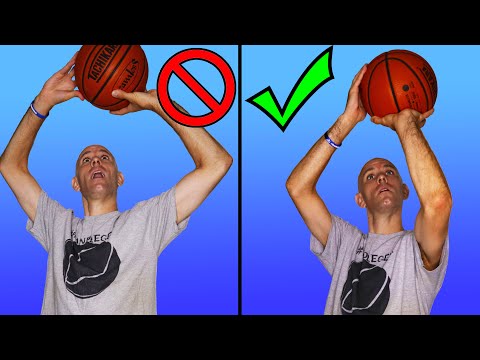 To achieve consistency, make 5 throws from under the hoop (or rebound jump) in a row, 3 of which must be CLEAR. Make it harder if you feel the need to.
NOTE: It is important to match the mission to the abilities of each player. The mission should challenge the player's sense of pride, requiring greater focus, but should not be unattainable.
Perfecting Medium Distance and 3-Point Shots
3. Practice CLEAN throws - make 5 shots in a row from the same spot.
This task develops stable accuracy as it requires great concentration and persistence. Five throws in a row from the same point improve accuracy, since all the components of the throw - form, effort, trajectory - must be the same each time and repeated over and over again, over and over again from the same distance. CLEAN throws automatically force the player to choose a high trajectory. High trajectory shots are harder for a defender to block, and the ball is more likely to go into the basket if it hits the metal hoop.![]() In the game, due to the excess of adrenaline, there is a tendency to apply a little more effort when throwing. If CLEAN throws are habitually improved in practice, in play the ball may lightly touch the back of the hoop BUT the higher trajectory increases the chances of hitting the basket. In addition, on a miss, a higher trajectory generates a shorter bounce, which increases the chances of hitting the ball into the basket.
In the game, due to the excess of adrenaline, there is a tendency to apply a little more effort when throwing. If CLEAN throws are habitually improved in practice, in play the ball may lightly touch the back of the hoop BUT the higher trajectory increases the chances of hitting the basket. In addition, on a miss, a higher trajectory generates a shorter bounce, which increases the chances of hitting the ball into the basket.
IMPORTANT: If 5 CLEAR rolls in a row is too difficult, lower this requirement.
Coach's note: Players who repeatedly hit the back of the basket when shooting are overexcited. To correct this error, explain it, and start practicing CLEAN throws right away, encouraging them to be used throughout the season.
4. Make several free throws in a row before leaving the court after practice.
This requires repetition of all throw elements and builds confidence. Each batter must pick up the ball himself after his throw. Emphasize the importance of repeating the same set-up routine before each throw.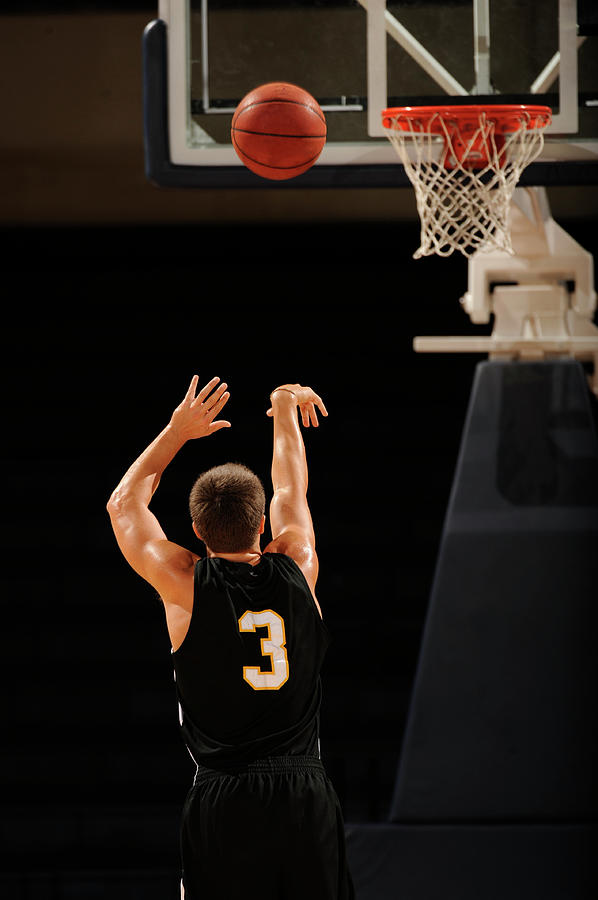 Taking a deep breath and exhaling before the throw relieves excess tension. Modify this exercise by adding more playful tension due to time constraints. Those who do not fit in the given time must make jerks, etc.
5. Make 200 free throws per day for 5 days, or 500 free throws on one day, and 200 on the next four days. Target: 25/25 of which 15 rolls are CLEAR.
This develops confidence and exceptional consistency in shot form, ball release and trajectory. In addition, it improves the accuracy of 3-point shots. Reward the player for: 25/25, the most hits in a row, and the most CLEAR hits in a row. NOTE: 100 throws require approximately 15 minutes of time.
6. Determine the spots from which you have to shoot regularly in the game, and practice shooting at least 5 consecutive shots from each of these spots.
This develops confidence and coordination when throwing. When a player shoots from one of these positions in a game, they feel comfortable and confident because they have been successful shooting from these positions so often in practice.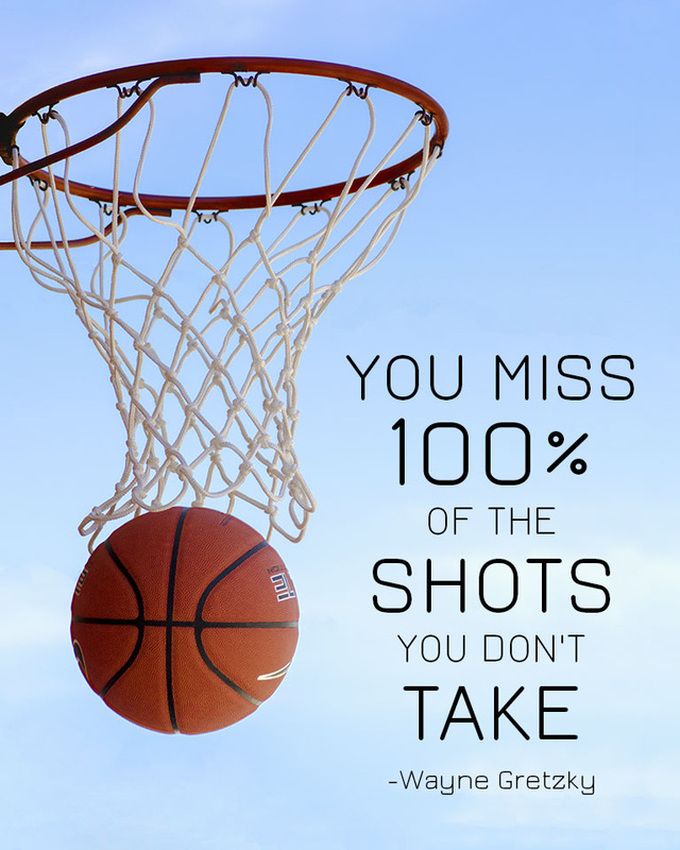
7. Perform all throws on a correctly marked area using a correctly marked backboard. The court must have a line for 3-point shots.
Court markings are an important factor in reducing the number of misses as it is easier for the player to judge the distance to the basket. For the same reason, additional confidence develops. A marked backboard gives the player a point of aim for a bounce shot from the backboard or for a shot from under the basket.
8. Keep your hands in the position of tracking the ball until it touches the basket.
Tracking the ball during the shot allows for better control of movement and improves performance.
9. Choice of throw type.
A good throw is one that remains uncovered during training in 60% of cases.
Emphasize the importance of learning about your abilities. ‘Good players use good shots’.
Conclusion
Self-assessment of shooting ability is closely related to the actual shooting potential. By getting athletes to hit the ball over and over again on their shots, you increase their confidence. They know that no one can stop them, as the training proves it.
Jay Wolf is a basketball shooting specialist, summer sports camp organizer, publisher, and owner of Star Shooter, an equipment company that helps athletes of all ages improve their shooting skills. For more information, visit www.Starshooter.net
Sourced from: http://streetball.world-basket.biz
Basketball Shot Technique
Basketball Shot Technique Exercises for individual training
The actions of the players on the field are aimed at getting the opportunity to perform a throw around the ring, therefore this element is one of the most important in the preparation of athletes. The coach should know well what shortcomings should be corrected, what to pay special attention to, how to dose the loads. As a result of control throws carried out with the player, a suitable method for throwing the ball around the ring is determined for the athlete.
Not only physical abilities are taken into account, but even the character of a person. And then - work on the technique, the athlete literally needs to bring the throw to the ideal and “memorize” it to such an extent that on the field without hesitation to throw the projectile around the ring correctly.
Technique Throws have differences, for example, in one, both hands are involved, in the other, one hand. The method of execution can be very different: there is a jump throw, on the spot, throwing a projectile on the move, using a fake move, and also at a distance from the ring.
By the way! Throw at a distance from the ring, or a three-pointer has three options: close to 3 meters from the target, medium from 3 to 5 meters and far, performed behind the line (6.25m).
Ring throw training also differs in how many people participate in them: the athlete is alone, or in the company of teammates (training in pairs, triples, etc. ), or maybe a dummy or a bench serves as a kind of opponent.
But there is a need for live opponents precisely because the players can be in the psychological state that is present on the field in a real confrontation.
It would be correct to start training with throws at short distances. Ideal would be 1.5-2 meters. Moreover, the throws should be clear, you need to make sure that the ball does not touch the ring itself, but passes exactly in the middle.
In addition to playing equipment, a chair may be useful, on which a beginner will climb in order to control the accuracy of throws. Gradually, the coach should increase the distance to the ring and put the basketball player in positions familiar to the technician.
In order for the throw to be the most accurate, it is necessary to bring the execution of the technique to automaticity without any errors and be confident in yourself and your movements. Also, practicing a confident confrontation with the players of the other team will be in your favor.
Important! Setting up a correct throw should be dealt with first of all with beginners, as correcting mistakes is more difficult for both the coach and the athlete. Therefore, it is best to immediately teach how to perform the throw correctly. Watching videos or programs with throws around the ring from NBA players, Russian and Latvian basketball players greatly helps in this. It is also useful to consolidate what you see in practice.
The influence of idols on beginners And if the player has the opportunity to see the competition live, he will be able to feel and understand the atmosphere in which he will be.
It will be great to see a throw from a famous athlete, or from a coach who himself is able to demonstrate the correct setting of the hands, or the position of parts of the body, body. But the main advantage of the coach is how well he can notice errors in the throwing technique and how quickly and efficiently he will help to correct the shortcomings.
People often get interested in basketball already at the stage of watching programs. Then, if a person decides to devote himself to sports, he begins to imitate his idol. This, in turn, will help the coach in preparation, as the beginner will also copy the techniques for performing certain throws. The advantage is that the player will be able to acquire an accurate shot faster.
In general, there are 7 types of shots in basketball, but we will talk about the main and most used by both beginners and experienced snipers.
Jump shot
Basically, all attacks on the opponent's basket are made using the jump shot technique. This method is not bad when hitting the ring from a certain distance.
This attack can be performed in three stages.
First stage: the player receives the ball. Be sure to capture the ball in motion, as otherwise a violation is counted.
Second stage: the athlete stops, stepping forward with the left foot and following with the right foot. With the main hand, the ball is carried over the head, and the auxiliary holds it to the side. When jumping, the push is made by two legs at the same time.
Basketball element technique: is somewhat similar to a free throw. First, the auxiliary hand is removed, and the ball is reversed with the fingers of the main (strong hand).
Third stage: the athlete moves forward with his body and lands on his feet about 20-30 cm further than the point from which he took off. This is necessary so that when landing, you do not collide with an opponent who has approached to protect his ring.
Tip! How accurate the throw will be depends on the skill of the athlete to maintain balance in the jump and on how exactly the torso and head are located. Therefore, the player needs to direct his entire body upwards after kicking. Head held straight, look at ring before landing.
Pay attention to the fact that the jump shot is performed with a kind of "freeze", this is done by professional snipers, but of course there is no hang. The player simply stands at their highest point of the jump and then shoots. This is necessary in order not to give extra momentum to the ball.
Double shots
Any good basketball shooter is a treasure. In order to become a good sniper, you need a great desire, as well as constant self-improvement: a professional coach, as well as many years of training, including at a game pace.
The intensity of the throws must be comparable to the game. It turns out that 1,000 sluggish, relaxed throws will be less effective than 100 made at a game pace, because. the first in a real match will simply not be allowed to be carried out by the defender of the other team.
So one of the effective ways to work out the technique of throws are throws in pairs.
Here are some drills to work on such throws:
Drill 1. Throw and rebound
It is performed at a distance of 4 meters from the ring. To start, one of the players makes a clear pass from under the basket, and then moves towards the player who has caught the ball. He, in turn, makes a throw on the basket and moves to the ring. That is, the pair simply replace each other at the game pace, but the throws must be clear.
Drill 2. Shot and rebound resulting in
Performed as above, except that the passer under the hoop must not only move beyond the three-point line, but must also try to prevent the other player from taking the shot, as the defender would. . The passer, in order to become the thrower, must miss 5 throws around the ring in an honest confrontation, then the players change places.
Exercise 3. Fraudulent throw
Here, a feint is added to the second exercise. That is, while the player who made the transfer of the ball is trying to prevent the attacker from making a pass, he tricks the defender into distracting himself and then makes a throw.
The exercise is repeated five times, and then the pair of players change positions.
Exercise 4 . Move followed by a shot
Defender passes while attacker moves at playing pace across the court, then the latter stops, catches the ball and shoots. This is repeated 7 times, then 2 free throws are made and the players switch places.
However, this exercise can be done in three different ways, or you can include three in your workouts at once:
- attacker catches the ball and immediately throws it;
- an attacker performs a fake throw, dribbles the ball without changing direction and throws;
- everything is the same as in the previous one, but the direction changes after the feint.
Exercise 5.
This is not an exercise in the usual sense, because it uses all kinds of dribbling techniques and a jump shot. That is, the attacker first runs to the opposite edge of the field, receives the ball. The choice of the leading hand depends on the side on which the athlete is dribbling. So, the right hand leads on the right, and the left hand leads on the left.
The variety lies in the fact that you can change the pace, make transfers and generally try to feel the part of the game process, consisting of the opposition of the attacker and the defender.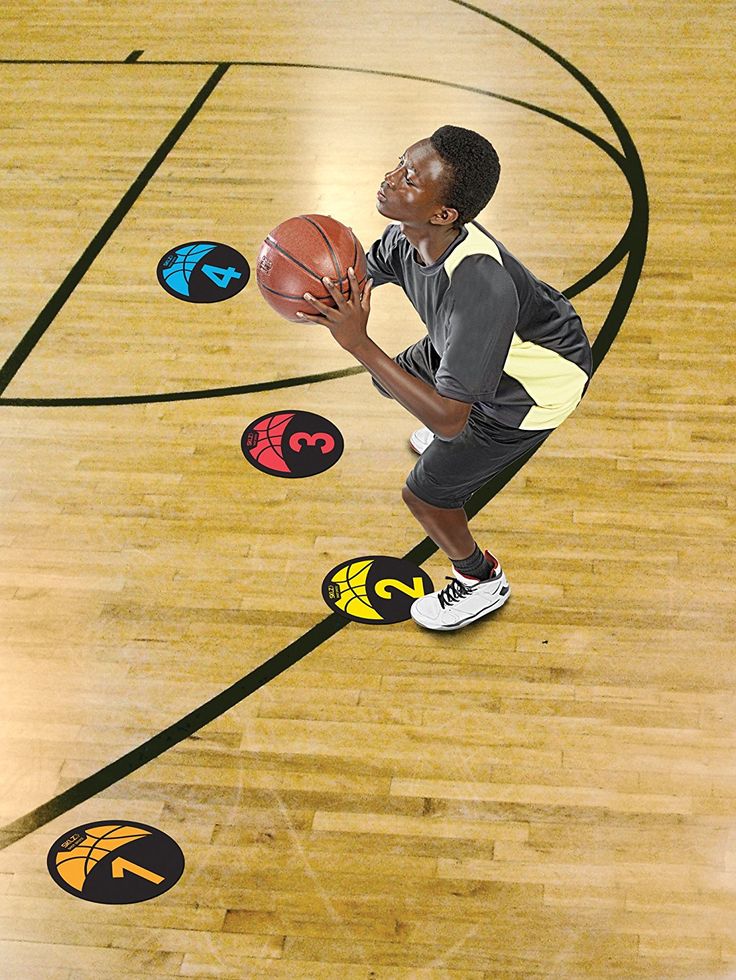 Using the learned techniques, the player will be able to understand what tactics to choose in a given situation.
Double shots: pass and discount
There are two players per team, but there may be one defender, or there may be no defenders at all.
The attacker moves through the center of the field to the ring so that the second defender pays attention to him, and then passes the ball to another attacker from the flank.
The passer catches the ball and throws it into the basket. The passer then picks it up and hands it to the thrower. So they switch roles. In training, 10 throws are usually performed for each.
To diversify the workout, you can add exercises starting from the flank and corner of the site.
Shooting training for centers and power forwards
If you make a list of the most used shots by centers and power forwards, you get the following:
- hook shot The throw is made by spinning the hand that is farthest from the basket.
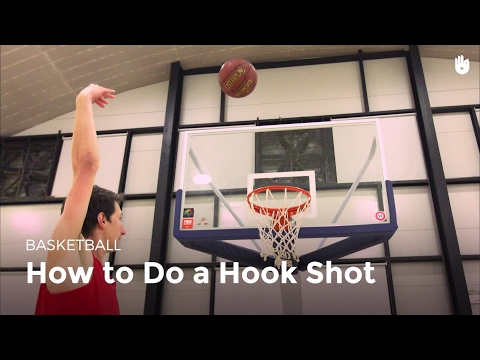 This is a great way to shoot the ball at short (close) distances, and the hand located between the attacker and the defender becomes an obstacle for trying to interfere with the throw;
 - jump hook (translated as a hook during a jump) - the attacker is half-turned to the ring, the throw is made by the hand farthest from the ring. The half-hook is good because you can use it after stepping or turning;
- pacing and then throwing - various options, the player can use pacing after catching the ball bouncing off the backboard or basket, or simply while dribbling. It is used both in the position of the back to the ring, and the face. It is especially useful to perform various throws after pacing during training, this helps to develop the vestibular apparatus and improve coordination;
- middle throws (3-6.5 meters from the backboard) or short distance with both hands from the top of the head, while the arms are first bent at the elbow, the hands are approximately opposite the forehead, and then straighten in the throw.
-Step-5.jpg/aid43486-v4-728px-Play-21-(Basketball)-Step-5.jpg) This is a classic that Tim Duncan loves to use in the game. Having received the ball, he makes a deceptive movement, the body and leg are involved, the player seems to go into the pass, and then throws the ball into the ring.
This is a classic that Tim Duncan loves to use in the game. Having received the ball, he makes a deceptive movement, the body and leg are involved, the player seems to go into the pass, and then throws the ball into the ring.
Here are some examples of favorite offensive techniques for centers and power forwards.
Same Tim Duncan (NBA player) uses one-handed turnaround throw . That is, while in the penalty area or the post area, he makes a turn with his back to the basket, bounces slightly, and then performs a throw with one hand. If the throw is performed with the left hand, then the turn goes to the right side and vice versa.
Step back (Carmelo Anthony, NBA) is performed from the middle of the post. The player receives the ball, turns around to face a defender, so the attacker steps forward, hits the ball on the floor, catches it, and then pulls back to shoot at the basket, thereby deceiving the defender.
Marc Gasol (NBA) quick turn over the back - the player goes further from the basket, slightly to the right or left of it, and at the moment when the defender starts to guard him, catching the ball, the attacker quickly makes a turn through the back, hits and comes to the basket. Then the throw is made.
To sum up all of the above, for excellent center and power forwards, the most important thing is to shoot from the penalty area and around the perimeter. Therefore, more time is devoted to training these techniques. In general, the number of throws per workout is individual, since the main thing is not to perform until you get tired, but to work out the movements correctly.
Shooting training for small forwards, attacking guards in point guards
There will be less recommendations here, as programs for practicing shooting are quite enough and they can suit most players in these positions.
But a few tips are still worth considering:
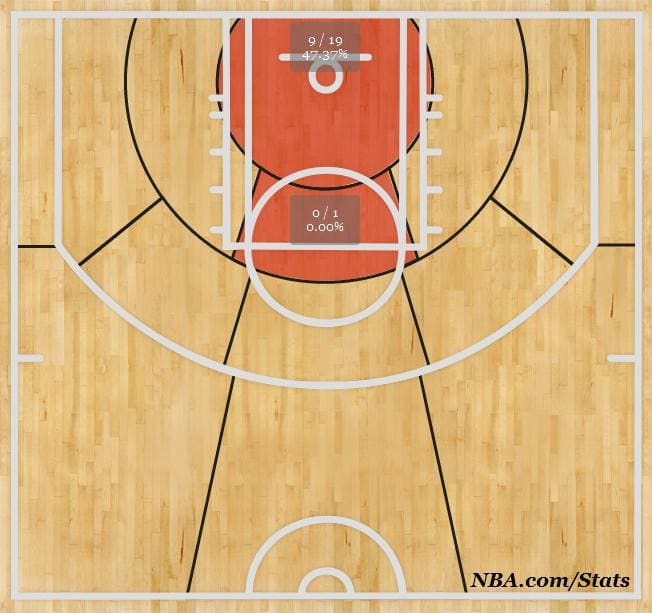
It is better to start practicing throws not in motion, as in the previous positions, but on the contrary - in a static position. You can stand at the side of the penalty area and perform five to ten shots with a hit on the basket.
Then you just need to move around the edge of the penalty area and shoot from different positions. When this zone is mastered, you can stand between the penalty and three-point lines and repeat everything from new positions.
It is also worth going through all the positions indicated in the figure below and learning how to throw from them.
If it's hard, you can reduce the number of hits on the ring.
In general, you can throw three-pointers from any point, but what is indicated in the figure is the minimum that is worth working out. Then work on dribbling, jump shots, and stopping.
Such a training technique is needed in order to work out both throws at the moment when no one interferes with throwing the ball, and those performed at a game pace.
Basketball Shot Training Summary
If you are hoping to find a ready-made training program on the Internet, you need to understand that it will not work without adapting to your personal qualities - physical fitness, flexibility, punching power, leading hand, psychological characteristics, game position and style.