Home »
Misc »
How to make basketball practice fun
How to make basketball practice fun
Fun Basketball Drills | STACK
Skip to content
It’s important for basketball players to train hard and practice their skills to improve their athletic performance, but practice can still be enjoyable for them. After all, they play the game because it’s fun. Basketball drills can be used to develop players’ skills and technique, while at the same time providing a fun and creative experience. It’s up to the coach to balance the two aspects of practice drills to help players enjoy them. Here are five fun basketball drills every coach should know.
1.
Bulldog DrillThis drill helps players develop dribbling skills while running at high speed, such as on a fast break. It requires players to keep their heads up when they dribble, which is essential during a game when looking for an open teammate.
How to Perform:
- The coach chooses one or two players as bulldogs, and they stand in the middle of half court.
- All the other players line up on the baseline.
![]()
- The players have 10 seconds to advance past half court while maintaining their dribble.
- The bulldogs try to knock the ball out of the hands of the other players while also maintaining their dribble.
- If a player has the ball stolen from him/her or knocked away, he or she becomes a bulldog.
- The game continues until only one player is left.
- The player who wins becomes a bulldog for the next game.
Coaching Points:
- Keep your head up.
- Change dribbling hands.
- Change directions and speed.
2.
Terminator DrillThis is one of my favorite fun basketball drills, because as a point guard I know how important ball handling is. Terminator helps players develop dribbling skills in tight corners, like when you are trapped or double-teamed on the baseline during a game. The drill forces players to keep their heads up and dribble with both hands, while also improving their awareness of the other players around them.
How to Perform:
- Form groups of 8 to 10 players.
- Each player starts off with a ball and must continuously dribble within a designated area (e.g., inside the 3-point line) while trying to knock away another player’s ball.
- When a player loses control of his/her ball or goes outside the designated area, he or she is out of the drill (i.e., “terminated”) and must vacate the designated area.
- As the number of remaining players is reduced further, coach restricts the area of play.
- The last player to remain dribbling the ball wins.
Coaching Points:
- Keep your head up.
- Change dribbling hands.
- Strategize and pick your moments.
3.
3-Man Weave DrillThis is an excellent drill to improve ball movement and speed. It helps teams synchronize their movements and tendencies to help them “gel” on the court. The goal is to move the ball down the court as quickly as possible without letting it touch the ground. Probably every coach you have ever had has told you that a pass is quicker than a dribble.
How to Perform:
- Players form three lines at one end of the court, behind the baseline.
- The middle player starts with the ball.
- The rule is to pass the ball and go behind the receiver.
- The middle player passes the ball to the player on his/her left and then runs behind the receiver.
- This is repeated all the way to the other end of the court, where the player who is closest to the basket goes up for a layup. (It’s better to practice going up for a layup without dribbling, since this could be useful in a real game situation.)
- The trailing player gets the rebound and becomes the middle player to start the 3-Man Weave back down the court, where a different player goes up for a layup.
- The next three players in line go next.
Coaching Points:
- Keep your head up.
- Make hard chest passes.
- Make sharp, quick movements.
- Be aware of the other players.
4.
Knockout DrillThis drill helps players develop quick shooting skills, helpful when a defender closes out on you in a game. It also develops speed, quickness and shooting under pressure with heightened sense of urgency.
How to Perform:
- All players line up at the free-throw line.
- The first two in line have a ball.
- The first player shoots a free throw.
- The second player shoots a free throw.
- If the first player makes the free throw, he or she gets the rebound and passes it to the next player in line who shoots a free throw.
- If the first player misses his/her free throw, he or she must get the rebound and make a layup before the second player takes a shot.
- If the first player makes his/her shot before the second player, he or she goes to the back of the line and waits for another turn.
- If the second player makes his/her shot before the first player, the first player is knocked out and the second player goes to the back of the line and stays in the drill.
- Each time a player makes a shot, the next player in line shoots to try to knock the preceding player out.
- The drill continues until only one player remains—the winner. He or she starts the next round as the first person in line.
Coaching Points:
- Keep your head up.
- Maintain proper shooting form/mechanics.
- Be aware of other players.
- Stay confident and calm.
5.
Loose Ball DrillThis drill creates a 1-on-1 competition that builds mental and physical toughness. It helps players learn to sacrifice their bodies for the team and give maximum effort on the court. It also helps to develop reaction time and quickness, which are essential skills needed for basketball.
How to Perform:
- Two players line up on the baseline equal distance from each other with their backs facing the open court.
- Standing in front of the players, coach rolls a ball out onto the open court.

- When coach blows the whistle, the players instantly turn and sprint to the ball.
- The player who reaches the ball first immediately tries to score on the other player.
- If the player with the ball scores, the drill is over.
- If the player with the ball misses or gets the ball stolen, the drill is also over.
- Once the drill is over, the two players go to the back of the line, and the next two players compete.
Coaching Points:
- Be aware of the other player and the ball.
- Focus on speed and quickness.
- Dive and fight for the ball.
RELATED
- 10 Essential Point Guard Drills From Skylar Diggins
- The Best Basketball Shooting Drills for Kids
- Team Shooting Drills for Your Next Basketball Practice
Share This Story!
MOST POPULAR
It’s important for basketball players to train hard and practice their skills to improve their athletic performance, but practice can still be enjoyable for them. After all, they play the game because it’s fun. Basketball drills can be used to develop players’ skills and technique, while at the same time providing a fun and creative experience. It’s up to the coach to balance the two aspects of practice drills to help players enjoy them. Here are five fun basketball drills every coach should know.
1.
Bulldog DrillThis drill helps players develop dribbling skills while running at high speed, such as on a fast break. It requires players to keep their heads up when they dribble, which is essential during a game when looking for an open teammate.
How to Perform:
- The coach chooses one or two players as bulldogs, and they stand in the middle of half court.
- All the other players line up on the baseline.
- The players have 10 seconds to advance past half court while maintaining their dribble.
- The bulldogs try to knock the ball out of the hands of the other players while also maintaining their dribble.
- If a player has the ball stolen from him/her or knocked away, he or she becomes a bulldog.
- The game continues until only one player is left.
- The player who wins becomes a bulldog for the next game.
Coaching Points:
- Keep your head up.
- Change dribbling hands.
- Change directions and speed.
2.
Terminator DrillThis is one of my favorite fun basketball drills, because as a point guard I know how important ball handling is. Terminator helps players develop dribbling skills in tight corners, like when you are trapped or double-teamed on the baseline during a game. The drill forces players to keep their heads up and dribble with both hands, while also improving their awareness of the other players around them.
How to Perform:
- Form groups of 8 to 10 players.
- Each player starts off with a ball and must continuously dribble within a designated area (e.
 g., inside the 3-point line) while trying to knock away another player’s ball.
 - When a player loses control of his/her ball or goes outside the designated area, he or she is out of the drill (i.e., “terminated”) and must vacate the designated area.
- As the number of remaining players is reduced further, coach restricts the area of play.
- The last player to remain dribbling the ball wins.
Coaching Points:
- Keep your head up.
- Change dribbling hands.
- Strategize and pick your moments.
3.
3-Man Weave DrillThis is an excellent drill to improve ball movement and speed. It helps teams synchronize their movements and tendencies to help them “gel” on the court. The goal is to move the ball down the court as quickly as possible without letting it touch the ground. Probably every coach you have ever had has told you that a pass is quicker than a dribble.
How to Perform:
- Players form three lines at one end of the court, behind the baseline.

- The middle player starts with the ball.
- The rule is to pass the ball and go behind the receiver.
- The middle player passes the ball to the player on his/her left and then runs behind the receiver.
- This is repeated all the way to the other end of the court, where the player who is closest to the basket goes up for a layup. (It’s better to practice going up for a layup without dribbling, since this could be useful in a real game situation.)
- The trailing player gets the rebound and becomes the middle player to start the 3-Man Weave back down the court, where a different player goes up for a layup.
- The next three players in line go next.
Coaching Points:
- Keep your head up.
- Make hard chest passes.
- Make sharp, quick movements.
- Be aware of the other players.
4.
Knockout DrillThis drill helps players develop quick shooting skills, helpful when a defender closes out on you in a game. It also develops speed, quickness and shooting under pressure with heightened sense of urgency.
How to Perform:
- All players line up at the free-throw line.
- The first two in line have a ball.
- The first player shoots a free throw.
- The second player shoots a free throw.
- If the first player makes the free throw, he or she gets the rebound and passes it to the next player in line who shoots a free throw.
- If the first player misses his/her free throw, he or she must get the rebound and make a layup before the second player takes a shot.
- If the first player makes his/her shot before the second player, he or she goes to the back of the line and waits for another turn.
- If the second player makes his/her shot before the first player, the first player is knocked out and the second player goes to the back of the line and stays in the drill.
- Each time a player makes a shot, the next player in line shoots to try to knock the preceding player out.
- The drill continues until only one player remains—the winner. He or she starts the next round as the first person in line.
Coaching Points:
- Keep your head up.
- Maintain proper shooting form/mechanics.
- Be aware of other players.
- Stay confident and calm.
5.
Loose Ball DrillThis drill creates a 1-on-1 competition that builds mental and physical toughness. It helps players learn to sacrifice their bodies for the team and give maximum effort on the court. It also helps to develop reaction time and quickness, which are essential skills needed for basketball.
How to Perform:
- Two players line up on the baseline equal distance from each other with their backs facing the open court.
- Standing in front of the players, coach rolls a ball out onto the open court.
- When coach blows the whistle, the players instantly turn and sprint to the ball.
- The player who reaches the ball first immediately tries to score on the other player.
- If the player with the ball scores, the drill is over.
- If the player with the ball misses or gets the ball stolen, the drill is also over.
- Once the drill is over, the two players go to the back of the line, and the next two players compete.
Coaching Points:
- Be aware of the other player and the ball.
- Focus on speed and quickness.
- Dive and fight for the ball.
RELATED
- 10 Essential Point Guard Drills From Skylar Diggins
- The Best Basketball Shooting Drills for Kids
- Team Shooting Drills for Your Next Basketball Practice
Share This Story!
Page load link
57 Youth Basketball Drills and Games for Kids
Home > Coaching > Drills > 57 Youth Basketball Drills and Games for Kids
If you are looking for some great drills to use with your youth or middle school teams, youve come to the right place! It doesnt matter if your players are beginners or seasoned vets
These include drills to master the basics and drills that are more advanced.
These drills are perfect for youth coaches who work with 7, 8, 9, and 10 year olds and middle school coaches who typically work with 11, 12, 13, and 14 year olds.
With these drills, your team will
- Shoot a higher percentage from the field
- Finish more lay ups under pressure
- Take care of the ball and reduce turnovers
- Develop highly effective dribble moves
- Make better passes that are on target and on time
- Score more points with better team offense
- Shut down your opponents with great defense on and off the ball
- And more...
When you add up the total years of coaching experience by the experts in the drills below, it will surpass hundreds of years...
This is vital for saving you time and making rapid improvement with your team
You dont have to decipher through thousands of ineffective drills. As these are some of the best drills that you can use for kids!
We even added some fun basketball drills and games for kids. These fun drills and games can be a great way to start and end practice.
That way, many of your players develop a lifelong passion for the game and play it well into the future!
Drills Organized By Category
If you want to quickly skip to a certain section, you can click on any of the category links below.
Shooting and Lay Up Drills for Kids
Dribbling and Ball Handling Drills for Kids
Passing Drills for Kids
Footwork Drills for Kids
Defense Drills for Kids
Offense Drills for Kids
Games and Fun Drills for Kids
And just a heads up, many of these drills are multi-skilled. This means one of the shooting drills might also work on footwork, ball handling, and triple threat moves. A ball handling drill might include shooting, defense, and rebounding.
Basic Drills to Advanced Drills
We wanted to make this as easy as possible for a youth coach working with 1st, 2nd, 3rd, 4th, and 5th graders and the middle school coach who works with 6th, 7th, and 8th graders.
So we tried to organize the basic drills towards the top of each category. And have it get more advanced as you go down the list.
This will help coaches of all ages progress through the season!
Even advanced youth teams can start each season with the basic drills as you review and solidify certain skills. The only difference is that you might progress more quickly.
On the other end of the spectrum, beginners can utilize almost all of these drills. Of course, you might have to make some modifications and progress a little slower. Well show you how to do that in the next section...
And sometimes, you have 7th and 8th grade teams that need to spend more time on the beginner drills. And thats okay! Basketball is one of the latest developing sports from an age standpoint.
If you coach long enough, you will see some kids that werent very good as middle school athletes develop into very good players at the high school level.
Even Beginners Need to Compete Against Defenders in Drills!
With younger teams or beginners, you might spend a little more time on drills without defenders. This helps you coach the technical skills of shooting, ball handling, passing, and footwork.
As alluded to earlier, advanced teams might spend a little more time on technical skills as you refresh and develop your foundation at the beginning of the season.
However, its very important to complement those drills with drills that include defenders.
Even with beginners, a general rule of thumb is to alternate between drills without defenders and drills with defenders.. For example
- 6 Minutes - Practicing dribble moves with no defense
- 6 Minutes - Attacking a live defender with 1v1 full court
- 6 Minutes - Practicing lay ups with no defense
- 6 Minutes - Shooting lay ups with a trailing defender
- 8 Minutes - Running your offense with no defense
- 8 Minutes - Running your offense against live defenders
If you have a more advanced team that is in the 7th or 8th grade, you could spend up to 70% to 90% of your practice drills against live defenders.
Modifications to Adjust Difficulty of Drills
As you go through these drills, you want to adapt the drills to make them the right fit for your players.
You can aim for roughly a 60% to 70% success rate. You want them to have some success and you also want them to be pushed. If its too easy or too difficult, they can lose interest or motivation.
Here are some common ways...
- Change position of defender
To give the offense an advantage, you can delay the start of the defender and give the offense a head start. You can also position the defender further away to cover more distance.
To add difficulty, you might give the defender a head start or allow them to cover a shorter distance. That way, the defender arrives earlier.
- Remove or add defenders
By reducing the defenders and making a drill 2v1, 3v2, 4v2, or other variations, it gives the advantage to the offense.
By adding additional defenders such as 1v2 or 2v3, this provides a greater challenge to the offense.
- Increase or decrease space
You can change the boundaries of any drill. By decreasing space, this makes harder on the offense as the defense has less ground to cover. By increasing space, this makes it easier for the offense as the defense has more ground to cover.
It would be the opposite for the defense. If you increase space, the defense has to cover more ground. If you decrease space, its easier for the defense.
- Time limits
Setting a time limit will force the offense to be more efficient with their moves. They have to attack in straight lines and they have to play with urgency.
You can increase the time limit for beginners. You can decrease the time limit to provide a greater challenge.
There are other ways to modify drills to change the difficulty level as you will see throughout the drills below. However, this is a great start.
Group Kids By Skill Level for Different Variations of Drills
You can also organize your drills where certain groups of players practice together for different skills.
For example, you might have one group of players participate in ball handling drills.
For one group of players, they might just play 1v1 full court.
Another group of your players that need a greater challenge, you might have them play 1v2 full court.
While this takes more time and organization, it can be a great way to maximize the development of your team!
We hope you enjoy the drills and they help you have more success!
Youth Shooting & Lay Up Drills
1. 6 Form Shooting Drills to Develop a Great Shot - These drills help you build a great foundation for your shot.
2. Form Shooting Drill - Organization for a Team - This shows you how to organize your form shooting drills in a team setting.
3. Elbow Shooting Drill - In addition to making shots from the elbow, you learn a format for rotations within your team shooting drills.
4. Fastbreak Shooting Drill - 12 Players, 1 Hoop - While improving your shooting out of the fast break, this also shows you a great way to organize a shooting drill when you have a bunch of players and only one basket.
5. 3 Pass 1v1 Shooting Drill (With a 3v3 version too!) - Here is a great way to introduce shooting against defenders. It also shows you how to convert all of your 1v1 drills into 3v3 drills, so you can improve decision making and passing against help defenders.
6. 1v1 Shooting Drill with Away Screen - This drill simulates shooting after a screen. It is done in a live environment, so your players learn how to attack the defense.
7. 3v3 Away Screens - Like mentioned previously, this 3v3 drill is a great way to add passing and decision making to your shooting drills.
8. Teaching Lay Ups - 3 Progressions (Lay Ups) - These progressions are great building blocks for teaching lay ups.
9. 1v1 Lay Up Drill - The Forgotten Situation (Lay Ups) - This drill works on a common occurrence in games that involves finishing in the lane.
10. 2 on 1 Fast Break Drill with Trailer (Lay Ups) - This simulates shooting and passing against defensive players.
11. Kyrie Irving Mikan Drill With 12 Variations! (Lay Ups) - This is an advanced drill that shows you different ways to finish around the basket.
Youth Dribbling & Ball Handling Drills
1. Maravich Stationary Ball Handling Drills - These are beginner drills to help develop better hand-eye coordination and a feel for the basketball.
2. 2-1-0 Dribbling Drills - These are beginner progressions for teaching basketball moves to your players.
3. Cone Touch Dribbling (12 Variations) - This is a fun game that teaches players how to dribble, change directions, and keep their head up.
4. Warm Up Dribbling Drill - This is a great warm up drill that teaches players how to play in a low stance while shooting lay ups.
5. Pirate Dribbling, Mr. Fox, and Coin Drop (3 Drills) - These are three fun drills to improve your teams ball handling.
6. Cone Chair Dribbling Drill Through Traffic - This is a great way to teach your players to keep their heads up and dribble through traffic.
7. 1v1 Grid Drill - This drill shows you how to organize a drill to max out repetitions for your team. It improves ball handling and defense.
8. 1v1 Speed Dribble - This is a great way to improve your ability to dribble at a high speed with a trailing defender. You also improve your ability to make lay ups with defensive pressure.
9. 1v1 Off Hand Dribbling Drill - Beat em Left - This is a great way to improve your ball handling for your off hand.
10. 3-on-2 Full Court Drill - Here is a great way to improve ball handling, decision making, and passing in a full court setting.
11. 1v1 Dribbling Drill with Random Traps - This forces you to handle traps better by utilizing a back up dribble and different dribble moves to avoid double teams.
12. 1v2 Pressure Ball Handling - This is an advanced drill that forces your players to beat two defenders.
13. Full Court Press Breaker Overload Drill - This is a great ball handling and passing drill that teaches your team how to beat full court defensive pressure.
Youth Passing Drills
1. Pair Passing - This is a beginner drill to teach your players the technical skills for passing the ball.
2. Pass and Switch - Here is a fun, fast-paced drill to improve passing.
3. Wall Passing Drills - Here is a great way to improve passing and hand-eye coordination while maxing out repetitions.
4. Diamond Reaction Passing - This is a fun way to warm up and get your player mentally focused.
5. Monkey in the Middle and Bull in the Ring - Here is a great way to introduce defenders to your passing drills.
6. 3 on 2 Continuous Passing - No Dribble - This is a full court drill that emphasizes passing, cutting, and footwork.
7. 5 on 3 + 2 Fast Break Offense Drill - This drill improves transition offense, passing, and decision making.
8. No Dribble Offense Drill - This is one of the best game-like drills to improve passing and cutting.
9. 10 In A Row Passing Drill - This is a great game-based drill that improves passing and footwork.
10. Ball Reversal Offense Drill - This is an advanced drill that emphasizes ball reversals and ball movement.
Youth Footwork Drills
1. Jump Stop Drill - This is a great drill for reducing travels, improving balance, and developing better footwork to improve scoring and passing angles.
2. 7 Progressions for Footwork & Passing - Quick Stops and Pivoting - This is a partner drill that builds on the previous drill.
3. Red Light - Green Light (For Footwork & Dribbling) - This is a fun way to improve your footwork and balance.
Youth Defense Drills
1. Defensive Slide Drill - This drill is essential for teaching your players how to slide and cut off the defense.
2. Hip Turn Drill - A vital drill that teaches your players how to quickly change directions.
3. Defensive Shell Drill - This creates proper help position and defensive rotations. A foundation for all great defenses.
4. Reaction Rebounding - This improves your rebounding, so you can properly finish every defensive possesion.
5. 1v1 Overlap Drill - In addition to ball handling, this shows you how to be efficient with your 1v1 defensive skills.
6. 1v1 Wing Close Outs - This is a great drill to simulate contesting the shot and stopping the dribble drive.
7. Defensive Challenge Drill - This is a fun way to instill a defensive mentality in your team.
8. No Hands Defense - A great drill for teaching proper defensive position and reducing reaching that puts your players in poor defensive positions.
9. No Paint Drill - This develops the mentality of keeping your opponents out of the most effective scoring area on the court.
Youth Offense Drills
1. 3 Drills for Cutting and Screening - These are foundational drills for teaching your players how to move without the basketball.
2. String Spacing - Dribble at Wing - This teaches your players how to move to an open spot when dribble penetration occurs.
3. String Spacing - Dribble at Post - This also teaches your players in the post how to move when a dribble drive happens.
4. 5v0 Pass and Move Drill - This is an important drill to teach your players how to move within your half court offense.
5. 3v3 Away Screens - Great offensive drill for teaching your players how to utilize screens.
6. No Dribble Offense Drill - This is one of the best half court offense drills out there.
7. No Dribble Advancement - This is a great variation of the no dribble drill that also removes shooting to get more repetitions.
8. 5 on 3 + 2 Fast Break Offense Drill - A great drill for improving your fast break offense.
9. Ball Reversal Offense Drill - Ball reversals tend to lead to better offense. This teaches your players how to develop the skills of moving without the ball, passing, and decision making.
Games & Fun Drills for Kids
1. Pivot 21 - This is a fun drill to improve your footwork.
2. Go! Go! Go! - This is a fun way to reward hustle and defensive footwork.
3. Chaser Drill (great for athleticism too) - Fun warm up drill to improve quickness and strengthen your lower body to reduce injuries.
4. Dribble Knockout - A fun way to add ball handling to the classic Knockout game.
5. Dribble Tag - Everyone It - A great game that forces necessary habits to be a very good ball handler.
How to create a children's training plan
Many times, visiting the training of children's teams in Ukraine and Portugal, I have seen and still see that most coaches do not have a pre-prepared training plan in their pocket. For some trainers, exercises last 20-25 minutes each. The coach thinks that this is how he achieves the successful completion of this exercise, not realizing that the players get bored doing the same action for a long time, and they lose interest and concentration. It was very rare that I saw a coach reach into his pocket and, having taken out a training plan, look at what was next in his training and what time was allocated for the next exercise. And it is very important whether this exercise is suitable for the age and technical preparedness of your players.
On this occasion, I would like to offer you an article by American basketball blogger Coach Mac - How to Create a Youth Basketball Practice Plan and a statement by leading coaches.
"Players win games. Coaches win practice." Practice is the time when coaches have the greatest opportunity to influence a player's basketball skills... However, I've attended practices so irrationally run that half of the coaching session is just trying to figure out which drill to do next.
All coaches should spend most of their time encouraging and providing feedback to your players. How can a coach fix this and make training more effective? We create a basketball practice plan.
Here are just a few quotes from great coaches that highlight the importance of having a plan to follow in a workout
"I always prepare my plan the night before a workout and then make adjustments a few hours before the workout starts" - Bobby Knight . "I spend almost as much time planning a workout as I do the workout itself. Everything is planned for every day" - John Wooden. Knowing how important it is to have a plan for every workout, let me show you the structure you should use to plan every workout.
Workout structure
We break down a typical workout into 5 sections ...
1. Dynamic warm-up / body movements
2. Mastery work
3. Team strategies
4. Small group games / games
5. Cool down
First, let's look at each section of the structure in more detail, and then later on, consider how much time you should spend on each of the sections.
Dynamic warm-up / body movements
Unfortunately, many of the children's basketball coaches are quickly released from this section. They have their team drills done in 2 minutes of dynamic warm up and immediately move on to other sections of the workout. When I watch children's games, it becomes obvious that the best players have fantastic balance, coordination and speed and change directions quickly accordingly. And there are those players who are struggling, trying, but who have not yet learned to control their body properly. It's extremely important that we help players build a sports base early on. With this foundation, it becomes much easier to learn new basketball skills as they progress. This workout section will help your players much more than their basketball skills. This will help them avoid injury and help in their movements in life. Here are some examples of body movements and coordination moves to include in your dynamic warm up.
- Jogging
- Sprinting
- Back Pedaling
- Side Stepping
- Changing Direction
- Changing Pace
- Jumping
- Landing
- Lunging
- High Knee Running
For more information on the best body movement exercises you must use Alan Stein's YouTube channel.
Skill work
Individual technique work should take up most of the training time at the level of the children's basketball team. Training should be fun and interesting, and at the same time improve the skills of your players. This includes drills that teach players how to properly perform skill skill moves, along with drills that help them learn when and how to use that skill. Drills that allow the player to learn when and how to use this skill are generally skipped.
As for throws, there's a little quote from Jeff Van Gundy ... Shooting hit percentage depends as much on the player's decision making as it does on his throwing technique - Jeff Van Gundy
This rule applies to all skills, not just throws. We need to put players in positions that require them to make decisions and learn from experience.
Here's a simple example to explain my point of view on the drill... Many trainers will practice the V-snatch to open up on the perimeter. They will show the players how to sprint, footwork to cover their defender and then rush in to get the ball. They will even show their players how to grab the ball and use 1- or 2-hit dribbles to complete a jump shot or double step shot. But when a player gets into a real game, and although he knows his rushing technique and footwork pretty well, he can't open up and get the ball. Why? Because they haven't learned when and how to use movement in competition. They didn't have enough experience with a defender to know when and how to rush behind the back and get the ball, etc. The bottom line is that we should include drills that teach the players' individual technique, and definitely drills that will allow them to gain experience on when and how to use it competitively. I recommend trying and splitting these two types of drills 50/50. Dribbling is an example: 5 minutes of steady ball handling and then a 1 on 1 game of hard tackling. Throws - example: 5 minutes of throwing technique and then 1 on 1 with a partner entering a defensive position where the thrower should decide whether to shoot or pass. Passing - example: 5 minutes of passing technique and then 10 minutes of 5 vs 4 play, so the attacking team has the advantage and will always have one player open.
 When I flip through games in small squads at the end of a workout, I still use them in this section to improve individual decision making skills. "Perform exercises that make your players think" - Bobby Knight.
TIP: At the youth basketball level, exercises should be no longer than 10 minutes. Players become uninterested in completing after this time. Keep the exercises short and fun!
Team strategy. Let me start by saying that "team strategy" is by far the least important part of kids' basketball training, and in my opinion not essential for players under the age of 10.
Training section *Team strategy* includes:
- Attack.
- Protection.
- Game schemes for attacking.
- Special situations.
If you decide to use this section of the training session with your team, please allow only a small amount of time for it. I see way too many coaches stealing practice time from skill development and spending half the practice helping players remember where they need to be for multiple play formations. Remember, we want to teach our players how to play basketball, not give them a couple of spots on the floor where they have to work every time they have the ball. Don't get me wrong, I don't mind teaching team strategy to players. - I include it in my basketball training. - I'm opposed to wasting half of your precious training time on this.
Team Wrestling and Small Team Games
These two sections are very important for every workout. What's the point of your players learning how to crossover with great technique if they don't understand when and how to use it in the game? The technical side of the performance is important, but it is also very important that allows children to use this technique in the game. This doesn't mean letting them loose in a 5-on-5 game in every practice though (even if this is indeed the case). One-sided games with a small composition include games 1v1, 2v2, 3v3, etc.
There are many benefits to using mini-games for your players including:
- Touching the ball more times.
- More space for movement training.
- More opportunities to hit the ball in the basket.
- And much more.
All of these benefits help players develop faster and have more fun! So if you have more than one hoop and enough balls, use them and play in small formations using all the baskets in your court. Another thing I like to do in 5v5 and small team games is to apply different rules to work on different skills. For example, one of my favorite rules is "no dribbling". It forces the kids to read the game and make tugs to open up. Without this rule, you will find a common youth habit of a player dribbling with 5 or 6 head down dribbles before throwing a wild hook into the basket while 3 of his teammates are standing wide open.
Cool Down
Cool Down - This part of your training should consist of a few minutes of slow jogging and walking up and down the gym, followed by a few minutes of static stretching. This allows the body to lower its temperature, and static stretching aids in flushing out waste products (lactic acid), among other things. I find stretching part of the cooldown important for communicating with the players. We could talk about the upcoming game/tournament or how we feel about our practice.
Structure of the Workout Plan
Now that you understand each section of the workout, let's talk about how much time during the workout should be devoted to each section. Below is how I distribute minutes depending on the duration of the workout.
60 minutes
Dynamic Warm-up / Body Movement - 10 minutes
Skill Work - 25 minutes
Team Strategy - 10 minutes
Team Wrestling / SSG Small Squads - 10 minutes
Cool Down - 5 minutes
90 minutes
Dynamic Warm Up / Body Movement - 15 minutes
Skill Work - 45 minutes
Team Strategy - 10 minutes
SSG Team Wrestling and Small Squads - 15 minutes, Cool Down - 5 minutes
120 minutes
Dynamic Warm-up / Body Movement - 20 minutes
Skill Work - 60 minutes
Team Strategy - 15 minutes
SSG Team Wrestling and Small Squads - 20 minutes
Cooldown - 5 minutes
Using this structure, I believe that it combines the teaching of individual technical skills with the practical application of these skills.
A Final Word on the Workout Plan
The biggest thing I want you to take away from this article is that you need a workout plan always and for every workout.
By using your training more effectively, your players will learn to play technically and effectively faster and you will look much better as a coach.
I want to hear from you. What do you think is the biggest benefit of planning and writing a kids basketball practice plan?
V. Melnychuk translated 12/07/2016.
Basketball practice hacks: how to score goals for beginners
Even if you are a novice basketball player, we will not give you a training plan, but we will tell you why the ball flies anywhere but into the ring and into your hands. It's all about technique: even with regular training and perseverance, novice adults and children often make simple mistakes. It's a shame, let's fix it. Below are 11 life hacks on how to hone your technique to increase the likelihood of a goal for your team.
Basketball Shot Rules for Beginners
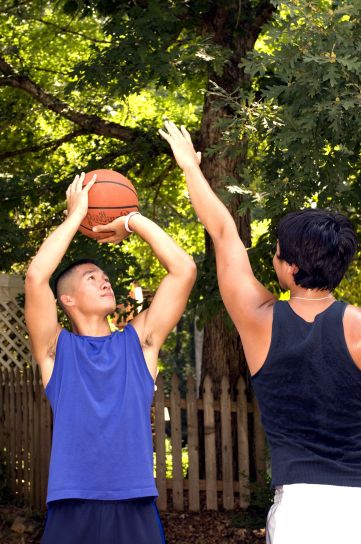
1. Hands up
In pursuit of the attacker, raise your hands, even if you are standing with your back to the pass, and even more so if the ring is in front of you. Your raised hands will increase the chance of intercepting the ball from the opponent by 2 times. Don't overlook this little thing!
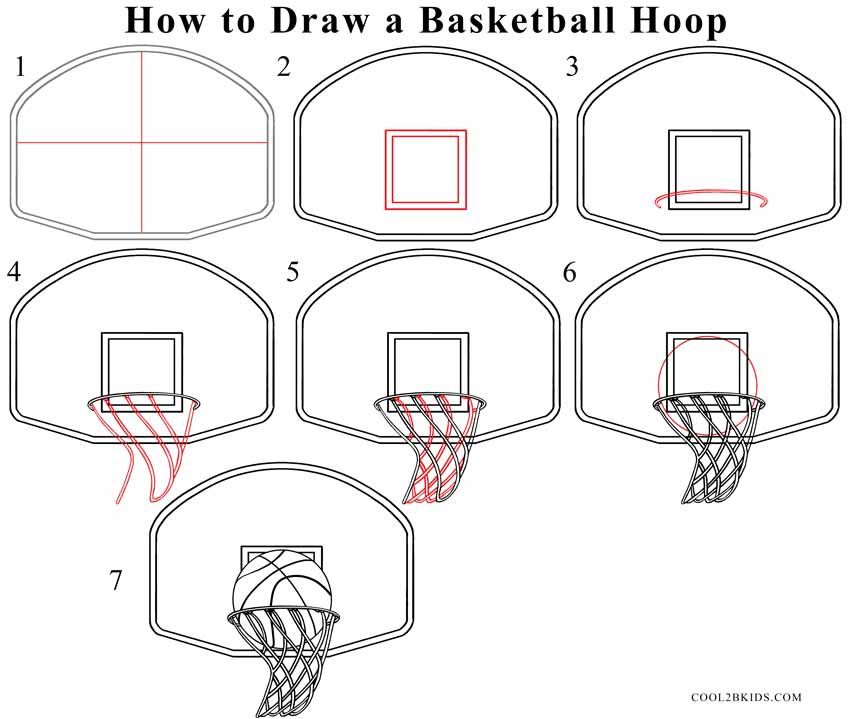
2. Throw from the shield
Even Tim Duncan did not neglect them! A square is drawn on the basketball backboard. If you are standing opposite the ring, then aim at the middle of the upper part of the square, if you are standing on the side, then at the corner. If you hit this square, then the ball is at 90% of cases will fall into the ring. The law of physics and no cheating!
3. Look at the ring, not at the ball
Practice driving the ball with your hand, not your eyes, develop tactile control. Your eyes should be on the hoop while dribbling and be aware of the position of your body in relation to the hoop. Then you will be able to take the correct posture, and the throw will be effective.
4. Dribble with the balls of your fingers only
The palm should not touch the ball, only the pads of the fingers. Dribbling should become familiar to you, like an extension of your hand. Then you can change its trajectory at any time and you will have more chances to score goals. Practice with the ball constantly.
5. Throw with one hand
If you throw the ball with two hands, you reduce the chance of hitting the basket. All the efforts of the throw are in one hand (in the right for right-handers, in the left for left-handers). The other hand only holds the ball, the leading one holds it with the fingers, not the palm.
6. Do not jump when protecting the ring
Jumping is the main mistake of rookie defenders. To intercept the ball and block the shot, simply stick out your hands. When you are in a jump, the attacker will easily bypass you.
7.
Don't look back
When you dribble, don't look back, but dribble and aim for the ring, focus on shooting (or passing to another player on your team).
8. Bring the throw to automatism
Incorporate the most basic basketball techniques into your training plan and bring the shot to automatism. Throw first from a distance of half a meter from the ring, gradually increasing it. Learn to throw the ball so that it hits the hoop without touching the edge.
Throw the ball with all fives and jump
Throwing Rules:
- Head in the center of the body - if tilted, accuracy is lost.
- Look at the ring: mentally build a trajectory. If you are far away, the ball flies in a curved curve with a maximum height of 2 meters above the hoop.
- A strong hand is in front and throws, a weak hand is on the side and directs, only holding the ball. The elbow of the throwing hand must be in line with the ring.
- The ball must rest on the fingers without touching the palm.
 The fingers are as far apart as possible and grab the ball.
 - Throwing arm bent 90 degrees, forearm perpendicular to the floor. If you bend less, then you get not a throw, but a throwing of the ball horizontally.
The main thing in the throw is the position of the body and its balance. Place your feet apart and parallel to each other: it is important to orient them in the middle of the basket. Then the direction of the body during the jump will coincide with the direction of the throw, and the ball will fly straight into the ring. When the feet are uneven, the ball flies in the wrong direction or does not reach (although the throw was normal).
Take a deep breath and release as you exhale.
How to hold the ball and shoot in basketball
How to throw correctly: straighten your arm, point your wrist up, and with your hand set the ball to rotate in the opposite direction from the flight. The ball should seem to "roll" off your fingers.