Home > Player > Basketball Skills > Shooting > Proper Basketball Shooting Technique, Fundamentals, and Form
It's often said that great shooters have a place on any team.
Even if you aren't blessed with tremendous speed, strength or athleticism, great shooting is one of the surest ways you can stand out on the basketball court.
If you spend the time developing and practicing your shot, it will pay off in:
Making the team
Getting more playing time
Scoring consistently
Feeling confident and having fun every time you step on the floor
Now, let me start with some good news!
Yes, you do need very good shooting form and technique to shoot consistently well.
But it does NOT need to be "perfect".
If you watch enough great shooters, you'll see that their form varies quite a bit based on what's comfortable (and what works) for them.
But almost all great shooters follow the principles I'll explain in this article. So keep reading for (all the good stuff)!
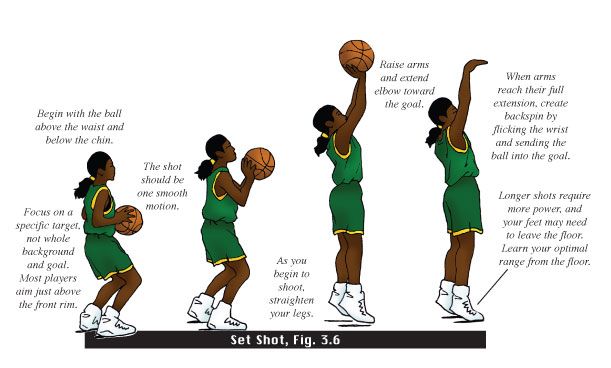
In this section, we give you the raw form and mechanics of stationary shooting.
In other words, this section does NOT address the fundamentals of shooting on the move and more advanced footwork you'll need for game situations.
Here's a quick roadmap of the stationary shooting fundamentals that we'll be covering:
Eyes on Target
Stance and Balance
Shot Pocket
Grip
Balance Hand
Delivery
Upforce and Landing
Follow Through
Correct Shot
EYES ON TARGET
To improve accuracy, locate the target (rim) as early as possible.
Keep your eyes on the target and do not follow the flight of the ball.
Keeping your target focus is very important!
STANCE AND BALANCE
Feet are shoulder width apart for good balance.
Feet should be in a slightly staggered stance that is consistent and comfortable for you. Your shooting foot is slightly ahead of the non-shooting foot in a comfortable position.
Point your feet in the general direction of the basket, but not necessarily directly at it. We prefer an open stance, but you can also use the closed (squared) stance if that's more comfortable for you. With an open stance, your feet point towards one side of the basket. For example, a right handed shooter will point his or her feet just to the left of the rim for a more natural position and shooting motion.
Once you develop a comfortable stance, line up your feet the exact same way on every shot. Whatever stance you use, consistency is critical.
Flex/bend your knees on every shot.
SHOT POCKET
As you catch the ball, move it quickly into the shot pocket.
Line everything up so the ball and your shooting eye form a straight line to the basket. This is VERY important.
Position the ball several inches above your waist.
Grip the ball properly and be ready to shoot.
Position the ball in your shot pocket the SAME way every time you catch it.
GRIP
Place the air hole between the middle and index fingers.
Line up your fingertip pads parallel to the long seams of the ball, so you can monitor the back spin.
Leave space between the ball and the middle of your palm. You should be able to insert a pencil between the ball and your palm area.
Spread your fingers far enough apart to comfortably balance the ball in one hand.
The ball should sit on your finger pads.
BALANCE HAND
Your non-shooting hand should be on the side of the ball.
Your balance hand should not add force or spin to the shot.
Your non-shooting hand should not move on delivery and should ALWAYS come off the ball FIRST.
DELIVERY
The ball should start motion directly upwards from the shot pocket.
Your elbow should be positioned comfortably under the ball.
The ball stays in front of you and should not go behind your head.
Uncoil your body with your legs, core, and arm power all coordinated.
Your elbow and wrist should extend in a straight line to the basket.
Your shooting hand should extend in a straight line to the rim.
Hand position on delivery is very important. The ball should come off the hand with perfect symmetrical backspin.
As shown in the picture to the right, your guide hand stays to the side and does not influence the flight of the ball.
UPFORCE AND LANDING
Release the ball on the way up, just before the top of your jump.
Use your legs to generate upforce.
You should land in the same spot that you jumped, which shows that you have good balance on your shot.
FOLLOW-THROUGH
Your wrists should be floppy (relaxed).
Fingers should be pointed at the target (rim).
Finish high. You should see your fingers at the top square of the back board.
Hold your follow through position until the ball hits the rim.
NOTE: If youd like specially-designed workouts for shooting and scoring, download our FREE Breakthrough Shooting Workout. It includes over 30 drills you can do by yourself or with a partner all you need is a ball and a hoop!
Click here to get your FREE Shooting Workout.
Related Products & Helpful Resources
Basketball Shooting Camps
Free Basketball Shooting Workouts
Basketball Workout App - Shooting Workouts, Guard Play Workouts, Post Workouts, etc.
How to Shoot a Basketball Perfectly (10-Step Guide)
Every young basketball player grows up wanting to learn how to shoot a basketball at a world-class level.
This is obvious to anyone who steps foot into a gym.
The first thing you'll look around and see are players as young as 5-years-old throwing up shots from behind the three-point line.
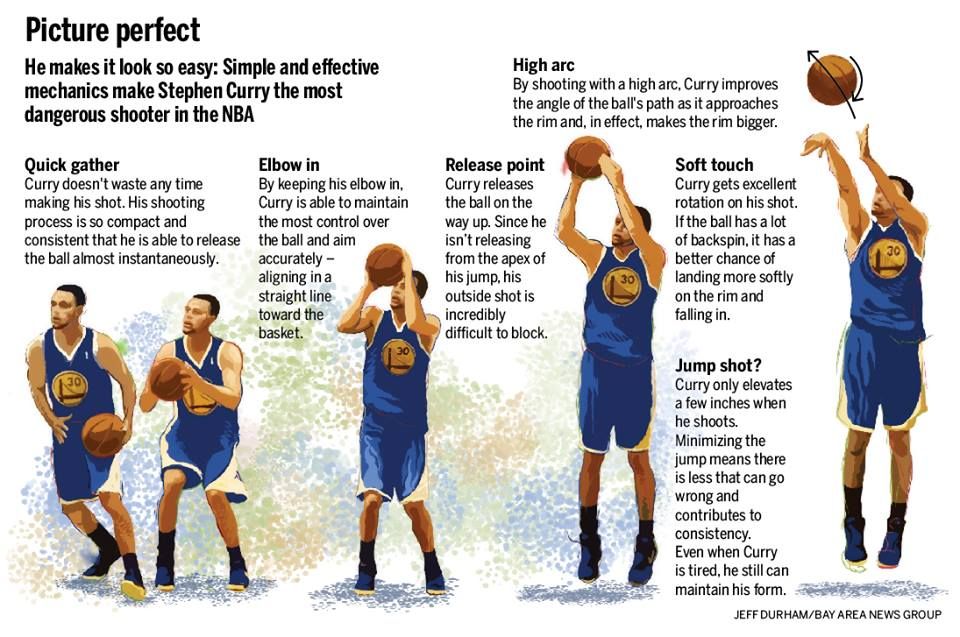
With the rise of players like Steph Curry and Damian Lillard, as well as the game of basketball developing to take more advantage of the three-point shot, learning how to shoot a basketball at a high level has never been more important.
There's only one issue with this...
Becoming a great shooter isn't an easy thing to do!
When I was a lot younger, I remember spending hundreds of hours in the backyard of our family home trying to perfect my shooting form.
I would sit in front of the TV and memorize the shooting techniques of my favorite player and then sprint outside and try to recreate it.
I would watch instructional shooting videos trying to diagnose the problems with my jump shot and then fix them.
Over time, I was able to improve a lot.
But as I started getting older and playing for different coaches, I kept running into obstacles in regards to my basketball shooting form. ..
Every coach wanted me to shoot the basketball a different way!
Some coaches wanted me to dip the basketball. Some didn't.
Some coaches wanted me to focus on the front of the rim. Some didn't.
Some coaches wanted me to completely face the rim. Some didn't.
As soon as I'd become comfortable with one variation, another coach would step in and demand I change it.
It's nearly impossible to become a consistently good shooter when you're constantly making these changes.
And that's why I created this 10-step guide...
My goal with this article is to clear up all confusion when it comes to learning how to shoot a basketball at a high level.
I'm going to give you detailed, step-by-step instructions on exactly how players should be shooting the basketball.
This article will be broken up into 9 sections...
Quick Navigation
3 Important Shooting Facts
The BEEF Method (and who shouldn't use it)
How to Shoot a Basketball Perfectly in 10 Steps
Why Becoming a Great Shooter is Important
5 Basketball Shooting Form Mistakes (and how to fix them)
3 Basketball Shooting Drills For Perfect Form
6 Common Shooting Technique Questions
11 Basketball Shooting Tips
A Special Note for Basketball Coaches. ..
Conclusion
3 Important Shooting Facts
Before we get into the details on exactly how to shoot a basketball, there are three important things I want you to always keep in mind...
Fact #1 - Shooting is the Most Important Skill in Basketball
Let's not kid ourselves...
There is no skill more important in the game of basketball than shooting.
Rebounding isn't more important.
Footwork isn't more important.
Passing isn't more important.
All those skills are still important, sure... but they're not as important as being able to shoot the basketball at a high level.
The sooner we can all admit this, the sooner we'll start creating better shooters at all levels of basketball.
Being a great shooter will result in not only more points for yourself, but more points for your teammates, too (we'll talk more about this later).
Fact #2 - Shooters are NOT born. They ARE developed
Not a single person on Earth was born with the ability to shoot a basketball at a high level.
Not Steph Curry.
Not Ray Allen.
Not Reggie Miller.
Not Kevin Durant.
All of these players began their lives with the same shooting ability as you, me, and all others players did…None.
"So, what separates them from the rest of us?"
They became some of the greatest shooters to ever step foot on a basketball court through hours and hours and hours of smart shooting repetitions in the gym.
Any basketball player who wants to become a great shooter one day must be willing to put in years of hard work to develop a great shot.
Fact #3 - There Are Very Few Players Willing to Put in the Work Required to Become a Great Shooter
I've been around the game of basketball for many years...
During all that time, I've seen very few truly great shooters.
"Why is that?"
Because 99.999% of players aren't willing to put in the work to become great.
But don't worry...
This is a good thing for you!
If you are one of the select few who is willing to put in the work (and I hope you are), then with a lot of hard work and dedication you can become one of the very few great shooters we have in the game today.
Now, let's get started!
The BEEF Method (and who shouldn't use it)
When kids first start learning how to shoot, one of the first acronyms a coach will teach them is the BEEF shooting method.
This is a super simple teaching tool created to help kids focus on four important aspects of shooting a basketball.
Here's what the acronym stands for...
(B) - Balance
(E) - Elbow
(E) - Eyes
(F) - Follow-Through
Simple, right?
To be clear, I do believe all of these points are important...
The problem with the BEEF method is that it's too simple.
Can it be used to teach absolute beginners or young athletes learning how to shoot a basketball for the first time?
Sure.
But once a player has learned the basics, it's time to move on to something more advanced.
I still see way too many coaches using the simple BEEF method with older and more experienced players.
We're letting the players down if our shooting advice doesn't get more advanced as they improve.
Let's go through the more advanced method I recommend...
How to Shoot a Basketball Perfectly in 10 Steps
Step #1 - Shot Preparation
Being a great shooter starts before you receive the basketball.
This step is often overlooked by most players and coaches but can be the difference between having enough time to take a good shot or getting your shot blocked by a defender closing out.
"You don't shoot fast. You get ready to shoot fast" - Don Meyer
Here are the three rules to make sure you're prepared to shoot when you catch the basketball...
a. Start with your knees and hips slightly bent
If you catch the basketball with straight legs, it will take extra time to bend your legs before raising up for your shot.
This is too slow.
b. Show target hands
Showing target hands to the player with the basketball shows them exactly where to pass to your shot pocket (we'll talk about this later).
c. Be mentally prepared to shoot
You'll never be more open than when you first catch the basketball.
As long as you're within your comfortable shooting range, you must be mentally prepared to shoot on the catch.
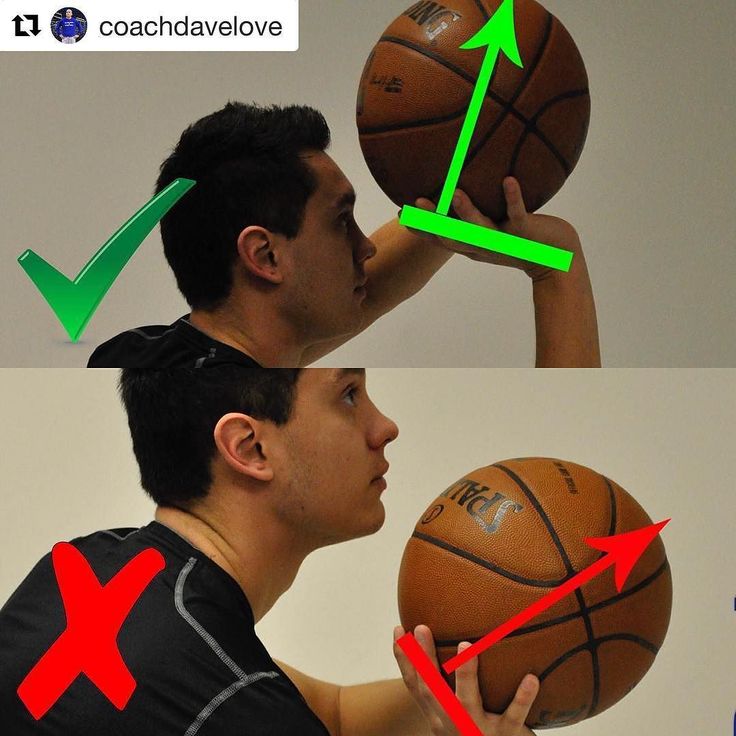
Step #2 - Hand Placement on the Ball
Upon catching the basketball or raising up into a shot, players must be able to quickly adjust their hands to the correct positions on the basketball.
The shooting hand must be under/behind the basketball and the balance hand should be on the side of the basketball.
The thumb of your shooting hand and the base of the thumb on your balance hand should form a 'T' (as pictured).
All finger pads and hand pads should be touching the basketball.
The only area of your shooting hand not touching the basketball is the small gap in the middle of your hand.
Another important but overlooked detail is that the fingers should be spread comfortably wide on the basketball.
These adjustments must happen immediately upon receiving the basketball.
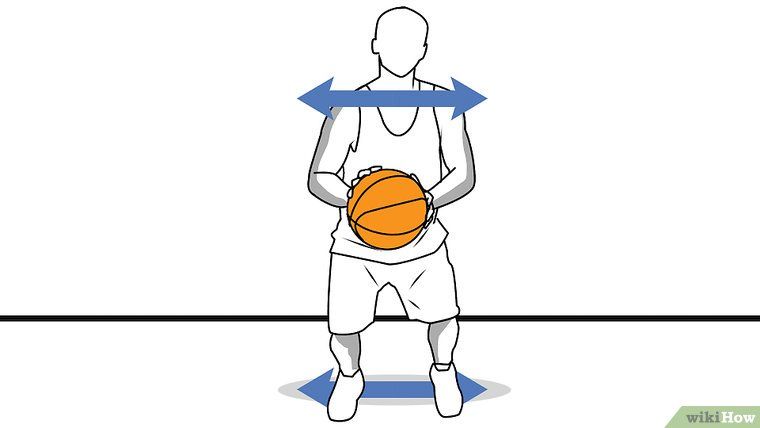
Step #3 - Balanced Base
"The key to being a good shooter is balance. Everything follows balance" - Larry Bird
Most players and coaches believe that shooting success is mostly to do with the movements of the upper body...
This is far from the truth. Great shooting always starts with the base.
If a player can't get the base of their shot correct, then it's very hard to become a consistent shooter.
A balanced base involves three important factors...
a. Feet slightly narrower than shoulder-width apart
If your feet are too narrow, it's very difficult to stay on balance when raising up for the shot.
If your feet are too wide, you won't get enough lift in your shot.
(Have a photo showing too close, perfect, too wide.)
b. Dominant foot slightly in front
When combined with the next step (the turn), this will improve the balance of your shot and release tension in your shoulder.
For right-handed shooters, this means sliding the right foot forward slightly. The opposite for left-handed shooters.
c. Weight equally distributed on each foot
For obvious reasons, a player should not be leaning to either side when taking a shot.
Your weight should be equally distributed on both feet.
Step #4 - Feet Direction (The Turn)
I could have included this in the 'balanced base' section above, but I feel that this is so important it deserved its own step.
When shooting the basketball, a player's feet should be turned slightly.
For right-handed shooters, their feet should be turned slightly to the left (11 o'clock).
For left-handed shooters, their feet should be turned slightly to the right (1 o'clock).
To understand why this is important, stand at the free-throw line with all 10 toes pointing towards the rim.
If you attempt to keep your elbow lined up with the rim while shooting with this base, you'll notice that tension is required in the chest.
To relieve the body of this tension, players should turn their feet slightly which will allow their elbow and shoulder to line up with the rim more comfortably.
Step #5 - Consistent Shot Pocket
The 'shot pocket' is the area a player is most comfortable starting the basketball from when beginning their shot.
This will usually be around the lower chest or stomach area of a player and will either be usually be in the middle of their body or slightly to the shooting hand side.
All players must find what feels comfortable for them.
Each time a player catches the basketball to shoot, they should be bringing the basketball back to their shot pocket before raising up into their shot.
There are two main reasons for this...
Keeping a consistent shot pocket ensures players are shooting the basketball the same way every time they shoot.
Since the shot pocket is often low, this will give player much better rhythm as they go up for their shot.
Will there be time when players don't have time to return the basketball to their shot pocket? Sure...
But they'll shoot better when they do.
Step #6 - Eyes on the Target
A while ago I asked 15 shooting coaches which part of the rim they encouraged players to focus on when shooting.
The answers were surprising...
Many of the shooting coaches were teaching their players to aim for different targets on the rim... Yet all of them were able to develop great shooters.
"What does this tell us?"
There isn't one 'correct' target to focus on when shooting.
Players have a number of options...
The center of the front of the rim.
The center of the back of the rim.
The first loop in the net.
The entire hoop.
etc.
Whichever target you decide to use, this is the most important thing you must keep in mind at all times...
Once you find a target you're comfortable with, be consistent.
'Front-rim shooters' and 'back-rim shooters' are focusing on targets which are 17 inches (45cm) apart aiming to achieve the same goal.
If you're constantly changing the target you're aiming at, it's nearly impossible for you to become a consistent shooter.
You have to pick one and then allow your shot to develop using that target.
Step #7 - Wrinkle the Wrist
Shooting with a straight wrist is another one of the most common problems for youth players.
Players who do this will often push the basketball towards the rim (flat shot) instead of shooting the basketball up and through the rim.
Fortunately, it's a simple fix with a visual cue.
The aim of this step is to get the wrist of the shooting hand bent back as far as possible (usually a little before 90 degrees).
This will give extra power to the shot and will also create the necessary backspin required to be a good shooter.
When bent back correctly, there will be small wrinkles in the skin on the back of the shooting wrist.
This provides a convenient visual cue for players to know if they're bending their wrist back correctly before shooting.
Step #8 - Elbow Under the Basketball
When you're raising up for the shot, the elbow of your shooting arm should be directly under the basketball.
This requires players to have their upper and lower arm forming an 'L' shape and also have their wrist bent back to 90 degrees (step 7).
Doing this will ensure that the basketball will be shot in a straight line to the rim and also have good backspin.
Players who flare their elbow out while shooting will often miss to the left or right because they're not shooting the basketball straight.
A player will often flare out their elbow when they don't turn their feet correctly (step 4).
This is because the chest requires uncomfortable tension to pull in the elbow when 10 toes are pointing towards the rim.
Step #9 - Balance Hand
The 'balance hand' is what we call the non-shooting hand.
As the name implies, its only role during the shooting motion is helping to balance the basketball on the shooting hand up until the release point.
For right-handed shooters, this is the left hand.
For left-handed shooters, this is the right hand.
If you've been around basketball long enough, you'll often hear this hand referred to as the 'guide hand'.
I don't like this terminology as this hand should never 'guide' the basketball anywhere during the shooting motion.
There should be no force from the balance hand when a shot is taken.
As the elbow starts to extend in the shooting motion, the balance hand releases flat off the side of the basketball.
If the balance hand isn't flat on release, this means that a player has pushed the basketball with their balance hand (most often with their thumb) while in the shooting motion and the shot will usually end up missing left or right.
Step #10 - Rhythm Shot + Follow Through
The final step is where it all comes together...
Shooting with rhythm involves many parts occurring simultaneously:
The basketball is lifted up from the shot pocket.
The knees and hips straighten out as the player raises themselves into the air for power.
The elbow of the shooting arm straightens up in the air once the basketball has been lifted past shoulder height. (To check if you're shooting the basketball up into the air at the correct angle, make sure that the elbow of your shooting arm finishes next to your eyebrow on the follow through).
Near the peak of the shot, the wrist is snapped in the direction of the rim so that they fingers are pointing towards the ground. This will ensure the basketball has good backspin resulting in a 'soft' shot.
Also at the peak of the shot, the balance hand will release from the basketball keeping perfectly flat. This ensures the balance hand isn't pushing the basketball.
The final two fingers to touch the basketball should be the index and middle fingers at the same time.
When you return to the ground, the rhythm of your jump shot will have guided your body forward slightly of where you took off from.When practicing, I encourage players to hold this form until the basketball has hit the rim so that they can look up and evaluate their technique.
Video:
Why Becoming a Great Shooter is Important
Hesitant about whether you want to spend the hours it takes to become a great shooter?
Here's why it's important that you do. ..
1. Increases Your Scoring Opportunities
Being a great shooter will increase your scoring from all areas of the court.
Not only will you make more shots from the perimeter, you'll also be able to drive to the basket and score much easier than before.
"Why is this?"
When you're a great shooter, the defense is forced to defend close to you on-ball and off-ball in order to prevent you shooting an outside shot.
This gives the defender a lot less time to react to a cut to the rim or a drive to the basket if you have the basketball.
2. Increases Your Teammate's Scoring Opportunities
Great shooters don't need to touch the basketball to help their team score.
By simply being a scoring threat from the perimeter, you will help your team's offense by creating space on the floor.
Since a shooter’s defender is forced to play close to them to prevent the quick shot, it's difficult for them to play help defense on the other offensive players.
This means that there will be more space inside to finish at the rim, more open cutters, more open driving lanes, etc.
3. More Points on the Scoreboard
At the end of the day, to win more basketball games, you need to put points on the scoreboard.
And improved shooting does that!
If a player is able to make 35% of their three-point shots, they'll be more efficient than a player who makes 50% of their two-point shots.
This is the reason why we're seeing more and more teams at all levels attempt more three-point shots as players become better shooters.
4. Proves You Work on Your Game
There's one rule that will always be true when it comes to shooting...
Shooters aren't born. They're developed.
It's impossible to become a great shooter without a championship-level work ethic and dedication to improve your game.
All coaches and recruiters know this.
Being a great shooter immediately proves to all watching that you have great attention to detail, you work hard, and that you’re disciplined.
These are all traits that recruiters are on the lookout for.
5 Basketball Shooting Form Mistakes (and how to fix them)
Here are the 5 main shooting technique mistakes that I commonly see in players at all levels.
Once you understand what to look for, many of them are simple to fix.
1. Not Shooting With Enough Arc
It's incredibly difficult to become a great shooter if you have a flat shot.
The flatter your shot, the less area of the hoop the basketball has to go through the rim.
In 99% of cases, this occurs because a player pushes the basketball out towards the rim from their chest instead of shooting the basketball up into the air.
To make sure this doesn't happen, ensure players are wrinkling their wrist, have their elbow under the basketball, and their elbow finishes next to their eyebrow on the shot release.
2. Pushing With the Balance Hand Thumb
The traditional basketball shooting motion is a one-handed shot.
The balance hand stabilises the basketball until near the point of release, and then the dominant hand should be doing 100% of the shooting.
But that's not always what happens...
A lot of players fall into a bad habit of using their balance hand thumb to provide extra power on the shot.
This is necessary when a player is young and doesn't have the strength to shoot with the traditional one-handed method. Instead, they compensate for this lack of strength by shooting with two hands.
As players grow older and develop more strength, they must transition away from the two-handed shot and learn to shoot without using the thumb of their balance hand.
3. Not Dipping the Basketball
Nearly every great shooter in basketball history dips the basketball.
Steph Curry dips.
Ray Allen dips.
Dirk Nowitzki dips.
Steve Nash dips.
Kevin Durant dips.
You get the point...
So, why do we have so many coaches pushing players not to dip after they catch the basketball? (yes, I had this happen to me).
I have no idea.
There are three main reasons why it's important to dip the basketball. ..
To ensure a consistent starting point (shot pocket).
For rhythm on the shot.
To prevent the upper body from being too tense.
Players: Dip the basketball.
4. Encouraging Players to Follow Their Shot
'Follow your shot' is one of the worst pieces of advice a coach can give to one of their players.
Doing so will negatively affect a player's shot in two ways...
a. It will ruin their shooting technique
Due to the rhythm of a jump shot, the motion will naturally take the shooter's upper body back and their lower body forward slightly.
This moves them away from the rim.
Players will be forced to shoot with bad technique to ensure they can sprint in and challenge for the rebound.
b. It will put them in the wrong mindset
When you tell a player to follow their shot, you're telling them that they're probably going to miss.
I think we can all agree that this is a terrible mindset to have before taking a shot.
Unless you know for certain a shot is off (players can always feel the bad ones), then you should never follow your shot.
Players should be putting 100% focus into completing the full shot routine with the best form possible each time they shoot.
5. Fingers Not Spread Wide Enough
Another important teaching point is making sure that players are shooting with their fingers spread comfortably wide on the basketball.
Many young athletes will catch and shoot with their fingers too close together.
The closer the fingers are, the less control players will have when they put up a shot.
The best time to address this point is when you're practicing form shooting with your team.
Get each player to hold the basketball in their shooting pocket and check to make sure each player is spreading their fingers wide enough.
3 Basketball Shooting Drills For Perfect Form
1. Perfects
'Perfects' involve a player beginning in a stationary position with the basketball in their shot pocket and focusing solely on shooting each shot with perfect form.
The goal is to make a specific number of perfect swishes from 4 different positions in front of the rim.
For example:
3-feet - 10 perfect swishes.
5-feet - 7 perfect swishes.
7-feet - 5 perfect swishes.
10-feet (free-throws) - 5 perfect swishes.
This is a great drill to begin individual shooting workouts with.
2. Spin Outs
The 'Spin Outs' drill works on catch-and-shoot situations.
This is a great drill for practicing shooting off the 'hop' or shooting off a '1-2 step'. As I said in a previous section, I always encourage players to practice both.
The drill involves players spinning the basketball out in front of themselves, catching the basketball with a hop or 1-2 step, and then rising up into the shot with perfect form.
These can be performed from midrange or from beyond the three-point line depending on the age and skill level of the player.
3. Off-Dribble Form Shooting
The final drill allows players to practice shooting with correct form off the dribble.
This is often the most difficult shot for young players.
To perform this drill, players start several metres behind where they plan to shoot the basketball from.
From there, the player takes 2 - 3 hard dribbles and then practices pulling up for the jump shot on balance.
After each shot, the player collects their own rebound (if they don't have a rebounder), and then returns to the starting position.
The biggest focus of this drill is to stay on balance throughout the entire shot.
6 Common Shooting Technique Questions
Here are the answers to 6 of the most common basketball shooting questions I receive...
1. "Should I shoot using a hop or the 1-2?"
Players must learn how to shoot off both.
I'm 100% against any coach demanding that their players use either the hop or the 1-2 step exclusively.
There are times throughout a game where the hop is better to use and there are times throughout a game where the 1-2 step is better to use.
Eventually, players will develop a preference and I recommend allowing them to make that choice on their own.
But players must be able to shoot off both.
2. "How many shots should I make every week?"
This is how many shots I recommend you make each week depending on the level of shooter you want to become...
Elite Shooter = 1,500 made shots per week
Great Shooter = 1,000 made shots per week
Poor Shooter = 500 made shots per week
This might seem like a low number to some, but I promise you if you're taking all shots from game spots at game speed it won't be easy.
With the amount of distractions we have today, it's crucial all players are scheduling time to get in the gym and work on their shot.
3. "What part of the rim should I look at when I shoot?"
There isn't a 'correct' target every player should be looking at.
Read 'Step 6' and check out this article where 18 shooting experts give their advice.
4. "Should the index or middle finger be last to touch the basketball?"
This is another one of those questions there isn't a 'correct' answer to.
I've always taught the fork (index and middle release at the same time), but there are many great shooting coaches with differing opinions.
I ran a poll on Twitter (follow me!) which received 1,115 votes and 49% of people believe the middle finger should be last to touch the basketball.
I know of very few shooting coaches who recommend this, but it shows that all finger releases should be tested by players.
I believe any of the three can work.
5. "Why is backspin so important?"
Backspin is important while shooting because it creates a 'soft' shot.
When a shot is soft (or has touch), the basketball has more chance of bouncing on the rim and then falling through the hoop.
If a shot is taken without backspin, the ball is going to hit the rim and bounce away with very little chance of a score.
6. "Which direction should my feet be pointing?"
Read 'Step 4'.
Brief answer: Feet should have a slight turn. This allows players to open up their shoulder and get their elbow under the basketball without putting tension on the chest.
11 Basketball Shooting Tips
1. Repetition, Repetition, Repetition
The great shooters separate themselves from the rest of the pack by spending thousands of hours shooting focused repetitions in the gym.
If you want to learn how to shoot a basketball at a high level, you must be prepared to put in the work to achieve it.
This might seem easy to commit to at first, but I promise you that there will be days when the last thing you feel like doing is going to the gym.
Cold mornings (and even colder in the gym).
You didn't sleep well the night before.
You feel like having a 'lazy day' at home.
The players who can cut through the excuses and get in the gym even when they're not feeling motivated to do so are the ones who separate themselves from the competition.
It's not about the number of hours you practice, it's about the number of hours your mind is present during the practice.
Kobe Bryant
2. Schedule Time for Shooting Practice
If all you do is stumble through each week and fit in shooting practice when it's convenient, I promise you that you'll never become a great shooter.
You must schedule your shooting workouts ahead of time.
Decide how many shots you want to make each week, work out roughly how long it will take, and then schedule your shooting workouts.
Once they're schedule, treat these blocks of time as non-negotiable.
A friend calls you and wants to hang out? Sorry, you're busy.
Feel like sleeping in late one day? Sorry, you're busy.
You must make shooting a priority.
3. Always Start Close to The Rim
It's never a good sign to see young players arrive at the gym and immediately start throwing up three-point shots.
Never underestimate the importance of starting close to the rim and making a lot of easy form shots to begin your shooting practice.
This allows you to get into a good rhythm, focus on your shooting technique, and build confidence by making shots.
Don't let your ego get in the way.
If you want to be a great shooter from 25 feet, you better be a great shooter from 4 feet first.
Steve Kerr
4. You Can't Rely on Team Practices for Shooting
Here's a little fact you probably didn't realize...
On average, a player will only shoot 25 - 30 shots in a team practice.
Doesn't sound like much, does it?
Of course, this will depend on the coach's priorities...
But with all the other skills, offenses, and defenses that need to be worked on, coaches simply don't have the time to schedule long blocks of shooting.
What does this mean?
90% of becoming a great shooter occurs outside of team practices.
You must be prepared to put in thousands of repetitions in the gym by yourself or with a teammate.
5. Always Have a Plan
If you simply go to the gym and throw up random shots while laughing with your friends, the rate at which you improve is going to be incredibly slow.
You must have a plan if you want to see quick results.
Ask yourself questions like...
Where do most of my shots come from during games?
At the next level where will most of my shots come from?
What shot do I need to make consistently to become a better player?
Which areas of the court do I struggle to make shots from?
etc.
Once you know the answer to these, create a workout.
This will ensure you're taking game shots, from game spots, at game speed.
Then when you get in the gym, you'll know exactly what you need to do.
I hate casual shooting. Every shot is preceded by working to get open and catch and shoot under game-like conditions.
Bobby Knight
6. Track your shooting workouts
I first started advising players to start tracking their made shots after reading a terrific article on shooting coach Dave Hopla.
Dave tracks every single shot he takes… and regularly shoots 98%.
Incredible, right?
In fact, you'll find it hard to find any great shooter that doesn’t meticulously track their makes and misses when working on their shooting.
So, why don’t more youth and high school players do it?
I have absolutely no idea!
It’s an absolute must if a player plans on improving their shot.
Here are 5 quick reasons why tracking shots will make you a great shooter:
You cannot improve what you don't measure.
It makes every single shot important.
Players can set shooting goals and commitments.
Players will see improvements.
Players will find out their weak shooting areas.
7. Analyze Your Missed Shots
You're going to miss a lot of shots...
Hell, even the best shooters on the planet make less than half of their shots during competitive play.
If you're going to become a great shooter, you must be able to analyze your missed shots and learn from them.
Here's something I want you to keep in mind. ..
Great shooters miss front and back. Poor shooters miss left and right.
"Why is this?"
In most cases, when a shot is missed due to hitting the front or back of the rim, it's because the players didn't judge the distance correctly or due to fatigue in the arms and legs.
When a player misses left or right, it's often due to a shooting technique issue.
While practicing, form the habit of looking up after each shot and evaluating the placement of both of your hands.
8. Incorporate Conditioning into Your Shooting Workouts
You're going to be fatigued while you're taking shots during games.
If you want to be a great in-game shooter, it's incredibly important that you replicate this feeling during your shooting workouts.
For players wondering why they can always shoot great while chucking up shots before practice but never in games...
This is likely reason why.
Being able to shoot the ball when you've expended so much energy at the defensive end of the floor is an amazing skill.
Steve Kerr
Here are a few ways you can add conditioning to your shooting practices:
1. Run the floor
After a specific amount of made shots, sprint a full length of the floor before continuing.
Once you've completed a few up-and-backs, you'll definitely feel yourself needing to put more focus into every shot.
2. Rebound for yourself
Rebound your own shots instead of getting a parent or teammate to rebound for you.
This will add a quick sprint after every missed or made shot.
9. Work on Your Inside Game, Too!
Want to know what's better than a player who can consistently knock down an outside shot?
A player who can consistently knock down and outside shot AND finish strong at the rim.
Understand this...
When you do become a great shooter, the opposition is going to start defending you differently than your teammates.
The opposition will be forced to player closer to you, they'll jump at more of your shot fakes, and they'll fight over screens instead of slipping under them.
All of this will lead to many more drive opportunities that wouldn't usually be there for a player who struggles shooting from outside.
Make sure you're able to take advantage of these opportunities by having a great shot fake and being able to finish strong around the rim!
10. Know the Shots You Should be Taking During Games
As you move from practices to games, it's important for all players to understand which areas of the floor are good shots for them.
The unwritten rule is that a players should be able to make 6-7/10 from a spot unguarded during practice before they start taking a shot from that spot during games (HS level).
Unfortunately for some, shooting the basketball is not an equal opportunity decision.
If you can't shoot well from certain areas of the court, you don't get to take those shots.
The players who spend thousands of hours in the gym are rewarded during games by shooting more than some of their teammates.
If you want to shoot more, practice more.
Shooting percentage is just as much about decision making as it is about technique.
Jeff Van Gundy
11. Don't Expect Instant Results
There is one thing I can promise you...
You're not going to become a great shooter overnight.
You'll feel like you're not making progress at all...
You'll feel like it's pointless to continue...
You'll feel like you want to give up...
But if you're consistent, the results will come.
This means being consistent with multiple weeks and months of working hard on your shot, not multiple days of practice.
I've had many players come to me upset because they've been making 200 shots a day for five days in a row and they haven't seen any progress.
It doesn't happen that quickly!
The process takes time.
A Special Note for Basketball Coaches...
If a youth player is shooting with bad technique, it's our fault.
Yep, you read that correctly...
Not any one coach specifically, but all of us as a whole.
Players fall into certain shooting habits early and we can't expect 5 - 12 year old kids to know the correct way to shoot a basketball.
It’s our responsibility as coaches to ensure that our players are shooting with great technique by teaching them correct form and using shooting technique drills in practice.
I once wrote an article explaining that there are only two steps to becoming a great shooter…
1. Master the Mechanics (Coach’s responsibility)
The first step to becoming a great shooter is mastering shooting technique.
It’s the coach’s responsibility to learn what great shooting technique is and teach it to their players.
It’s one of our most important roles in assisting players to develop their shot.
2. Lots of Smart Repetitions (Player’s responsibility)
The responsibility of the second step rests solely on the shoulders of each individual player…
Putting in the time to shoot the amount of shots it takes to be a great shooter (I recommend 1,500 makes a week).
There simply isn’t enough time during practice for players to get many shots up during team practice.
The bulk of these makes must come during the player’s own time.
Photo and Video Credit:
A big thank you to Ryan Razooky for providing this blog post with images and videos of the different steps on how to shoot a basketball.
Conclusion
Even after 6,000+ words on how to shoot a basketball, it's important to understand that there is not one 'correct' way to shoot.
Steph Curry
Dirk Nowitzki
Reggie Miller
Ray Allen
Klay Thompson
Peja Stojakovic
All of these players are world-class shooters with very different shooting techniques.
Use the 10-steps I've outlined above as a guide to develop your own shot and then make subtle changes to find what works best for you.
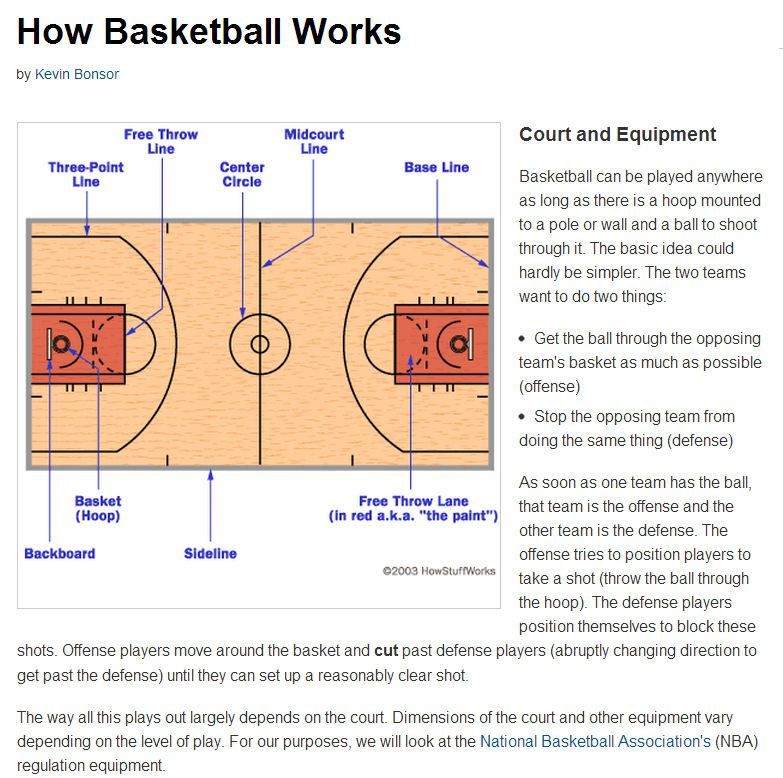
Basketball Shooting Technique: Basic Rules
One of the fundamental things in the game of basketball is the correct shooting technique. You can dribble, make accurate passes, play with your body as you like, but without this final stage of attack, your team will not score enough points to win the match. So how do you learn how to throw the ring correctly? SOVSPORT.RU has studied this issue in detail and is ready to provide you with several recommendations in this regard.
One of the fundamental things in the game of basketball is the correct shooting technique. You can dribble, make accurate passes, play with your body as you like, but without this final stage of attack, your team will not score enough points to win the match. So how do you learn how to throw the ring correctly? SOVSPORT . EN has studied this issue in detail and is ready to provide you with some recommendations in this regard.
There are different types of throw: from the pass, classic, slam dunk, free throw, with a bounce from the shield, without it, and so on. Let's take a look at what each of them is.
Free throw
First, let's look at the basic technique of all basketball shots - the free throw technique. The ball should be at chest level (feet may be in line or one leg extended slightly forward), held with fingers, elbows near the body, legs slightly bent at the knee joints, torso straight, gaze directed at the basket. Simultaneously with the circular movement of the ball (as in a simultaneous pass) and even more bending of the legs at the knee joints, the ball is brought to the chest. Without stopping the movement, the ball is carried along the body up and forward in the direction of the ring and with a sweeping movement of the hands, giving the ball, the reverse movement is released from the fingertips, while the legs are straightened. The weight of the body is transferred to the front leg, the body and arms must accompany the flight of the ball. After releasing the ball, the player returns to the starting position.
Throw from three steps
Throw from three steps is practiced as follows. First you need to stand on the line of the penalty area, a little obliquely in relation to the ring. It is necessary to take a couple of steps for a run, while not forgetting to dribble. As soon as you feel that you have already accelerated enough, take one long step with your right foot. The ball should already be in your hands at this point. After that, a short step is taken by rolling from heel to toe with the left foot. At the same time, you push off with your left foot, swing with your right foot, and carry the ball over your right shoulder so that it rests on your right hand, and your left supports it to the side. At the highest point of the jump, the arm is straightened to the end in the elbow joint, the throw ends with a sweeping movement of the hand. After the ball is released, the player lands on both feet. The description of the throwing technique on the move is given for players throwing from the right side. In the situation with the passage on the left, accordingly, everything is done the other way around: you take the first long step with your left foot, and the second with your right.
As a rule, in the technique of throwing from a three-step, another way to get the ball into the basket is used - a throw from the backboard. Its essence lies in the fact that, being at an angle with respect to the shield, it is quite difficult to throw the ball directly into the ring. This is where the white square line drawn on the shield around the bow of the ring comes to our aid. It is quite simple to train the technique of throwing from the side. To do this, you need to stand within the penalty area, at an angle of 45 degrees with respect to the shield. To throw the ball from this position, you need to hit the upper corner of the square line on the shield closest to us. That is, if you are to the left of the ring, you throw it to the upper left corner of this square, and if you are to the right, then to the right. Everything is quite simple and clear.
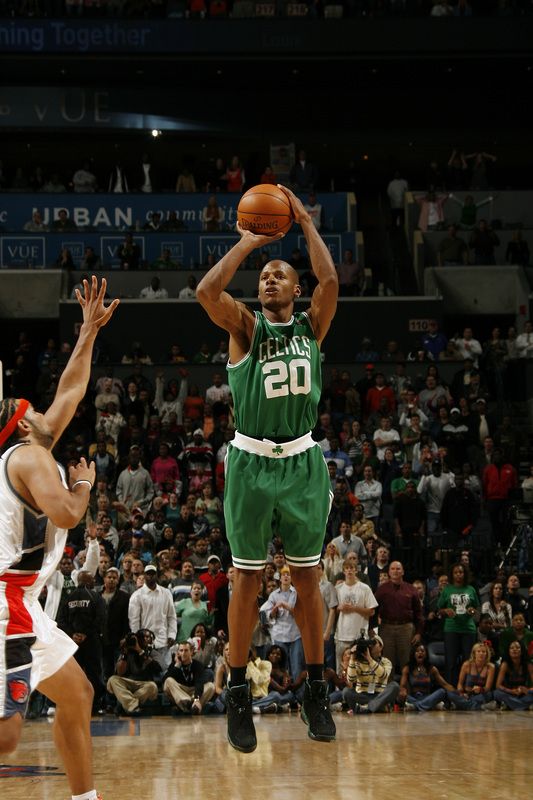
Jump shot
In general, the main technique of shooting at the opponent's basket in basketball is the jump shot. As a rule, in this way, players try to hit the target from a long distance. This type of throw can be roughly divided into three stages. First you have to get the ball in motion. Having caught it, you take a short stopping step with your left, simultaneously placing your right. Then you take out the ball with your right hand (if you are right-handed) over your head, along the way holding it to the side with your left. Take off from the ground with both feet. The technique of the throw itself is similar to the technique of performing a free kick: when releasing the ball from your hands, remove your left hand, and with the fingers of your right palm, give the projectile a reverse rotation. In the final stage, it is necessary to ensure that the distance between the points of repulsion and landing is approximately equal to 20-30 centimeters, so as not to collide with the player of the defending team.
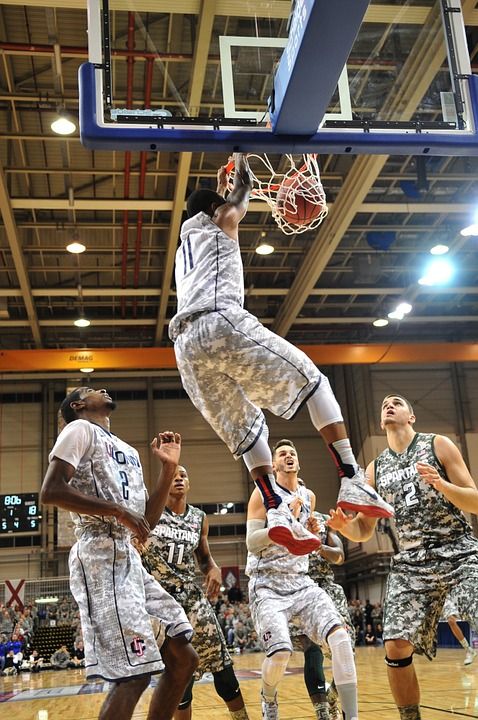
Slam dunk
If you have already mastered all of the above throwing techniques and are craving something more cool, then it's time to turn to perhaps the most spectacular, but at the same time the most difficult way to hit the opponent's ring - slam -dunk. Millions of basketball fans around the world go into a state of complete ecstasy every time they see a professionally made and beautiful shot from above. Do you want to be the same cool performer of this element, so that your opponents on the court are afraid of you, and the girls in the audience go crazy with your person? Then the following description of the technique of throwing from above will help you achieve this.
A proper slam dunk begins with the fact that a three-step throw also starts with a running start. Take the allowed two steps, dribbling the ball with your arm and controlling your approach. Jump off your lead foot, opposite your kicking arm, extend your arm towards the hoop and throw the ball into the net. Try throwing with one hand first, as a two-handed dunk requires a higher jump. Coaches recommend starting with a smaller ball as it is a little easier to control.
Also, there is a very important point with the landing. This must be done with support on both legs, softening and bending them at the moment of touching the site. Experts highly advise beginners not to mow under the NBA stars, hanging after the throw on the bow of the ring, as at this moment your balance may be disturbed and it will seem to you that you are falling backwards.
Actually, these are some of the basic shooting techniques in basketball, with the help of which 90% of the balls are thrown. Now your task, dear fans of this wonderful sport, is to train them so that your rivals do not have a single chance to win! I wish you success!
Methods of teaching basketball
How to choose sneakers for volleyball
replica swiss watches
Basketball is a great team game, the team consists of players whose skill is achieved with great effort. The only person who can understand that you are working hard is yourself. Remember, you only get out of the game what you put into it. Give yourself to her without a trace.
Jump shot
In basketball, an outstanding sniper is a piece item. If you want to be a great sniper, all you need to do is just want to be one.
First, you must improve your craft.
This includes having a good coach and years of training. Secondly, you must improve in game mode.
This means that you must perform throwing drills at the same intensity as in the game. It's far better to hit 100 shots in play than 500 sloppy shots that a good defender would never let you make in a game. Finally, you must understand that working on a roll is like investing in a bank. If you don't deposit anything into your account, you won't receive dividends when you need them.
The sniper must have "throw school". When throwing after a dribble, one of the main features is the last hit of the ball on the court, which must be fast and strong so that it bounces higher, right into your hands - this will help you not waste time handling the ball.
Individual Shooting Exercises
Exercise 1 Attention Concentration
Start from a distance close to the ring.
Throw with one hand. Follow correct technique.
Make five from each position. Take a step back and repeat (Fig. 1).
Exercise 2 7 throwing positions and rebound (4 meters)
Jump shot from position 1.
Pick up the ball, dribble quickly to position 7, shoot.
Pick-up, fast with guiding back to position 1.
Make 10 rolls.
Repeat the same steps using positions 6 and 2, 5 and 3, 4 (Fig. 2).
Exercise 3 7 shooting positions and a rebound (from behind the three-point line)
1. Repeat the same steps as in exercise 2 (fig. 3).
Exercise 4 Throw after stop
Start from position 1, toss the ball to position
Pick it up, while you have to run around the ball so that you are facing the ring.
Make 10 rolls, then advance to the next position.
Ex.5 Shooting from five positions after a fake move (from four meters or from behind the three-point line)
Start from any position.
On bent knees and with your head up, you do a throw feint, hit the ball one or two with your right hand, stop and jump.
Return to position, throw feint, one or two hits with the ball with the left hand, stop, throw.
At each position, 5 attempts (Fig. 5).
Exercise 6 Jump shots after dribbling
Start the exercise from the center of the field, move towards the hoop with dribbling at game speed, after stopping quickly shoot.
The shot must be taken from a middle distance or from behind a three-point arc. Perform the exercise, both on the right and on the left and in the middle of the site.
Use different types of dribbles: fast dribbles, broken tempos, pivots, etc.
Make 5 attempts in each direction (Fig. 6).
Exercise 7 Playing with a virtual opponent
Perform a free throw. If you have implemented it, you get one point. If not, then your "opponent" is three.
You make subsequent throws from any position except the three-second zone, imitating the rhythm of the game. Work on different moves and throws. Each of your successful attempts is estimated at the bottom of the point, unsuccessful at two for the "opponent". The game goes to 11 points.
This is a very good exercise to consolidate what you have learned. Try! Improve! (Fig. 7).
Double shots
Dr. 8 2 players, shot and rebound (4 meters or from behind the three-point line)
The drill starts with a good, clear pass. The player who made the pass from under the basket goes to the place of the thrower.
The player in position 1 catches the ball and shoots.
After the shot, the player runs to the rebound and then passes the ball 1 position and so on.
Each player must make five throws. The exercise is performed at a fast pace, but the throws should not be sloppy.
Then move to another position and everything is the same (Fig. 8).
Exercise 9 Two players, throw and rebound (per result)
The exercise is performed as described above.
The player who made the pass tries to interfere with the shot, but does not block.
Game up to 5 hits.
Then we move to another position, and so on. (Fig. 9).
Exercise 10 Two players, throw and rebound, throw feint
The exercise is performed in the same way as the previous one.
The defender who made the pass tries to interfere with the player in position 1, but does not block the shot.
The attacker makes a throw feint and beats the defender.
Performs a short dribble, stops and throws.
Do 5 times each and change position (Fig. 10).
Ex. 11 2 players, shot after a stoppage (from four meters or from behind the three-point line)
The attacker is in position 1, ready to receive the pass.
The player under the basket passes.
After the throw, the attacker waits for the rebound to be made.
The player receives a pass by making a stop, but already in position 2. Then back.
Make 7 throws, two free throws and switch (fig. 11).
Ex. 12 Moving shots (from four meters or from behind a three-point arc)
The attacker moves around the perimeter at game speed.
A player passes to the hand farthest from the ring.
The attacker must stop, catch the ball and throw.
Make seven throws, two free throws and change (fig. 12).
Note: The previous exercise has three options.
A) Receive the ball and throw it.
B) After receiving, throwing feint, dribbling in the same direction, throwing.
B) Receives a pass, throw feint, dribbling to the ring in the other direction, stop, throw.
Ex.13 Various dribbling options and a jump shot
The attacker starts from the center of the field and, dribbling at game speed, moves towards the ring, stops and takes a jump shot.
The player under the basket picks up the ball, the attacker runs to the center of the field, and receives the ball on the opposite flank. Moves with dribbling to the ring, stop, jump shot.
On the right side, dribble with the right hand, on the left - with the left (Fig. 13)
Note: Use speed dribbling, change of pace, transitions, pivots.
Three players, two balls
Exercise 14 Warm-up exercise
One player throws, another passes, a third rebounds.
Thrower becomes rebounder after seven tries.
Passer - thrower. Picking up - passing (Fig. 14).
Note: different options are possible
1) From seven positions (four meters)
2) From seven positions (from behind the three-point arc)
3) From five points with feints to shoot
4) Throw after stoppage
5) Throw and rebound (constant rotation around the circle)
Double shots: using screens
To use the screen effectively, you must read the defender correctly. You must always see the player with the ball and how the defender defends against you. A player who moves well off the ball and knows how to use screens correctly is very useful offensively. When you watch a match that has good players, notice how well they move off the ball. The hardest thing to defend against is a well-moving attacker.
Exercise 15 Back screen and snatch
The player imitates opening and screening behind his back, makes a dash to the corner of the court.
Throw to the nearest hand.
Attacker catches the ball and shoots.
The attacker picks up his shot, gives the pass to a partner and returns to his original position.
Make seven attempts and change (Fig. 15)
Note: do not back up when dashing, turn and run, but do not lose sight of the ball.
Exercise 16 Screening behind the back, "false" screening
1. Attacker starts on the base of the trapezoid and moves up to imitate the screening.
2. After the imaginary breakout runs, the screening attacker rises to the ball and prepares to receive the pass.
3. Having caught the pass, he immediately makes a throw.
4. Make seven attempts and change (Fig. 16).
0003
An attacker imitates a defender on the screen and quickly rises to the ball.
The player must be ready to receive the ball.
The attacker catches the ball and makes a quick throw.
Make seven attempts and change (Fig. 17)
Exercise 18 Screening the ball carrier, moving away from the ring
The attacker screens the ball carrier.
The ball carrier passes through the screen aggressively.
Instead of backing out to the basket (deuce), the screening attacker moves away from the basket and prepares to receive the pass.
Having caught the ball, he immediately makes a throw.
Make seven attempts, then switch.
Exercise 19 Barrier at the base of the trapezoid - opening to the flank
The attacker takes the player under the ring, breaks shoulder to shoulder through the barrier and makes a dash to the flank.
When catching the ball, the player must turn to the ring.
Use different throw options: just throw, and dribbling to the right or left after a throw feint. Change after five attempts (Fig. 19).
Exercise 20 Screening at the base of the trapezoid - opening into the corner of the court
The attacker leads the player into the three-second zone, pretends to break through to the flank through the screen, the defender starts running around the screener through the three-second zone.
The attacker makes a dash to the corner of the court, and the defender hits the screen.
Next, the same as in the previous exercise (Fig. 20).
Exercise 21 Screen at the base of the trapezoid - dash inward
The defender is chasing you, not falling behind until the very screen.
Then you run through the screen as close to the screener as possible and break into the three-second zone or foul line area.
Receive the ball by turning towards the hoop and throw it.
Also work out various options for continuing after receiving the ball. After five attempts, change (Fig. 21).
Throws in pairs: pass and discount
Ex. flank.
The receiving player is opened for transmission.
Player receives a pass and shoots.
The player who made the pass picks up the ball and gives it to the thrower.


 ..
.. ..
..
-Step-5.jpg/aid43486-v4-728px-Play-21-(Basketball)-Step-5.jpg)
 Everything follows balance" - Larry Bird
 Weight equally distributed on each foot


 ..
..