Home »
Misc »
How to run a zone defense in basketball
How to run a zone defense in basketball
2-3 Zone Defense - The Complete Guide
The 2-3 zone defense is by far the most common zone in basketball and is more than likely the specific formation that will come to a coaches mind when they hear the term ‘zone’ relating to basketball.
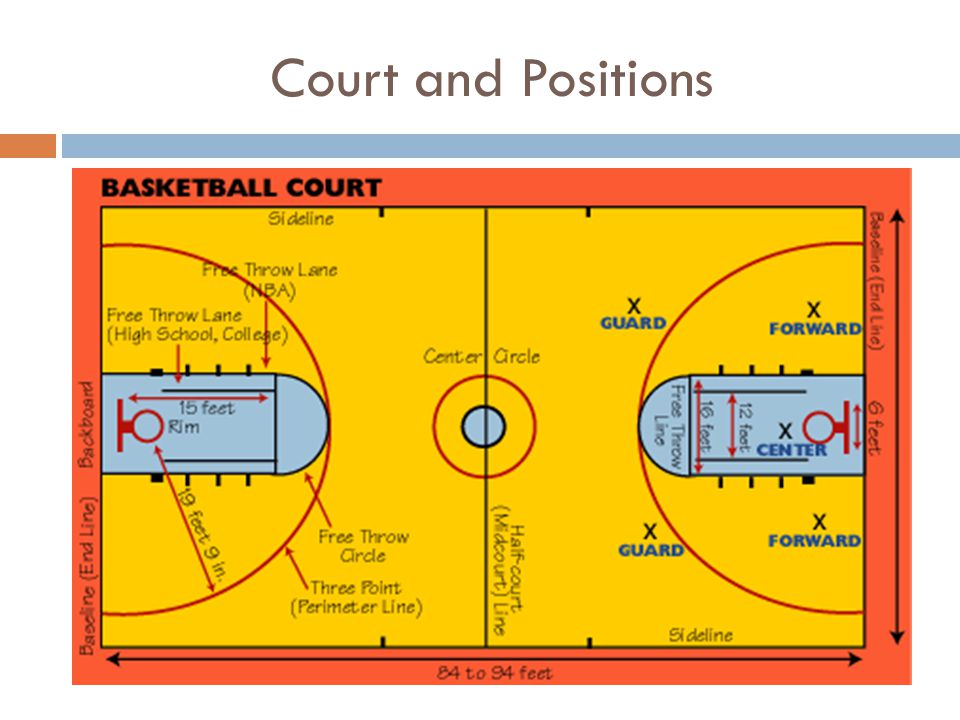
The 2-3 zone defense involves two players across the top of the zone near each high post; these players are referred to as the ‘guards’ (1 and 2), two players a step outside of each block; known as the ‘forwards’ (3 and 4), and a player in the middle of the key referred to as the ‘center’ (5).
The areas of a 2-3 zone defense.
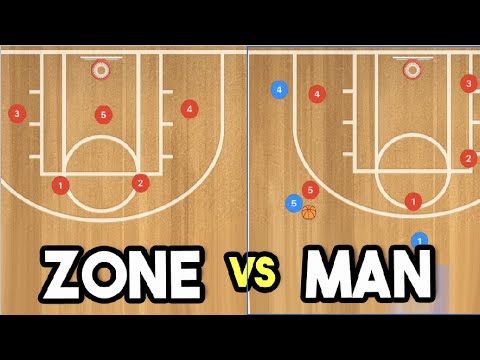
The biggest difference between a man-to-man and a zone defense is that instead of being responsible for a certain offensive player, all defensive players are instead responsible for an area of the court. The image shows the main areas each position is responsible for but keep in mind that they definitely do overlap at times depending on where the ball is on the court.![]()
Make no mistake, a 2-3 zone defense doesn’t allow your team to rest on defense. A great 2-3 zone defense requires just as much effort as a great man-to-man defense.
Jim Boeheim at Syracuse has won nearly 1,000 games and made a career primarily out of teaching and running the 2-3 zone defense.
While I don’t recommend using this as your primary defense, the 2-3 zone is a fantastic change-up defense to throw a different look at your opponent and see how they respond to it.
The 2-3 zone defense is by far the most common zone in basketball and is more than likely the specific formation that will come to a coaches mind when they hear the term ‘zone’ relating to basketball.
Advantages of a 2-3 Zone Defense1. Protects the Paint – The 2-3 zone is a great defense to keep the ball as far away from the hoop as possible. This is accomplished by the center basically never leaving the paint and always having help very close.
2. Teams Aren’t Prepared for a Zone – Every team prides themselves on their man-to-man offense and set plays. How often do most coaches practice their zone offense or set plays against a zone? Barely ever. Most coaches will only have a couple of practices to prepare themselves for your 2-3 zone defense.
3. Will Limit Fouling – Due to a combination of factors, players simply don’t foul as much while playing in a zone defense.
4. Teams Aren’t Patient – The number one way to beat a zone is with smart passing and being patient until you get a good shot. Well I have good news, not many teams are patient. You’ll find most teams rush and will often take contested shots, or they’ll turn the ball over trying to make fancy passes against the zone.
5. Tempo Control – A good zone defense can dictate how fast the game is played. Want a faster tempo? Play a more aggressive trapping zone. Want to slow the game down? Play a patient zone with minimal traps.
6. Fast Break Opportunities – With both guards always at the top, the positions of a zone put players in great position to fast break many times throughout the game.
Weaknesses of a 2-3 Zone Defense1. Great Outside Shooting – The biggest disadvantage of a 2-3 zone defense is that it can struggle against great outside shooting teams. It’s the trade-off this defense makes in order to pack the paint so well.
2. Rebounding – In a zone players don’t have specific match ups, they guard areas. This can make rebounding a problem at times.
3. Offense Chooses Matchups – Though there will always be great help if they get beaten off the dribble, if the offense want to match their best player up against your worst player every time down the floor, they can.
4. Playing from Behind – If you’re playing from behind teams can use up all of the shot clock on each possession. If there’s is no shot clock, well, it looks like you can’t play zone anymore.
5. A Loose Link – The zone relies heavily on the team working together as a unit. If any player doesn’t fulfil their role, other defenders will have to compensate and it will lead to open gaps and usually easy scores for the other team.
Who Should Use a 2-3 Zone Defense?Let’s get this myth out of the way early. Too often I hear coaches voice that “a 2-3 zone defense should ONLY used by big and slow teams”. This is stupid, and definitely not true.
The coach just has to make a few tweaks to the defense depending on the personnel you have on your team.
For example, if you do have a big and slow team, the most effective way to use a 2-3 zone may be to play a patiently, limit trapping, and force the offense to move the ball around until they can find a gap or an open shot.
On the other hand, if you have a small and fast team, the most effective way to use a 2-3 zone may be to trap often, force the offense to take quick shots and make rushed decisions, look for steals, and keep the tempo of the game as fast as possible.
Any team can use the 2-3 zone defense, you just have to adjust how you run the zone to best suit your personnel which we’ll talk about later on in the article.
The 4 Most Important Rules of a 2-3 ZoneBefore we get into the particulars of the zone, I want to share with you the four crucial aspects of an effective zone. Keep these in mind while you’re reading through the rest of the article.
1. Everyone must have active hands and be in stance
Great passing is one of the weaknesses of the zone. If teams are able to effectively make passes inside the zone the whole floor opens up for the offensive team. The defense must keep their hands up and active at all times to discourage passes inside and get deflections. Being in stance makes it quicker to react when a pass is made or a potential steal opportunity arises.
2. Everyone must move on the flight of the ball
Everyone must move on the flight of the ball and not on the catch.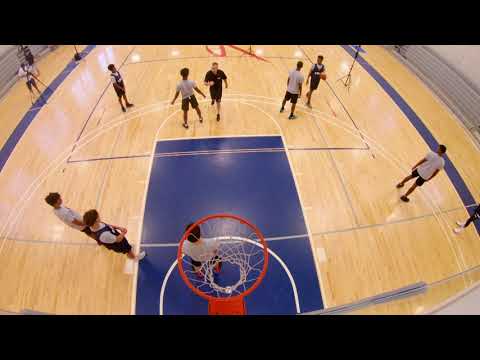 Moving on the flight of the ball means we’re in defensive position when the offensive player receives the basketball. The quicker your team can get to the player with the ball the better your defense will be.
3. Everyone must communicate
Communication is critical to every defense and that includes the 2-3 zone. Players must communicate screens, cutters, bumping, who’s got the player with the basketball, etc. All great zones have great communication.
4. No layups
This point may seem like the odd one out but it must be included. Do not allow layups against your zone. Players must not make it easy for the offensive team inside.
Positions of a 2-3 Zone DefenseNow we’re going to go through where your players should be positioned depending on where the ball is on the floor.
There are 6 mains spots on the court the offensive team will have the ball against a 2-3 zone defense:
- The top.
- The wing.

- The corner.
- High post.
- Low post.
- Short corner.
Let’s discuss each of them in detail…
Positions – Top of the KeyBasic setup when the ball is at the top of the key.
When the ball is at the top is when we see the basic 2-3 zone defense structure. Two guards are at the top of the zone (1 and 2), two forwards a few steps out from the block (3 and 4), and the center in the middle of the key (5).
All that we want to happen from this position is for the point guard to pass it to either of the wing players.
We DO NOT want the ball to go from this position into the high post area. That can happen by the point guard attacking through the middle of the guards or passing to a player in the high post.
We discourage both of those options by making sure the guards are close enough that they are nearly able to touch hands.
Note that in a 2-3 zone defense we don’t actively deny the pass to the wing players. Instead, we rely upon players moving on the air time of the pass and a tactic we call ‘bumping’ (I’ll discuss this is detail a bit later in the article) that involves the forward on the ball-side quickly closing out on the wing player before getting bumped by the guard who quickly recovers to the wing.
Positions when a player is forced to take the ball. Notice 2 is responsible for the high post.
If the point guard at the top of the key is a good shooter and within shooting distance, we must respect the shot by one of the guards playing them. Whichever guard is closest to the ball handler must call out ‘Ball!’ or ‘Mine!’ to prevent confusion.
When this happens the other guard is now in charge of denying the high post while the on-ball defender puts pressure on the point guard. The same rules apply on the wings, on any pass to the wing player the forward must help out and then be bumped back by the guard.
As for the low players, notice that the forwards are a little higher than usual. This is to make the close out to the wing player quicker because it’s a shorter distance.
Positions – Ball on the WingStructure when ball is on the wing and the corner is free.
After the ball has been passed to the wing player and the forward has been bumped down this is how we should be set up.
- The on-ball guard (2) should be in either a neutral stance or forcing the ball towards the baseline depending on the coaches preference. I prefer to channel the ball towards the baseline as this makes it harder to pass to the high post and forces the offensive player towards our bigger defenders.
Structure when there is a player in the corner.
- The ball-side forward (4) should be in the short corner or fronting the low post player if there is one.
- The weak-side guard (1) should be near the closest elbow if there’s no player in the high post, or denying the pass to the player in the post from the high side.
- The center (5) is behind to half-fronting the post player.
- The weak-side forward (3) should be a few steps up the lane preparing to pick off any skip passes the player with the ball might make.
Positions – Ball in the CornerCorner structure with the 2 guard sagging in.
The image shows the normal positions for when the ball is in the corner.
- The ball-side forward steps out and pressures the ball.
- The center fronts the post.
- The ball-side guard is sagging into the lane to prevent a pass inside and to discourage the drive.
- The weak-side guard is denying the high post.
- The weak-side forward is up the lane getting ready to pick off the skip pass.
If you’re not trapping (which we’ll talk about soon), the two main options you have to decide on is in regard to the ball-side guard. They are:
- You can choose for the guard to sag into the lane, allowing the simple pass from the corner to the wing while preventing the pass inside or dribble penetration.
- You can get the guard to completely deny the pass back outside and force the corner player to make a decision and be aggressive.
If you have an experienced team, you could use the second option against certain weak players on the other team and force them to make a decision.
Positions – Ball in the High PostStructure when the ball is in the high post.
When the ball makes it into the high post we’re now in a very vulnerable position. If the offensive team have put a good passer in the high post (a wise decision), every other offensive player on the floor is now only a short pass away and a threat for a quick catch-and-shoot. That’s why we need to keep it out of there!
- The center (5) immediately sprints up to play the ball.
- The two forwards (3 and 4) must immediately ‘pinch’ in and take the closest player on their side of the basket. When the ball is at the high post we’re in a vulnerable position for a high-low pass for an easy layup.
![]() We must not allow this pass! But at the same time, the forwards must be prepared to sprint out to the corner to defend the three-point shot if the pass it made to there.
We must not allow this pass! But at the same time, the forwards must be prepared to sprint out to the corner to defend the three-point shot if the pass it made to there.
- The two guards (1 and 2) must close in to the ball and try and force the high-post player to pass the ball out, but be ready to sprint out and defend the wings if the pass is made to either one.
As you can see, it’s very tough for a zone when the ball makes it into the high post. The best way to defend it is to not let it get there in the first place!
BumpingAs referred to earlier in the article, bumping effectively is absolutely crucial to running a great 2-3 zone defense.
You see, the problem with a 2-3 zone is that the two guards at the top are responsible for guarding three positions around the perimeter; the top of the key, and the two wings.
We run into problems on passes to the wing, skip passes, and ball reversals, where the offensive wing players may be left open while the guard quickly recovers to them; long enough that they’d be able to take an open shot.
To combat this, we have the closest forward help out by closing out on the wing player to prevent the shot, before getting bumped back down to their normal position when the guard responsible for that area arrives.
This help from the forwards allows two guards to play against three offensive players on the perimeter.
Here are two examples…
1. A Ball Reversal.
Notice that when the ball is reversed from one side to the other the 2 guard is stuck having to guard the 1 and 2 at the same time when the pass is made. He is helped by ‘bumping’ of the 4 who temporarily helps out while 2 sprints and recovers to the offensive 2 guard.
Bumping in a ball reversal.
2. A Skip Pass
It’s the same situation if there is a skip pass from wing to wing. Since the weak-side guard is denying the high post, it’s a long way to recover if there is a skip pass thrown. To help this, the ball-side forward helps out until the 2 guard can bump them back down.
Bumping on a skip pass.
Rebounding3, 5, and 4 crash their respective sides of the hoops while 2 gets a body on the offensive 5 player.
Rebounding must be a constant emphasis when coaching a 2-3 zone defense. Since your players are guarding an area and don’t all have specific players, your team is at a distinct disadvantage compared to a man-to-man each time a shot is put up.
Rebounding is an area that you must judge differently on each team you coach and there’s not one correct answer.
If you have a bigger team, then you may only need your forwards and center to rebound and your guards can leak out for fast break opportunities. Although, if you have a smaller team, you might require everyone to crash the boards.
You have to decide on your own philosophy regarding rebounding depending on the personnel of your team.
Either way, there will always be gaps and a zone will allow more offensive opportunities than a man-to-man. This can lead to easy put-back shots or the kick outside to open shooters. All we can ask is that our players box out, are relentless pursuing rebounds, and do their best to secure the basketball.
Trapping in a 2-3 Zone DefenseTrapping is very effective for a zone defense. Here we’re going to discuss the different types of traps you can use in a 2-3 zone and I’ll also include how often I think you should use each one.
Depending on the amount of traps you use and where they are will play a big factor in the tempo of the game.
It’s important that the players don’t foul on the trap and they force the offensive player to throw the ball high over the trap to give your other players a chance to steal the ball.
Stress to your players that the steal doesn’t often come directly from the trapping players, it comes from the interception by the other defenders.
Trapping – Top of the KeyTrapping the point guard as they cross half court.
The first trap you can use is on the point guard right as they come across the half-court line.
This is a surprise trap and should only be used a couple of times per game. Usually out of a time-out or in a late game situation when you desperately need a steal. You can also use this trap against weak or unconfident ball-handlers.
As soon as the ball-handler crosses half court everyone must act at exactly the same time. This is crucial to running this trap effectively. We don’t want to give away what we’re doing or give them an easy pass out of it.
- The top two guards (1 and 2) must sprint at the ball-handler with high hands to prevent easy passes over the top and then trap him aggressively.
- The two forwards (3 and 4) immediately sprint out to deny the wing players as this is where the point guard will often look to pass first.
- The center (5) is left guarding two players. Most likely one in the high post and one in the short corner or the corner.
 The center has the toughest job and must try and predict where the pass will be made and play the ball accordingly.
Be aware that you may get burned when running this trap. The offensive team could end up with an easy layup. But I’ve found if used at the right time and against the right player, this trap can be very successful.
BFC Recommendation: Use this trap two to three times per game
Trapping – On the WingTrapping on the wing.
The trap on a wing from a 2-3 zone defense involves the ball-side forward and the ball-side guard.
- Instead of bumping like usual, the forward (4) doesn’t retreat and we aggressively trap the wing player with the forward and the ball-side guard (2).
- The center (5) fronts the post and is ready to sprint out and pick off or defend the player in the corner temporarily.
- The weak-side guard (1) denies the closest pass to the wing player, usually the point guard.
- And the weak-side forward (3) is trying to read the other players and pick off any skip pass that may be thrown.
I’m not a big fan of trapping on the wing as I find the offensive player usually has enough options to make an easy pass out of it and then you’ll find your team in bad positions.
But it might be something you might want to throw in randomly and catch the other team by surprise!
BFC Recommendation: Use very rarely. Occasionally as a surprise, if needed.
Trapping – In the CornerTrapping the corner.
The corner trap in a 2-3 zone defense is by far the most effective trap you can use in a 2-3 zone.
The offensive player with the ball is forced to make a very long and high pass in order to get the ball to a teammate if the trap is performed correctly.
- When the pass from the wing is made to the player in the corner, the ball-side guard (2) immediately follows the pass and will trap the player with the forward (4) that is closing out.
- The center (5) must front on the post when the ball is in the corner.
- The weak-side guard (1) sprints all the way across the court to deny the easy pass back to the guard.
- And now it’s up to the weak-side forward (3) to keep his eyes on the two other players and anticipate the high pass that will be made. He must be in line with the lowest of the two players to prevent a lob or back-door pass.
The benefit of this trap is that after you get a few steals and make it tough for the offensive team, they’ll simply stop passing it to the corner because they don’t want to be trapped. This makes it much easier to play a 2-3 zone defense.
BFC Recommendation: Trap the corner every time if you have a team that can.
Trapping – Short Corner/PostTrapping the Short Corner
You might have noticed that we skipped the short corner/post section when we were going over general positions. That’s because we ALWAYS trap the short corner and post. So I saved explaining it until we got to the section on traps.
In a 2-3 zone defense, we always want to keep the ball as far away from the basket as possible. For that reason, when the ball is passed into the post or short corner, we must immediately double and get the ball out of there! This trap also occurs on all baseline drives to the ring.
- When the ball gets into the short corner or the post it must be immediately doubled by the center (5) and the closest ball-side forward (3).
- The weak-side forward (4) must now look after the paint. The player does this by coming across and making sure there isn’t anyone flashing down from the high post (a common pass).
- The ball-side guard (1) denies the easy outlet pass to the guard on the perimeter.
- The weak-side guard (2) is now playing the interceptor with the other two players and should back down as far as he needs to in order to see both players.
The main goal we want out of this trap is for them to pass the ball out and we can set up our defense again.
BFC Recommendation: Trap the short corner/post every time.
A Few Random 2-3 Zone Thoughts1. Ball Pressure – Ball pressure will depend on how aggressive of a zone your team is playing. Don’t be afraid to get right up on players and force them to drive or make a lobbed pass that may be picked off.
2. Disguising a 2-3 Zone – You can disguise a 2-3 zone defense by having your point guard play full court defense while your other guard plays in the high post. The second guard takes the first pass using bump help from the forwards and then the point guard falls back into their position. This is a great way to disguise a 2-3 zone or force the ball to a particular player or side of the court.
3. Run Shooters off the 3-point Line – As we’re stuck closing out often in a 2-3 zone, if you line up against a great 3-point shooting team, run the shooters off the three-point line and make them put the ball on the floor. The strength of the zone is in the key so there will be help.
4. Scouting Other Players – The more advanced your team, the more you should look at scouting the opposition and making adjustments depending on certain players. Who’s the shooters? Should you deny the ball to a certain player? Should you immediately trap a certain player every time they touch the ball?
Should You Use a 2-3 Zone in Youth Basketball?No.
I could argue for hours the reasons you shouldn’t use a zone defense in youth basketball (and have had to too many times, unfortunately)…
Just don’t do it.
Yes, it’s very effective in youth basketball.
Yes, you’ll win more games in youth basketball.
No, you still shouldn’t do it.
I’m not going to get into depth on the topic in this article (I’ll save that for a later post), instead, if you want to read further on the subject, read this article from Breakthrough Basketball and make sure to watch the video by Stan Van Gundy.
Adapting a 2-3 Zone to Fit Your TeamIf you’re looking to add this defense to your team’s arsenal, there are three things you must decide on before implementing the 2-3 zone with your team.
1. Decide how often and where you’ll trap.
2. Decide how aggressive your players will be on the ball.
3. Decide how many players will crash the boards.
These answers to these three questions will decide at which tempo you play the game.
If you have an athletic and quick team you should be trapping often and being aggressive on the ball. If you have a slower team you can trap less and be patient until the other team takes a silly shot.
ConclusionCongratulations, you’ve made it through a 4,000+ word article on the 2-3 zone defense and should now have a thorough understanding of how it works.
As stated earlier in the article, I don’t recommend you use this as your primary defense, but it’s a great defense to throw at your opponent and see how they respond to it. If it works, keep using it.
It’s not a lazy defense if played correctly and will definitely challenge your players mentally and physically, but the benefits can be enormous.
Some teams simply can’t play against a 2-3 zone defense, so use it!
Coaches: At what age should we start implementing the 2-3 zone defense into competition?
How to Teach a 2-3 (2-1-2) Zone Basketball Defense
The Internet's #1 Website for Basketball Camps, Resources and Learning Products
|
Member Login
Summary
This zone is similar to the 2-3 zone that Jim Boeheim uses at Syracuse. This is can be a very
effective zone defense, because it still covers the 3-point arc as well as the inside game.
Youth Coaches: Even though, you CAN win more games, AVOID playing any type of zone defense, because it can teach bad habits and hinder the long-term
development of your players.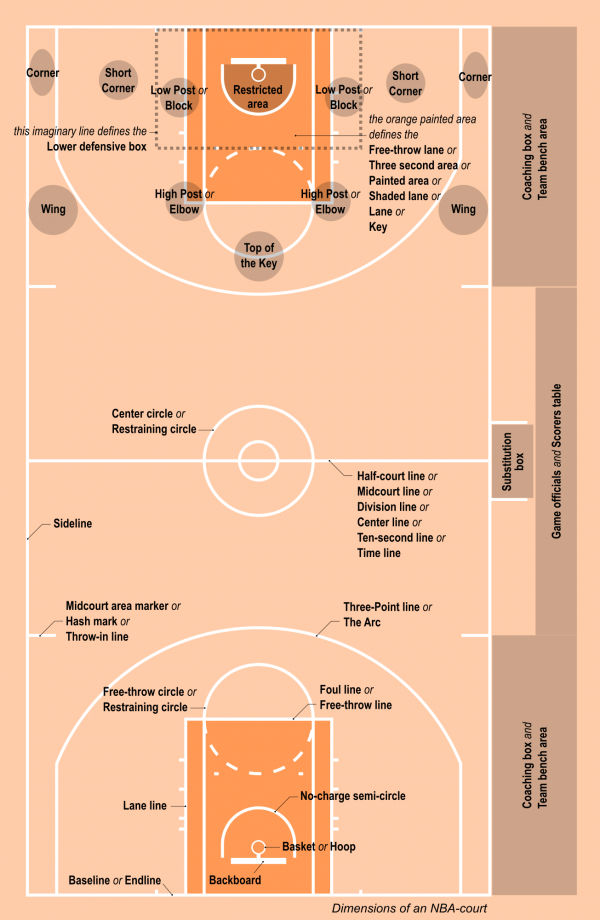 Our advice would be to focus on Man to Man Defense.
If you would like to read a detailed explanation of why we advise youth coaches to avoid zone defenses, click
here.
Our advice would be to focus on Man to Man Defense.
If you would like to read a detailed explanation of why we advise youth coaches to avoid zone defenses, click
here.
Our Gift to You: We had this post turned into a PDF for your convenience! (Download Now!)
Instructions
- This the original set on the 2-3 zone. The top two players will pinch towards the middle to stop
dribble penetration.
- Pass to the Wing:
Player 4 comes up to stop the outside shot and dribble
penetration. Player 1 hustles over to the wing to guard the ball. Player 2 slides in front of the
high post. Player 5 slides over a couple steps at first to cover the player on the low block.
The transition to the next diagram should only take a split second.
As soon as Player 1 recovers to guard the wing, he or she will push Player 4 down. Player 4 will slide
down to cover the player in the short corner. Player 5 can step up towards the middle of the lane to
guard the player in the high post if he receives the ball. Player 4 will slide
down to cover the player in the short corner. Player 5 can step up towards the middle of the lane to
guard the player in the high post if he receives the ball. Player 2 has two options: - If the player in the high post is hurting you, he'll probably want to sink down and deny the entry into
the high post. He'll want to stay on the top half of the player, so he can still rotate to cover the
ball at the top of the key. - If the opposing team is hurting you from the 3-point arc or the opposing player in the high post is
not a threat, you can have Player 2 cheat towards
the top of the key. Generally, this will also enable him to create a few more turnovers during the
game.
- Pass to the Corner:
Player 4 guards the corner. Player 1 takes a couple of steps inside
the 3-point line, but he should still be within reach to defend the shot on the wing.
- Entry into High Post from the Top of the Key:
Player 5 steps up to guard the ball. Player 4 takes away the player on the block. Player 4 takes away the player on the block.
If you have trouble getting your players to pinch towards the player on the block, you can set a rule:
Every time the ball is entered in the high post, Players 3 & 4 pinch no matter what. We've had to do
this with our high school squads.
Players 1 & 2 have their hands up to defend the pass back out
to the wings, but need to be ready to swipe at the ball if the player in the high post decides
to dribble.
- Entry into the High Post from the Wing:
Player 5 steps up to guard the ball. Player 4 pinches to deny the pass to the low block.
Player 1 steps back into the lane a couple steps.
- Entry Pass into the Short Corner:
Player 4 & Player 5 immediately trap the ball.
Player 1 denies the pass back out to the wing. Player 3 rotates to deny the ball to the player in
the high post. Player 2 plays center field trying to steal a pass thrown to either player.
- Skip Pass - Top of the Key to the Corner:
Here's the proper rotation if a skip pass is thrown from the top of the key to the corner:
- Skip Pass - Wing to Wing:
Here's the proper rotation if a skip pass is thrown from wing to wing: Player 3 takes away the outside shot until Player 2 rotates over to guard the ball. Player 3
waits until Player 2 nudges him back down. Player 1 rotates over to the opposite side.
- Trap the Top of the Key:
You can have your top two players trap the ball the second the ball is dribbled
past half-court. Players 3 & 4 need to deny the pass to the wing and Player 5 needs to deny
the pass to free throw line. If the players can't deny the wings in time, the trap will fail and the offense will get
an easy bucket.
This is generally used only once or twice a game to surprise the offense.
- Trap the Wing:
Players 1 & 4 trap the wing on the pass.![]() Player 5 rotates over
to deny the pass to the block. Player 3 rotates over to deny the pass in the high post and Player 2 denies
the return pass to the top of the key. Player 5 rotates over
to deny the pass to the block. Player 3 rotates over to deny the pass in the high post and Player 2 denies
the return pass to the top of the key. - Trap the Corner:
Players 1 & 4 trap the corner. Player 2 slides over to take away
the return pass to the wing. Player 5 fronts the post to deny the pass. Player 3 plays center field
and tries to steal a pass to the wing or the top of the key. If a player slides into the high post, Player 3 denies that pass.
|
|
|
Helpful Zone Defense Resources
If you'd like to dig deeper and get more information about developing an effective zone defense, we highly recommend Al Marshall's Zone Defense. In our opinion, he runs one of the best zone defenses in the country and it gives you the most thorough explanation of zone defense we have seen.
Zone Defense Concepts & Tips
What do you think? Let us know by leaving your comments, suggestions, and questions...
Subscribe to our free monthly newsletter to receive new drills, plays, scoring tips and coaching strategies,
plus three free eBooks with over 270 pages of our favorite basketball drills and plays!
Subscribe to our free monthly newsletter to receive three free eBooks with over 270 pages of content!
Zone Defense | Team actions in basketball
The meaning of the zone defense system is that each player of the team is instructed to protect a certain area of the court (zone) under his shield. On his site, the player is responsible for the actions of any player of the opposing team (fig. 80).
Fig. 80. Zone defense system
The size of protected areas depends on the degree of preparedness of the players, as well as on the nature of the actions of the attacking team.
The positive aspects of this system are less significant than the negative ones. The zone protection system provides strong protection of the nearest approaches to the shield with little energy consumption; it also makes it difficult for the enemy to use barriers.
The positioning of players in the zone defense system is convenient for a quick transition to the attack and makes it easier to fight for the ball after rebounding from the backboard.
The most significant drawback of this defense system is its passive nature, which excludes the fight for the ball outside the zone. The passive nature of the zone defense system leaves its mark on the development of defensive skills among the players. Players do not get used to acting on their own, and this does not bring up initiative in them. In addition, with zone defense, throws from a long distance and from the corners of the site are possible, it does not make it possible to distribute their players according to the forces of the attackers.
One player guarding his area of the court puts the defender in a difficult position when two or three attackers operate on his area. This system is not universal, and its use is completely useless in a game with an opponent who has an advantage in the score and drags out the game time.
Thus, the zone defense system has serious drawbacks, and the criticism of those teams that try to use this system as the main one is completely fair. It is absolutely unacceptable to use the zone defense system in children's and youth teams, where it is especially important to form the skills of active combat operations in defense.
It is advisable to use the zone defense system against teams that do not have a long-range shot, or on days when a long-range shot is difficult (strong wind, wet weather, etc.), in small halls and against teams that cannot play against a zone and having poor game discipline.
The zone system is used in the same way as a means to throw the opponent off the pace. To this end, it is advisable during the game to suddenly switch from a personal defense system to a zone defense system.
The actions of the players in the zone defense system are organized as follows. All players must return to their seats in a timely manner. The absence of even one player on his site seriously violates the organization of defensive actions. If this condition is not met, then the first players to return to the defense must occupy the sections in this sequence (Fig. 81). The first player to return occupies section A. The second and third - sections B and C, the fourth and fifth - D or E, depending on which side the attack develops. In the future, as soon as the opportunity presents itself, the players occupy the areas to which they are assigned.
Fig. 81. Sequence of occupying areas when returning to defense
Players must occupy areas, depending on individual characteristics, on the degree of their skill. Sites B and C are the most responsible; therefore they must be occupied by experienced defenders. Sections D and E are the most convenient for a quick transition to the attack, therefore, these sections should have players with high ball possession technique and experience in single combat with the enemy.
Section A is usually assigned to the most experienced and possibly tallest player. The location of this area is convenient for the general management of the team, as well as for fighting for the ball after rebounding from the shield. The player in section A engages in single combat with the enemy who has broken into the zone, and also, moving in a timely manner, strengthens any side of the zone if the enemy is concentrated in one place of the zone.
The actions of all players in the zone defense system and their attention is directed mainly to the player with the ball, in connection with this, the players in the zone move, as one organism, towards the position of the player with the ball.
Fig. 82. Movement with zone protection system
fig. 83. Various forms of building a zone protection system
In fig. 82, a, b, c shows different movements depending on the location of the player with the ball. To prevent throws from a long distance, it is necessary to skillfully use hands and distracting actions. If the opponent nevertheless made a shot to the basket, all players must turn to face the backboard, trying not to let the opponent into the zone in order to take the ball from the backboard.
The zone defense system has several options that differ from each other in the arrangement of players, these are: 3 : 2; 2 : 1 : 2; 2 : 3; fourteen; 1 : 3 : 1 (Fig. 83). The first numbers show the number of players in the back row and the second numbers show the number of players in the front row. In the 2:1:2 option, the number "1" shows the location of the intermediate player standing between the first and second row.
The main task of the players standing on the back line is to protect the nearest approaches to the backboard and to fight for the ball after the rebound from the backboard. The front row players cover the approaches to the free throw area and actively fight against shots from medium and long distances.
The more players on the back row, the more passive the defensive actions of the team are, and vice versa, the more players on the front line, the more active the team is in defense.
Variants of zone defense 1 : 4, 1 : 3 : 1 and 2 : 3 are advisable to use in a small hall, where a small area limits the maneuverability of attacking players and creates conditions for fighting against throws from medium and long distances; in cases where the opposing team is dangerous with long-range shots and against teams that have poor tactical training or do not know how to accurately pass the ball.
Option 3 : 2 is used with teams shooting at the basket from the corners of the court, as well as with teams that have a dangerous post player in their roster, on which the game is built.
The most flexible form of defense is the 2 : 1 : 2 option.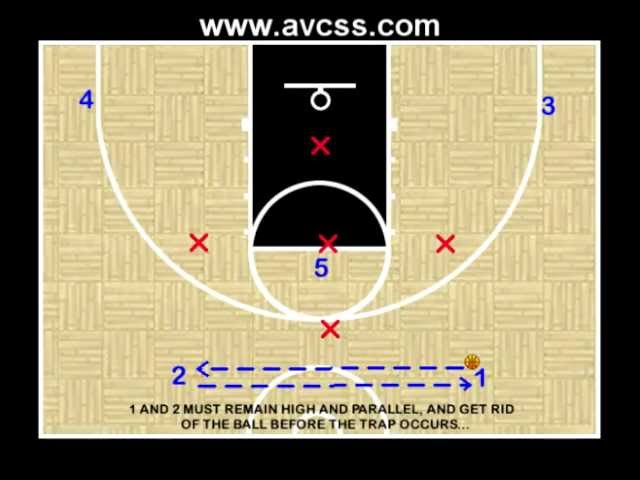 The player standing in zone A moves depending on the specific game situation: if it is necessary to fight against long-range shots, he secures dangerous areas and thereby creates conditions for more active actions of other players zones (Fig. 84, a, b). 1. To strengthen the protection of the nearest approaches to the shield, the central player is pulled to the shield and interacts with the players standing in zones B and C.
Fig. 84. Movement of players standing in zone "A"
To further improve the zone defense system, it is necessary to strengthen the fight against shots to the basket from a long distance and the fight against a numerically superior opponent who has accumulated in the zone of one player. All this required a significant increase in the area of action of each player, for which he must be more mobile and active.
The departure of a player from his main position to fight against a long-range shot or against attacking players accumulating in his partner's zone requires a more perfect organization of mutual safety net of dangerous sections of the site and a change in the boundaries of each section of the zone. Each area has become larger in size, not only as a result of an overall increase in the area protected by the team, but also as a result of the inclusion in the area of \u200b\u200bthe zone of one player of the areas of his partners' zones that border him. This is called “zonal overlay” (Figure 85).
Fig. 85. Principles of superimposing zones
This principle of superimposing zones makes it possible for players to move more freely to fight against long-range shots, for mutual insurance, and at the same time creates favorable conditions for concentrating the required number of defenders in the zone of one player, eliminating the numerical superiority of the enemy (Fig. 86).
Fig. 86. Movement, eliminating the numerical superiority of the enemy
Zone defense
We still have the opinion that zone defense in basketball did not justify itself. In the recent past, some coaches have even been criticized for teaching their athletes the principle of zone defense.
In the sports literature you can find instructions on how to attack a team using this defense system. There are almost no tips on how to properly organize a zone defense in the press.
Isn't this the reason why the combined teams of the Soviet Union at the right moment could not use zone defense at various international competitions?
This was the case, for example, at the 1953 World Student Games in Bucharest. The USSR men's team met with the young team of the Democratic People's Republic of Korea. Our players, most of whom were about 190 cm tall, could not cope with the fast and agile Koreans in defense. At the 25th minute of the game the score was equal. Our basketball players were forced to abandon the defense system that had not justified itself and began to defend according to the zone principle. But since this system was not previously studied, the players could not organize it correctly. As a result, the Koreans threw a few more balls into the basket with the team's bowl, and she had to return to the previous defense system again. Our basketball players won this meeting, but only with great difficulty.
And this is far from the only example of how important it is to be able to play defensively and according to the zone principle. In defense, as in attack, you need variety, the ability to change the tactical pattern of the game depending on the situation. And most of our, even the best, teams just do not know how to do this.
And it turns out that sometimes our basketball players cannot successfully fight against the zone system. This is understandable. After all, in order to be able to destroy this or that defense system, one must be able to organize it correctly. So, the USSR men's team lost a friendly match against the French team only because our basketball players, as the team's coach G. Nikitin himself admitted, could not organize an attack against the opponents' zone defense.
Like any tactical formation, the zone system also has its drawbacks. However, this does not mean at all that it is necessary to abandon the study and application of variants of this principle of defense, which also has its positive aspects.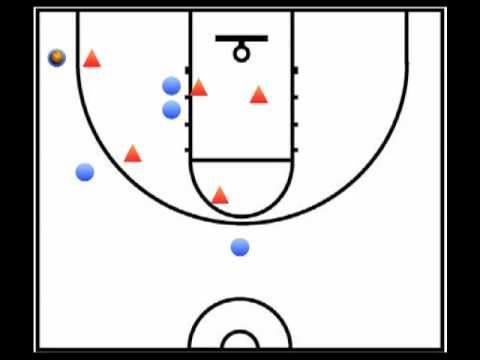
There are moments in the game when zone defense is the most effective.
Let's say an opponent, throwing in the ball from behind the end line or touchline, uses very effective combinations. Here it is useful to switch to the zone principle of defense and stick to it until the team takes possession of the ball. This will prevent the opponent from successfully carrying out his combinations.
It is advisable to use zone defense at the very beginning of the game, when the team does not yet know its opponent. This makes it possible to most correctly determine the capabilities and functions of each player of the opposing team and correctly distribute their holding during the transition to the “player against player” defensive system.
Moving from one system to another gives the team some advantage in itself. Such a transition greatly complicates the actions of the enemy. In this case, even experienced players cannot immediately rebuild their game in attack.
Sometimes it is beneficial to use the zone system throughout the game.
This system helps to neutralize the opponent's high-scoring post players. There will always be two or three defenders near the center forward who will prevent him from receiving the ball.
The zone principle of defense obliges the attackers of the enemy to make fast, sharp and accurate passes. And since many of our players, especially women's teams, do not have such qualities, the zone system gives an advantage to the defending team.
Zone defense has many options: 2 + 1 + 2, 2 + 3, 3 + 2, 1+3 + 1, etc. Perhaps the most effective combination of options 2 + 1 + 2 and 3 + 2.
Here are some combinations based on the use of these options.
Suppose attacker 3 has the ball (diagram 1). Defender 5 must prevent attacker 6 from getting the ball. If player 6 tries to enter the penalty area to receive the ball, then defender 5 must stand in front and cover it with his body.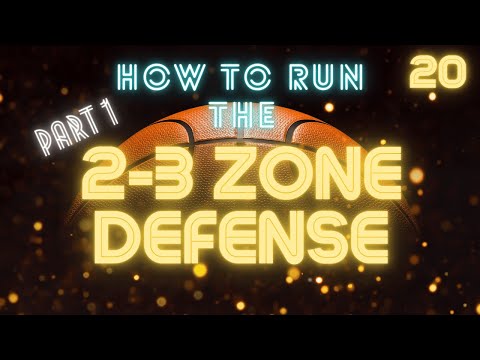
Player 7 of the defending team insures his partner 5, makes sure that the ball is not thrown over him to the attacking player 6. Defender 6 watches the attacker 7. If attacker 3 starts aiming for a throw from afar, then one of the defenders (3 or 4 ) comes close to him, trying not only to prevent him from making a shot at the basket or going to the backboard, but also to prevent him from passing the ball to his partner b. If this is done by defender 4, then defender 3 must insure him with 'rights. Therefore, the player of the defending team 4 must cover the attacker 3 from the left by putting his right foot forward.
Suppose attacker 3 passes the ball to his partner 4. Defender 4 will not have time to block attacker 4's path to the backboard. Therefore, defender 3 should change places with partner 4 and cover attacker 4. Here, a variant is possible: defender 4 moves forward and helps partners to hold player 4.
What if the ball was received by player 5, and not 4 (diagram 2)? All defenders turn to the side where the ball is.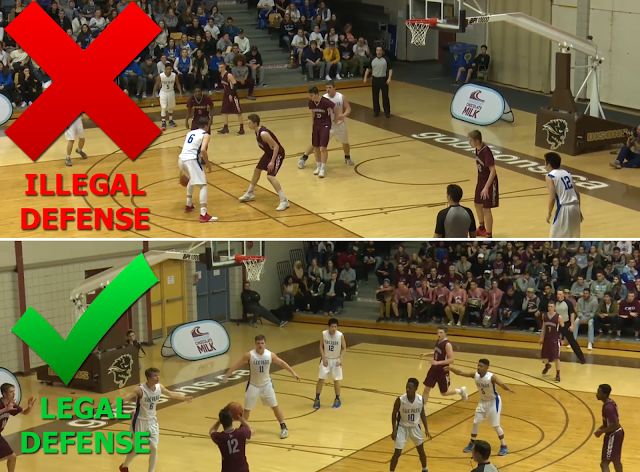 Forward 5 is covered by defender 3. On the left, a player of the defending team 4. helps him, and their partner in approaches player 7.
Consider the third case: attacker 7 has the ball (diagram 3). Defender 6 prevents him from throwing the ring. Defender 5 must stand in front of attacker 6 in order to prevent him from receiving the ball. Defender 7 has a large load - he insures his partner o "so that the ball is not thrown over him to attacker 6, and at the same time closes the way for attacker 4. If attacker 6 stands at a distance of 3 - 4 meters from the basket, defender b should be located on the side, closing him shopping cart access. Defender 3 guards attacker 6 on the left and at any moment can prevent attacker 7 from passing between them to the shield. Defensive player 4 prevents attackers 5 and 3 from receiving the ball on the foul line or when approaching the backboard.
Some attacks against a zone defense start with the offensive player running the ball along the endline. In this case, the passing player distracts the attention of the central defender 5 and passes the ball to player 6, who throws the ball into the basket from under the backboard. To avoid this, the defenders need to prevent the players from passing the ball along the baseline. To do this, defender 6 must put forward his left foot and close the way for attacker 7. If the attacker still managed to bypass defender 6, then defender 5 blocks his way, and the player of the defending team 6 switches to attacker 6 and does not give him the opportunity to get the ball. Defenders 3, 4 and 7 must prevent other attackers from getting the ball in the penalty area for a finishing attack.
If attacker 7 managed to bypass defender 6 with the ball (diagram 4), then defender 3 blocks his way. In turn, defender 4 hurries towards attacker 5 who has come forward. will try to go forward, defender 6 will have time to cross him and even intercept the ball.
Defenders must always have a positional advantage to catch the ball bouncing off the backboard.
Let's assume that player 7 has thrown the ring from a distance (diagram 5). Then defender 7 covers player 4 with his body. At the time of the throw, attacker 6 is in a better position to fight for the Bouncing ball than defender 5. In this case, defender 4 must cover player 6, and defender 5 takes an empty place under the shield. This creates the “bounce triangle.”
How do you play against a 2 + 1 + 2 zone defense?
Many coaches tell offensive players not to pass through the zone because the ball is supposed to be intercepted. This warning is not always correct. Transmission through the zone is not only possible, but must be used. However, it is necessary that the player waiting for the pass does not go out towards the ball, does not pull himself closer to the penalty area, to the place where the defenders are located.
Diagram 6 shows a cross-field pass combination in forward formation 4 4-1 .
Player 4 passes the ball to attacker 3. The latter, aiming for a shot, attracts the attention of defender 5. At this moment, player 6 screens defender 7. At the same time, player 3 passes the ball across the zone to player b, to whom defender 6 is immediately rushing. will have time to intercept the ball directed to player 5, since the distance between them is more than 5 meters. Attacker 5 immediately passes the ball to player 7, who is released from guardianship and goes under the shield.
If, after passing the ball to player 3, the attacker manages to stand in front of defender b, who guards him, then the ball must be directed to him.
Suppose player 5 already has the ball. If defender 6 clears space under the basket by covering attacker 7, then player 5 can dribble under the backboard and shoot.
But now, after player 5 received the ball, defender 4 tried to cover him. Then attacker 4 must go to the backboard and, having received the ball from his partner 5, make the final throw.
Defender 7 may not stand on the side, in front of attacker 7 (diagram 7).