Home » Misc » How to tape your thumb for basketball
How to tape your thumb for basketball
How to Tape a Sprained Thumb or Wear a Splint
Injury Guides
by Patty Weasler, RN July 25, 2020
Benefits Athletic vs Kinesiology Tape Techniques Benefits How to Splint Tape or Splint
Don’t wait too long after your injury to learn how to tape a sprained thumb. Whether taping or splinting, both techniques will support the thumb joint and work to prevent another injury. It’s especially important to splint or tape after a thumb sprain if you plan to get back into activities or sports that involve your hand. Here we will cover the benefits of taping and splinting and how to perform each one correctly.
Benefits of Taping
If you’ve suffered a sports injury to your ulnar collateral ligament, taping could help. The benefits of taping your thumb and hand are all based on preventing an additional injury and supporting your hand and thumb. Check out the specific benefits listed below.
Supports the thumb joint
Minimizes movement
Prevents hyperextension
Increases your awareness of the injury
Provides compression
Reduces thumb pain
Try Alternating Hot & Cold Therapy for Added Relief
Athletic Tape vs Kinesiology Tape for Thumb
Athletic tape and kinesiology tape are two very different types of support tape used for injuries. Athletic tape’s benefits make it a better choice during the initial recovery phase. Whereas kinesiology tape is better for long-term recovery and protection. Neither one is an overall better tape than the other, each has its specific advantages.
Athletic Tape
Stiffer
Acts more as a brace
Restricts range of motion
Supports the joint
Inexpensive
Easy to find
Kinesiology Tape
Improves self-awareness
Changes how your body feels pain
Reduces the load on the joint during movement
Boosts circulation
Can remain on the skin for multiple days
Taping Techniques
Before you begin taping your thumb make sure you have tape and scissors. Clean your hand and thumb to remove oils and any residue. This will help the adhesive on the tape adhere to your skin. Thumb injuries can be difficult to tape on your own. We recommend having someone help you until you get used to the process.
Athletic Tape
Cut and place a piece of tape around your wrist to act as an anchor strip.
Divide the tape into two strips, length-wise.
On the back of the hand, put one strip of tape down on the anchor piece and wrap it between your thumb and index finger, with the end landing on the anchor on the inside of the wrist.
Make a figure 8 with another piece of tape, wrapping from the anchor piece over your thumb and back down onto the anchor.
Repeat steps 3 and 4 two more times.
Finish with a last piece of tape wrapped over the anchor to secure all the tape.
Kinesiology Tape
Measure a piece of 1-inch wide tape from the thumb knuckle to just above the wrist.
Cut the edges of the kinesiology tape so they are rounded.
Position your thumb against your palm and push your hand toward your ulna bone.
Place the tape over the knuckle of the thumb and up your arm.
With a 2-inch wide kinesiology tape, place it perpendicularly over the wrist but do not wrap it completely around the wrist.
Rub baby oil onto the and around the tape. Let the oil sit for 20 minutes. Then gently pull the tape off.
Hop in the shower and lather up with soap and water. The tape should come off easily.
Always be sure to hold your skin down as you pull the tape off.
Pull in the direction of your hair, not against it.
Do not pull quickly or yank the tape off.
Benefits of Thumb Spica Splinting
If you have suffered a partially torn ligament, a thumb splint with a spica brace is what many doctors will recommend. The protection and support it provides will give you lasting benefits as your injury heals. It also offers a range of unique benefits.
Immobilizes the thumb
Allows the fingers to move freely
Stabilizes the thumb joint
Supports the thumb during activities
Easy to put on and take off
Adjustable to any swelling within the hand or thumb
How to Prepare a Thumb Splint
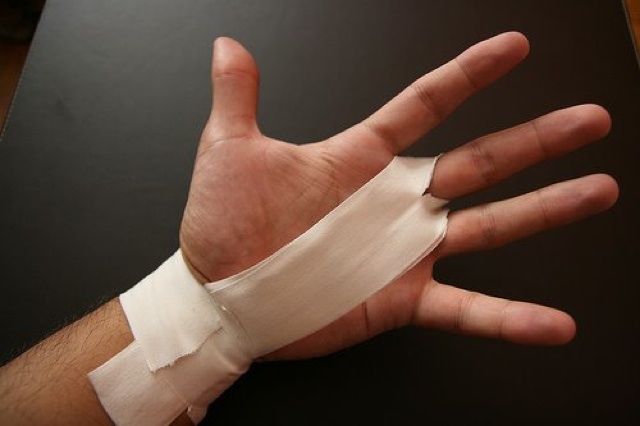
Making a thumb splint with athletic tape is another way to support your thumb and help protect it during sports and activities. Follow our step-by-step instructions to splint your thumb at home.
Start with wrapping a piece of athletic tape around your wrist.
Make sure the tape is not too tight and does not restrict blood circulation.
With the second piece of tape place one end on your inner wrist and wrap the tape up over your thumb and loop it back down to the back of your wrist.
Repeat step number 3 up to four times to secure your thumb.
Wrap a piece of tape around the distal end of the affected thumb.
Continue with this piece of tape and secure it down on the back of your hand in between your thumb and index finger.
Try these other treatment options for a sprained thumb.
Choosing Tape or Splint
A thumb sprain is a painful injury that can interfere with many of your daily activities. After your injury, seek medical advice from your doctor to make sure your method of immobilization is safe for your injury and that you don’t have a broken thumb; which needs an x-ray to confirm. If your diagnosis confirms a sprain then follow your doctor’s orders regarding splinting and taping.
Overview Best Ways to Treat a Sprained Thumb Stretches & Exercises for a Sprained Thumb How to Tape or Splint a Sprained Thumb
Shop Sprained Thumb Products
Patty Weasler, RN
Patty Weasler is a freelance health writer and nurse. She is certified in critical care nursing and has been practicing for over 10 years. Patty lives in Milwaukee, WI with her husband and three children. She enjoys spending her time with family and educating people about their health.
Please enable JavaScript to view the comments powered by Disqus.
Also in Resources
Why Delivery Services for Seniors Are Growing in Popularity
by Jessica Hegg November 08, 2022
Health & Wellness
In recent years, online shopping has only grown more popular, allowing anyone to access meals, clothing, medication, and a range of services right from their own home.
Read More
Building Balanced Snacks - The Easy Way
by Lindsay Allen November 01, 2022
Health & Wellness
The goal is to think of a balanced snack like a mini meal. It should contain a mix of carbs, proteins, and fat to keep you going all day long – for bonus points adding fiber will help fill you up and slow digestion leaving you feeling fuller longer.
Read More
Why Routine Foot Care at Home is Important
by Jessica Hegg October 09, 2022
Health & Wellness
Foot pain is more common than you may think, affecting 19% of men and 25% of women over 45 years old. The risks only increase with age, which is why taking care of your feet is so important.
Read More
Practicing Self-Care for Caregivers
by Jessica Hegg October 09, 2022
Caregiving
If you’re providing unpaid care to another adult with health needs, you’re not alone. In fact, almost one in five people serve as home caregivers in the United States, and the number is rising.
Read More
Let's Live Better ®
free Shipping Over $39
100% Satisfaction Guarantee
Lowest Price Guarantee
How to Use KT TAPE for Sprained Thumb – Thumb Joint Pain
Problems with thumb pain and thumb sprains
Thumb pain and a sprained thumb usually presents as pain at the base of the thumb and wrist. A notable thumb pain condition includes De Quervain Syndrome, also known by many other names such as gamer’s thumb, mother’s wrist, and mommy thumb. This condition in particular is a degenerative (microscopic injury) condition of the sheath (extensor retinaculum) that surrounds the tendons passing over the thumb side of the wrist. These tendons control the motions of the thumb, most specifically the movement of thumb towards the wrist.
Causes and symptoms of thumb pain
When this sheath becomes injured or inflamed, the tendons become entrapped and cause pain during movement of the thumb. Thickening of the tendons from overuse or trauma will also cause problems when the tendons need to slide beneath the sheath. Women are considered at higher risk due to the sharper angles of the bones in the wrist, but the actual cause is somewhat unknown. Many believe overuse is the primary cause leading to inflammation. This hypothesis is backed up by noting that most patients with this pain are new mothers who repeatedly lift their growing babies. Symptoms are most often noted in both wrists and to the same degree of pain, indicating that more overuse activity causes more inflammation leading to thumb joint pain.
When these conditions are present, movement of the thumb is restrained and further perpetuates the inflammatory condition and may create swelling in more severe cases. Pain is noted during thumb and wrist motion along with thickening and hardening of the area at the base of the thumb. Difficulty gripping, tenderness at the base of the thumb, and swelling are common symptoms. Thumb pain is usually slight to moderate, and extreme pain may be an indication of a more serious condition.
How KT Tape can help
Treatment of the pain is determined more by noting what has worked in the past rather than scientific data. Kinesiology Tape has been shown to provide support during motion of the thumb and wrist, and has markedly reduced wrist and thumb pain in many subjects*. KT Tape also increases circulation to reduce inflammation and speed the healing process. Corticosteroid injections are thought to be successful, but do need to be weighed against the negative side-effects of increased degenerative effects. Surgery has been well accepted and successful in almost all cases, but conservative therapies are highly preferred prior to making this leap. Ice after activity, rest, and avoidance of activities that incite pain are all important steps to avoid surgery. A focus on proper lifting mechanics will also help to avoid these symptoms in the future.
Video Guide: Taping Thumb Joint
* Not clinically proven for all injuries.
How to tap fingers
home
Blog
Main
How to Tape Your Fingers
Volleyball players injure their fingers quite often. Most often this happens when performing a block, when the ball hits the left finger. This can happen even to professionals. Beginner athletes injure their fingers even when simply passing or receiving the ball.
Finger injuries are primarily sprains, fractures and dislocations of the fingers. It is not possible to accurately track the statistics of finger injuries in volleyball due to the fact that an athlete does not stop playing in case of a finger injury, but continues to play, fixing the injured finger, for example, with a plaster or kinesiotape.
Kinesiology taping is a method of applying adhesive elastic tapes (tapes) taking into account the vector of muscle movement. This method is successfully used for the prevention and treatment of sports injuries, as well as to alleviate the patient's condition in a number of diseases, such as osteochondrosis, arthrosis, enthesopathy, etc. Taping fingers in volleyball is rightfully considered the most effective method of preventing injuries, and the wrapped fingers of athletes have long ceased to be exotic.
Tape is a tape made of breathable elastic cotton on a hypoallergenic adhesive layer. In contrast to the usual patch, which athletes used to wrap their fingers with, special tapes have elasticity in the longitudinal direction - such an application does not cause discomfort.
Advantages of the kinesiology taping method:
tapes are “worn” for several days, do not interfere with the body's breathing and are water resistant;
is completely free of discomfort when applied correctly;
does not affect the functionality of the muscle;
open 24 hours;
accelerates the process of rehabilitation after injuries;
increases resistance to stress.
Taping in volleyball is successfully used both for injury prevention and recovery of the athlete. Kinesiology tape, by its nature, mimics the properties of the skin: when properly applied, it transmits positive sensory signals to the body, allowing physiologically correct movement of muscles and joints. As a result, the correction of the motor stereotype, the likelihood of developing both accidental injuries and the consequences of overstrain during the game, is significantly reduced.
Taping consists of the following steps:
Preparation - remove excess hair; clean, degrease and dry the skin.
Applying the tape - remove the paper base; stick the tape.
After applying, rub the kinesio tape with your hand to activate; wait at least 30 minutes before playing or training.
Removal - steam the tape in the shower and carefully remove; soak the tape with a special solvent and remove it painlessly; holding the skin, remove the tape in the direction of hair growth with one sharp movement.
Tape Removal Spray
Taping is performed in a brightly lit place, without pressure, with prolonged friction, which ensures maximum adhesion of the tape to the skin surface. At the same time, folds should not form on the surface of the skin - this can lead to irritation in the taped area.
Thumb Injuries: Protection and First Aid
When we talk about thumb injuries, we most often think of sprains of the metacarpophalangeal joint of the thumb, which often occur in sports such as skiing, team games with ball, especially volleyball.
The thumb is the most important finger of the hand. It allows you to adjust the grip strength from the weakest to the strongest. His movements allow the hand to act more accurately.
A sprain is an injury that ranges from a simple full force sprain to a partial tear in some of the fibers. In the case of the thumb, the medial lateral ligament is usually affected when the finger is left at the maximum distance and pressure or impact is applied to it. In volleyball, this mechanism of injury occurs when receiving, defending, and less often when falling on the hand. Pain in the thumb after playing volleyball cannot be ignored and an x-ray must be taken to rule out a fracture. The symptoms of a sprain are pain in the area of the ligaments, sometimes swelling, which may appear later, with or without hematoma. Increased mobility of the finger may indicate an increased complexity of the injury.
First steps after injury
• Stop play.
• Apply ice and lightly squeeze the injured area to reduce pain and swelling.
• Try not to lower your hand.
• While waiting to see a doctor, fix your finger with a bandage, splint or tape.
Treatment
This is an important step to restore a stable and strong joint to the hand. It includes:
• An immobility phase that lasts depending on the severity of the injury, swelling and inflammation.
• Restoration of range of motion.
• The phase of strengthening the various muscles of the hand, which is carried out with the help of the other hand, varying the resistance.
• Development of a pincer grip in conjunction with other 4 fingers, first without resistance, and then with it.
• Work on global arm movements to bring back the technique needed for the sport.
• The resumption of training, while the player must be in a bandage or brace.
Until then, the therapist must be satisfied with the condition of all joints of the thumb, and the finger must be included in all physiological axes up to the elbow. Secondly, it is necessary to observe the biomechanics of the entire upper limb.
Injury prevention
Prevention is better than cure, so pay attention to warm-up and functional training y:
• Take your time, try to warm up all the fingers individually and together (especially in winter, the cold makes the joints stiffer) .
• Push-ups on the floor or against a wall on your fingertips (an easier version of push-ups is to kneel).
• Handling 2 tennis balls or similar sized balls.
• Throw the ball with a partner, changing the height of the throw, the position of the hand and wrist (you can also throw the ball against the wall).
• Pull the power cable towards you first with your whole hand, then with your thumb and forefinger, thumb and middle finger, thumb and ring finger, etc.


 We recommend having someone help you until you get used to the process.
 It also offers a range of unique benefits.
 She is certified in critical care nursing and has been practicing for over 10 years. Patty lives in Milwaukee, WI with her husband and three children. She enjoys spending her time with family and educating people about their health.
 A notable thumb pain condition includes De Quervain Syndrome, also known by many other names such as gamer’s thumb, mother’s wrist, and mommy thumb. This condition in particular is a degenerative (microscopic injury) condition of the sheath (extensor retinaculum) that surrounds the tendons passing over the thumb side of the wrist. These tendons control the motions of the thumb, most specifically the movement of thumb towards the wrist.
 Symptoms are most often noted in both wrists and to the same degree of pain, indicating that more overuse activity causes more inflammation leading to thumb joint pain.
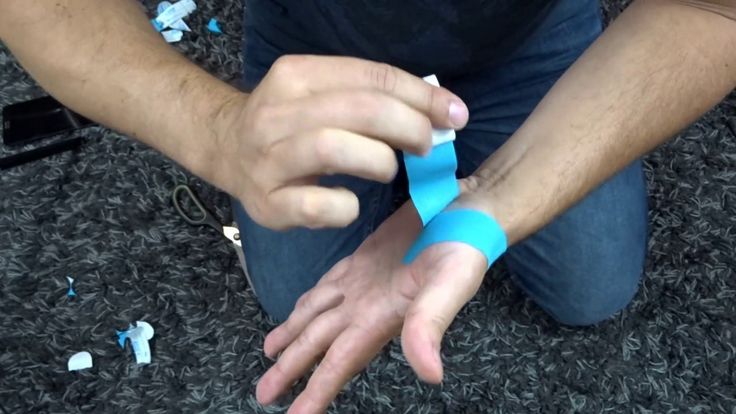 KT Tape also increases circulation to reduce inflammation and speed the healing process. Corticosteroid injections are thought to be successful, but do need to be weighed against the negative side-effects of increased degenerative effects. Surgery has been well accepted and successful in almost all cases, but conservative therapies are highly preferred prior to making this leap. Ice after activity, rest, and avoidance of activities that incite pain are all important steps to avoid surgery. A focus on proper lifting mechanics will also help to avoid these symptoms in the future.
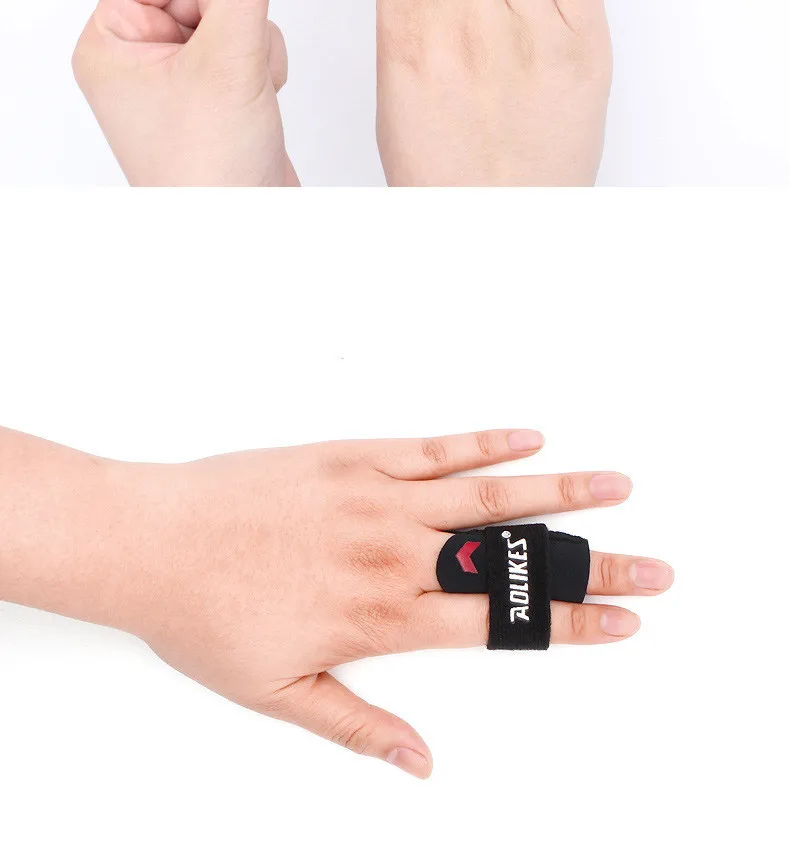 Most often this happens when performing a block, when the ball hits the left finger. This can happen even to professionals. Beginner athletes injure their fingers even when simply passing or receiving the ball.
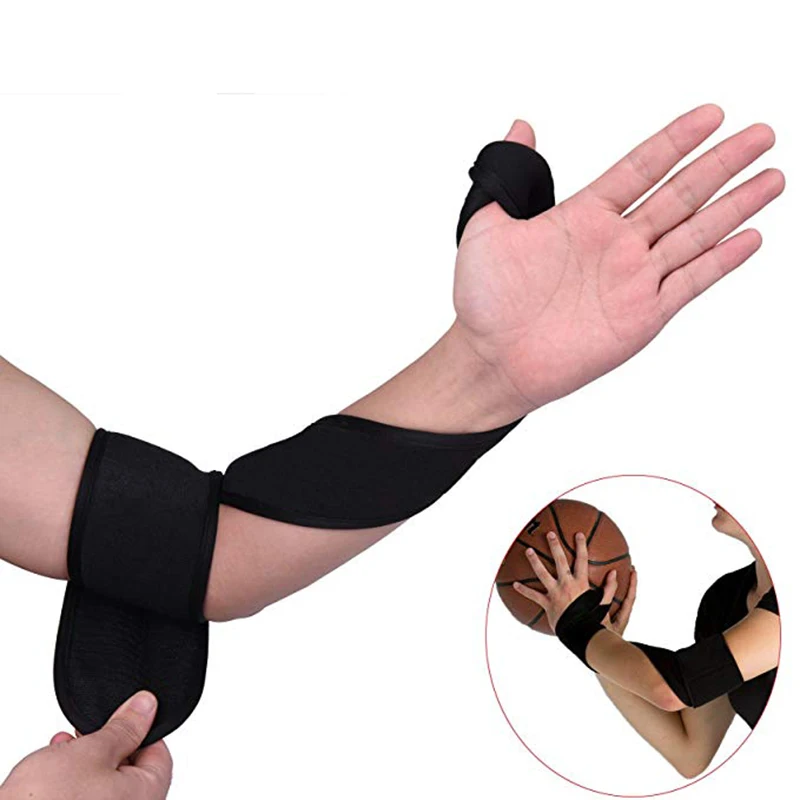
 As a result, the correction of the motor stereotype, the likelihood of developing both accidental injuries and the consequences of overstrain during the game, is significantly reduced.
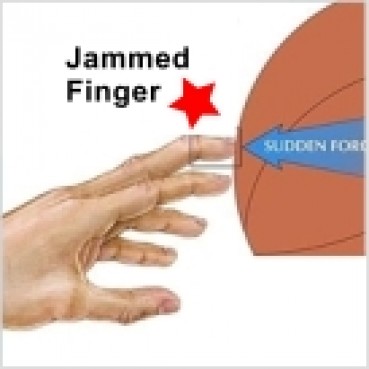
 Increased mobility of the finger may indicate an increased complexity of the injury.