Home »
Misc »
How to attack a 2 3 zone defense in basketball
How to attack a 2 3 zone defense in basketball
How to Beat a 2-3 Zone
I want to preface this article with this statement:
The 2-3 zone defense should not be allowed in youth basketball.
Instead of listing the reasons why in this article, I encourage you to check out Tyler Coston’s article on the subject which has most of them covered in my opinion.
The 2-3 zone is the most common zone used in the half-court. For better or worse, it’s used by teams of all ages at all levels. So it’s imperative that all coaches are prepared for when their team will face it.
Since most youth teams don’t have the extra time to practice and memorize an entire zone offense, here are 17 strategies you can implement mid-game to help your team beat the 2-3 zone.
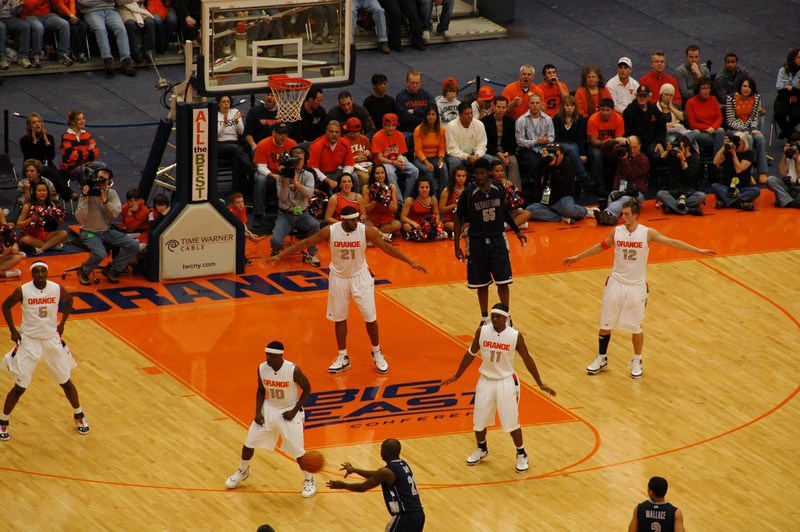
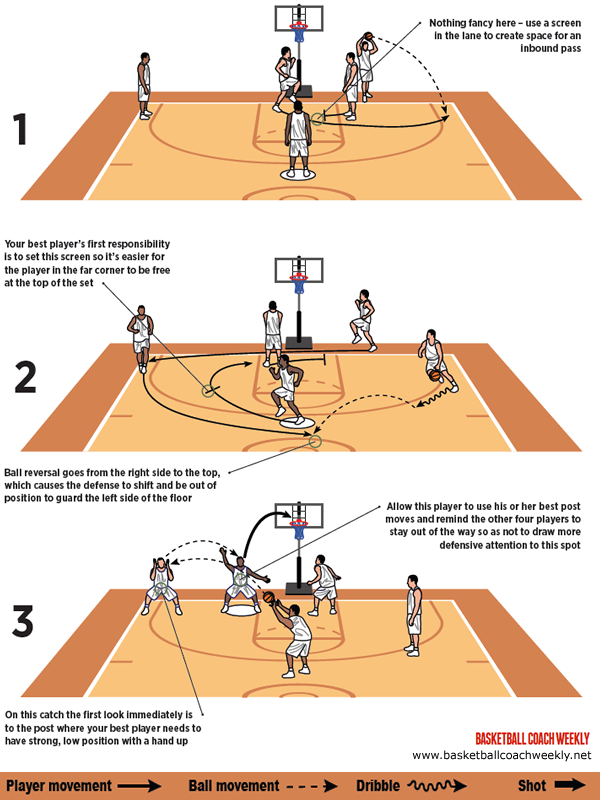
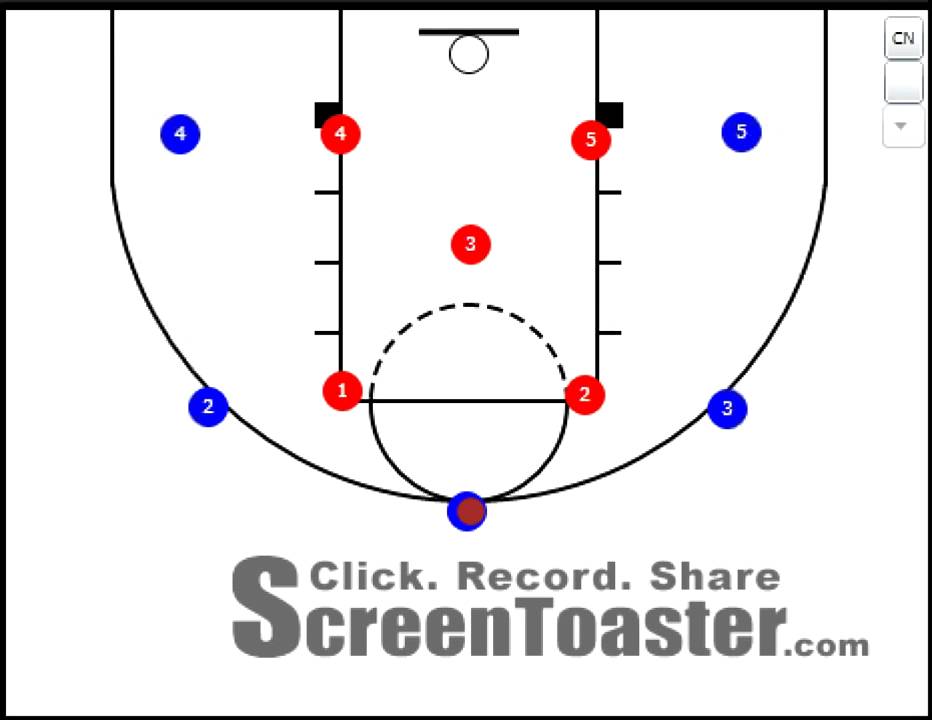
1. Set Up in a 1-3-1The 1-3-1 is the best formation to set up in offensively against a 2-3 zone.
Traditionally, this will mean your point guard at the top, your shooting guard and small forward on the wings, one big on the free-throw line, and one big on the baseline.![]()
This formation is effective because it places your team in the gaps of the zone and forces the defense out of their ideal positions.
When a player receives the basketball on the perimeter, there will often be a clear lane to the basket in front of them that they can attack.
Being in the gaps of the defense can also confuse them as to who should guard the basketball which can lead to open players all over the floor.
2. Beat Them Down the FloorThe easiest way to defeat a 2-3 zone is to avoid playing against it on as many possessions as possible.
Your team can do this by utilizing quick transition basketball to beat the opposition team down the floor.
If your players all run hard down the floor and the basketball is moved quickly, there will often be open lanes for your players to attack the basket before the defense is able to set up their zone.
3. Attack the GapsIf a player receives the basketball and finds themselves with an open lane to the basket in front of them, they should immediately attack the gap.
One of two things will happen in this situation…
1. The attacking player will split the defense and have a high-percentage shot at the rim.
2. The defense will collapse and take away the shot.
The first option for the attacking player is to finish at the rim. Your players must always be aggressive and looking to score.
If the defense collapses and takes away the drive, this will often mean there are open players on the perimeter for open shots or that when the basketball is pitched out there will be more open gaps in the defense.
A great drill for teaching this action is the ‘Drive and Kick Drill’.
Players will find that, with good spacing, the quicker the basketball is passed around the more gaps will present themselves in the defense.
4. Utilize Pass FakesPass fakes are super effective against a zone because the defense is always anticipating the next move they need to make.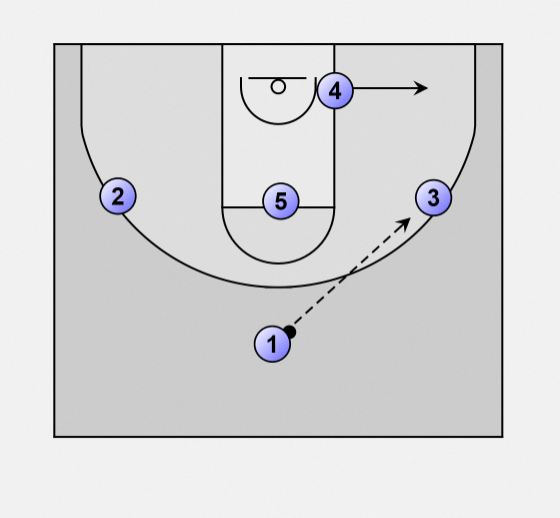
Often a single defender will have the difficult task of guarding two offensive players in their area.
When a pass fake is made, the defender will usually anticipate where they need to rotate to next and start leaning towards their next assignment. This slight movement can lead to open lanes and the defenders taking valuable time to get back into the correct position.
Make sure your players have been taught how to correctly fake a pass without coming off-balance so that they can explode to the ring if the defense goes for it.
5. Put Your Best Passer in the Middle of the ZoneOne of the weakest areas of a zone is the free-throw line. When the ball is at this position, the player with the basketball has many options to attack the defense.
Nearly every time I watch a team play against a zone they put their center at the free-throw line in this position without even considering other options.
It’s a mistake to automatically assume your center is the best option for this role.
The most effective player to position in the middle of the zone is often the team’s best player and/or passer… regardless of their height.
This player must be a threat to score and should also be one of your team’s best passers. Get them the basketball at the free throw line and let them create!
6. Move the Basketball (Quickly)The worst thing you can do against a zone is hold the basketball and allow the defense to fully recover and establish their ideal positions.
In order to beat a zone, you must keep the defenders moving and scrambling to recover. This is achieved by quick passing of the basketball, good spacing between players, and constantly looking for gaps in the defense that can be exploited.
Explain to your players that when they have possession they have a maximum of one second to decide whether to pass, shoot, or dribble.
Keep in mind that the highest percentage shots you will get against a zone occur after one or two ball reversals when the defense is starting to break down and the defenders are fatigued.
7. Attack From the Short CornersAnother great strategy is to attack from behind the zone along the baseline.
If you’re setting up in the 1-3-1, have the baseline player float between the short corners along the baseline depending on which side the basketball is on. Their feet should be nearly out of bounds in an effort to stay as low as possible.
This either forces the defenders to play close to the baseline in order to watch the baseline player, or it allows baseline offensive player to hide behind the sight of the defense.
If the basketball is caught in the short corner, the offensive player has many options to attack the zone…
1. Pass to the offensive player at the free-throw line who will be open diving to the basket.
2. Shoot from the short corner.
3. Pass to a perimeter player since the defense will collapse.
4. Shot fake and attack the rim for an easy basket or a foul.
The player will also be a great scoring option after dribble penetration. When the low zone defenders step up to help on dribble penetration, a simple drop-down pass to the baseline player will often result in an easy score.
8. Create and Take Advantage of MismatchesOne benefit of the opposing team running a zone is that the offense has the ability to decide the matchups on the court.
When coaching against a 2-3 zone, identify the weak links and target these defenders by forcing them to match up against your best offensive players.
For example: If the team your facing has one strong guard and one weak guard, you can send your best guard to the side of the floor that their weak guard is defending each time down the court.
As this matchup favors the offense, your guard can blow past them every time and get into the paint where they can score or create a shot their teammates.
This is also a great strategy when overloading. Overload towards what you consider to be the weaker side of the floor defensively.
9. Screen the ZoneThe best thing about screening a zone is that there’s no defender hedging or there to help on the dribbler when they use the screen.
By screening the zone you’ll either get an open jump shot, or the defense will have to rotate to close out which will create open shots and driving lanes on other areas of the court.
Either way, by setting screens on the zone it forces the defenders to help out of their zones.
This will often lead to one of the guards getting in the lane where they can finish with a floater, dump down pass to the baseline, or pass out to a shooter when the defense collapses.
I’ve included some plays that use screening in the report you can download for free below.
10. Overload the ZoneA great way to consistently get high-percentage shots against a zone is to overload one side of the court.
This strategy exploits the fact that in a zone defense each defender has a specific area of the court to guard.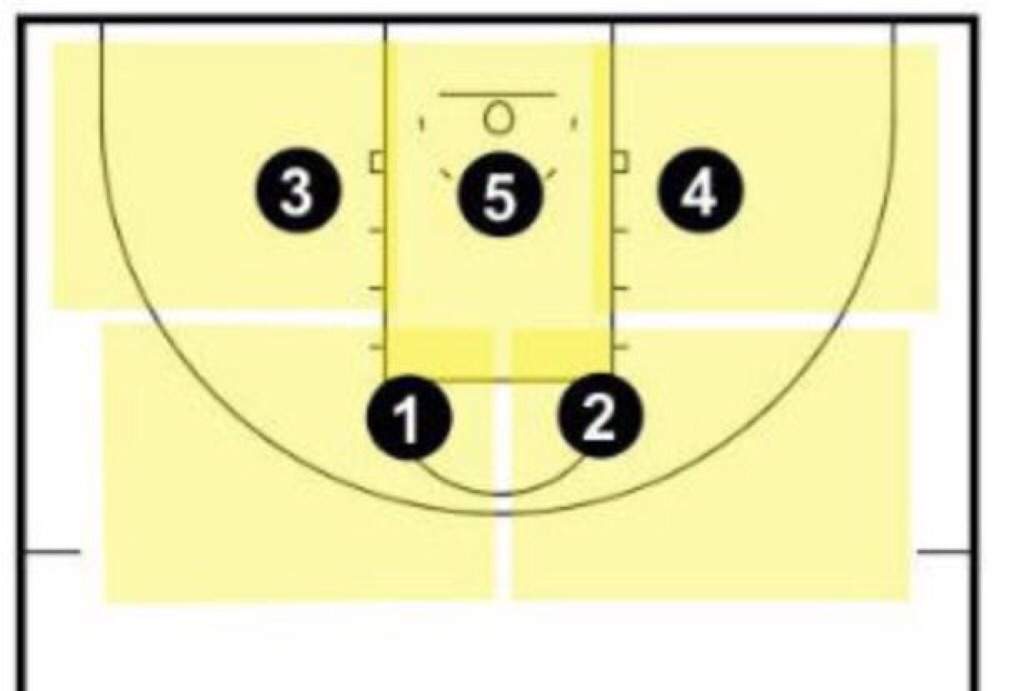 The offense should take advantage of this by placing three offensive players on one side of the court guarded by only two defenders.
As long as the three players have spaced themselves out along the three-point line, the two defenders will struggle to challenge the shooters while also preventing dribble penetration.
11. Second Chance Points (Rebound)Another big weakness of the 2-3 zone is rebounding the basketball. The reason for this is because the players are defending zones and do not have a specific player matchup.
Instead of being able to simply turn, make contact with their player and box out like in a man-to-man, players in a zone must first find an opposition player and establish rebounding position between them and the basket.
This is a difficult task for the zone defenders so there are frequent offensive rebound opportunities (especially from the weak-side) as long as you send players to the glass and they’re relentless in pursuit of the ball.
The biggest benefit of offensive rebounds is that they often lead to high-percentage shots.
12. Don’t Allow Them to Play ZoneThis is a controversial strategy… but one that definitely works if you’re willing to implement it.
If your team gains an early lead in the game, consider holding the basketball near half-court so that the defense is forced to discard their 2-3 zone and come out and play you man-to-man.
If they get back into a zone defense, get your point guard to retreat with the basketball back to near the half-court line until the opponent gets out of their zone.
This strategy will only work if the league you’re playing in does not have a shot clock.
Please note: Although effective, this strategy leads to boring, unwatchable basketball (Even ask Dean Smith of North Carolina who’s team held the basketball for nearly an entire half against Duke in 1979).
13. Practice Against a ZoneA simple strategy that’s often forgotten.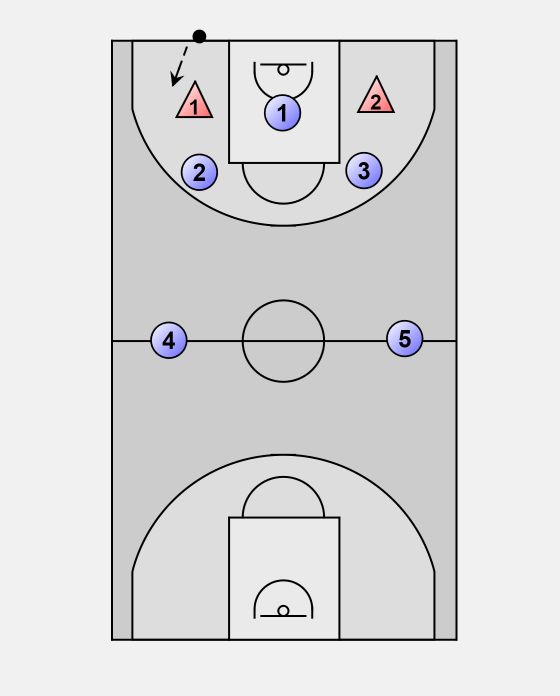
It’s a great idea to give your team some experience and confidence when competing against a 2-3 zone prior to coming up against it during a game.
Assign a few 10-15 minute blocks in your practices early in the season to teach your players the strategies in this article that you think will work best for your team.
Since your team will be competing against themselves, it’s not important that your players know how to run the 2-3 zone perfectly. Simply put the players in positions and explain to them that they must guard the area and not a specific player. Most of them will have a good idea of how it works.
Your players will enjoy changing things up at practice and it will give them confidence when they face a 2-3 zone during a game.
14. Make Shots…Fact: You are going to struggle against a 2-3 zone if you don’t make shots.
It doesn’t matter how well you execute overloading the zone, how often the basketball into the hands of your best passer at the free throw line, or how good your spacing is if your players don’t knock down their shots.
Your team must make perimeter shots if you’re going to defeat a 2-3 zone. This fact alone is the main reason why it’s such a common defense in youth basketball.
If you want to develop great shooters, I highly recommend you check out these shooting drills and also these shooting workouts.
15. Run a Full-Court Press on DefenseWait… What?
I bet you’re asking… “Why does the particular defense we run matter? I just want to beat their 2-3 zone”.
By using a full-court press, you change the tempo of the game.
If you’re competing against a 2-3 zone, you should aim to increase the tempo of the game since a zone favors a slowed down type of game.
By speeding the game up, the opposition will take quicker shots and there will be a lot more fast-break points where the opposition doesn’t have time to set up their zone.
I’d recommend having a look at either the 2-2-1 press or the 1-2-1-1 diamond press.
16. Don’t Settle for the Outside Shot
Don’t be the team that continues firing away from the outside if the shots aren’t going in.
Weak-minded teams will settle for the outside shot without being patient and working the basketball around for a high-percentage look.
You must get the basketball into the post.
When the basketball is passed inside, it forces the defense to collapse and will result in wide-open jump shots for your team.
If your team does start firing away at too many three-pointers and aren’t working the basketball around enough or getting it into the post, consider calling a time-out and telling the players the basketball must be passed into the post at least once before shooting.
17. Run Set PlaysI never recommend running set plays for the entire game, but if you’re looking for a quick basket against a 2-3 zone, a set play or two might be exactly what you need.
ConclusionIf you’re serious about being prepared, I encourage you to read my article on the 2-3 zone defense to completely understand its strengths and weaknesses.
By understanding how it works, you’ll be taking giant step towards understanding how to exploit the 2-3 zone’s weaknesses.
Don’t allow your team to fall into the trap of doing what the defense wants you to do. Which is settle for the outside shot and play a slow-tempo game.
By using these strategies, you’ll have an arsenal of strategies to defeat the 2-3 zone when you face it during a game.
Basketball Coach's Clipboard 2-3 Zone Attack Principles
Home >
Offenses >
Zone Offenses >
2-3 Zone Attack Principles
By Dr. James Gels, from the Coach’s Clipboard Basketball Playbook
Watching Duke and Syracuse men's teams play each other in the NCAA "Sweet-16" was really interesting, with both teams trying to attack each other's 2-3 zone defense. Several evenings before, a very good Michigan State team had major problems attacking Syracuse's zone. After watching all this, studying it, listening to TV commentators, and taking notes, I came away with some strong opinions on what I now consider key elements in attacking the 2-3 zone defense.
I believe that the most important key is getting the ball into the high-post, "middle space", to an offensive player who can score and make good decisions with the ball. See diagram 1. Good things can happen when you get the ball inside in the green space. I'll discuss this below.
Don't settle for 3-point shots (diagram 1). It's very tempting and requires little effort to just launch 3-point shots, as you can always get a 3-point shot. You must get the ball inside, and you must establish this early in the game. If you can score inside, it takes the pressure off your 3-point shooters. If you can get the ball inside, the defense will have to sag more, and then the outside becomes more wide open.
Realize that against the 2-3 zone, you will have to work hard to get those inside shots, and you must be patient.
Take the first good shot that avails itself. Sometimes, especially with a shot clock, it's hard to get a good shot. Too often I see a pass go in to the high-post/middle area and instead of the player simply turning and shooting the open short shot, he/she passes it back out or forces a bad pass down low.
Pass fakes and shot fakes are very important fundamentals for opening passing and dribble-penetration lanes. Drill this in practice.
Avoid too much perimeter "passing around the horn" (diagram 2). We've been taught that passing quickly back and forth around the perimeter is a good thing, to over-shift the zone. But in reality, this leads to player stagnation with little player movement and usually fails, or results in someone just jacking up a 3-point shot. We have got to get the ball into that middle area seen in diagram 1.
Attacking the middle space
In the past, we have used a 1-3-1 offensive set with a player occupying the high-post area (see these set 2-3 Zone Offenses. But now I believe that instead of having a player constantly standing in the high-post (and clogging the middle), it's better to leave the middle space open, and then attack that space by having your post players flashing there for a pass. A good athletic wing player who is comfortable with the ball in the middle could flash there too.
Teach your players to flash, not just to the free-throw line, but more inside the lane (diagram 1). This space appears to be open more often than the free-throw line, and is harder to cover for the perimeter defenders, while still a difficult cover for the inside defenders.
With players flashing in and out of this space, there is less chance of a 3-second lane call. Here are ways of getting the ball inside:
1. Opposite low post flash and pass from the wing or top. See diagrams 3 and 4.
Duke vs Syracuse - low post flashes into the middle space, gets the pass and open shot.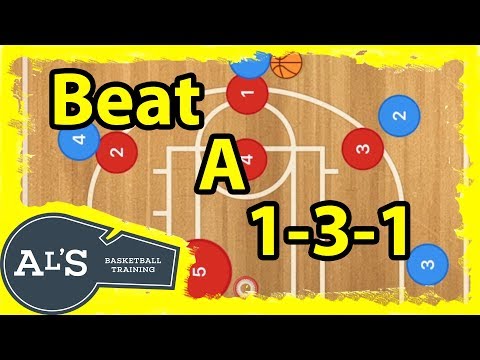
2.
High-post screen and dribble-attack. If the high-post player cannot get open for a pass, he/she could screen either of the top two defenders. This can result in dribble-penetration into the middle space. See diagram 5.
3. Opposite wing flash. See diagram 6. If your wing player is comfortable here, he/she can flash to the middle also. We have two inside post rebounders if he/she shoots here.
4. Dribble-penetrate the middle. See diagram 7. Instead to the guard going all the way to the hoop and into the shot-blockers, a nice simple pull-up jump-shot often works great here. Or a dribble-drive followed by a kick-out pass to the opposite wing may be right the play (diagram 8).
Duke vs Syracuse - several things in this clip. Duke shows good patience, working for the good shot. The opposite guard cuts into the middle space, gets the pass and kicks it out to the wing, and moves out. Later the opposite low post flashes into the middle spot, but doesn't get the ball. Finally, we see dribble-penetration to the middle, with a pass to the short corner for an open shot.
Making decisions in the middle space
A number of good things can happen once we get the ball to your "decision-maker" in the middle:
1. Turn and shoot (diagram 9). This is often the best option as it is a short, relatively easy shot when the shooter is open. Far too often, I see players passing up this shot, and some not even looking for the shot.
2. Pass hi-lo to low post (diagrams 10 and 11). The zone defenders will mess up from time to time and the low post will become open.
Michigan State video - ballside high post drops to block as opposite low post flashes into the middle space, gets the pass, and makes the hi-lo pass.
3.
Shot fake and dribble-drive (diagram 12).
4. Pass to opposite wing, or to the point, for an inside-out 3-point shot (diagrams 13 and 14).
Other key elements
1.
Pass fakes and shot fakes. I'm repeating myself here because they are such important fundamentals.
2. Don't forget that rebounding on both ends of the court is very important, and strong defensive rebounding with the quick outlet pass and an aggressive transition offense can be very helpful, especially against teams that don't get back quickly.
3. Use of the high lob pass to the low-post. Watching these college games on TV, how often would we see a low post player sneak underneath (baseline) the zone defenders and get a lob pass for a dunk (diagram 15)? You might not have a dunker on your team, but still the lob and a two-handed tip-finish might be possible.
4. What if the defense brings the low middle defender up, like a 2-1-2 zone? That's OK if they have to adjust to you. You can still get the pass into the middle space, although the shot there might not be open as often, but the hi-lo pass to the low post will be easier.
In summary - be patient, work hard, and get the ball in the middle space and usually everything else will fall into place.
Related pages:
- Zone Offense
- 2-3 Zone Offense Sets
- Screening the Zone
- 2-3 Zone Plays
3-2 offense against zone defense
When 3-2 offense is used, attackers must add combinations against zone defense to it. These combinations use the principle of continuity and are easy to adapt to any zone defense setup.
Some 3-2 attack combinations against zone defense are shown in fig. 154-158.
Fig. 154. Player I starts dribbling to the right, indicating the direction of attack against the zone defense. After one or two hits on the floor, he passes the ball to player 2. When player 1 starts to dribble, player 5 crosses the three-second zone to meet the ball. Player 2 passes the ball to player 5 if possible and goes forward along the touchline. At this time, player 4 makes a dash under the basket.
Player 5 may pass the ball to player 4 entering under the basket, player 2 moving along the touchline, or player 3 entering the outer semi-circle of the free-throw area.
Rice. 155 (another option to continue the attack). If Player 2 fails to pass the ball to Player 5, Player 4 must V-move into the corner and receive the ball from Player 2 (1). Player 2 then charges towards the basket, ready to receive a return pass from Player 4. If the defense allows, Players 2 and 4 play a "pass and go" situation. After player 2's pass, player 5 moves to the end line on the side of the ball. Player 1 moves to the right to receive a possible back pass. Player 3 may move to the free throw line or the outer semi-circle of the free throw area to receive the ball from player 4 and take a mid-range jump shot. If Player 4 fails to pass the ball to Players 2, 5 or 3, he returns the ball back to Player 1 (2), who will pass it to Player 3 (3), who goes to the top of the free throw area. Player 2 goes to the left side in a position convenient for a mid-range jump shot.
Fig. 156 (continuation of the combination shown in Fig. 155). Player 3 must quickly pass to player 2 before the zone has time to shift in his direction. Player 5 crosses the three-second zone to meet the ball. Player 3 moves to the left, towards the side of the ball. Player 4 makes an exit under the basket from the side farthest from the ball. Player 1 enters the outer semi-circle of the free-throw area, where it can be exposed if the players in the zone move quickly to the left - back.
Using the screen (fig. 157). Player 1 passes the ball to player 3 (1) coming towards the ball. Player 5 breaks through the area to the free throw line. Player 2 advances to the top of the free throw area receiving the ball from Player 3 (2). During these interactions, player 4 blocks the back player of the zone on his side of the court. This player usually moves towards the basket. Player 4 sets up a barrier. Player 1, after passing to player 3, breaks through the zone in the center and goes beyond the barrier set by player 4. Player 2 passes the ball to player 1 (3).
Attack against zone formations with two back row players (diag. 158). Teams using zone defense in 3-2 or 1-2-2 formations can be attacked as follows: player 1 passes the ball to player 2. At this time, player 4 from the right corner moves to the center position, and player 5, the far corner player , moves to the vacant seat and receives a pass from player 2. Player 3 enters the outer semicircle of the free throw area. Player 2 may also pass the ball to players 4 or 3.
Offensive vs. zone defense
ATTACKS WITH ZONE DEFENSE
Basketball coaches have long debated the value of zone defense. But regardless of these disputes, zone protection, as one of the means of defense, is used by many basketball teams.
A team using a zone protection system is not able to reliably protect the entire field - some areas of the field remain less protected. Those methods of attack are based on the use of these weak points, during which the players adhere to the so-called zone principle of attack in the arrangement.
Diagrams 1-4 show the most common methods of zone protection. The least protected areas of the site are shaded. The designation of players both in defense and in attack goes from the middle line to the front. For example, "zone defense 2-3" ion "attack 2-3" means that two players are closer to the middle line, and three - to the front.
Against the 2-1-2 zone (diagram 1), it is best to use the 1-3-1 formation in attack, as it allows you to often carry out long-range side throws at the basket from the least protected places on the court. If the opponent tries to cover these places more tightly, by mixing players, it will be possible to use passages under the shield.
The 3-2 zone defense (diagram 2) has the most vulnerable spots near the foul line and in the corners of the court. In this case, it is best to use the 2-1-2 formation in attack. One of the defenders standing closer to the front line is forced to patronize the attacker playing near the penalty line. As a result, one of the corners remains unprotected.
Basket shots can be made from there.
In zone 2-3 (Scheme 3), the court is least protected near the sidelines, from where it is relatively easy to make targeted shots. The attacker with the ball (1-3-1 formation), moving in the center, makes an attempt to pass between the two front defenders. One of these defenders, naturally, tries to prevent him. Because of this, the player on the touchline remains without guardianship Having received the ball from the central striker, he makes a throw around the ring.
The 1-2-2 defense (diagram 4) leaves free-throw space open and (for a short time) the corners of the court. The best formation in attack is 2-1-2. The task of the center player, who is in the free throw area, is to draw a defender to him and thereby free one of the partners from custody for aimed shots from the middle line or give him the opportunity to play against only one defender.
Of course, the choice of one or another arrangement in the attack depends on the individual qualities of the players. For example, a 2-1-2 offense requires a team to have two good center players, and the rest to be able to dribble around the opponent and drive forward sharply. An attack in a 1-3-1 formation is impossible without well-aimed "shooters" from the sidelines and a tall center player who could fight the ball in the event of a rebound.
To exploit the weaknesses of any zone defense system, it is necessary to have players in the offensive team who are good at shooting from the least protected areas of the court. Forwards must be good at long-range throws and throws from the front line (from a distance of 4-5 m).
In training, we advise you to pay great attention to practicing shots, especially long-range shots from the side lines and from the corners of the site. It is difficult to throw the ball at the basket from the foul line with a hook and turn. This is thwarted by retreating defenders. The most convenient in such conditions is a jump shot. In training, you need to ensure that the player, practicing this technique, releases the ball from his hands, being at the highest point. Otherwise, the throw loses a significant amount of effectiveness.
When attacking in a zone defense, the player must be able to hit the ball that bounced off the ring into the basket.
When the players have mastered the basic techniques of an individual attack, you can move on to team training. It is best to start with the game on one half of the court.
In order for the attackers to learn how to use the weak points of the zone defense in training and gain confidence in the accuracy of the throws, the defenders are positioned correctly, but do not offer active resistance.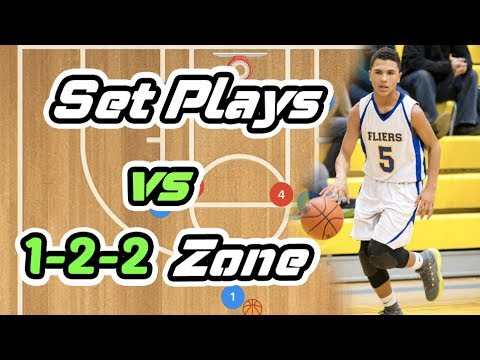
It is useful to train with three fives Two fives, using any of the zone defense arrangements, defend the baskets, and one attacks. If the attack is successful, the attackers will attack another basket. In case of failure, the attacking five becomes defensive, while the defending five attacks, etc.
In further training, the defense is activated. Defenders, having mastered the ball, are trying to make a fast break .
It takes a long time to learn a large number of attack options. Therefore, it is recommended to first study the attacks in the arrangement of players in the attack 1-3-1. With this arrangement, you can use the weak points of all options for zone defense, and in case of a ball loss, you can quickly organize the defense of your basket (if the opponent, having gone on the attack, applied a fast break).
Skillful arrangement of attackers 1-3-1 can create a numerical superiority over the defenders in one or more areas of the site. Therefore, the placement of attackers is sometimes carried out not only in a straight line (schemes 1 and 3), but also along the diagonal of the site from right to left or left to right. The players do the same. as in a straight line.
Against a zone defense, when there are two players in the front row (2-1-2 and 2-3), it is recommended to use a forward formation. If there are one or three players in the first line of defense (1-2-2, 1-3-1 or 3-2). it is better to place attackers diagonally. The attacker / determines in which arrangement his partners should act. At the right moment, he dribbles the ball from the middle to the right or left to the sideline, stops there, and the total players move accordingly (diagram 5). Player 5 basically doesn't change places. The same, only in reverse order, occurs when moving from a diagonal arrangement to a straight line
The coach must position the players in such a way as to make the most of their abilities, to create an offense capable of destroying any zone defense system.
What qualities should players have who use the 1-3-1 formation in attack?
Player 1 organizes attacks. He also insures the rear. It is his duty to quickly determine what kind of defense system the enemy has used and organize the attack accordingly. This player must be able to perform excellent passes, a direct throw from 6-7 m, be able to play a calm, consistent game plan. In this position, the height of the player does not really matter, but speed qualities are very important to him. After all, he often has to quickly move from attack to defense and fight with a numerically superior enemy (one against two or with a partner against three).
In the free throw area there is a player (5) who is better than others in the team in fighting for the rebounded ball. He must be able to throw the ball into the ring (from the foul line and closer) from any position - while facing the basket and with his back to it. In the arsenal of his techniques should be hook throws, and jump shots, and throws with a turn, and an accurate transfer of the ball.
Player 4 is the second strongest player on the team in the fight for the ball bouncing off the ring. He must be able to perfectly perform throws from under the basket and from short distances, jump shots, and clearly pass the ball to partners.
Player 2 must be able to pass the ball and shoot well.
Player 3 is a defender. He must be able to accurately throw the ball from the spot, pass the ball to partners, quickly come back and intercept the ball from the opponent.
At least three players must participate in the fight for the bounced ball. They seem to form a triangle: one is located in front of the basket, and two are on the sides of the shield. The remaining two players step back at the moment of the throw to organize protection in case the opponent takes possession of the ball after the rebound. Such insurance is necessary for the team in case of an unexpected transition of the enemy into a fast break.
Players 2 and 4 fight for the ball after each failed throw, the latter acting on the side where the combination was started. Center 5 fights for the ball in front of the basket.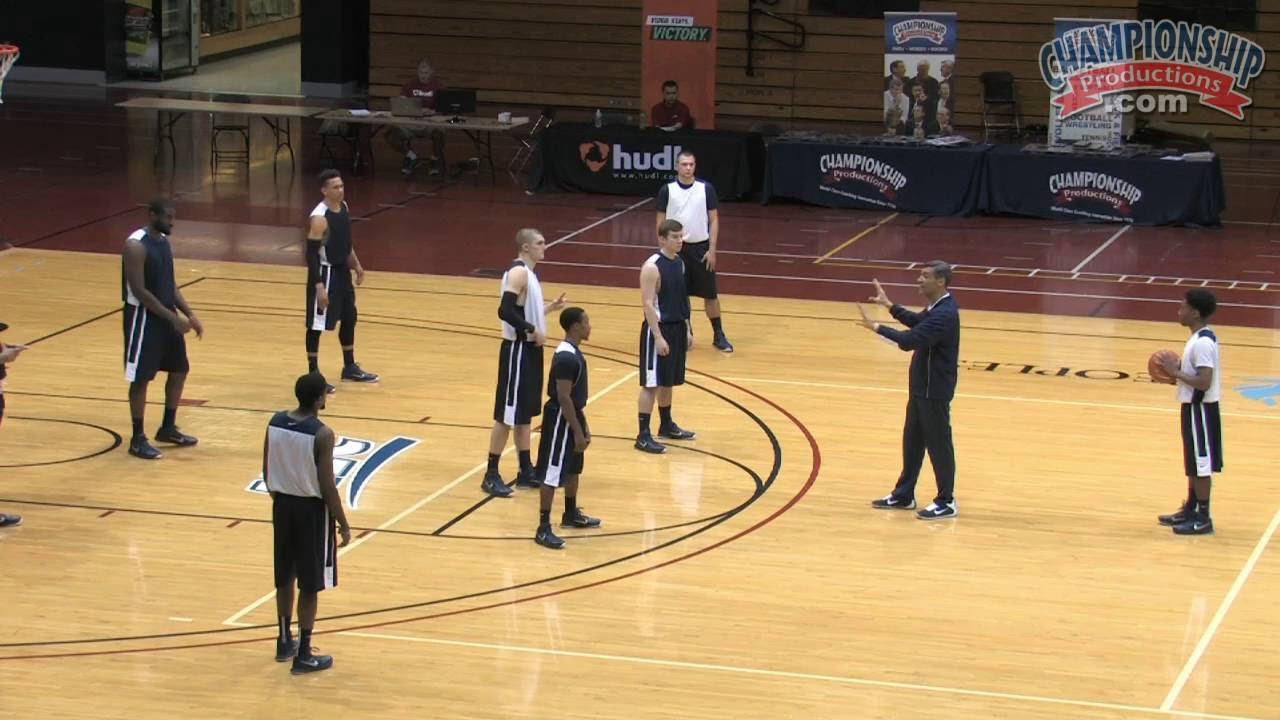
Player 1 does not challenge for the ball He is outside the free-throw area semi-circle in the center or to the side (left or right depending on the direction of the diagonal attack). If, after an unsuccessful throw, the attackers regain possession of the ball, player I is included in the attack. If the ball is at the opponent, he goes to the defense.
Player 3 acts as a defender. He takes part in the fight for the bounced ball only when player 2 shoots at the basket from a distance of more than 6 m or when he himself shoots from a distance of less than 5 m. /, 4 or 5). he joins player 1 to organize a defense. Player 3 must always be ready for an immediate defensive retreat.
When player 2 or I throws at the ring, players 2 and 4 fight for the bounced ball from both sides of the basket, player 5 from the front side. Using the attack option 1-3-1 allows the team to effectively attack the opponent. For example, the enemy used a 2-3 zone defense (Scheme 6). Forward /.