How to fix a basketball
A Fix for All Common Issues that Basketballs Face
Contents
- 1 The most common problems of basketballs
- 2 A hole in the basketball
- 2.1 How do you locate a hole in a basketball?
- 2.2 How do you patch a hole in a basketball?
- 2.3 The best ball repair sealant
- 3 The basketball valve is loosing air
- 3.1 How do you confirm that the basketball valve does not hold air?
- 3.2 How do you repair a basketball valve that is loosing air?
- 3.3 What to do if a basketball has slippery surface?
- 3.4 Can you repair a basketball with lumps?
- 4 The top tools to repair a basketball
- 4.1 basketball repair kit: Sports Ball Leak And Flat Fix-Repair Kit
- 4.2 basketball repair sealant: Unique Sports Ball Doctor (Quart)
- 4.3 basketball valve repair kit: MINDCOLLISION Basketball Valve Replacement Kit
- 5 If the ball is too damaged, you may need to purchase a new one
- 6 FAQs
- 6.
![]() 1 Can you fix a punctured basketball?
1 Can you fix a punctured basketball? - 6.2 How do you fix a broken basketball?
There’s nothing quite like the feeling of sinking a shot from downtown and hearing the net ripple. But what do you do when your basketball starts to act up? In this blog post, we will walk you through how to repair a basketball. We’ll cover all the common issues that basketballs face, and how to fix them yourself!
The most common problems of basketballs
In most cases, all you need is a patch or a needle and some thread or glue. However, there are a few other tools that can come in handy. Here are the most common issues that basketballs face, and how to fix them:
- a hole in the basketball
- the basketball valve is loosing air
- damaged / slippery surface
- deformed basketball shape
A hole in the basketball
How do you locate a hole in a basketball?
First of all, you need to find where the hole is. The most obvious way is to submerge the ball in water and locate the point where small air bubbles are coming out.
Because it is natural that small bubbles of air will exist in many of the ball pores, use your palm to pass it around the ball surface to make them go away faster. Be patient and after the residual air of the surface pores goes away, it will be pretty obvious where the actual leak on your ball is. It is the spot where bubbles keep coming out.
Next step is to use something sharp, like a dull knife or better a colored marker to make a small circle around the spot where the hole is. Trust me, I have repaired a lot of basketballs in my career, and while you might think that this is not required, it is actually very important if you do not want to repeat the process from the beginning and loose your patience!
How do you patch a hole in a basketball?
There are a few different ways that you can patch a hole in a basketball. First of all, if you have a punctured ball with a small hole, you can try to melt the ball’s surrounding surface a bit, so that it gets sealed “naturally”. Of course this method can only used for a rubber ball and not on modern leather basketballs.
You can use a hot knife to achieve a hot melt of the outer surface at the point where it is leaking air. Better use a dull knife for this procedure, as you do not want to create more damage to the ball. Use the hot knife to melt some of the surrounding rubber and move it over the hole.
After you believe that you have had the hole shut, wait for some time until the rubber gets cold and then try again. Bounce the ball vigorously and then submerge it into water to check if the leak persists.
If the above failed or you have a leaking basketball that is made out of leather, you may try our next method which is to use an adhesive patch. These patches come in a variety of sizes, so you will need to select one that is slightly larger than the hole.
Usually patches come as a part of a repair kit. These kits come with everything you need to patch a hole, including adhesive patches, glue or ball repair sealant and instructions. Repair kits are readily available at most sporting goods stores.
The best ball repair sealant
One of the most effective solutions to fix both rubber balls and composite leather basketballs, is the Unique Sports Ball Doctor. It is basically a formula that you insert into the ball with a syringe. Then you inflate the ball properly and bounce ball vigorously for several minutes, so that the formula spreads alla over the ball’s inner bladder. This way it covers all the surface and is able to seal properly any leaking basketball.
Check Price on Amazon
The basketball valve is loosing air
How do you confirm that the basketball valve does not hold air?
The simplest way to do this is to submerge the ball in enough still water. If you can see small air bubbles escaping from the valve, then the valve is not holding air.
How do you repair a basketball valve that is loosing air?
First of all you can try the “toothpick method”. It is probably the cheapest and most accessible way to fix your leaking basketball valve, because it does not require the purchase of anything (as long as you have a toothpick in your home.
First step is to make sure that the leaking basketball valve hole is clean. For this purpose, you will use a wet inflating needle and you you put it in the valve hole several times in and out to clean the dirt from the valve. Do not spare effort on this, you want to make sure that nothing stands inside the ball’s valve hole to make the valve leak.
Then take the inflator needle out of the ball’s valve hole and put the toothpick in it. Break off the end of the toothpick, leaving the valve plugged. The toothpick can act as a sealant and repair the damaged valve.
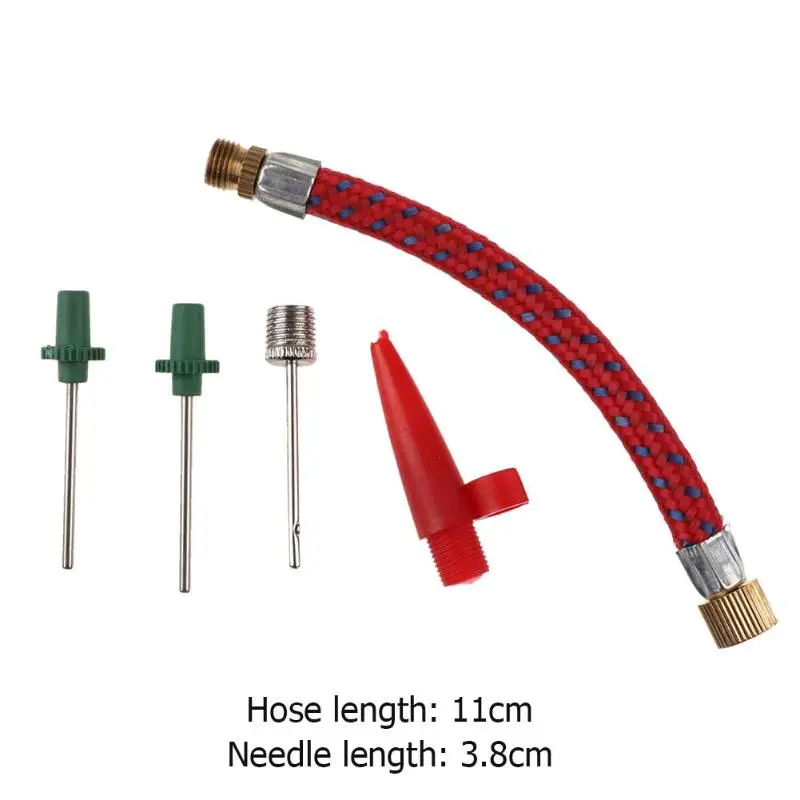
A leaking basketball valve cannot always be fixed with the toothpick method. If it fails, your next option is to try and replace the valve with a new valve. There is a great valve replacement kit on Amazon, that will help you insert a new valve into the ball’s bladder.
The process can be very effective for most basketballs, as long as you follow the manufacturer’s directions:
- First you use one of the supplied crochets to pull the damaged valve outside
- The you simply insert the new valve that comes with the set
- You push it a deep a you possibly can to insert it at the maximum level in the ball
- You use a pair of diagonial pliers to cut of any excessive length of the new valve
If the valve leaks after the above, you may need to repeat the process once more.
Check Price on Amazon
What to do if a basketball has slippery surface?
A slippery surface on an outdoor basketball can be caused by a number of things, including water, sweat, or dirt. If the surface is damaged, you may need to replace the ball. However, if the surface is simply dirty or wet, you can clean it yourself. Simply dampen a cloth and wipe the ball clean. Be sure to dry the ball completely before using it again.
If we are talking about an indoor leather basketball, then a leather conditioner can be used to to keep the surface material flexible, pliable, and new looking..
Apply a little amount of conditioner to a clean cloth and work it into the ball in a circular motion. Allow the conditioner to sit for at least 15 minutes before removing any excess with a towel.
Check Price on Amazon
Can you repair a basketball with lumps?
Most people think that you can only repair a basketball if it has a hole in it, but that’s not true! You can actually repair a basketball with lumps or deformed shape, too.
Basketballs often develop lumps and unevenness over time, especially if they are frequently used on rough surfaces. Although it may seem like the ball is beyond repair, there are a few simple steps that can help to restore its original shape.
First, you’ll need to deflate the ball and remove any air from it. Then pump it up again but this time to an air pressure level lower than the previous one. Some air lumps are caused by excessive air pressure inside the ball and will simply go away when the pressure is made right.
If the above did not work, try running the ball under warm water for a few minutes. This will help to soften the rubber and make it more pliable. Next, use your hands to massage the lumpy areas, working the rubber back and forth until it is smooth. Finally, let the ball dry completely before using it again. With a little bit of patience, you can easily repair a basketball with lumps.
The top tools to repair a basketball
basketball repair kit: Sports Ball Leak And Flat Fix-Repair Kit
Check Price on Amazon
basketball repair sealant: Unique Sports Ball Doctor (Quart)
Check Price on Amazon
basketball valve repair kit: MINDCOLLISION Basketball Valve Replacement Kit
Check Price on Amazon
If the ball is too damaged, you may need to purchase a new one
Finally, if the hole in your basketball is large, the surface is fully damaged or the valve leak irreperable, you may need to replace the entire ball. Fortunately, in your website you may find great suggestions to get a brand new ball. With a little bit of effort, you can have your basketball back up and shooting like new in no time!
FAQs
Can you fix a punctured basketball?
Yes, you can fix a punctured basketball by either melting the surrounding surface, using an adhesive patch or a ball repair sealant kit
How do you fix a broken basketball?
A broken basketball can be fixed by using a ball repair kit, that will seal any open holes in it. You may also change the ball’s valve or use melt around a punctured spot to seal it.
Austin
I am a passionate basketball player and coach who has played at the semi-pro level overseas. I'm also a huge fan of the game and love to watch it.
Latest posts by Austin (see all)
How To Fix A Basketball That Won’t Hold Air – Get Hyped Sports
Every single basketball will eventually start leaking in some way, whether you want it to or not, with even the best cared for balls becoming a problem. It’s essential to know how your basketball can leak and what you may stop the air from escaping.
Your basketball may have dirt, or something else stuck in the valve that needs to be cleaned out to help it seal properly. If you have a small leak, you can melt the hole shut with a hot melt, patch it with a kit, or you may have to resow the seam that has been broken and needs to be resealed.
You must understand just how your basketball can suddenly start leaking air when you least expect it. Many things can cause this issue, and people have made the mistake of disposing valuable balls that can be fixed within a few minutes.
Why Would a Basketball Keep Losing Air?
Three things can cause your basketball to leak, each one of them usually being fixable with just a bit of patience. We recommend familiarizing yourself with the potential causes of basketball leaks, as this will ensure that you know what you need to fix them.
Focusing on these three will allow you to comfortably have your favorite ball for a lot longer, with most leather balls fixable until their last puff of air. You must ensure that you know how to fix and identify the most common ways to damage a basketball.
Valve Leak
Oddly enough, a valve leak or damage is most familiar with the basketballs cared for the most, as the valve becomes damaged because it is often used.
The valve will often be damaged because the needle is wrong, dirt is stuck in the valve or aging.
Most people often rule out valve leaks as they assume the valves will not be damaged no matter how many times they pump the basketball. However, it takes one needle accidentally dropped to entirely ruin a valve as the valves are made of plastic.
Small Holes
A leather basketball is not so likely to suffer from small holes as they use an internal bladder system, and when pumped to the correct pressure, it will not be damaged.
However, most other basketballs can quickly develop tiny holes that must be patched or fixed.
Rubber basketballs have no internal bladder, with composite basketballs differing from manufacturer to manufacturer. These holes can be made by anything from overinflating to having the ball roll or bounce onto something small and sharp, making these the most common problems.
Seam Leaks
Rubber basketballs and composite basketballs do not have seams as they are one solid piece of material containing the air, making seam leaks unlikely. However, select composite basketballs and all leather balls seam leaks can cause damage to the bladder, causing leaks.
Seam leaks are natural for all balls made using the bladder system as the materials stretch and change over time. This means that the seams start to open, and the soft, sensitive internal rubber bladder can be damaged by the seams themselves or by sand stuck inside the ball.
How To Fix Each Type Of Leak
Now that you know the most common types of leaks for your basketball, you need to know how to fix them. However, depending on how the ball is damaged, the required work to fix the ball will be different, with the type of ball creating further confusion.
A few things cannot be fixed, with holes large enough to put your finger through, meaning that the ball needs to be replaced. Repairing the ball properly will easily and comfortably have you enjoy the ball for a lot longer than the manufacturer expected.
Fixing a valve leak
This is the most touch-and-go type of leak you can find with your basketball, whether a leather ball or a rubber ball. You need to ensure that you can do everything that may need to be done to your valve before attempting to fix them.
Generally, we recommend not trying to fix a valve that is holding no air at all; once you remove the needle, the valve lets all the air out, you have to consider replacing it. Knowing when this will happen is important and how to fix the ball otherwise is what will help your ball last forever.
- Wet needle: This is the repair that you should always hope works, get some soapy water, and dip the needle into the water. Insert and remove the needle multiple times from the valve; this cleans out any dirt or debris stuck inside the valve that stops it from closing.
- Inset Toothpick: A temporary fix that should only be done if you have no other choice is to insert a needle to plug the basketball. If the valve has been broken entirely and cannot block the air, you can insert a toothpick and break it off flush with the valve.
- Replace Valve: This will require a unique tool and is only ever worth doing with a leather basketball. The valves can be replaced without breaking the ball’s seams or removing the bladder; with a new valve, most balls will be perfectly usable for another few games. Here are some great replacements on Amazon that we found.
See Our Complete List Of Helpful Basketball Articles Here.
Fixing a Hole
Leather balls rarely, if ever, get a hole as the materials are stronger than their rubber counterparts, with only needles or thorns pressed into them easily breaking through. If your ball is overinflated, it will be more prone to developing these holes, whether they’re leather or rubber.
To fix a small hole causing the ball to lose air slowly, you must identify whether the ball has an internal bladder. Most rubber basketballs do not have bladders inside; composite balls may or may not have an internal bladder, while all leather balls have bladders.
- Patching Kit: Basketball patching kits consist of a needle inserted into the area where the hole is and a liquid inserted. This liquid is sucked out of the hole and then hardens, sealing the hole and keeping the air inside; this only works on rubber balls. Here is an example of a patching kit.
- Hot Knife: Using a hot knife will not work on all rubber basketballs, will not work on leather, but will quickly seal a vinyl basketball. These basketballs look similar to others, but you can easily seal most small holes on a basketball with only a hot, blunt knife.
- Replace Bladder: We recommend doing this every few years anyway as the bladder will be damaged and deformed as the ball is used.
 Replacing leather or composite basketball bladder requires a few special tools that you may not want to buy, but you can send the ball away to have it done.
Repairing The Seam
We don’t recommend you attempt when you have a composite or rubber ball as the cost and time needed to do it are overwhelming. Rubber balls do not have seams to start with, just seam lines, while composite balls are not much more expensive than redoing the seam.
You will require more than just a needle and thread, which many people assume you need; you will also require the sealant. The seams on modern leather basketballs are hidden by the black lines that crisscross the entire ball; these give the balls their iconic look.
We highly recommend that you send the ball to a professional to have this done; not only will they be able to test the health of your bladder, but they can also reseal everything as well. The threading and stitching required to repair a seam are tight and need stronger thread than usual.
Conclusion
Your basketball can have multiple reasons that it will be leaking air out of it at a steady pace, with most people assuming it’s easy to fix. Knowing how to and when to repair your basketball will allow you to enjoy the basketball for a lot longer.
Whatever you do, please don’t try to fix a basketball that has any cut in it larger than a few inches!
How to repair a soccer ball?
- Home
- Articles
- How to repair a soccer ball?
| Despite the fact that the design of most soccer balls from trusted manufacturers is durable and practical, for a number of reasons various “emergencies” can occur with a game projectile. Shards of broken glass, pointed ends of metal fences, constant pumping, improper operation - all this can lead to various types of damage. The list of possible damage to football equipment includes: Shards of broken glass, pointed ends of metal fences, constant pumping, improper operation - all this can lead to various types of damage. The list of possible damage to football equipment includes: - - Damage to the chamber (puncture formation)
- - Damaged nipple
- - Damage to the tire (seam rupture)
What to do if a soccer ball hits? The most annoying thing is when the ball breaks down at the most inopportune moment, for example, before a long-awaited important match or training in good weather. So, what to do if a soccer ball is punched? In such a situation, you have three options. You can send the damaged ball to rest and purchase a new ball from the sports shop. Also, you can give it to the workshop for repair, but this will entail additional financial costs. Well, finally, you can try to repair the projectile on your own. By choosing this option, you will save your money, but at the same time you will have to make some efforts and spend some amount of precious time. Any repair starts with problem diagnosis. If tire damage can be determined visually, then with the nipple and the camera the situation is a little more complicated. In order to make sure that the nipple is functioning normally, you need to apply soapy water or saliva to its opening. The absence of constantly appearing bubbles will indicate the working condition of the valve. In this case, you should look for damage on the camera itself. If the "hole" is large enough, then it can be detected by simply putting a hand to the camera. When you encounter a microscopic puncture, finding it will be a bit more difficult. To do this, you will need to carefully open the seam, remove the camera and place it in a vessel with water (bath or basin). The puncture will be in the place near which the water will bubble. Be sure to mark this area with a pen or marker. How / How to seal a soccer ball? Now that the problem has been identified and you have decided to repair the projectile with your own hands, two reasonable questions arise: “how and with what can you glue a soccer ball?”. It should be noted that some manufacturers and sellers of balls supply a so-called “repair kit” for cameras (or “first aid kit”) complete with a projectile, which includes: special active adhesive, patches of various sizes, a set of auxiliary tools, as well as repair instructions, following which even the most inexperienced master can fix the problem with the camera. The process of repairing a damaged chamber of a football apparatus consists of several successive stages. First you need to slightly rip the seam so that the threads begin to diverge. Then, with a knife (or scissors), cut the threads along the seam and pull the tube out of the tire, being careful not to damage the nipple. There are two options for this step. You can simply replace the punctured chamber with a new one, or repair it by sealing the puncture area with a patch. If you chose the second option, proceed to the next step. Before starting restoration work, bleed all the air out of the chamber. Sand the selected patch with sandpaper for a firmer grip. There is a need to clean the puncture area, use alcohol or acetone. On the fragment marked during the diagnosis, apply a thin layer of activating glue and let it dry a little for several minutes. Then we apply a pre-treated patch to the puncture area. Take two small wooden blocks, attach them to the patch and place them in a vise for 4-5 hours. Sand the selected patch with sandpaper for a firmer grip. There is a need to clean the puncture area, use alcohol or acetone. On the fragment marked during the diagnosis, apply a thin layer of activating glue and let it dry a little for several minutes. Then we apply a pre-treated patch to the puncture area. Take two small wooden blocks, attach them to the patch and place them in a vise for 4-5 hours. By the way, self-adhesive patches for chambers with a pre-applied adhesive layer are commercially available, which greatly simplify and speed up the process of repairing the soccer ball chamber. After the specified time, release the camera from the vise and place it back into the tire. At this stage, it is extremely important to make sure that the sealed chamber does not let air through. To do this, pump up the ball with a pump and set aside for 20 minutes. If the chamber continues to blow air, try another patch. It is also possible that there are other punctures and cuts that need to be identified and repaired following the algorithm described above. If, after repair, the chamber holds air securely, you can proceed to stitching the ripped seam. Also, the actions performed at this stage are applicable to situations where the chamber is intact, but there are damage to the seams in the ball structure. Next, we will tell you how to sew up a soccer ball at home. How and how can a soccer ball be sewn up? Before you start sewing, you should prepare improvised means - needles, thread, pliers, a piece of wax. Cut a piece of thread about 50 centimeters long, press it against a piece of wax and stretch it several times in both directions. This will allow you to more easily pass the thread through the eye of the needle and through the holes in the tire panels. In order not to accidentally pierce the chamber, it is recommended to use blunt needles when stapling, which will be more convenient to pull with pliers. Then we determine the sequence of joining the joints for several seams, and thread the thread into the needle hole. It is necessary that both ends of the threaded thread have the same length. One of the ends must be inserted into another needle. The seam is applied in a zigzag way, similar to lacing shoes. Pull the thread tightly to complete the stitch. After creating a seam, place both free ends of the thread under the tire and tie in a few knots. Next, shorten the ends to about 2 centimeters with scissors and tuck them in. When the required number of stitches has been made, proceed to tying the last knot. To do this, first pass both needles between the panels to be connected, and then, after removing the needles, tie a few strong knots and shorten the end of the thread. After that, it remains only to very carefully fill the ends of the thread inward. Do not use sharp objects to avoid damaging the camera. Now you can slightly stretch the material of the tire and the seams, in order to verify the integrity of the resulting structure and pump up the repaired projectile. That's it, your soccer ball is ready to play again! It is necessary that both ends of the threaded thread have the same length. One of the ends must be inserted into another needle. The seam is applied in a zigzag way, similar to lacing shoes. Pull the thread tightly to complete the stitch. After creating a seam, place both free ends of the thread under the tire and tie in a few knots. Next, shorten the ends to about 2 centimeters with scissors and tuck them in. When the required number of stitches has been made, proceed to tying the last knot. To do this, first pass both needles between the panels to be connected, and then, after removing the needles, tie a few strong knots and shorten the end of the thread. After that, it remains only to very carefully fill the ends of the thread inward. Do not use sharp objects to avoid damaging the camera. Now you can slightly stretch the material of the tire and the seams, in order to verify the integrity of the resulting structure and pump up the repaired projectile. That's it, your soccer ball is ready to play again! Where can I repair a soccer ball? If you do not have the ability and desire to do repairs yourself, but you do not want to throw away an item dear to your heart, you can give it to a repair shop. Such workshops are often available at sports shops. For a fee, professional craftsmen can, for example, repair a nipple, or perform even the most complex types of tire or tube repair work. The tire of the ball can also be sewn up at a shoe repair shop, and you can patch a punctured inner tube at a center where car tires are repaired. Such workshops are often available at sports shops. For a fee, professional craftsmen can, for example, repair a nipple, or perform even the most complex types of tire or tube repair work. The tire of the ball can also be sewn up at a shoe repair shop, and you can patch a punctured inner tube at a center where car tires are repaired. From this article, you have gained the following useful knowledge: - - What to do if a soccer ball was hit
- - How to fix a broken ball
- - How to sew up the cover of the ball
- - Where footballs are repaired
| Displaying 1 - 10 (total 17 reviews) | Pages: 12 > | Rating: [5 out of 5] Date added: 06.10.2022 author: Guest The nipple fell into the inside of the ball. What can be done? What can be done? Rating: [5 out of 5] Date added: 05/03/2022 author: Chingiz No comments... Rating: [5 out of 5] Date added: 05/03/2022 Author: Guest Hello. Nipel flew out into the sword, tried to get it, it doesn’t come out. What should I do ?! Help( Rating: [5 out of 5] Added date: 12/15/2021 author: Guest Very good article. Thank you. Helped me. Rating: [5 out of 5] Date added: 03.11.2021 author: Kolya No comments... Rating: [5 out of 5] Date added: 03.11.2021 author: Kolya No comments... Rating: [5 out of 5] Date added: 07/20/2021 author: Almaty No comments... Rating: [5 out of 5] Date added: 07/20/2021 author: Guest No comment. .. .. Rating: [5 out of 5] Date added: 07/18/2021 author: Almaty malades No comment... Rating: [5 out of 5] Date added: 07/18/2021 author: Guest No comments... | Displaying 1 - 10 (total 17 reviews) | Pages: 12 > | | |
Learn how to properly sew up a ball
It would seem that information on how to properly sew a ball should become of little interest - sports equipment is offered in stores in the widest range, so it is easy to replace a torn ball. In fact, the issue is still relevant. Good inventory is so expensive that sometimes it takes months to collect it. And buying a quality ball is not so easy.
Mess or not?
Learning how to sew a ball properly only makes sense if you have a really good leather thing on your hands. First, keep in mind that the work will be painstaking and many hours. For the sake of cheapness, you should not mess with it. And secondly, leatherette, which most of the inexpensive soccer balls consist of, will still not last long after the restoration procedures - the seams will begin to spread quickly. It is possible that this will happen even in the process of resuscitation.
Even if you decide to sew up the ball, do not forget: you will not be able to restore its original ideal shape. The object, most likely, will not resemble a melon, but it will no longer become a full-fledged ball. So it will only be suitable for training and friendly matches.
Preparing tools
For your work to be successful, you need to stock up:
- strong threads, thick, nylon, twisted, but the fishing line will not work - it will stretch itself and tear the fastened material;
- with an awl, matched to the size of the holes on the elements of the ball;
- special eyelet tool.
Let's dwell on the last one. To create it, a piece of elastic steel string is taken with a cross section of no more than half a millimeter and a length of 20 cm. In the middle, it is heated on a candle, burner or lighter and bent in half. The ends are clamped with an M5 screw into the rod - it will become a handle that greatly facilitates the work. The end of the loop expands to fit the thread and is slightly bent to push it through. You can get to work.
The beginning of the beginning
Now directly about how to properly sew the ball. The torn seam is ripped to the nearest joint. The camera descends and the ball is turned inside out through the resulting hole. Nearby seams are checked for strength. If they diverge, you will have to rip them apart. Often there is a need to cut out a whole pentagon element, or even several. On intact seams, the fastening of the thread is checked: it must be tightened to the stop, and the knot must not begin to unravel.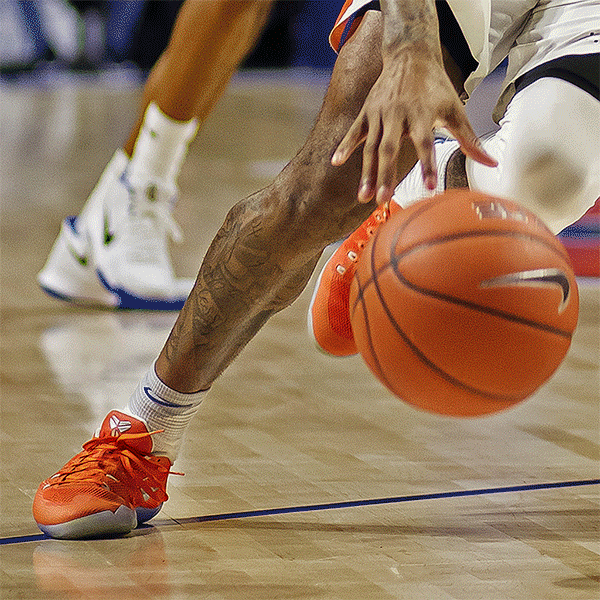 If this is observed, the knot must be tightened as tightly as possible and tied 3-4 times.
How to properly sew up a soccer ball
Getting started on the seam that has come apart.
- An eyelet is inserted into an already existing hole so that it passes through both elements to be connected.
- The end of the thread is inserted into the loop and pulled through to the other side.
- Tie a double knot with maximum thread tension and so that it is inside.
- The loop is inserted into the next hole from the right; one of the ends of the double thread stretches to the right.
- The eyelet returns to the previous hole, and the other end is pulled towards the thread already pulled.
This procedure is repeated over and over again. Visually, the seam looks like a pair of oncoming snakes. When it reaches the corner of the pentagon, the threads are strongly pulled in opposite directions to connect the elements as tightly as possible, after which several knots are tied and melted with a lighter. In this state, the fastening is guaranteed to be protected from divergence.
When the last element remains, the ball is turned inside out, the camera is inserted, and the pentagon is sewn in the same way as the others, but without tightening. Putting it in place, the seam pulls the ends through the remaining small hole, ties and melts the knot, which is then pushed inward with a match.
Restoring the nipple and inner tube
Knowing how to sew up the ball properly will also be useful if the nipple has started to etch or the inner tube has been damaged directly. Note that in times of a global shortage of this knowledge, it would be enough for you: with a “scoop”, you could easily buy new “details”. So the whole concern was pulling out the old ones and putting in the new ones. Now repairing balls is no longer so simple. Buying a football camera is almost impossible. So you have to carefully rip open the shell and reanimate the old "stuffing".
- If the nipple is holding and the ball is going down, then the camera is poisoning.