Home »
Misc »
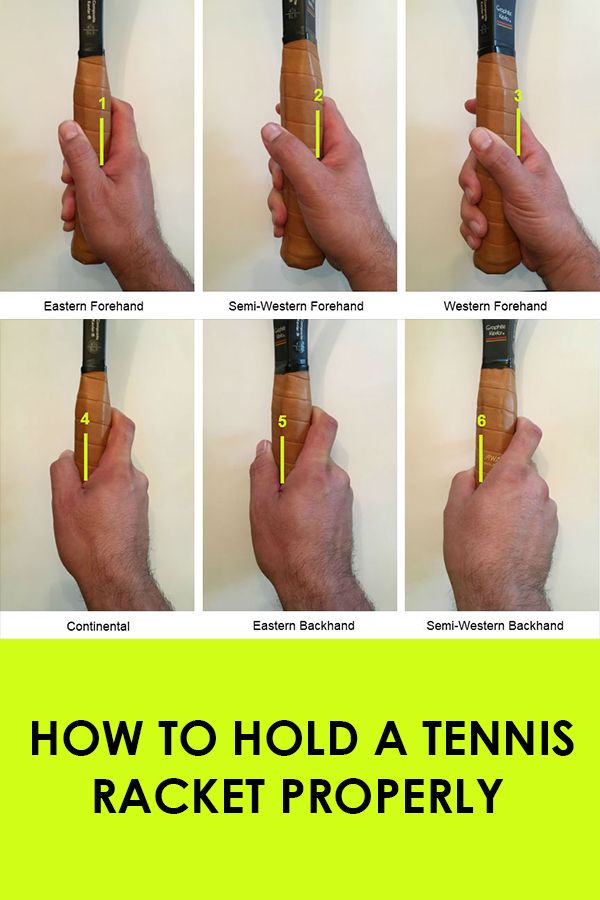
How to hold a basketball properly
How to hold a basketball properly
How to grip the basketball and use your hands for a perfect release
How you grip the basketball is critical to a consistent release.
There are so many details that go into holding the ball and using each of the hands in order to become a great shooter.
If you can get consistently close to an optimal grip and release, then you stand an excellent chance of developing repeatable form.
Use these details to start to develop your own system of drills to isolate the habits, and layer drills. Or skip to the front of the line and get my my proven system of drills in my SHOT DEVELOPMENT SYSTEM – PURE RELEASE.
THE GOAL OF THE HANDS
As I’ve mentioned in other posts, our goal when we shoot is to create as much Positive Power in the shooting motion as possible. Positive power is any energy that is straight up and in line with the hoop.
Since it is your hands that are actually TOUCHING the basketball, it is going to be critical that we create as much positive power with our hands as we possibly can.![]()
We want to avoid the shooting hand pushing the ball off line in one direction and the guide hand pushing the ball off line in the other direction, and then trying to perfectly synchronize those two motions to create positive power. It is POSSIBLE to do, that but the MORE you have compensate, the harder it will be to be consistent.
Instead, try to build a one-handed release with one hand pushing the ball towards the target.
Need help creating positive power but have no idea how to do it? Want to build a true one-handed release? CLICK HERE TO GET MY SHOT DEVELOPMENT SYSTEM – PURE RELEASE.
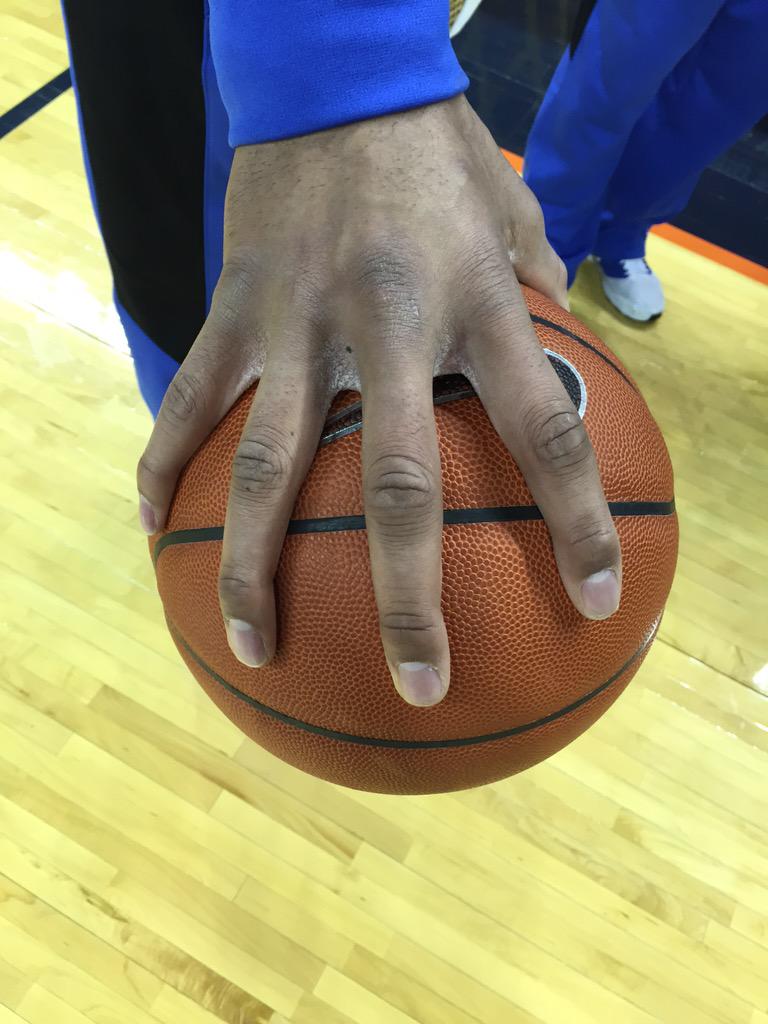
START BY MEASURING YOUR HAND
This is one of the key building blocks that so many people miss. They build their shot around assumptions, or theory, but not their actual body.
Start by gripping the ball with your shooting hand wide and your thumb comfortably spread out. Place your index finger (pointer, forefinger) on the air valve of the ball. Then place the ball on your hip so that you have your guide hand free. With your guide hand, measure the distance from the tip of your index finger to the tip of your thumb. Then compare that distance to the tip of the index finger and the tip of the pinkie.
I
‘ve measured over 10,000 players hands over the years at camps, clinics, and my own personal workouts. I’ve found that 90-95% of players, when they grip the ball with a wide thumb, the index finger is the middle of their grip. About 5% of players might find that the center of their grip is in between the index finger and the middle finger.
I’ve never had anyone grip the ball correctly and find that the middle of their grip is the middle finger. If you do, make sure that the thumb is spread out wide. If the thumb isn’t wide, your hand won’t be as big as it could be, and won’t control the ball as well as it could.
Need help isolating this important skill, then learning to apply it into games? Click here for my SHOT DEVELOPMENT SYSTEM – PURE RELEASE and get all the drills you need to build the habit!!
MIDDLE OF THE HAND UNDER THE CENTER OF THE BALL
Once you know where the middle of your hand is, we need to work to get the middle of the hand under the center of the ball.
Just like in billiards, the ball will go in the opposite direction of where force is applied to it. If your hand applies force to the very bottom of the ball, the ball will go straight up in the air. And if we apply force near the bottom of the ball but slightly to the right side, the ball will go up but slightly to the left – even if we try to lift straight up in the air. Same thing on the other side – if your hand is slightly on the left side of the ball it will push the ball slightly to the right.
Our goal is to get the middle of the shooting hand under the center of the ball at the release of the ball. To make that easier, we want to get the middle of the shooting hand under the center of the ball at the set point. We may not be able to do this perfectly, but the closer we can get, the more accurate we have a chance to be.
Need some drills for getting your shooting hand under the ball? Then need to learn how to layer drills so you can apply the habit at game speed? GET MY SHOT DEVELOPMENT SYSTEM – PURE RELEASE.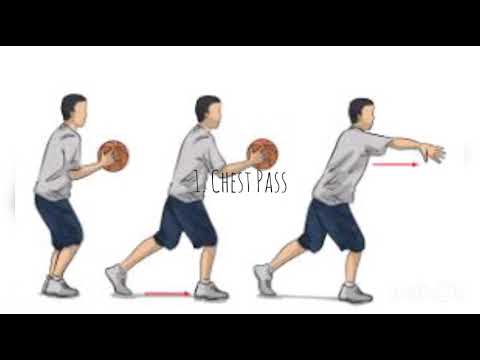
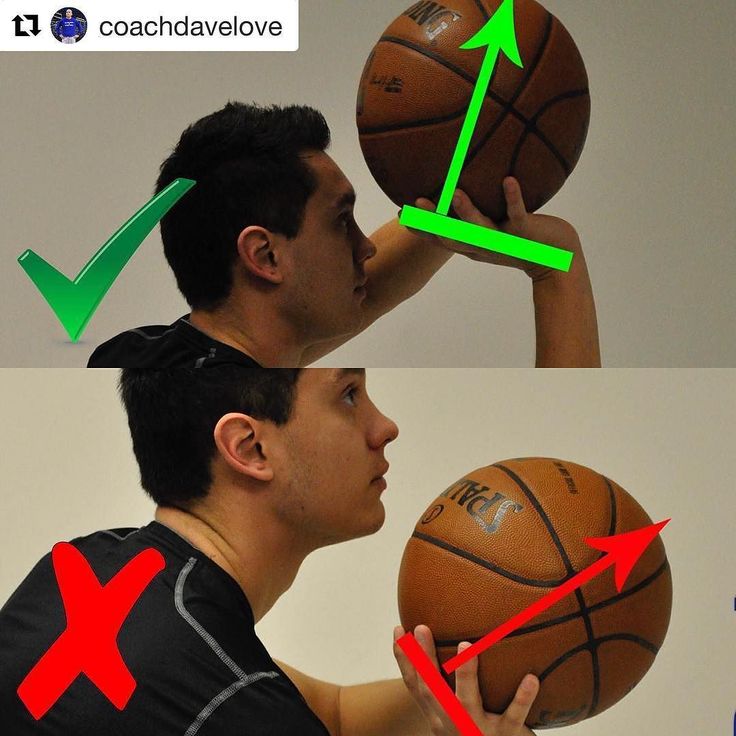
SHOOTING HAND FINGER PARALLEL TO THE TARGET LINE
This is one of the most overlooked keys to shooting. The angle of the finger on the middle of the ball.
Coaches tend to refer to getting the “elbow in” without realizing why it matters. But let me say this first – the position of the ELBOW doesn’t really matter, the elbow isn’t touching the basketball. We can, however, use the elbow as a cue to get the finger into correct alignment. So saying “elbow in” isn’t WRONG, it just doesn’t fully cover the issue.
When a player can get the finger of their shooting hand parallel to the target line, it will remain on the very bottom of the ball throughout the wrist snap. If the finger isn’t parallel to the target line, it will eventually come off the middle of the ball as the wrist snaps, and push the ball off line.
Also be aware that you can get your “elbow in” too much. It is most common/natural for a right handed shooter to let their elbow relax outward, and the finger to come out of alignment in one direction, but it is equally bad to get the elbow “too far in” and have the finger be out of alignment in the other position.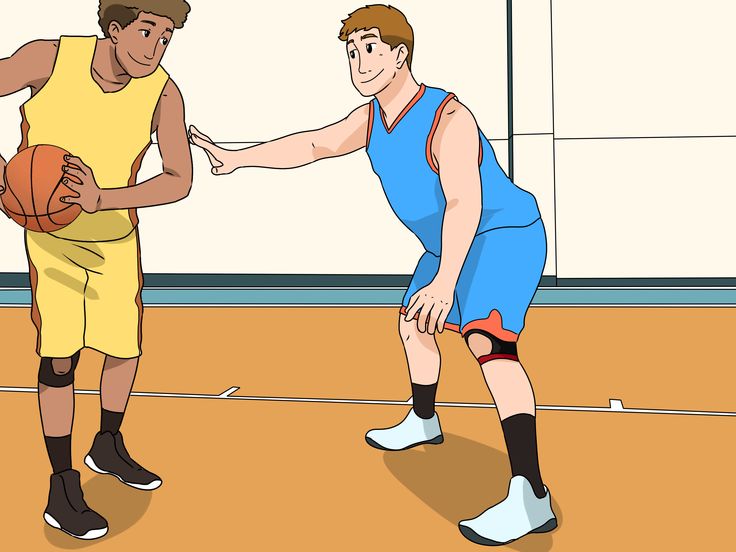
Do you have a tendency to push the ball off line on your release? Click here to start building a Pure Release.
GUIDE HAND COMING OFF THE BALL AT THE SET POINT
Once the shooting hand is in the correct position, we can focus on getting the guide hand off the ball.
Players and coaches both need to remember that if the guide hand pushes at all, it will push the ball off line. Even if the motion that the guide hand makes appears to push the ball FORWARD, it will push off line since it is on the side of the basketball. The only way you can truly push the ball on line is from the middle of the ball, and there isn’t enough room for two hands there.
So the role of the guide hand is to simply help hold the ball stable in the shooting hand as the two hands lift the ball. At triple threat position, a player needs the guide hand to play a role in holding the ball, otherwise the ball will fall out of the shooting hand. Same thing as the player lifts the ball – if the guide hand is removed when the ball is at chest height, the ball will fall out of the shooting hand because it isn’t under the ball yet.
The guide hand needs to support the ball until the shooting hand can fully get underneath the ball and support it by itself. That occurs around the set point. And that is when the guide hand should start to come off the basketball, though it might not actually release from the ball until a fraction of a second later.
Does your guide hand push the ball off line? Need a progression of drills to help with this? MY SHOT DEVELOPMENT SYSTEM WILL TEACH YOU ALL THE DRILLS I DO WITH MY PRO PLAYERS
GUIDE HAND ON THE SIDE OF THE BALL
The positioning of the guide hand on the ball will play a large role in how easily or how well it can come off the ball.
Keep this in mind… it is POSSIBLE to get the guide hand off the ball or even make shots from ANY hand position. But our goal is to make the movement as simple as possible, because SIMPLE IS REPEATABLE.
So our goal is to find the most simple position that the hand can assist in the lifting motion, but not interfere in the shooting motion. I encourage players to hold the ball so that the guide hand is on the very side of the basketball with the fingers pointed at the ceiling when the ball is at the set point. From that position, all the guide hand has to do it come off the ball a fraction of an inch, and it is out of the way and passive in the shooting motion.
If a player grips the basketball with the guide hand towards the top or front of the ball, the guide hand will need to make a bigger move to release from the ball. The bigger move means more time, and more room for error.
Now, it may be necessary at times to catch the ball with a larger separation in the hands because a catch was challenging and needed to be more secure. But understand that makes the SHOT slightly more challenging. We can work on the skill of catching the ball better, but there will always be some variability in the hand position on catches just because catching and shooting are two different skills, with two different ideal hand positions.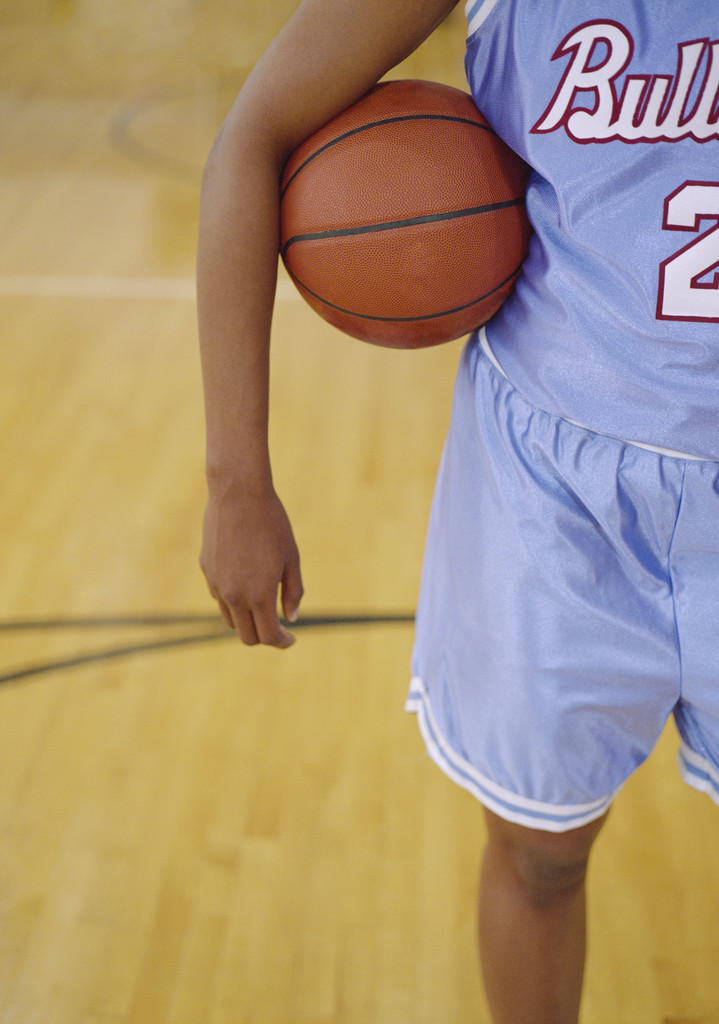 Continue to work on the habit of simplifying your hand position, not intentionally making it more difficult.
Need help getting your guide hand off the ball cleanly? CLICK HERE TO GET THE HELP YOU NEED TO MAKE MORE SHOTS.
WHY DOES IT LOOK LIKE SO MANY PEOPLE SHOOT OFF THEIR MIDDLE FINGER?
This is a common question and requires a deeper understanding of shooting form.
First of all, no one’s shot will be perfect, especially in game situations. And being “perfect” doesn’t mean you’ll make every single shot, just like being “imperfect” doesn’t mean you’ll miss every shot. Being better will simply give the shooter a BETTER chance of making each shot.
In order to simplify the shooting motion as much as possible, I’d like a player to get the middle finger under the middle of the ball at the set point, then lift the ball straight up in the air so that both sides are being lifted evenly, and then releasing off the finger that is the middle of their hand.
But many players appear to release the ball off their middle finger? Why?
The shooting motion is short and violent. The wrist is snapping quickly and there is a lot of variability in how the ball leaves a players hand from shot to shot. Even two swishes can come off a great shooter’s hand differently.
This is why I concern myself far more with the position of a player’s hand at the set point, rather than the release.
Secondly, most players don’t hit a perfect position creating ONLY positive energy. They start off with the shooting hand slightly on the right side of the ball (as a right handed shooter) and start the shooting motion pushing the ball slightly to the left. Then, as they lift the ball, the shooter rotates their hand under the ball so that their middle finger is under the center of the ball, more hand is on the left side of the ball, and finish pushing the ball to the right.
This happens all the time, but that small rotation is something we want to try to either minimize or eliminate from the shooting motion.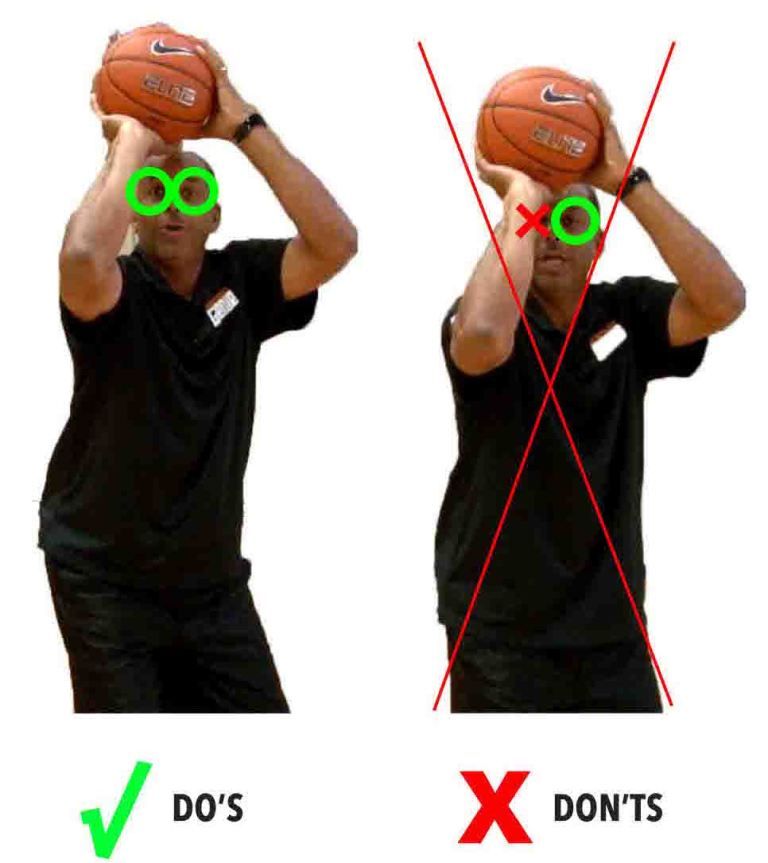
Have you struggled to be able to do this in games? It might be because you never layered drills so that you could APPLY what you were learning. Finally break the habit once and for all with my SHOT DEVELOPMENT SYSTEM – PURE RELEASE.
HOW DO I BUILD THESE HABITS WITH MY NBA CLIENTS?
Building habits in the grip and release requires attention to detail and patience.
I focus on isolating the habit that needs work. In many cases, this can look like standing close to the rim, taking as much time as needed on each shot, and holding the correct position for a couple of seconds before shooting.
From there, as a player gets better at the new, isolated skill, I will start to layer in other drills to make the situation more like a game. The more their habits progress, the more layers I add.
It is a process that takes a lot of experience, so it is difficult for me to explain in a single blog post.
That is why I created my Shot Development System “Pure Release”.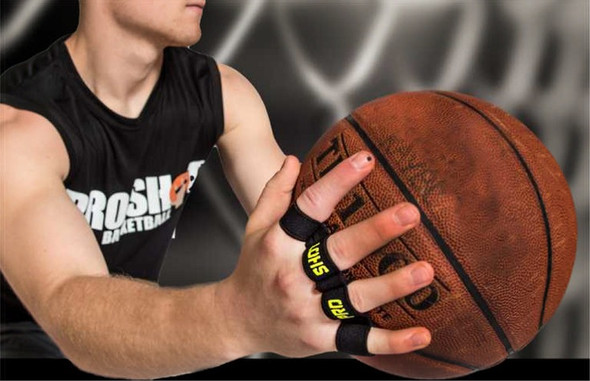 All the drills that I use with my NBA players, laid out in order in video form. Stop guessing what to work on. Start getting results.
You get:
- 60+ Videos of drills and tips
- 2 hours of video content
- Everything laid out in order to remove the guesswork
- Life-time access
You can get “Pure Release” by CLICKING HERE.
Proper Basketball Shooting Technique, Fundamentals, Form, Mechanics
By Jeff Haefner
Home > Player > Basketball Skills > Shooting > Proper Basketball Shooting Technique, Fundamentals, and Form
It's often said that great shooters have a place on any team.
Even if you aren't blessed with tremendous speed, strength or athleticism, great shooting is one of the surest ways you can stand out on the basketball court.
If you spend the time developing and practicing your shot, it will pay off in:
- Making the team
- Getting more playing time
- Scoring consistently
- Feeling confident and having fun every time you step on the floor
Now, let me start with some good news!
Yes, you do need very good shooting form and technique to shoot consistently well.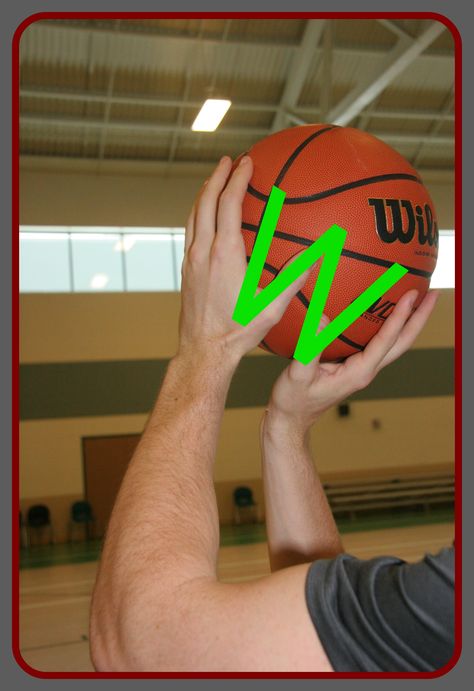
But it does NOT need to be "perfect".
If you watch enough great shooters, you'll see that their form varies quite a bit based on what's comfortable (and what works) for them.
But almost all great shooters follow the principles I'll explain in this article. So keep reading for (all the good stuff)!
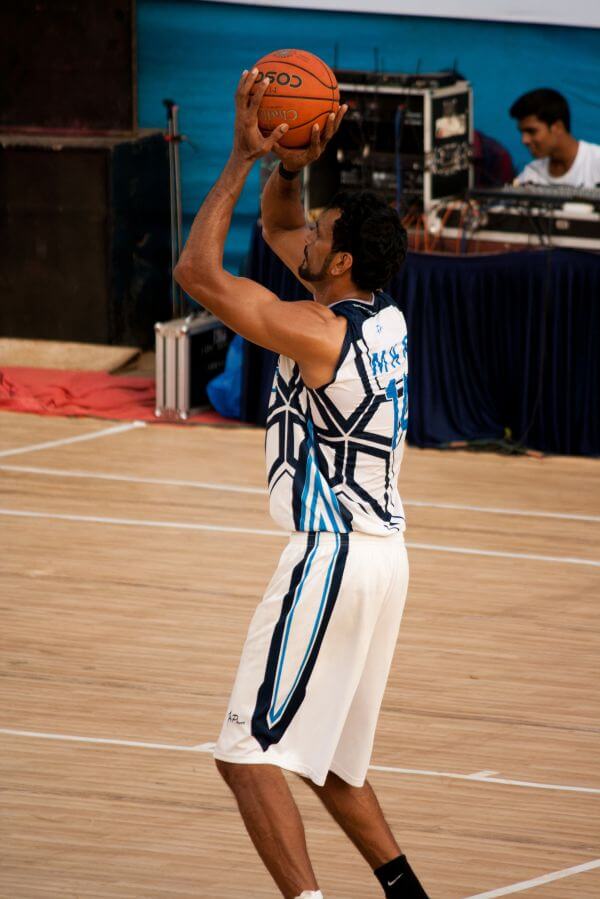
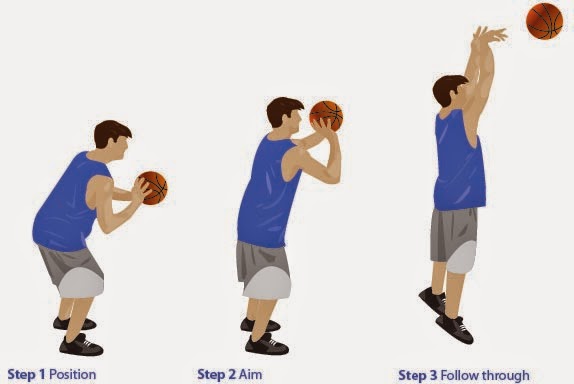
In this section, we give you the raw form and mechanics of stationary shooting.
In other words, this section does NOT address the fundamentals of shooting on the move and more advanced footwork you'll need for game situations.
Here's a quick roadmap of the stationary shooting fundamentals that we'll be covering:
- Eyes on Target
- Stance and Balance
- Shot Pocket
- Grip
- Balance Hand
- Delivery
- Upforce and Landing
- Follow Through
- Correct Shot
EYES ON TARGET- To improve accuracy, locate the target (rim) as early as possible.
 - Keep your eyes on the target and do not follow the flight of the ball.
- Keeping your target focus is very important!
|
STANCE AND BALANCE- Feet are shoulder width apart for good balance.
- Feet should be in a slightly staggered stance that is consistent and comfortable for you. Your shooting foot is slightly ahead of the non-shooting foot in a comfortable position.
- Point your feet in the general direction of the basket, but not necessarily directly at it. We prefer an open stance, but you can also use the closed (squared) stance if that's more comfortable for you. With an open stance, your feet point towards one side of the basket. For example, a right handed shooter will point his or her feet just to the left of the rim for a more natural position and shooting motion.
- Once you develop a comfortable stance, line up your feet the exact same way on every shot.
 Whatever stance you use, consistency is critical. Whatever stance you use, consistency is critical. - Flex/bend your knees on every shot.
|
SHOT POCKET- As you catch the ball, move it quickly into the shot pocket.
- Line everything up so the ball and your shooting eye form a straight line to the basket. This is VERY important.
- Position the ball several inches above your waist.
- Grip the ball properly and be ready to shoot.
- Position the ball in your shot pocket the SAME way every time you catch it.
|
GRIP- Place the air hole between the middle and index fingers.
- Line up your fingertip pads parallel to the long seams of the ball, so you can monitor the back spin.
- Leave space between the ball and the middle of your palm. You should be able to insert a pencil between the ball and your palm area.
|
|
- Spread your fingers far enough apart to comfortably balance the ball in one hand.
 - The ball should sit on your finger pads.
|
|
BALANCE HAND- Your non-shooting hand should be on the side of the ball.
- Your balance hand should not add force or spin to the shot.
|
|
- Your non-shooting hand should not move on delivery and should ALWAYS come off the ball FIRST.
|
|
DELIVERY- The ball should start motion directly upwards from the shot pocket.
- Your elbow should be positioned comfortably under the ball.
- The ball stays in front of you and should not go behind your head.
|
|
- Uncoil your body with your legs, core, and arm power all coordinated.

- Your elbow and wrist should extend in a straight line to the basket.
|
|
- Your shooting hand should extend in a straight line to the rim.
- Hand position on delivery is very important. The ball should come off the hand with perfect symmetrical backspin.
- As shown in the picture to the right, your guide hand stays to the side and does not influence the flight of the ball.
|
|
UPFORCE AND LANDING- Release the ball on the way up, just before the top of your jump.
- Use your legs to generate upforce.
- You should land in the same spot that you jumped, which shows that you have good balance on your shot.
|
|
FOLLOW-THROUGH- Your wrists should be floppy (relaxed).

- Fingers should be pointed at the target (rim).
- Finish high. You should see your fingers at the top square of the back board.
- Hold your follow through position until the ball hits the rim.
|
NOTE: If youd like specially-designed workouts for shooting and scoring, download our FREE Breakthrough Shooting Workout. It includes over 30 drills you can do by yourself or with a partner all you need is a ball and a hoop!
Click here to get your FREE Shooting Workout.
Related Products & Helpful Resources
Basketball Shooting Camps
Free Basketball Shooting Workouts
Basketball Workout App - Shooting Workouts, Guard Play Workouts, Post Workouts, etc.
Basketball coaching hacks: how to score goals for beginners
Even if you are a novice basketball player, we will not give you a training plan, but we will tell you why the ball flies anywhere but into the ring and into your hands. It's all about technique: even with regular training and perseverance, novice adults and children often make simple mistakes. It's a shame, let's fix it. Below are 11 life hacks on how to hone your technique to increase the likelihood of a goal for your team.
Basketball Shot Rules for Beginners
1. Hands up
In pursuit of the attacker, raise your hands, even if you are standing with your back to the pass, and even more so if the ring is in front of you. Your raised hands will increase the chance of intercepting the ball from the opponent by 2 times. Don't overlook this little thing!
2. Make shield rolls
Even Tim Duncan did not neglect them! A square is drawn on the basketball backboard. If you are standing opposite the ring, then aim at the middle of the upper part of the square, if you are standing on the side, then at the corner. If you hit this square, then the ball is at 90% of cases will fall into the ring. The law of physics and no cheating!
3.
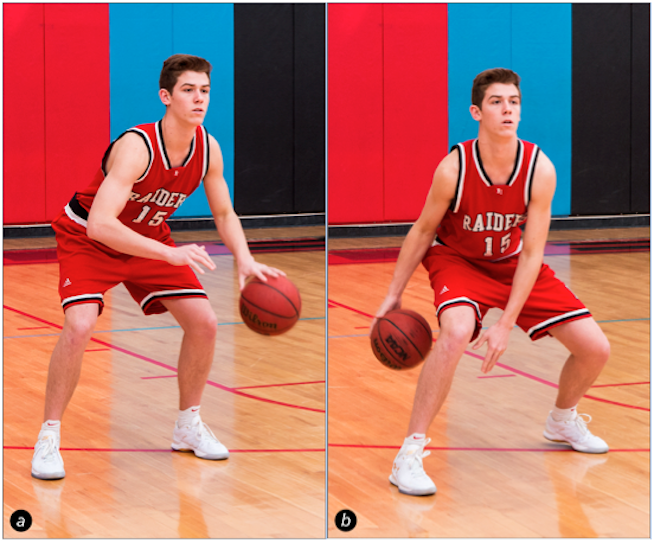
Look at the ring, not at the ball
Practice driving the ball with your hand, not your eyes, develop tactile control. Your eyes should be on the hoop while dribbling and be aware of the position of your body in relation to the hoop. Then you will be able to take the correct posture, and the throw will be effective.
4. Dribble with the balls of your fingers only
The palm should not touch the ball, only the pads of the fingers. Dribbling should become familiar to you, like an extension of your hand. Then you can change its trajectory at any time and you will have more chances to score goals. Practice with the ball constantly.
5. Throw with one hand
If you throw the ball with two hands, you reduce the chance of hitting the basket. All the efforts of the throw are in one hand (in the right for right-handers, in the left for left-handers). The other hand only holds the ball, the leading one holds it with the fingers, not the palm.
6.
Do not jump when protecting the ring
Jumping is the main mistake of rookie defenders. To intercept the ball and block the shot, simply stick out your hands. When you are in a jump, the attacker will easily bypass you.
7. Don't look back
When you dribble, don't look back, but dribble and aim for the ring, focus on shooting (or passing to another player on your team).
8. Bring the throw to automatism
Incorporate the most basic basketball techniques into your training plan and bring the shot to automatism. Throw first from a distance of half a meter from the ring, gradually increasing it. Learn to throw the ball so that it hits the hoop without touching the edge.
Throw the ball with all fives and jump
Throwing Rules:
- Head in the center of the body - if tilted, accuracy is lost.
- Look at the ring: mentally build a trajectory. If you are far away, the ball flies in a curved curve with a maximum height of 2 meters above the hoop.
- A strong hand is in front and throws, a weak hand is on the side and directs, only holding the ball. The elbow of the throwing hand must be in line with the ring.
- The ball must rest on the fingers without touching the palm. The fingers are as far apart as possible and grab the ball.
- Throwing arm bent 90 degrees, forearm perpendicular to the floor. If you bend less, then you get not a throw, but a throwing of the ball horizontally.
The main thing in the throw is the position of the body and its balance. Place your feet apart and parallel to each other: it is important to orient them in the middle of the basket. Then the direction of the body during the jump will coincide with the direction of the throw, and the ball will fly straight into the ring. When the feet are uneven, the ball flies in the wrong direction or does not reach (although the throw was normal).
Take a deep breath and release as you exhale.
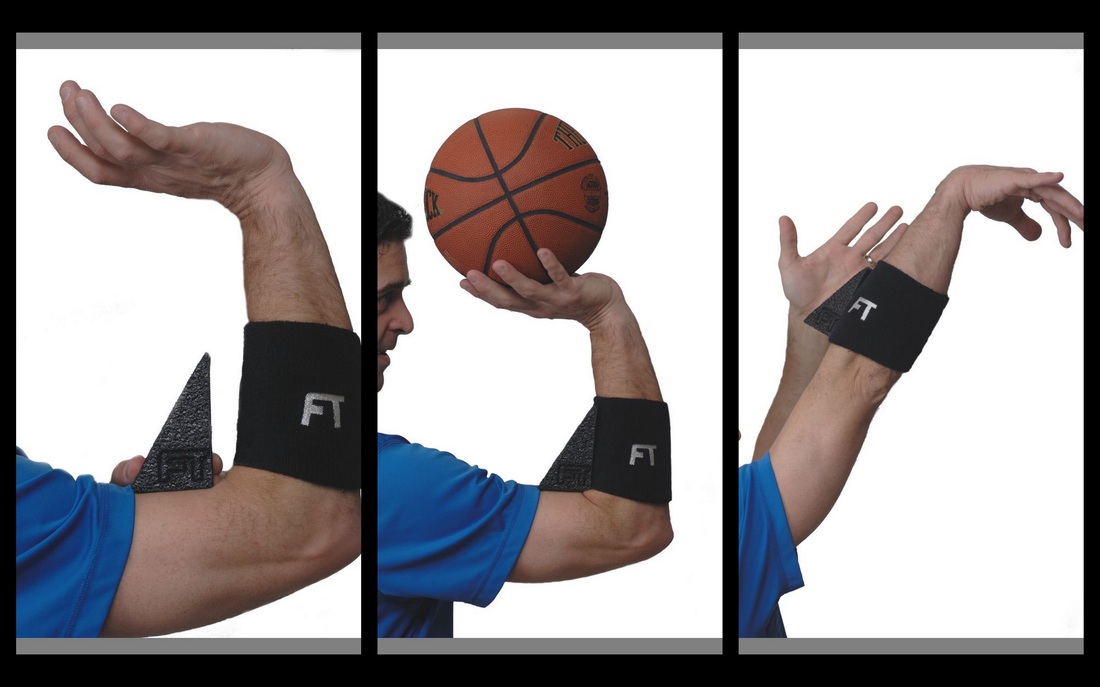
How to hold the ball and shoot in basketball
How to throw correctly: straighten your arm, point your wrist up, and with your hand set the ball to rotate in the opposite direction from the flight. The ball should seem to "roll" off your fingers.
9. Copy masters and play as a team
Watch professional basketball games and try to copy the movements of your favorite players in training. And be sure to conduct game sparring - this will allow you to develop more techniques.
10. Do not throw in a straight line
The higher the arc of the ball, the greater the chance of a goal and the less chance of blocking by the opponent.
11. Do not throw the ball from a full height stand
This is the biggest newbie mistake!
Before the throw, bend your knees slightly and at the moment of the throw, straighten your body, making a jump. You need to straighten up and push off the ground at the same time. When squatting, keep the elbow of the throwing arm close to the body and towards the ring.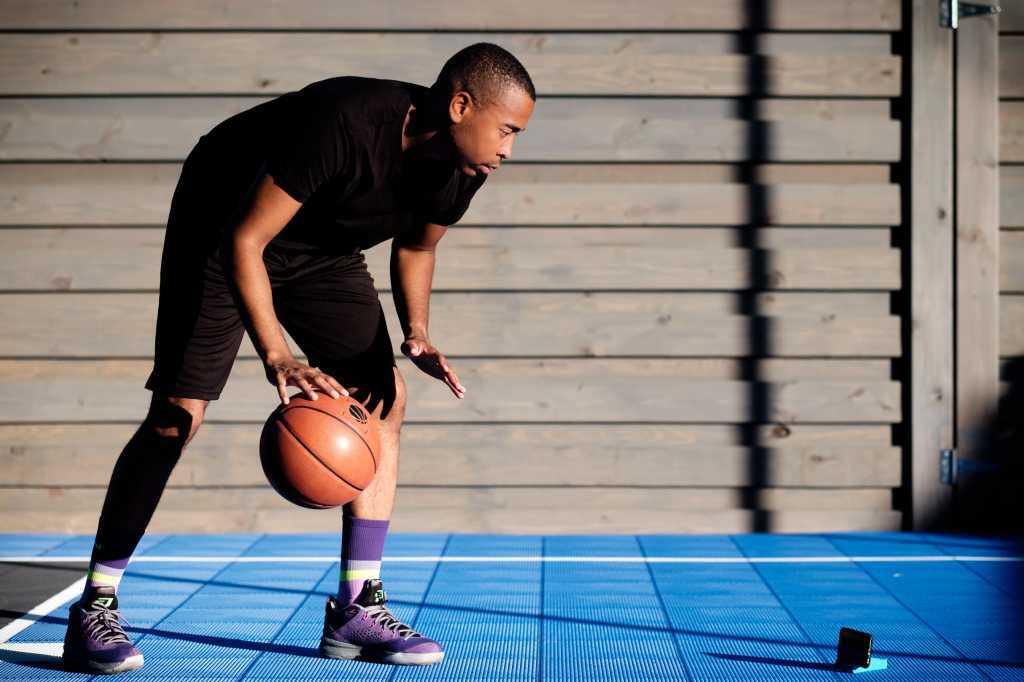
The jump will give momentum to the ball and will allow you not to make sudden movements with the brush.
***
And to be a long-term player, do not forget about your health: take care of your joints and muscles, use tapes, do a warm-up. And be sure to strengthen your arms, legs and shoulder girdle, develop coordination. Regular exercises on uneven bars and horizontal bars will help you with this.
How to learn to spin a basketball on your finger
To skillfully spin a basketball on your finger, you need to learn a few simple techniques, find the ball and set aside 10 minutes of training per day. After a week of practicing your skills, you will master the technique of this trick and show it to your friends. In the step-by-step instructions below, we will show you how to learn how to spin a basketball on your finger.
Tossing the ball correctly
You can train on the sports ground, near the house or even in the apartment, but in any place you need to take into account the environment. For example, when practicing a trick in a room, the ball can bounce and break fragile objects. When a place is found and inventory is prepared, you can begin training. Initially, you need to learn how to properly hold and throw the ball into the air:
- Hold the ball so that its stripes are vertical. Horizontal scrolling looks ineffective and it is very difficult to catch a projectile from this position.
- Select throw method:
- Two hands. You need to keep the ball not on the sides, but so that 1 hand “looks” at you, and the second from you. Having fixed the object, sharply spread your arms and slightly “throw” the ball up.
- With one hand. To throw with one hand, place your fingers along the lines of the ball. It is important that there is free space between the palm and the inventory. Lightly squeeze the ball. Turn the brush outward until it stops, and then gently turn it back. At the last moment, you need to give additional rotation to the ball with your fingertips.
 But we do not recommend using a large one, because. this will upset the balance and the ball will fly away.
- Throw the ball parallel to the floor, do not allow the projectile to “wag”. It is important that when thrown, the projectile rises above eye level. When its bottom surface is visible, the ball is easier to catch.
These steps must be repeated until fully automatic. Usually it takes two days. When the throws are confident, you can move on to the second level.
Learning to catch the ball
Once you have learned how to throw correctly, try catching the ball with your finger. To do this, remember the following nuances:
- You need to catch the projectile on the nail, not the finger itself. In this case, it is important that the brush is turned with the palm towards you.
- The finger must be placed exactly in the center, at the junction of the vertical lines, otherwise the ball will slide off.


/cloudfront-us-east-1.images.arcpublishing.com/pmn/6FB2E2LATFHPTOFGUSNMEQM6NM.jpg)