Home »
Misc »
How to make a basketball headboard
How to make a basketball headboard
BUILDING A DIY BASKETBALL BACKBOARD
David Schultz
Since moving into our house a few years ago, one of the things we wanted to do was replace the old busted up basketball hoop we inherited from the previous owners. We took down the (really heavy) rusty metal backboard and lived with a lonely pole for a while, as you may have seen in photos previously. The classic crisp white school yard hoop is the look we like, but it turns out those are expensive, so we kept our eyes open for one on the thrifted market.
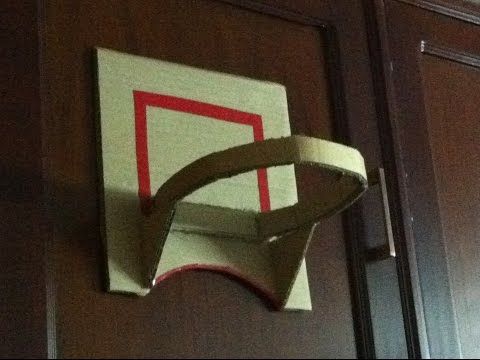
When one became available we pounced and made plans to install it. BUT the new (really heavy) metal backboard unsurprisingly proved difficult to lift up 13 feet in the air for an extended period of time. More importantly, the holes in the backboard for connecting it to the pole weren’t in a great position to make things as sturdy as I would want. So, we shifted to our typical strategy when we can’t seem to find the right product to fit our needs – make it yourself.![]()
Our design ended up very simple, two pieces of plywood glued and screwed together with a couple support pieces of 2 x 8 for 1) the rim and 2) attaching everything to the pole.
MATERIALS
- (2) 3/4” x 4’ x 4’ plywood panels ($50)
- (1) 2”x 8”x 8’ pressure treated lumber ($8)
- 1 and 1/4” screws ($16)
- construction adhesive ($3)
- caulk ($5)
- 2 and 1/2” RSS Screws ($15)
- hardware for attaching pole and rim, we used different sizes of galvanized hardware ($30)
- porch and floor paint ($30)
PROCESS
- Cut plywood panels identically to size for the backboard. We made ours 36 inches tall and 44 inches wide.
- Cut (1) 2 x 8 piece so the length is the same as the width of the backboard. Cut an additional 2 x 8 piece 12 inches long.
- Glue, clamp, and screw the plywood panels together using the 1 and 1/4” screws. I put screws about 8 inches apart on the edges and used a grid-ish pattern on the interior.
- Sand the edges of the backboard so both panels are smooth and continuous. Sand faces of backboard. Sand all corners to round them slightly.
- Caulk all seams and screw holes on the backboard.
- Paint backboard and 2 x 8 pieces. I did three coats to maximize moisture protection.
- The next part, mounting, will vary depending on how you’re putting up your backboard, but our existing pole was set up so we were attaching our backboard to a flat rectangular piece of metal (I’ll call this the bracket) with four large holes at the corners. I clamped the long 2 x 8 to the bracket, centering it in both directions. Then, on the side of the 2 x 8 opposite the bracket, I used a spade bit to make recesses where the heads of the bolts could sink under the surface of the 2 x 8. Then I drilled holes through the 2 x 8 and attached it to the bracket using bolts, nuts, and lock washers.
- Clamp the backboard to the mounted 2 x 8 at the appropriate height so the rim can eventually be attached at 10 feet.
 Attach the backboard to the mounted 2 x 8 using construction adhesive and the 2 and 1/2” screws, screwing through the 2 x 8 into the back of the backboard.
 - Clamp the 12 inch 2 x 8 to the back of the backboard in the appropriate position so you can attach the rim through the backboard and the 12 inch 2 x 8. Attach the 12 inch 2 x 8 to the backboard using construction adhesive and 2 and 1/2” screws, screwing through the 2 x 8 into the back of the backboard.
- Attach the rim to the backboard using whatever hardware works for your rim, going through the backboard and the 12 inch 2 x 8.
- Caulk remaining screw holes and seams.
As the primary recreational b-baller in our family, I was concerned with how a diy backboard would hold up and how well the ball would bounce off the wood.
After testing it for some time, I haven’t been able to tell the difference in bounce between our hoop and a nice indoor one. IT’S BEEN REALLY FUN to shoot around and our backyard looks much more normal with something attached to that pole.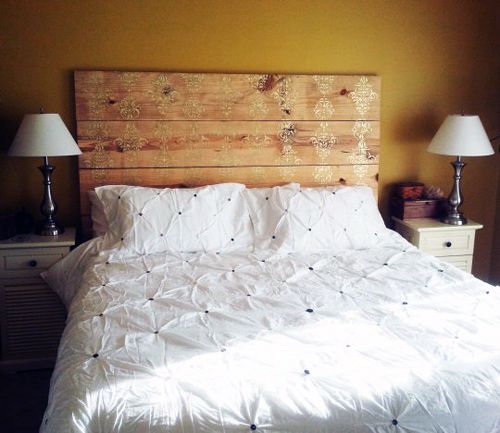
PRE-ORDER NOW: AMAZON | BARNES & NOBLE
How To Make A Basketball Backboard?
Basketball is a fun sport that anyone can enjoy. You can go crazy in your backyard if you have a basketball court. Without a good basketball backboard and hoops, you can’t play basketball. Here in this post, you will get all the information regarding how to make a basketball backboard.
The basketball backboard is the vertical board that holds the hoop or net. A high-quality backboard has a good rigidity that allows you to dunk or throw at incredible speed.
If you don’t want to spend too much money buying a basketball board, you can easily make one. All you need is some building materials and equipment.
Here in this post, you will get all the information regarding how to make a basketball backboard. So, read the full article to know every tiny detail!
| Covered |
|---|
| What are the measurements for a basketball backboard? | |
| Which Material is the Best to Make a Basketball Backboard? | |
| What Kind of Wood is Used for Basketball Backboards? | |
| How Do You Make a Basketball Backboard out of Wood? | |
| How to Paint a Basketball Backboard? | |
| How to Make a Basketball Backboard with Plexiglass? | |
What are the measurements for a basketball backboard?
Before selecting what kind of materials you need to make a backboard, you need the measurements for your courtyard.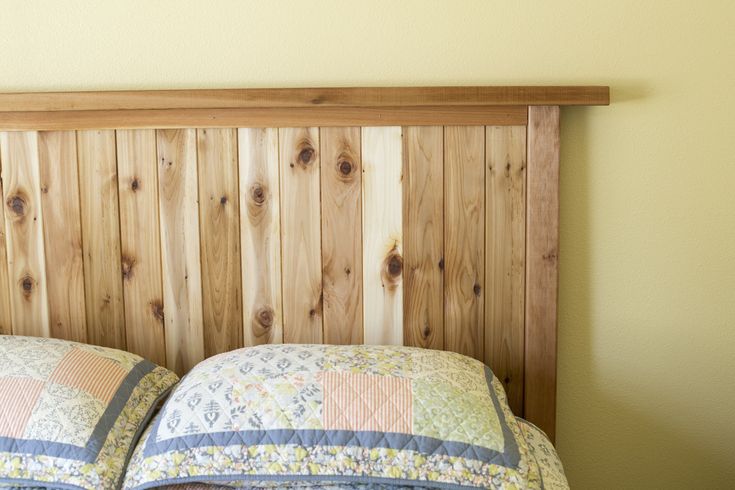 There are some standard backboard sizes that professional leagues follow, but that’s for a proper court. Many houses don’t have that much area to fit a full-size basketball court.
Another thing you need to consider is who’s going to play in the backyard. Basketball Players’ height, age, preference will also matter as it’s not a professional arena. You would want to enjoy playing in your comfortable court. Still, try to follow the standard measurements as much as possible.
First, let’s talk about the adjustable height of the board from the ground. The wall that holds the backboard should ideally be 15 feet tall, with the basketball hoops being 10 feet high. If you decide to use a pole, carefully place it on the ground to remain steady. A wall is a more sturdy option as it guarantees a perfect foundation.
The standard size for the home basketball backboard is 36-38 inches tall and 46-48 inches wide. Depending on your court, you can adjust the length and width by few inches.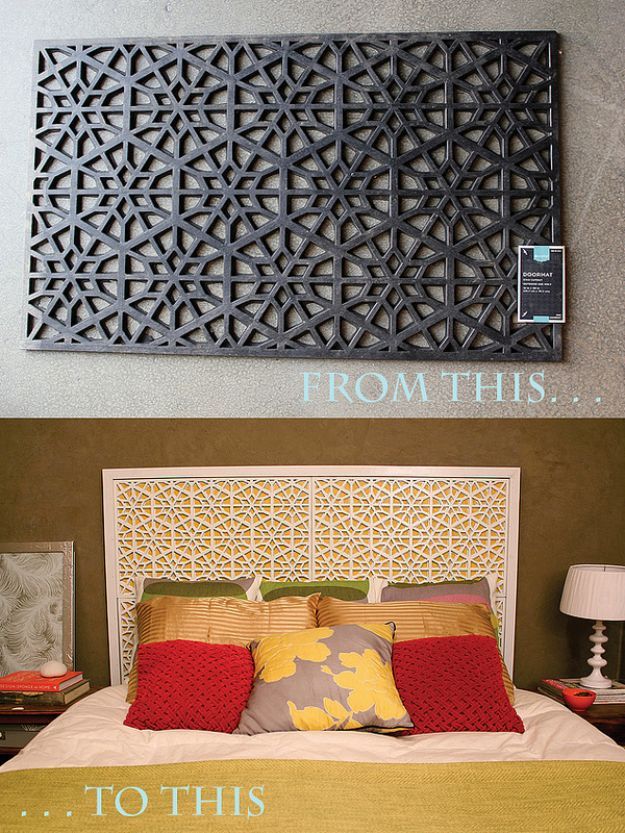
These measurements are big enough to make you accustomed to three-pointers, bank shots, errant shots, etc. So, you won’t need anything more significant than this as the backboard will end up taking too much space.
Silverback Basketball Yard Guard Defensive Net System
Check price on amazon
Which Material is the Best to Make a Basketball Backboard?
Choosing the suitable material according to your requirements is a tough job. Because there are many different materials, you will need, depending on your backboard frame. Once you decided which structure you will use, you also need to consider the backboard weight and height.
Plywoods are one of the most accessible picks for a basketball backboard building material. They are affordable and easy to find. You can buy them at any local brick-and-mortar store or online shop.
However, there are many categories of plywoods, such as softwood, hardwood, tropical, marine, flexible, etc.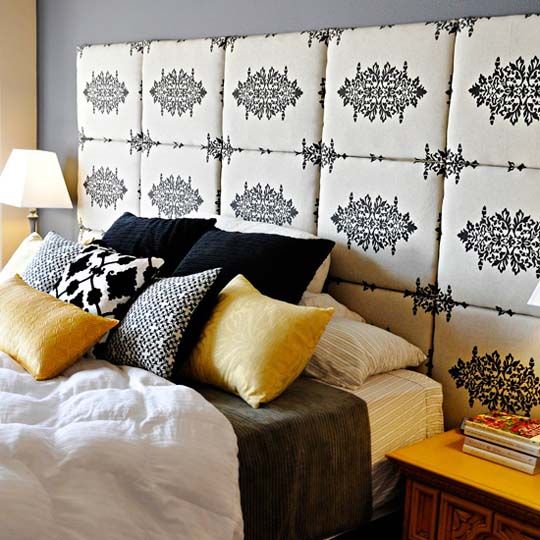 Our recommendation will be to opt for the hardwood because it can endure harsh weather conditions.
If you don’t want to choose plywoods, then you have the option to use a plastic board to make your DIY basketball backboard. The best thing about the plastic material is that it can handle any rough weather conditions without any problem.
Even when your plywood board will find it challenging to endure heavy rains and storms, the plastic board will remain excellent.
The second last suggestion on our list will be plexiglass. This type of board is the standard backboard that you will see at NBA or NCAA games. While these are not cheap options to make a homemade board, you can use them to make yourself one.
However, you must have expertise in cutting glass and handling them. Without those skills, it’s best to avoid plexiglass boards.
The very last thing on our list is acrylic backboards. They are also known as plexiglass boards. These are very similar to tempered glass, but they don’t have the same level of durability.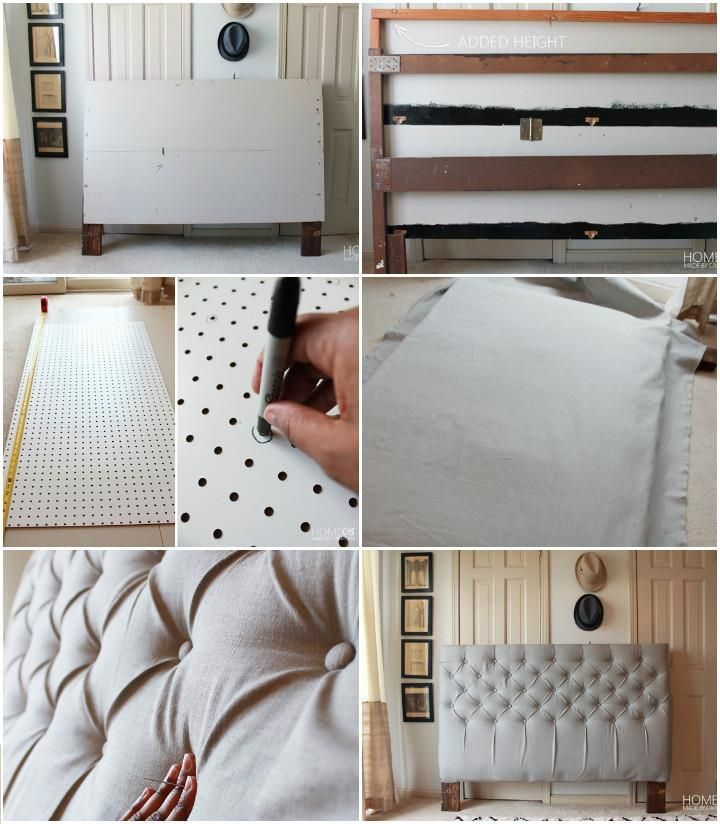
Nevertheless, they are a more affordable choice, and you can use them to make transparent basketball backboards.
What Kind of Wood is Used for Basketball Backboards?
Now that you have come this far, you are thinking of using wood to make your basketball backboards. Wood is an admirable choice for backboards because not only is it affordable, but it also serves well in the long run. If you are determined to use wood, there are many options for you to look at.
Plywoods are the most appropriate pick for homemade backboards. You will find them near your woodshop or online. Marine plywoods tend to have more durability and damage protection compared to softwood or flexible plywoods.
Softwood or hardwood is also a good pick if you will play in your backyard once in a while. While there are many other materials you can look at, such as steel backboards, acrylic backboards, etc., we advise you to try making a board with plywood at first.
The reason being is that the other materials can be a little tricky to manage.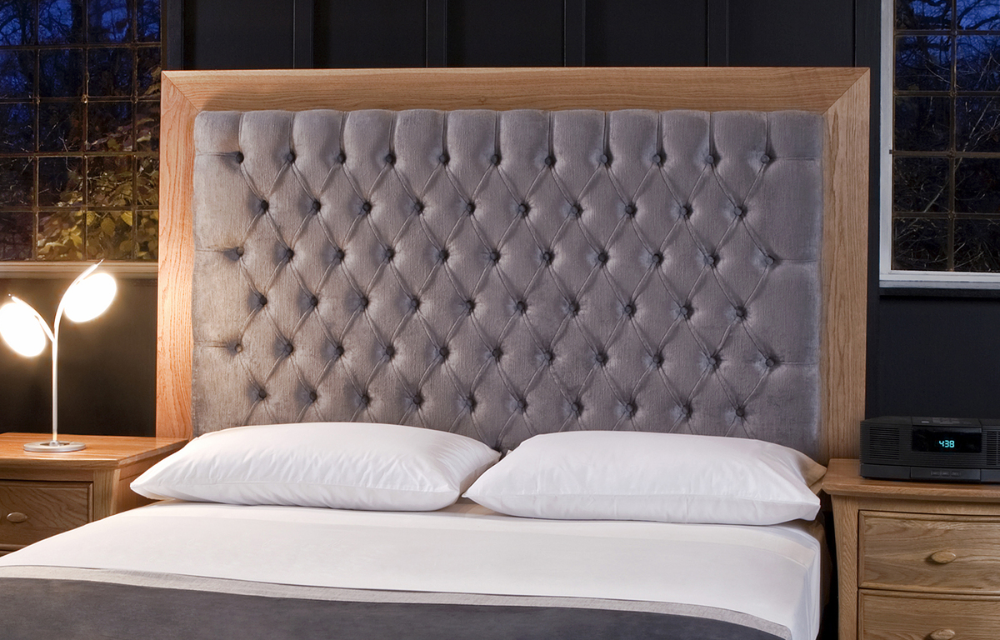 So, it is better to start with easy ones and try the harder ones after you have some experience in backboard making.
Goalrilla Basketball Yard Guard Easy Fold Defensive Net System
Check price on amazon
How Do You Make a Basketball Backboard out of Wood?
If you have already made up your mind about choosing wood for your backboard, then this section is for you. Here, you will learn about how to make a perfect basketball backboard using plywood. Before we get into detailed instructions, we need to know the materials to use. Look at the following essentials:
- Plywood panels
- Masking tape
- Screws & lag bolts
- Construction adhesive
- Hardware for pole and hoop attachment
- White floor paint
- Cardboard pieces
You can add other items as well, depending on your requirements, but these are essentials. After you have bought or managed the materials, you can start with cutting the plywoods.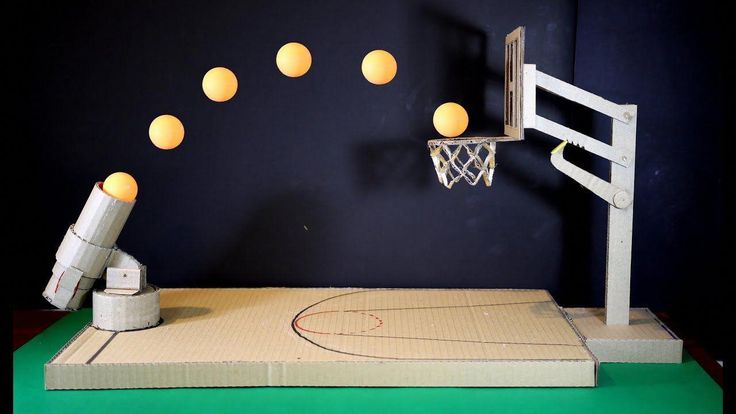 If you are using reused panels, you need to brush off the debris and uneven areas.
Without proper sanding, the basketball will not bounce off the backboard properly. So, using new panels will save you from the extra work.
Cut the panels maintaining the standard measurement of the backboard. However, you can make a slight adjustment as you don’t have to follow any rules in your backyard.
After cutting both the panels seamlessly with a table saw or hand saw, use glue, adhesive, clam to screw the plywoods with a traditional 1/4″ screw. If you use a new panel, sanding won’t bother you too much.
Gently look over any hard or uneven areas and smoothen them out. Do the same thing for the edges as well. You can also make the corners round with any circular object. It will give you extra safety from getting hurt by sharp edges.
At this point, you are mostly done with making a usable basketball backboard from plywood. Always drill the pilot hole and align the panels cautiously because any mistake can wash away all of your efforts.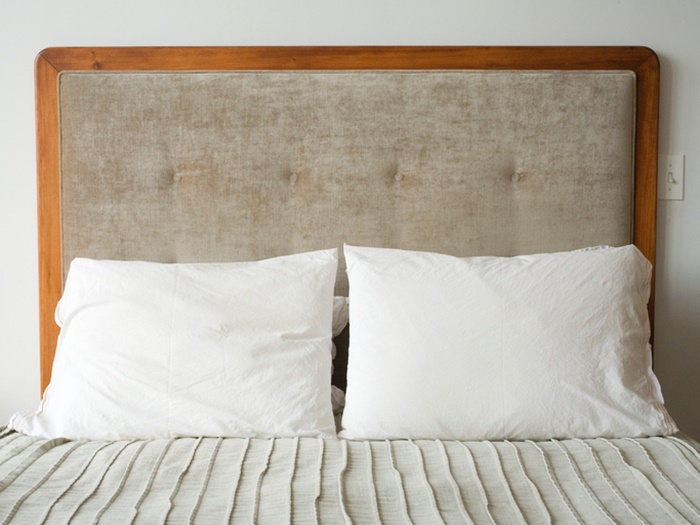
How to Paint a Basketball Backboard?
Painting a basketball backboard needs patience. After you finish making the backboard, sand it again before you start painting. Without sanding it, the debris and particles can get inside the paint. It will make your easy job way more complicated. So, sanding is crucial before covering your board with three layers of paint.
Once you perfectly smooth out the surface, use white paint (also, you can choose any dark color) to paint your board. Carefully paint all of the feelings and use multiple strokes. Make sure every inch of your board is covered with the paint evenly.
If you use a water-based color, your first layer of paint will dry quickly enough. When the color becomes dry, gently sand your backboard and clear it with a soft piece of clothing.
Adding a third layer is unnecessary, but you can slap another layer of paint on your board for more resistance. Now, you need to trace the color lines around the corners and for the hoop.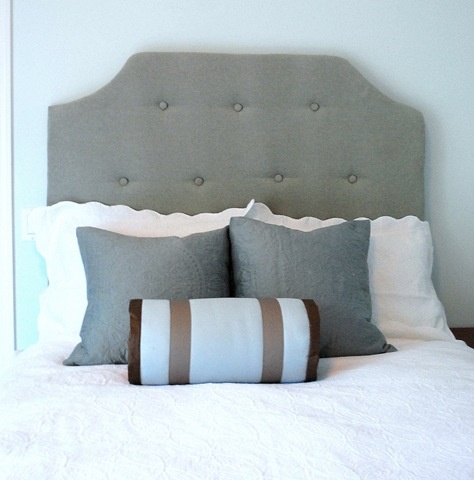 While tracing the ropes with a pencil, you can use painter tape to align them perfectly.
Make a 12 by 12 inch square in the center where your basketball hoop will sit. When you trace the corners, be careful not to drop any paint on the surface as it would not look good. After the paint is dry, prepare the hoop to install.
You can use different types of hoops, such as cheap, commercial, and portable. Often they come with an easy installation process and screws. If you already made holes for the round, screw it properly and look for other problems before putting it on the wall.
Franklin Sports Defender Net Pro Defensive Net System
Check price on amazon
How to Make a Basketball Backboard with Plexiglass?
Plexiglass or acrylic material is a widespread choice for basketball backboards. It offers perfect weather protection, and that’s why many choose this material over plywood. If you want to use acrylic material to make a homemade backboard, prepare some panels to use.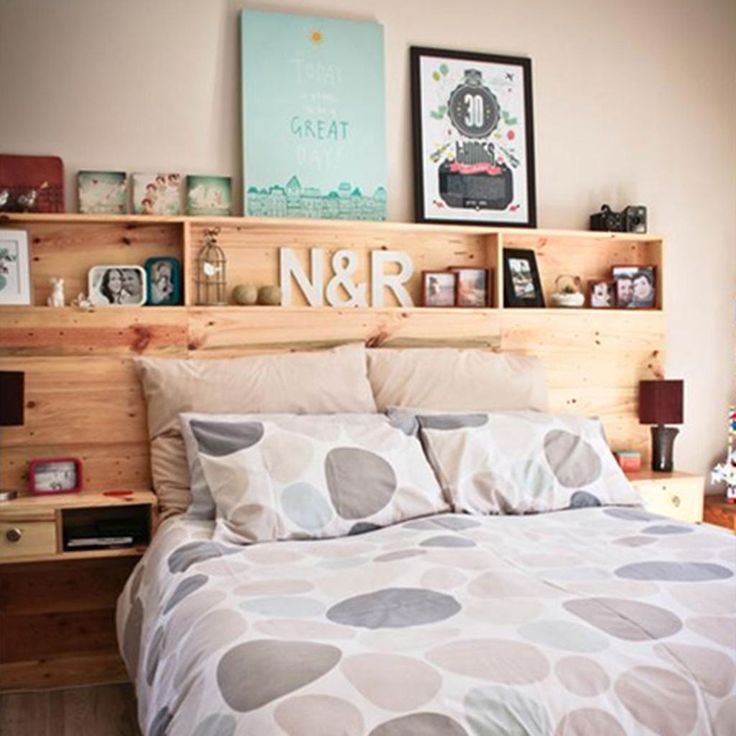
The basic regulation size backboard has a width of 70 inches and an adjustable height of 42 inches. You can use a pencil to mark the board and square out the edges properly. After that, recheck all the measurements before you start cutting with a handsaw.
Slowly guide your saw along the marked lines. Make sure to wear safety glasses, gloves, and a mask. The particles of the board can quickly get into your body and make you sick.
So, be cautious at all times. After cutting the board, adjust the corners with sanding and round them with any circular object.
Define all the horizontal and rectangular positions for the edges and the center. As the material is similar to glass, it is best to use colored masking tape for borders.
So, apply the videos after you are done drawing the lines according to the standard measurements. Cut any extra tape with a knife or razer. Lastly, attach the board to the wall or pole and drill it tight.
Common Answered Questions Regarding Basketball Backboard
Customers that go to buy materials for the backboard often ask very similar questions.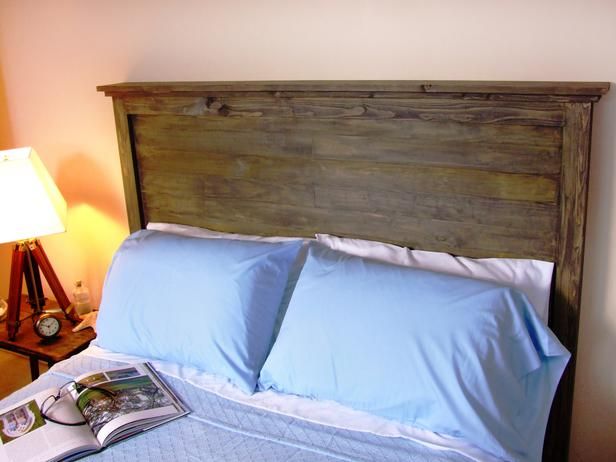 So, we have compiled some of the typical customer questions and answered those questions in this section. Have a look:
How can I Restore a Basketball Backboard?
First, take down the backboard from your post and remove the hoop. Sand the backboard with sandpaper and remove the old paint. Sand again and clean the board with acetone. Apply a new colour, and now you have a fresh backboard.
Is acrylic or Glass Backboard Better?
Acrylic is better in terms of durability and vandal resistant. It can withstand any powerful impact of rock or complex objects. While tempered glass is also challenging, it can get damaged if you are not careful.
What Size Backboard Should I buy?
If you don’t want to make your backboard, you can buy one from basketball stores. The boards come in many sizes with a range from 48 inches to 72 inches. So, you can buy anything within this range, depending on your circumstances.
What Size Backboard Should I buy?
If you don’t want to make your backboard, you can buy one from basketball stores.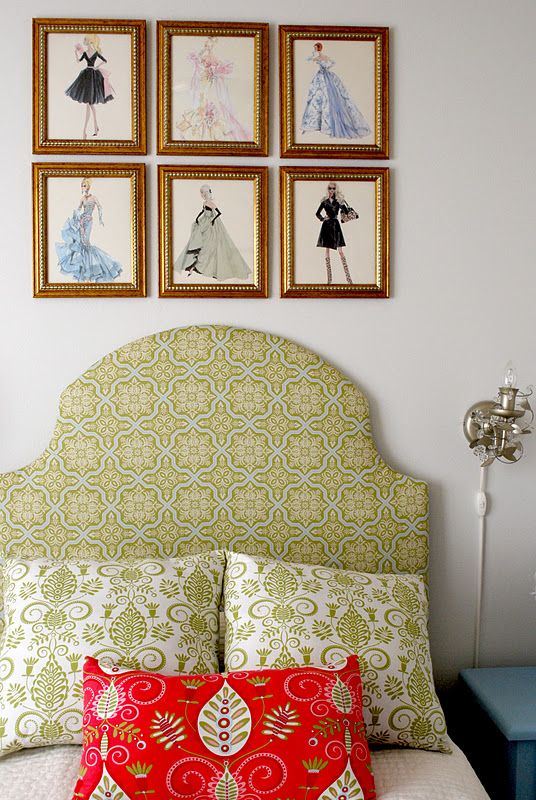 The boards come in many sizes with a range from 48 inches to 72 inches. So, you can buy anything within this range, depending on your circumstances. Read our guides on how to make a basketball hoop net.
Are Portable Basketball Hoops Safe?
While portable hoops are easy to move around, they can cause severe damage because of their heavy piece of metal build and a thick basketball rim. If you can’t maintain balance or pace, you can get painful bruises and injuries.
Basketball in your backyard is a perfect recreational activity on any day. Having a homemade basketball backboard makes the experience more memorable. We hope that this post helped you learn all the necessary instructions to complete your basketball backboard. So, don’t sit idly and start making one yourself!
know more
Learn how to make a headboard with your own hands
In furniture stores, beds with a beautiful headboard are an order of magnitude more expensive than standard, unremarkable sleeping furniture.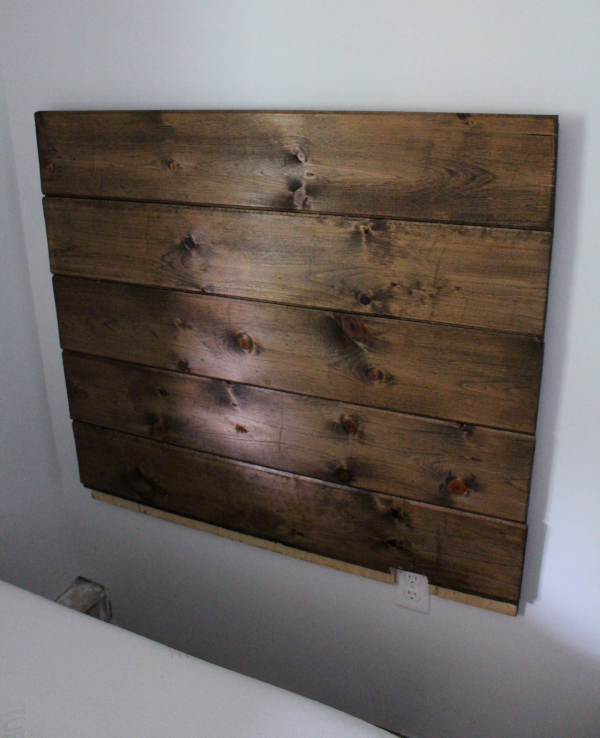 At the same time, the quality and functionality are exactly the same. In order not to overpay for the decorative design of furniture, you can make a decorative headboard with your own hands. This option will provide an opportunity not only to save on the purchase, but also to show imagination at the time of finishing. You can use any leftover materials to decorate this piece of furniture, so the work will not require special costs.
How to change the headboard yourself
Sometimes you need to make radical decisions about the design of the headboard. Radicality lies in the complete replacement of a piece of furniture with a better option. Before making a headboard with your own hands, you should pay attention to the following features:
- Compatibility of the material prepared to replace the element and the stationary bed frame.
- Compliance of the material selected for replacement with the general interior design of the room.
- Practicality and functionality of the element, environmental friendliness and quality of the material.
When completely dismantling a piece of furniture, it is worth considering the course of the entire work. Changing the head of the bed with your own hands is quite simple, you must follow the standard algorithm:
- Take measurements from the bed, in accordance with which the replacement part will be made.
- Buy additional fastening parts: self-tapping screws, corners to strengthen the structure.
- Install the new headboard into the bed frame using a screwdriver. Using metal corners, fix the screed of the elements.
If necessary, the joints can be smeared with sealant or wood glue. Such a trick will improve the connection, eliminate gaps that worsen the appearance of the bed. All actions should be done carefully so as not to damage the furniture body.
Types of headboard for a bed in self-design
Before proceeding with the design of the headboard with your own hands, you should decide on the type of this element.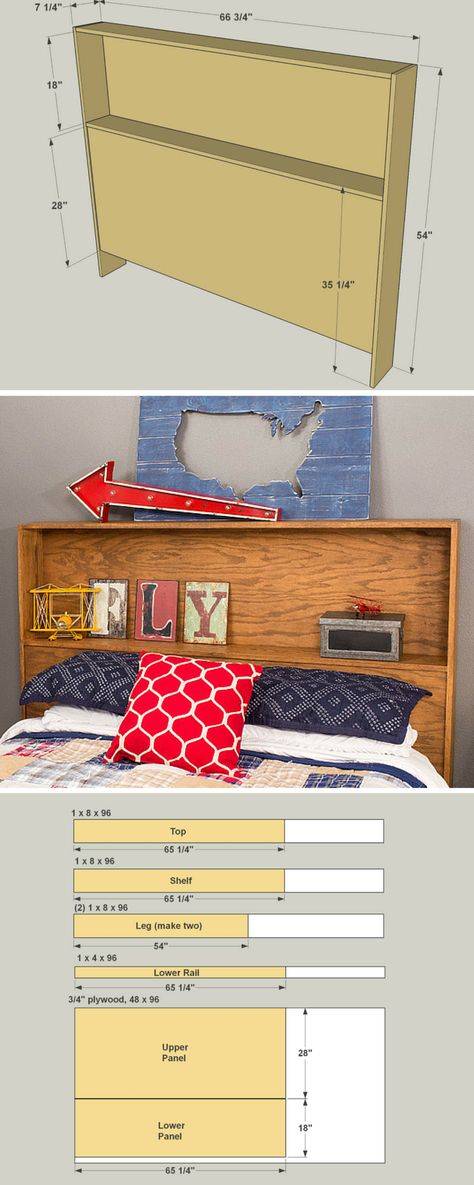 The base may have a certain texture and texture. Conventionally, headboards are divided into several types:
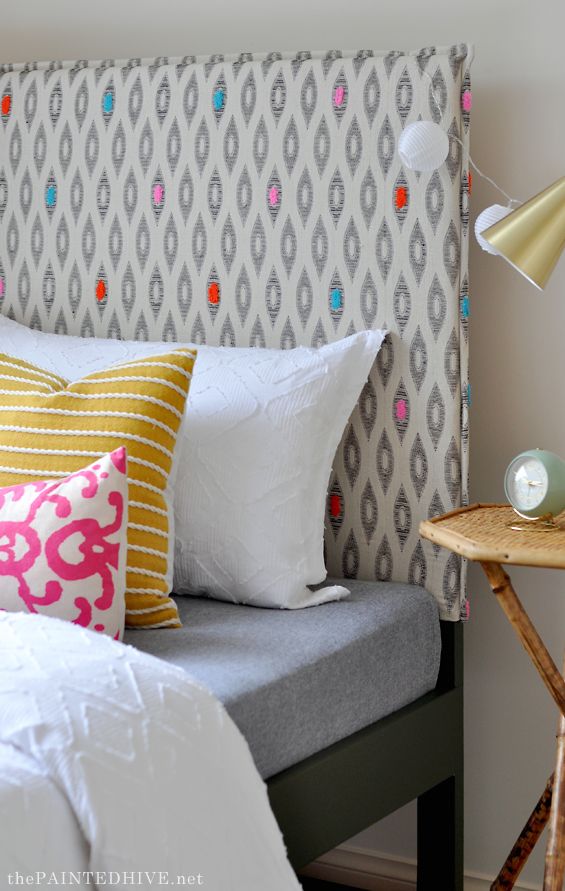
- Soft. Do-it-yourself soft headboard is much easier to make than a hard one. It is enough to have a sewing machine, some synthetic winterizer and foam rubber.
- Solid. This arrangement requires the ability to work with wood and similar materials. If you use a ready-made base, then there will be no problems with finishing.
- Combined. This option is considered the most difficult, as it combines several finishes. Must be able to work with different types of materials.
Another conditional division is due to dimensions. In modern bedroom interiors, it has become fashionable to have a bed with a headboard that protrudes significantly beyond the width of the bed. Beds with a headboard up to the ceiling are considered the latest fashion. The classic option is the headboard, which fully corresponds to the proportions of the bed in width and height.
What you can make your own headboard from
You can use a huge variety of materials to design your own headboard, which are definitely not used in factory production. This variety will make the bed unique in design.
If there are no specific preferences and options, then you can view the design products. Almost any such headboard can be made with your own hands from a photo. For the manufacture of furniture designers can use the following materials:
- Ordinary wooden boards. Wood should be sanded with sandpaper. Additionally, you can open with varnish.
- Remnants of laminate or parquet make a wonderful headboard wall for this type of furniture.
- Wrought iron headboards are now a symbol of romance and luxury.
- If you do not plan to rearrange the bedroom for a long time, then you can make this piece of furniture in the form of a mosaic, lay it out of tiles or natural stone.
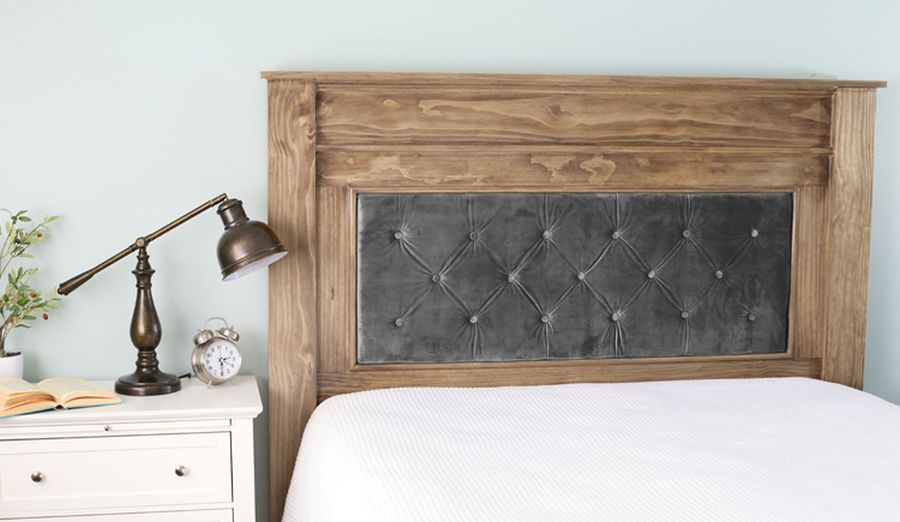
- Do-it-yourself upholstered headboard is easy to make from leather, leatherette, velvet, satin, cotton.
The materials can be easily combined with each other, complementing each other. It is important that textures and textures look harmoniously together. In some cases, rough decor elements are easy to smooth out with lighter textile parts.
How to make an upholstered headboard using different techniques
Before you make an upholstered headboard with your own hands, it is worth deciding exactly on its type. Weight of design methods:
- The current option is the hinged method of mounting the element from pillows. The old part is completely dismantled or sawn off to the base of the body. At a certain height, a cornice is fixed, to which soft pillows are attached to the tapes. The height can be easily adjusted with the straps.
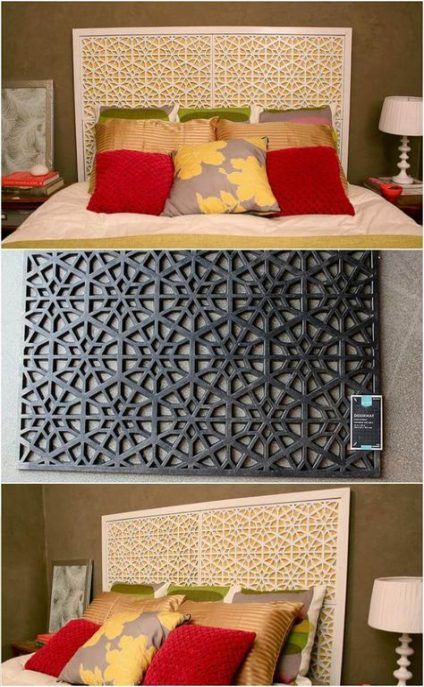
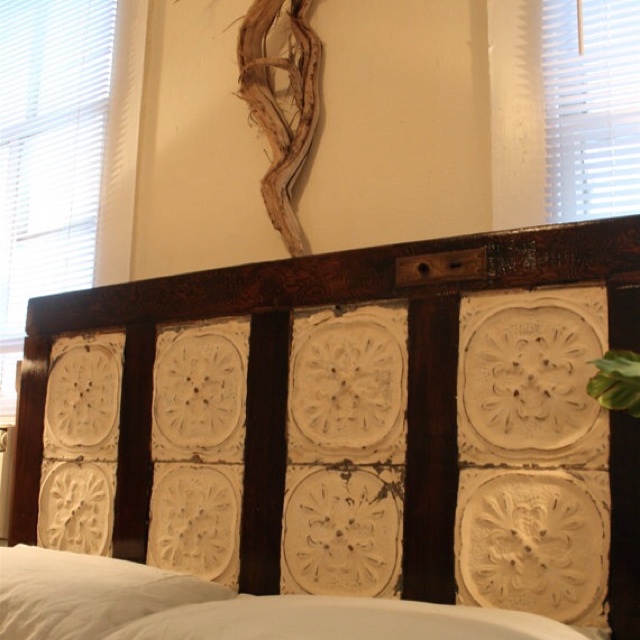
- Imitation tiles. The perfect way to reorganize an old item or make a brand new one. Cut plywood into equal squares. Cut the fabric into squares that are an order of magnitude larger than plywood. Place a textile square on each plywood square and glue them together on three sides.
 Lay a synthetic winterizer through the left opening and seal the pocket. Glue a soft tile onto a whole sheet of chipboard.
 - Classic restoration. Lay a piece of foam rubber on a solid base. For greater effect, you can place a synthetic winterizer between the foam rubber and the wooden base. The synthetic winterizer is attached by gluing. According to the dimensions of the product, sew a cover, which, like a pillowcase, is put on through the top. You can attach textiles to the base with a construction stapler.
Having decided on the method of making a soft element from textiles, you can understand how to make a headboard of a bed with your own hands from leather and leatherette. The principle of operation is completely identical.
Design options for decorating the decorative part of the bed
In order not to wait for inspiration to create a masterpiece, for example, you can use the design work. DIY headboard ideas are easy to regenerate by looking at a finished role model. In addition to standard materials, experienced people in the field of design suggest using an original approach in design.
Do-it-yourself headboard design options are easy to implement without the ability to work with different types of materials:
- A very popular option is stenciling with paint. The drawing is applied directly to the wall. In this case, the main headboard is dismantled.
- Wallpaper appliqué can be made on the wall. A simpler option is to stick three strips up to the ceiling.
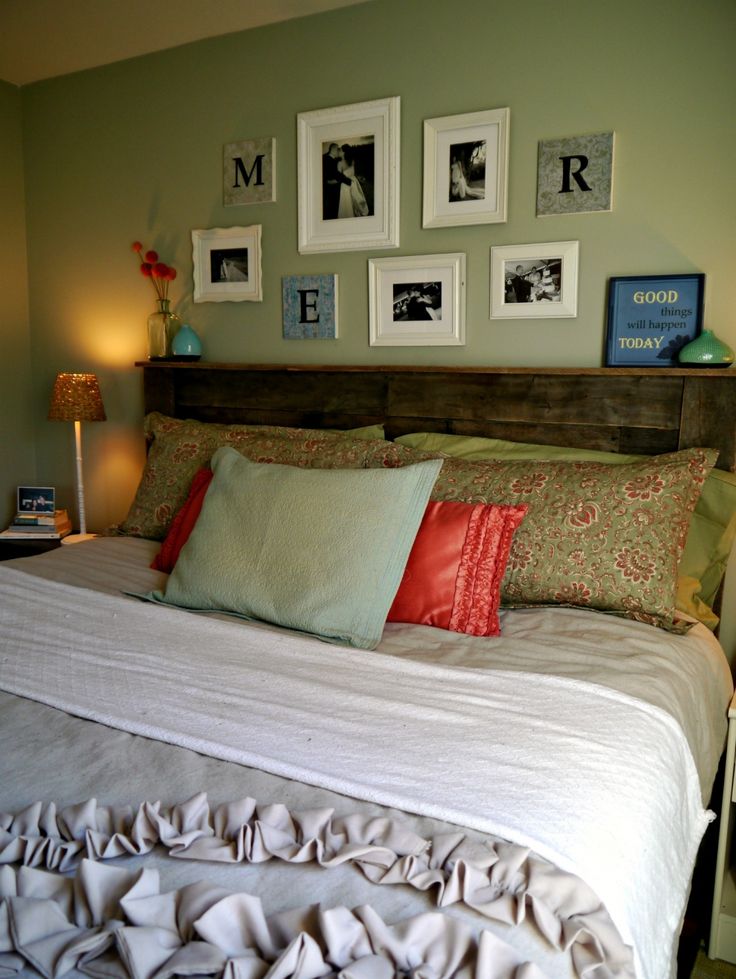
- Picture in a frame, painted on canvas - an interesting option for decorating the head of a bed.
- Various models are formed from fabric according to the type of canopy: sail, waterfall, stripes.
Design ideas are not limited to conventional methods, materials and techniques. At the same time, the cost of finishing is mere pennies. It is best to use old decor elements that have remained intact: mirrors, decorative pillows, framed photographs, soft toys and much more.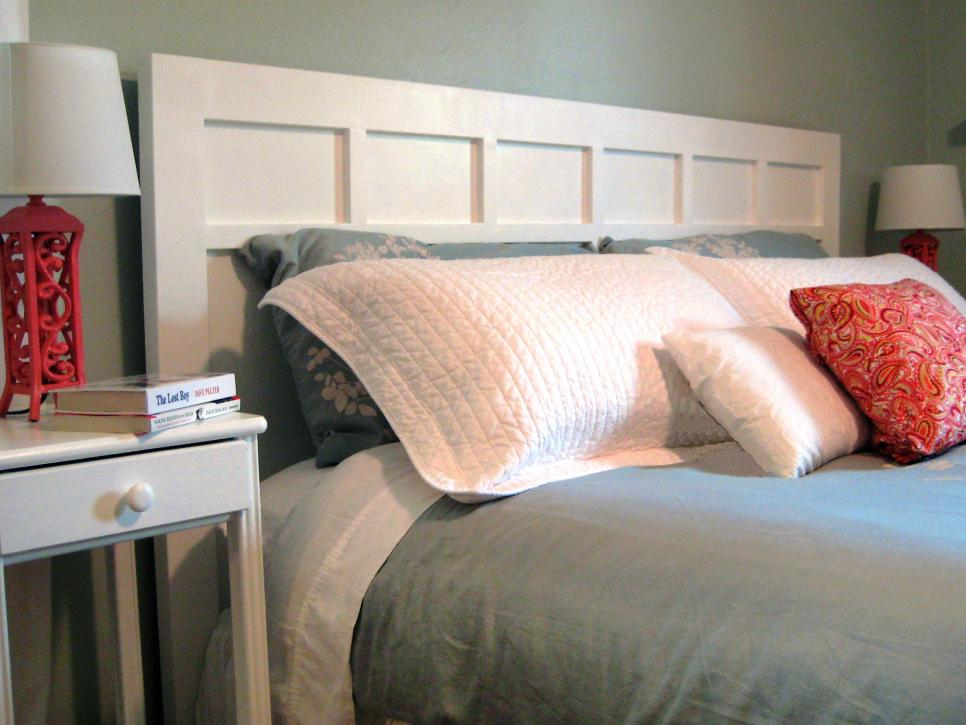
Wood as an option for decorating the headboard of bedroom furniture
Working with wood requires certain skills, a woman cannot always cope with the processing of such material.
But there are other arrangements. Do-it-yourself wooden headboard is easy to make from already processed materials. To do this, it is enough to use the remains of building material or finished wood products:
- Parquet or laminate board. You can compose whole paintings in the style of abstraction, which are placed in a common or separate frame.
- Old interior doors. Such elements can be installed without additional fixations, leaning against the wall and propped up with a bed.
- Doors from an old wardrobe. Installed using the method described above. Canvases can be placed vertically.
- Staircase from wall bars. Placement can be vertical or horizontal.
- Trays, bamboo blinds. This design has recently become very popular among designers.
A panel made using the lacing method will look unique.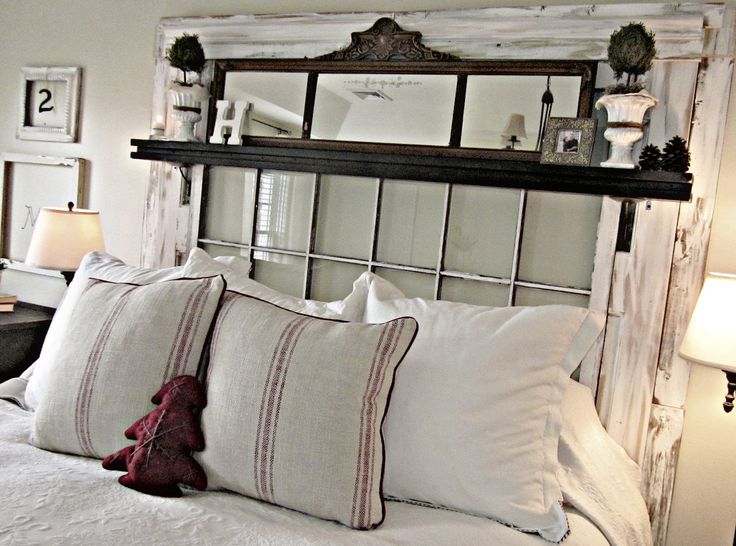 To do this, a canvas made of chipboard or fiberboard must be drilled through in a certain sequence. Use twine or other thread to lace. By the same principle, paintings are created by weaving a pattern from a vine, straw.
To innovate the design, you can change the design by painting the base in other colors. Auxiliary decorative elements can be threads, pebbles, beads.
Small shelves can be placed on a solid and sturdy surface. On auxiliary surfaces, you can place books, vases, figurines, lamps, personal items of a non-decorative nature.
Carriage screed as an option for finishing a bed in an aristocratic style
In a modern design, especially in a classic style, a screed will become an actual method of finishing the headboard of a bed. Do-it-yourself screed for the head of the bed is made exclusively from expensive and dense fabric. Genuine leather, suede, velvet are often used. It is worth choosing exclusively plain bases without prints and patterns. This type of decor is often compared to a carriage tie, so all decor elements must match the aristocratic style.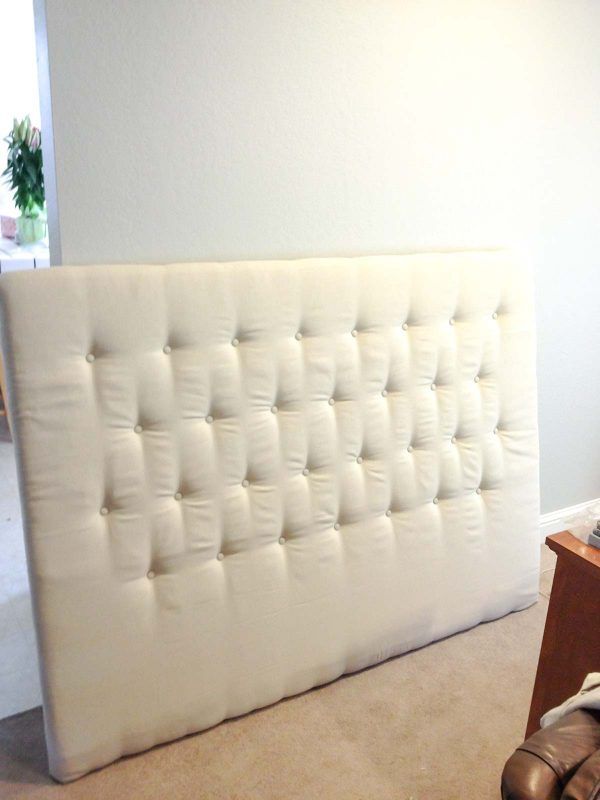
To decorate the carriage screed on the head of the bed with your own hands, you need to prepare the following materials and devices:
- Fabric or leather for exterior decoration.
- Foam rubber and synthetic winterizer.
- Drill, scissors, construction stapler.
- Wood glue and thick nylon thread.
- Hook needle and scissors.
- Large buttons, glass stones.
- Self-tapping screws and hangers for furniture.
- Wooden base.
Additional tools may be needed if additional decoration is to be carried out. Sometimes the edges are trimmed with fringe or other type of textile to create a contrasting border.
The embodiment of the carriage headboard at home
Making a carriage headboard with your own hands is quite simple if you follow the steps exactly. Then the result will be no worse than in expensive furniture stores. For optimal results, you should use a photo of the head of the bed with your own hands.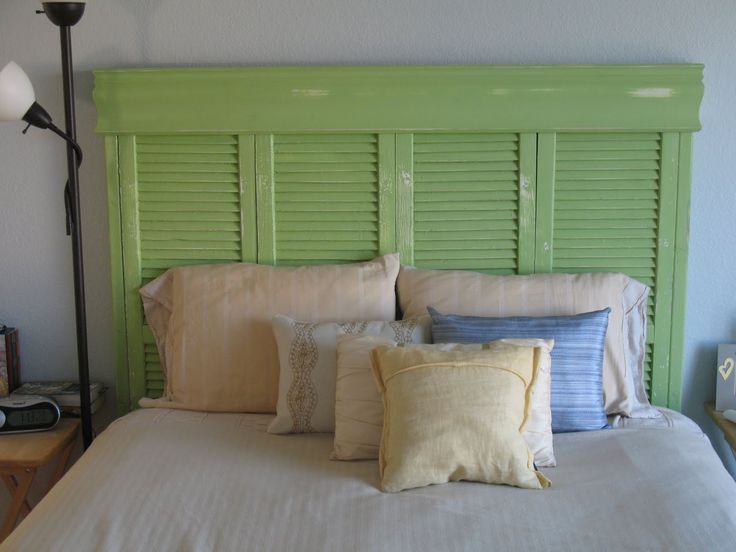
Steps for forming the carriage tie:
- Cut the foam according to the shape of the wooden base. Make a markup regarding the location of the buttons.
- In the foam where the button will be attached, use scissors to make holes with a diameter of 2-3 centimeters.
- Glue the foam to the wooden base with a special adhesive.
- Using a drill, make holes in the middle of each circle in the foam.
- A thin layer of synthetic winterizer is placed on the foam rubber. Put a fabric on top, wrapping it behind a wooden base. Fix the material with a construction stapler.
- Sew a button or glass stone into each opening. The thread should match the color of the material. For better fixation of the thread, it is worth additionally fixing it with a stapler.
- The last step is to install the covered wooden base to the bed frame.
To create a more original tie decoration, you can apply the effect of forming diamonds between the buttons.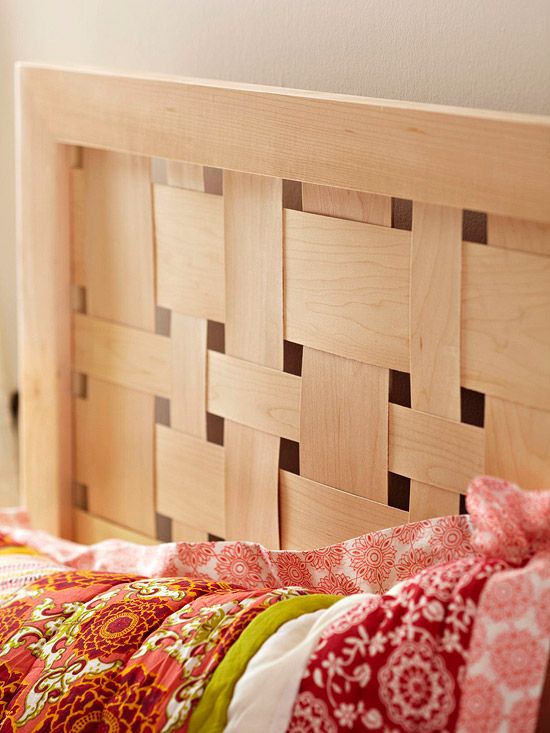 Then the installation scheme at the stage of fixing the fabric will change a little:
- Lay the fabric on the foam rubber with synthetic winterizer, fix the places where the buttons will be sewn with the help of safety pins.
- Sew diamonds between future fixing points of decorative elements.
- Loosen the safety pins and staple the fabric to the wood base.
- The last step is to sew on the buttons where the diamonds cross.
Fixing methods for double bed headboard after renovation
Handmade double bed headboard requires proper fixing. There are several options for fixing this element. The installation method is determined by the interior design and the type of headboard.
The best mounting options are:
- Attaching the bed base to the wall. Ideal for fixing solid wood sheets. Loops are screwed into the product, and self-tapping hooks are driven into the wall. The headboard is attached at such a level that the bed frame is not lower than the canvas.
- Attaches directly to the bed frame. Installation is carried out by drilling holes in the furniture body and fastening the headboard with self-tapping screws to the main frame.
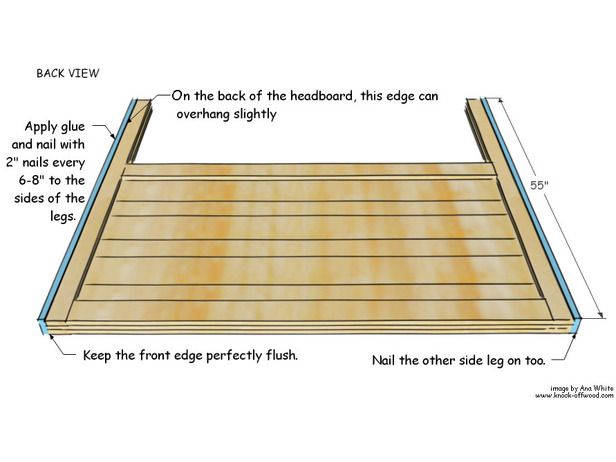
- The headboard stands on legs, separate from the bed, without fixing to the wall. The finished canvas is installed on the legs. The immobility of the canvas is guaranteed by fixing the bed and the wall on both sides.
If the headboard is multi-level and occupies a huge area of the wall above the bed, then it is worth using several mounting options. This method is relevant in the case when the main part is screwed to the bed, the second level of fabric is hung on a baguette.
Decorative finishing of the finished headboard using various techniques
If the bed looks quite presentable and has not worn out at all, then there is no need to change the headboard - just update the canvas. In accordance with this, it is worth first deciding on the functionality of the room and the overall design.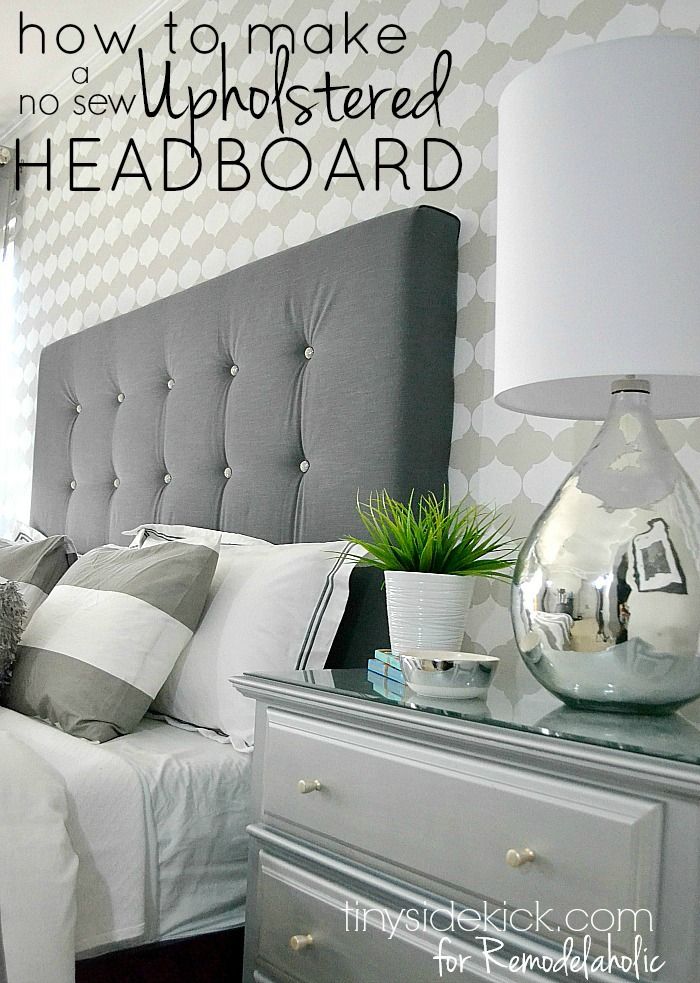
You can update the head of the bed with your own hands, using simple techniques, as follows:
- Add soft elements to the design of the body. Cut out individual geometric shapes from plywood and cover them with a fabric filled with synthetic winterizer. Glue the elements in sequential or random order.
- Throw pillows are the most elementary method of renovation. Fix small baguettes on the basis of the old headboard, to which pillows will be attached using ribbon ties.
- Change of color design by means of decoupage, repainting, wallpapering. Sometimes these 3 methods are combined within the same plane.
- To hide an old headboard quickly and inexpensively, you can sew several thick fabric covers. Each case can be designed to correspond to a certain season.
- Add additional elements made of wood, metal or plastic. The actual option will be the letters of the Latin alphabet, painted in different colors. Elements are screwed or glued to the base.
- Modeling from polymer clay has become topical. You can make figures of animals, people, plants and fix the products around the perimeter of the entire headboard.
Update methods can be completely different. The complexity of the implementation varies by the degree of deterioration of the base headboard. Sometimes the best upgrade method is a complete dismantling. The decoration zone can be decorated directly on the wall surface through wallpaper, textile stretches.
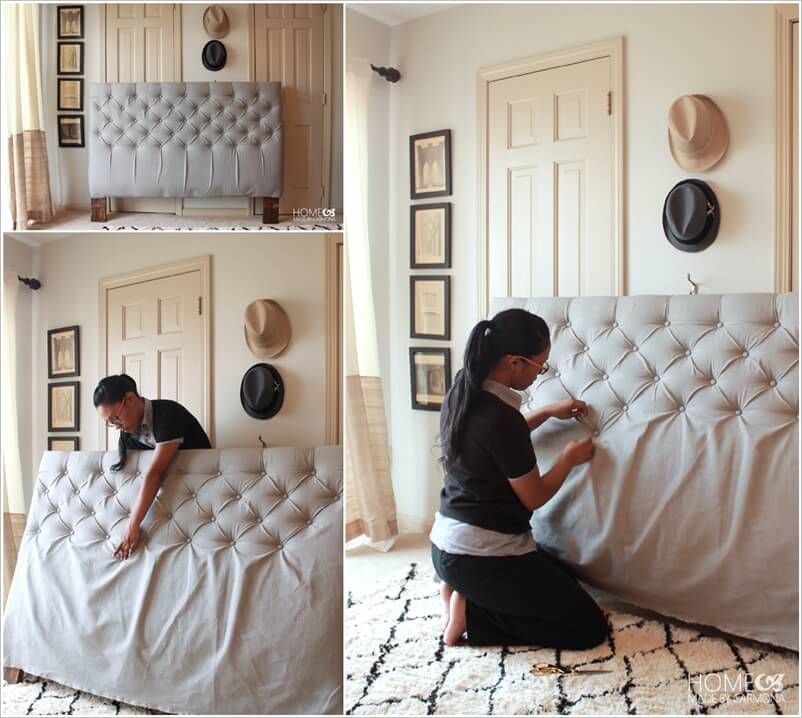
DIY upholstered headboard - INMYROOM
Upholstered headboard looks nice and elegant, but it is quite expensive. In order not to put off indefinitely the purchase of a headboard, we suggest you make it yourself.
Prepare materials and tools
You will need:
- an old headboard frame and some boards - an old discarded countertop or used kitchen fronts. The appearance of the boards is absolutely not important, since they will be covered with a cloth;
- piece of foam rubber;
- fabric of your choice : linen, cotton, velvet or eco leather;
- Tie buttons : for a headboard for a 180x200 cm bed, you will need about 37 pieces;
- plastic buttons - also 37 pieces;
- twine or strong thread, thick needle , Moment glue;
- scissors;
- furniture stapler;
- drill and wood drill.
![]()
Assembling the frame
As a basis, you can take a frame from an old back and nail MDF panels or, for example, doors from an old cabinet, suitable in size, to its front side.
Metal corners, door hinges, glue or nails are suitable for fastening the structure. At this stage, the aesthetic side of the issue is not so important. The main thing is to assemble a strong and even frame.
Making markings for decorative buttons
If you don't want to waste time on painstaking and accurate measurements for marking buttons, use a perforated board, which is often used as holders for stationery, photographs and various small things.
Measure and mark the center of the headboard on the board. Highlight it with a bright color so as not to lose it.
Count three points obliquely to the right and mark the fourth. Set aside three more points obliquely to the left and again mark the fourth. Draw a rhombus in this way.![]()
After that, from the center mark, count seven points to the left and put a mark on the eighth. Number the points from the center (8) to the edge (1). The number 4 will be the middle of the next diamond. This will mark all button holes symmetrically.
Place the perforated board on top of the backrest exactly in the center and transfer all marks.
Take a small diameter wood drill. Drill through holes.
Attaching foam rubber and fabric to the back frame
Take two pieces of foam rubber and attach them to the base with a stapler. Please note that the filler should not go beyond the edges of the frame.
Drape the base with fabric. The cut should be with a margin of about 20-30 cm: this is necessary to close the foam rubber, the sides of the frame and make elegant tucks.
Clip the fabric along the top edge and place the backrest upright.
Decorating the buttons for the tie
Each button must be covered with fabric to match the upholstery.![]()
Making a tie
Take a plastic button and sew it with twine. Tie a strong knot. Pass the needle through the hole and pull it out from the front.
Then attach a decorative button and tighten the thread. After making a screed, tie the thread tightly around the button and cut off the excess ends.
Immediately after attaching the first button, stop and carefully fold in.
It is important to assemble the darts of the top row correctly, this will set the direction of the pleats along the entire headboard.
Every three or four buttons, straighten the pleats and staple them on the back side of the frame. Pay attention that all tucks look in one direction.
We process the edges of the fabric
After the screed is ready, it is necessary to remove the fabric along the edges and fix it around the entire perimeter of the frame.
Carefully fold the top corners as shown. Then fasten the fabric to the sides by gently pulling the fabric.