Learn to Keep the Ball Secure with the Dribble Tunnel Basketball Drill
Skip to content
Use this drill to help improve your ability to advance the ball up the court before your next game.
Strong ball handling and ball security on the court puts you in possession of the ball for as long as possible, which means more opportunity to score. To work on those techniques, try the Dribble Tunnel basketball drill.
Basketball camp director and college coach Donnie Arey says that he personally uses this drill to evaluate his players and see if they have the ability to be great ball handlers in a game situation.
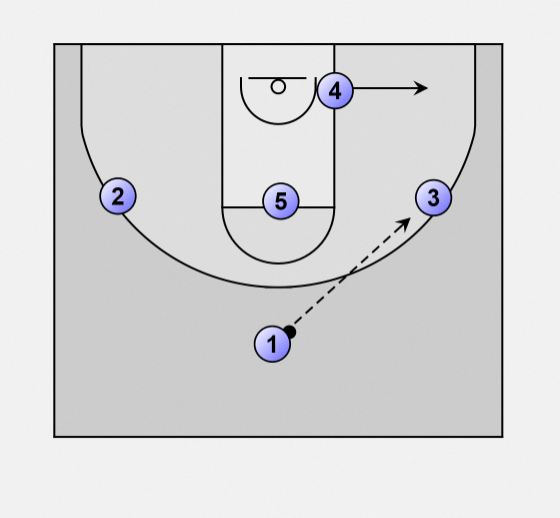
To begin, place three cones on the sideline and space them about 4-5 feet apart. Place three more cones on the volleyball line (the closest parallel line from the sideline) and align them with the ones on the sideline. This will be your “tunnel.”
When you’re ready to begin the drill, start at one of the end cones and dribble to the next cone on the opposite line. Once you reach that point, perform a crossover and head toward the cone closest to you diagonally. You’ll basically be attacking the cones in a zig-zag pattern. Get as close as you can to each line without crossing.
At the beginner’s level of the Dribble Tunnel, all you have to do is perform a basic crossover when you reach each cone. Try to create a rhythm by keeping a steady pace as you move diagonally from cone to cone.
To make this drill a bit more challenging, try performing a between-the-legs or behind-the-back crossover at each cone. Try to work on your exchanges so that they’re quick and fluid.
The advanced-level Dribble Tunnel will have you performing three separate moves at each cone: spins, pivots and retreats. During your first go, use all the space you have when you’re performing a spin.
When you perform a pivot, keep the ball tight against your body as you pivot back and forth at each cone. You don’t want a defender stripping the ball from behind during a game.
To start performing retreats, head to the first cone, hit the brakes and bounce back. Make sure these are quick stops and bounces; you’ll lose momentum if you take your time.
“Match the Move,” another advanced-level Drill Tunnel, requires multiple players. It’s just like follow the leader. The starting player will perform a crossover and the player behind them has to follow suit. The faster you’re able to mimic the move, the better.
This drill is great because it replicates the short space you’ll have between you and a defender. If you’re able to keep control of the ball and pick up speed as you move, you’ll be better equipped to get around your opponent and set up a scoring play with ease.
Related Articles
Ultimate Hoops - Tips to improve your basketball dribbling
downloadable . pdf
Dribbling is a key skill to master in the game of basketball. The better you can dribble the more opportunities you have for you and your teammates to score. A great goal to have is to be able to dribble the ball with either hand without looking down at the ball. Keeping your head up gives you the ability to see where your teammates are on the court and look at what the defense is doing.
Step 1: Dribbling BasicsA. Low stance
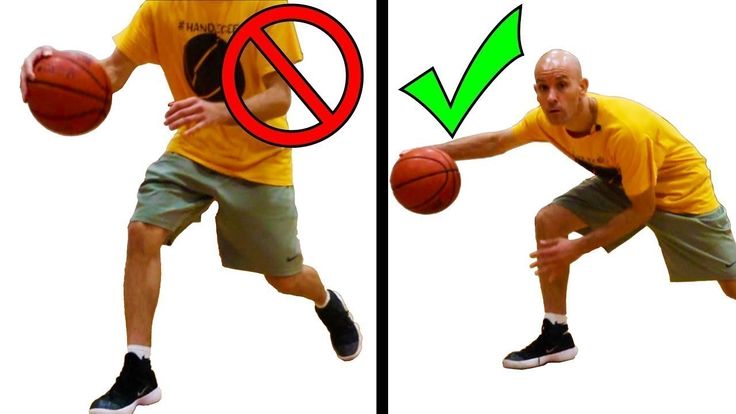
Spread your feet should-width apart. Bend your knee, drop your hips back and get in a low stance. Make sure your body is balanced giving you the opportunity to move quickly or change directions. Avoid bending at your waist.
B. Bounce the ball
Start with your dominant hand first and pound the ball into the ground, extending your arm and snapping your wrists to send the ball to the ground. Each time the ball returns to your hand, don’t catch it, push back towards the ground. Placement of your bounce should be in front of your body slightly to the side of the foot that is on the same side of your body as the hand you are using. You want your dribble to be quick, steady, and controlled.
C. Use your fingertips, not your palm
When you dribble it’s important to have good ball control. Using your fingertips gives you more control over the ball and the more control you have the less strength needed to keep it bouncing. Using your fingertips also allows you bounce the ball faster. Spread your fingers out across the surface of the ball for a wider, more even contact area. Try to keep the palm of your hand directly over the ball so it bounces up into your fingertips.
D. Ball height low
Do not bounce the ball too high, keeping your dribble low will improve your control but also makes it harder for the defense to steal it.
E: Protect the ball
Keep the ball safe by using your body and your non-dribbling arm to keep the ball shielded from defenders. Keep your body between your defender and the ball, never dribble the ball on the same side of your body as the defender is on.
F. Dribbling equally well with both dominate and non-dominate hands
A basketball player needs to develop dribble equally well with both hands. This increases their opportunities on offense and makes it harder for the defense to stop.
Step 2: Next StepsA. Keep your head up
This is important skill in basketball, you need to be able to look at the defense and also see where your teammates are on the court. Practice dribbling without looking at the ball.
B. Know the rules
Know what you can/can’t do with the basketball while you are dribbling.
Traveling: Moving the ball without dribbling
Taking an extra step or shuffling your feet
Holding on to the ball while you walk or run
Moving or changing your pivot foot when stationary
Double Dribble: Two separate meanings
Dribbling with both hands at the same time
Dribbling, stopping your dribble, and then starting to dribble again
Carrying: Catching the ball with one hand and then continuing to dribble (without stopping the dribbling motion). Your hand makes contact with the bottom of the ball, then turns the ball over while dribbling.
C. Court awareness
Know where you are going to go and who is around you. The way you dribble the ball should change based on where other people on the court are. If you are in an open court (dribbling the ball down the floor with no defenders) you can dribble the ball in front of you. If a defender is close, you will want to protect the ball and dribble it to the side of your body so the defender cannot steal it. Good court awareness is also important to avoid dribbling into trouble. Look out for dribbling into double teams (two defenders), or into your own teammates.
D. Think ahead
Know what you are going to do with the basketball before you pick up your dribble. If you stop dribbling your options are to shoot or pass the ball. Remember once you stop dribbling you cannot start dribbling again.
E. Dribble with purpose
Reasons to dribble
To advance the ball up the court
To open up a passing lane, increased chance of pass completion and to help a teammate get open
To drive to the basket
To get open to shoot
To get out of trouble (defensive trap)
To run out the clock at the end of a game
Step 3: Advanced Moves
Here are a few moves to practice to give you separation from your opponent on the basketball court. We will break these down in future tutorials.
Crossover
Behind the back
Through the legs
Hesitation dribble
In-and-out dribble
Spin move
Trainer Tips
Start with stationary drills and work your way up drills that include movement around the court
Improve the strength in your hands, squeeze a stress ball or tennis ball to give you greater control while dribbling
Dribble with two basketballs
Setup a dribbling obstacle course using cones or props from your garage
Practice both hands
Practice dribbling with a tennis ball
Implement only the moves you have mastered into a game
Have a friend or parent guard you when practicing
Don’t worry if you mess up, get out of your comfort zone by pushing hard to try new things
Check out more tips from Ultimate Hoops Trainers here.
Share your workout on social with hashtag #KeepPlaying
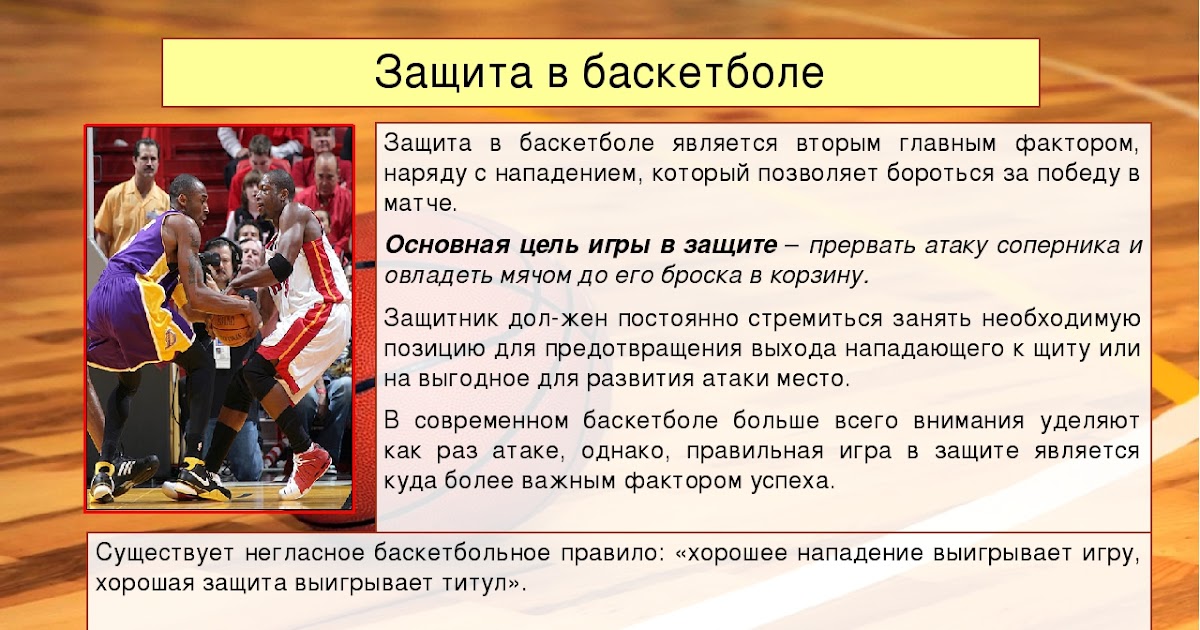
Playing defense in basketball
Hello, dear visitors of the website basketball-training.org.ua ! Today I want to share with you my observations and conclusions, which I received as a result of 's desire to improve his game in 's defense.
It so happened that the first few years of playing basketball (mostly on street courts) my defense game consisted of constant attempts to cover the opponent's shot. Sometimes it worked, sometimes it didn’t work very well (I ended up either on the opponent’s back or on his head). It's a hell of a defense. A couple of years ago, I reconsidered my vision of playing defense, which I want to share with you.
Defensive Tips for
Basketball Players The first video that gave any hint of developing a basketball player's defensive skills was 's three-minute performance by Bruce Bowen on the TNT Fundamentals series. Then there was a short article on how to play defense against A. Gomelsky. Well, the last, but probably the most important training video was the company's products Better Basketball - Better 1 on 1 Defense . Even after skipping over half of what was said (some because of the language barrier, something because of banal restlessness) and putting even less into practice, I became much better at defending myself.
By the way, in this article everything will be exclusively about personal defense (and not a word about zone defense, although it is also worth writing about). So, I highlight the following stages of defense in basketball:
Stage 1: Defense against a player without the ball.
The essence of defense is to prevent the opponent from getting the ball . This is probably one of the most difficult stages, but also one of the most effective. Agree, it is difficult to attack without having the ball. So, this stage of defense is incredibly difficult, because you have to give a lot of strength, not to be fooled by movements of the body, head and legs. A good result of such a defense is that the player does not receive the ball throughout the attack. Also a good result if the ball is received, but: in an awkward position (far from the ring; in the corner of the court) or in the last seconds of the attack. Shitty result - the ball is received quickly and conveniently.
Stage 2: Defense against the player who received the ball.
When a player receives the ball, he is in the classic "triple threat position". This means that he can shoot the ring, pass or start the dribble. This means that we will have to confront all three threats at the same time. So, the best option is to take a position that will minimize the range of movement of the enemy. First of all, close its strong side from the passage by sitting a little to the side of it. As an option - from the side of his supporting leg; those. You will know the direction of his movement (he will not step with his supporting foot).
Let's conditionally divide the opponent's body into 2 levels: the first zone - to the waist; the second zone is above the belt. So, in order to start dribbling, the ball must be in the first zone. Both zones are suitable for a pass, and for a throw, the ball must go from the first zone to the second. I hope it's clear for now. So, one hand is playing with the bottom zone (preventing dribbling and low passing), the second is defending against a shot and a pass from the upper zone. Remember about the legs: with bent legs it is much easier and faster to make a jerk. If the legs are straight, then for a jerk they must first be bent.
And one more piece of advice: pull the player all the time with your movements. Let the probability that these "ritual dances" help to knock out the ball will be small, but you will be able to knock the opponent out of his usual rhythm. And it's worth a lot!
Excellent defense: the ball is knocked out. Good defense - loss on pass, inaccurate pass, throw from an uncomfortable position.
Stage 3: Defense against the dribbler.
Assume that previous attempts to take possession of the ball have failed and the opponent has started to dribble. How to defend yourself then?
Let's not consider those situations in which the opponent is obviously weaker than you. It's just not interesting. The opponent is stronger, faster and jumpier than you - that's a good situation. Like I said, close his strong side. But if you don't know its strengths and weaknesses; you don’t know how to hold: from a throw or from a pass - that is, a good solution. We are trying to make sure that you are the leader. One side is obviously closed - and the player is deliberately skipped to the other. So you can not lose in the starting jerk and not guess the direction of movement: it can only go in one direction. Try to push the opponent with the ball to the end line, from where he can no longer comfortably attack the basket. Clamp into a corner, press to the line.
Again: close one side tightly. Better - if it will be his forte; if you don’t know which one is strong, close your weak side and let defenses under your strong side. And a safety net: sometimes it's better not to let a player throw from an average distance. Allowing him to get under the ring. After all, there will be a safety net in the form of a “big”, which cannot be thrown so easily.
Stage 4: Maintenance completed.
It can be a double step and a throw, a simple throw after a stop, a jump, a pivot (reversal), a series of displays, etc. Let's take a closer look at this.
Double step. Remember: he has 2 steps to complete the attack, and you have 2 steps to hit the ball down, and then another full step to block. I recommend doing this:
A series of small touches to the ball during a double step (as if you were playing a drum). Thus, you will not knock out the ball, but you will disorientate it accurately. Yes, and in order to keep the ball, you have to make more.
Trying to hit the ball from below! When hitting from above, there is a very high chance that you will hit your fingers - this is a foul. But from below: few people expect such a blow, few people close the ball from below. And taking the ball up for a throw, he will receive an additional impulse, the push of the ball - throwing it as it was previously thought would not be so easy.
A little tip: after picking up the ball by the opponent, very often the ball goes down, and this is done strongly and abruptly. Just substitute okay from below at the level of the opponent's lower back: he himself will knock the ball against your hand. This is a very cool and often unexpected trick for the opponent.
If it was a jump stop, or just a stop, then you need to get as close as possible and raise both hands vertically up. Now you can not be afraid of a foul.
Stage 5: Jump Shot.
It's good if you jump high and sharp - then try to block at the moment when the ball leaves the thrower's hand. You can just try to brush it off at the moment when the supporting hand is no longer involved in the throw, and the ball is on the wrist. I will not talk about how to block-shot, this is a topic for a separate article.
Remember that you can block the thrower's view with your hand: just don't poke it in the eyes, just bring it closer to the thrower's face. A good way (if you have not already jumped out for a block shot, and the throw is being made) is to simulate contact with various organs of the opponent (guys, you understand what I mean). Belly, solar plexus, groin - all this interferes with concentration at the time of the throw. Well, and often on street sites there is a clap of hands: at games they can give a foul, but on the street it can bring down that very concentration.
And finally, I suggest watching the old film , about the individual protection of basketball players, filmed in the USSR. There are some really useful things in there (the movie is old - so turn up the volume).
[youtube]9GMNCBu0Kes[/youtube]
Well, that's all, the main points that will help you defend better without any drastic changes in the game. I am sure that each of you found something useful in this article. If you have any questions or comments - write them in the comments, I will be glad to discuss.
And this article is over, I wish you successful training and see you soon on the pages of our site.
Defense Training
Defense Training
Learning how to move in defense.
1. Move in a defensive stance diagonally backwards. After 3-5 steps, turn around and change direction. Then do the same diagonally forward. 2. Do the same but add hand movements. The far hand works to protect against the transfer, the near hand imitates the capture of the ball. 2-3 sets of 5 diagonals forward and backward.
DETAILS : Increase and decrease your movement speed. Keep your back, don't jump in the move. The back leg drags along the floor.
CHIPS : Emphasis on the first step, it must be fast and taken with the lead foot.
Improving defensive actions.
1. Five attackers stand on the perimeter and pass the ball to each other, each of them has a defender. Defenders must change their stance and shift to the correct position depending on the ball. 2. The same, but with active defense, try to intercept or take the ball away. 3. At the signal of the teacher, the player with the ball goes into the aisle. For 30 seconds, then change roles, 3 times.
DETAILS : Defenders must always see the ball, keep their distance, actively use their hands.
CHIPS : The drill will be especially effective if performed without fouls.
Improving defensive actions.
1. Stand opposite each other with a partner. The attacker stands still and performs turns, moving the ball to the side. The defender reacts to the attacker's movements and moves accordingly, making defensive movements with both hands in front of the ball. 2. The defender tries to knock out or take the ball away from the attacker. 30 seconds each, 3 sets.
DETAILS : Low stance, keep distance, back straight.
CHIPS : The drill will be especially effective if performed without fouls.
Improving defensive actions.
One player (playing) has the ball, two other players - a defender and an attacker. The striker makes movements (forward / backward, right / left), trying to get a pass from the player with the ball. The defender plays in a closed stance, covering the passing line, making it difficult for the attacker to receive the ball. If the pass is still passed, then the attacker must perform turns (one circle forward or backward) and give a reverse pass to the playing along, and the defender must actively interfere with him, try to knock out or take the ball away. 30 seconds in each role, 3 times (change in a circle).
DETAILS : The defender must always have a view of the ball, keep his distance, actively use his hands. The attacker must perform turns without running.
Learning the basic defensive stance.
From a standing position, take a protective stance at the signal. At the next signal, return to the starting position. 10-15 times.
DETAILS : Feet slightly wider than shoulder width and parallel, arms in line with legs, shoulders relaxed, arms half-bent, palms open towards attacker.
CHIPS : The stand must be very stable. To check this, you can knock a little.
Improving defensive actions.
1. Three attackers stand in a triangle and pass the ball to each other, each of them has a defender. The defensive stance varies depending on the ball. If your player has the ball, then a parallel stance with active hand work; if the ball is in the possession of a nearby player (in one pass), then a closed stance with overlapping of the transfer line; if the far player has the ball (in two passes), then the stance is open. 2. The same, but with active defense, try to intercept or take the ball away. For 30 seconds, then change roles, 3 times.
DETAILS : Defenders must always see the ball, keep their distance, actively use their hands.
Learning how to move in defense.
Get into a protective stance and move around: 1. Small steps to one side and the other. 2. Small steps to one and the other side with greater speed. 20-30 seconds each exercise.
DETAILS : Leading foot turned slightly in the direction of travel, the "back" foot does not approach the leading, the distance between the legs is maintained.
CHIPS : Emphasis on the first step, it must be fast and taken with the lead foot.
Learning how to move in defense.
1. Move backwards in a defensive stance in a zigzag from the beginning to the middle of the court, quickly, without stopping. Come back with an easy run. 2. Do the same in alternation with acceleration. Start with 2-3 times, and later increase the number of times or distance.
DETAILS : Keep your back, don't jump in the move.
CHIPS : Emphasis on the first step, it must be fast and taken with the lead foot.
Learning how to move in defense.
Move in a protective stance: 1. Back and forth, adding a normal run every three steps. 2. In one direction and in the other, adding the usual run at the command of the coach. 20-30 seconds each exercise.
DETAILS : Leading foot turned slightly in the direction of travel, the "back" foot does not approach the leading, the distance between the legs is maintained.
Improving defensive actions.
1. Stand opposite each other with a partner. The attacker dribbles the ball in place with cover, the defender tries to knock out or take the ball away. If he succeeds, then the defender gives the ball back to the attacker. 2. The same, but the attacker moves left and right along the line in 3-5 steps. 3. The same, but the attacker moves diagonally back and forth in 3-5 steps. 30 seconds each, 3 sets.
DETAILS : Keep your distance, back straight.
CHIPS : The drill will be especially effective if performed without fouls.
Learning how to move in defense.
Stand opposite each other in protective stances with a partner. One makes movements, the other repeats after him: 1. The host moves in one direction and the other, makes various movements with his hands (raises and lowers). 2. The leader moves in one direction and the other, sometimes adding a normal run. 30 seconds each, 3 sets.
DETAILS : Increase and decrease your movement speed. Keep your back, don't jump in the move. The back leg drags along the floor.
CHIPS : Turn on your imagination, perform different movements.
Learning how to move in defense.
Accelerating forward 1/4 of the landing, at the end of a step with active work of the hands - moving sideways in a protective stance - accelerating forward again with a step and so on. 3 sites.
DETAILS : Keep your back straight, low stance in defensive movements, active arm work
Improving defensive actions.
One player (playing) has the ball, two other players - a defender and an attacker. The striker makes movements (forward / backward, right / left), trying to get a pass from the player with the ball. The defender plays in a closed stance, covering the passing line, making it difficult for the attacker to receive the ball. If the transfer still went through, then the attacker returns the ball to the play-by-player and opens again.


 During your first go, use all the space you have when you’re performing a spin.
 pdf
pdf Placement of your bounce should be in front of your body slightly to the side of the foot that is on the same side of your body as the hand you are using. You want your dribble to be quick, steady, and controlled.
  Keep your body between your defender and the ball, never dribble the ball on the same side of your body as the defender is on.
 Your hand makes contact with the bottom of the ball, then turns the ball over while dribbling.
 We will break these down in future tutorials.
 Then there was a short article on how to play defense against A. Gomelsky. Well, the last, but probably the most important training video was the company's products Better Basketball - Better 1 on 1 Defense . Even after skipping over half of what was said (some because of the language barrier, something because of banal restlessness) and putting even less into practice, I became much better at defending myself.
  So, this stage of defense is incredibly difficult, because you have to give a lot of strength, not to be fooled by movements of the body, head and legs. A good result of such a defense is that the player does not receive the ball throughout the attack. Also a good result if the ball is received, but: in an awkward position (far from the ring; in the corner of the court) or in the last seconds of the attack. Shitty result - the ball is received quickly and conveniently.
  You will know the direction of his movement (he will not step with his supporting foot).
  Good defense - loss on pass, inaccurate pass, throw from an uncomfortable position.
  Clamp into a corner, press to the line.
  Yes, and in order to keep the ball, you have to make more.
 There are some really useful things in there (the movie is old - so turn up the volume).
 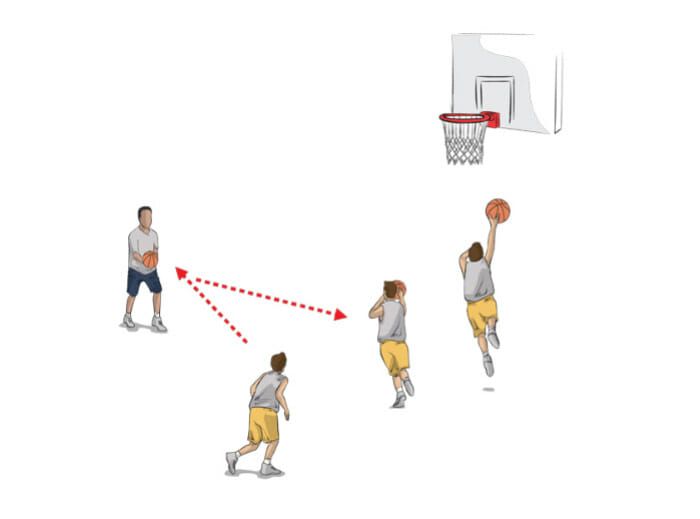 2-3 sets of 5 diagonals forward and backward.
 If the pass is still passed, then the attacker must perform turns (one circle forward or backward) and give a reverse pass to the playing along, and the defender must actively interfere with him, try to knock out or take the ball away. 30 seconds in each role, 3 times (change in a circle).
  To check this, you can knock a little.
  2. Small steps to one and the other side with greater speed. 20-30 seconds each exercise.
  3. The same, but the attacker moves diagonally back and forth in 3-5 steps. 30 seconds each, 3 sets.