Home » Misc » How to run a 3rd grade basketball practice
How to run a 3rd grade basketball practice
3 Basketball Practice Plans for All Age Groups (7
“Players win games. Coaches win practices”.
Practices are the time coaches have the biggest opportunity to impact the basketball skills of a player…
However, I constantly attend practices that are inefficiently run.
The coach spends half of practice trying to work out what drill to run next.
All coaches should be spending the majority of their time encouraging and providing feedback to their players… not working out what the next drill is going to be.
How do coaches fix this and make practices more efficient?
Create a basketball practice plan.
Two of the greatest coaches of all time knew how important a practice plan was…
“I always designed my practice plans the night before and then made tweaks a few hours before practice began” – Bobby Knight
“I would spend almost as much time planning a practice as conducting it. Everything was planned out each day” – John Wooden
Having a plan for each practice is absolutely essential.
Here is how to do it:
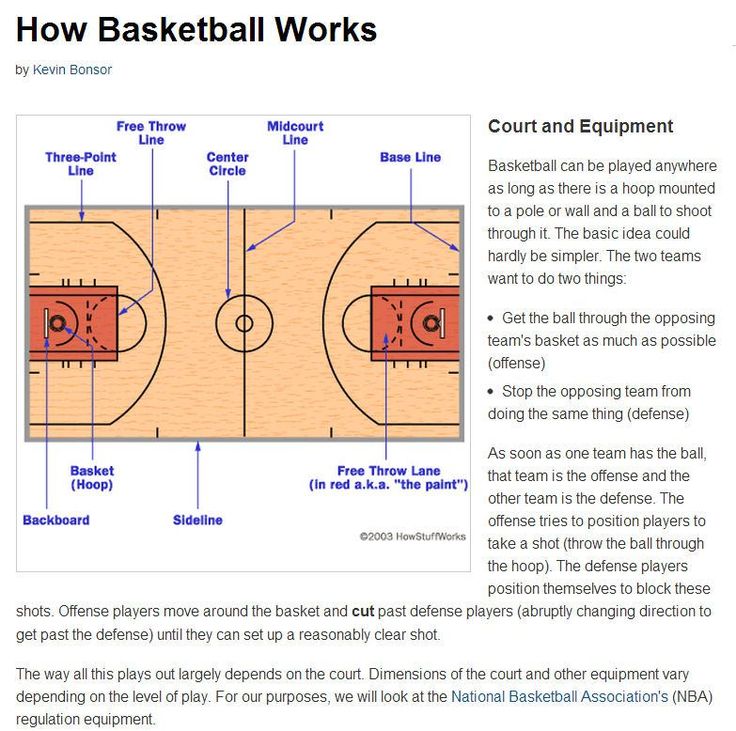
Basketball Practice Plan Structure
At Basketball For Coaches, we break down a typical practice into 5 sections…
1. Dynamic Warm-Up/Body Movement 2. Skill Work 3. Team Strategies 4. Scrimmage/Small Sided Games 5. Cool Down
First, let’s discuss each section in more detail.
Later on we’ll break down how long you should spend on each of the sections.
And then I’ll share 3 complete practice plans that you can print off and use with your team.
1. Dynamic Warm-Up/Body Movement
This section of practice cannot be skipped.
Most youth teams perform a 2-minute warm-up before moving immediately on to other sections of practice.
When I watch youth basketball games, it becomes quickly apparent that the best players have fantastic:
Balance
Coordination
Change of Speed
Change of Direction
The players who struggle haven’t learned how to control their bodies yet.
It’s extremely important to help players establish an athletic foundation. With this foundation in place, it becomes much easier to learn new basketball skills as they progress.
This section of practice will help your players with much more than their basketball skills. It will help prevent injuries and will help them in all sports and movements of life, because as we all know, players shouldn’t be specializing solely in basketball at a young age.
Here are a few examples of body movement and coordination movements you need to incorporate into your dynamic warm-up.
Jogging
Sprinting
Backpedaling
Sliding
Change of Direction
Change of Pace
Jumping
Landing
Lunging
Skipping
2. Skill Work
The bulk of a youth basketball practice should be skill work. The drills should be fun and interesting while still improving the skill of your players.
This includes drills that teach players how to perform the skill movement correctly, along with drills that assist them to learn when to use the skill.
Drills that allow the player to learn when to use the skill are commonly skipped over.
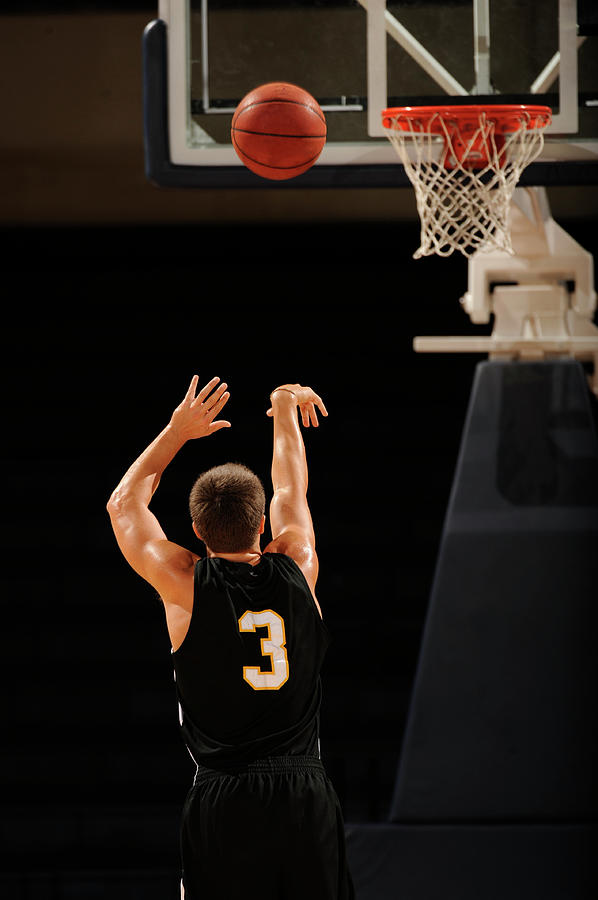
Referring to shooting, this is a great quote by Jeff Van Gundy…
“Shooting percentage is just as much about decision making as it is about technique” – Jeff Van Gundy
This rule goes for all skills, not just shooting…
We need to put players in positions that require them to make decisions and gain game-like experience.
A lot of coaches will show players exactly what they need to do… they’ll give fantastic instructions, and the players will eventually look brilliant at training.
Then, the players will get into the game and it’ll look like they’ve forgotten everything!
Why does this happen?
Because they haven’t learned to play against competition.
We need to include drills that will teach players the technique, and drills that will teach them when to do it in the game.
I recommend splitting these two types of drills up 50/50…
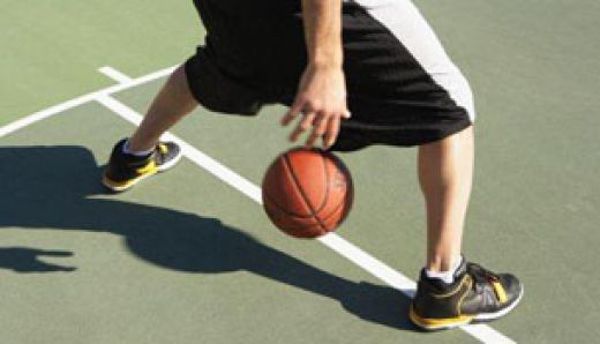
Dribbling Example:
5 minutes of stationary ball handling and then a game of 1v1 in the full-court.
Shooting Example:
5 minutes of shooting form and then 1-on-1 partner close-outs with the offensive player deciding whether to shoot the ball or drive.
Passing Example:
5 minutes of form passing and then a 10 minute game of 5 vs 4 keep-away.
While I list small-sided games at the end of practice, I still use them in this section to improve individual skills while making decisions.
“Perform drills that force your players to think” – Bobby Knight
BFC TIP: At the youth level, drills should be no more than 10 minutes long. The players will start to become disinterested after that time. Keep them short and fun!
3. Team Strategies
Team strategies are the least important component of a youth basketball practice.
And in my opinion, they are not necessary for players under the age of 10.
The team strategies section of training includes:
Offense
Defense
Set Plays
Special Situations
If you decide to use this section of practice with your team, dedicate only a small amount of time to it.
Too many coaches steal practice time from skill development and spend half of practice helping athletes memorize set plays.
Remember that we want to teach our players how to play basketball, not give them a couple of spots on the floor they have to run to each possession.
So, I’m not opposed to teaching team strategies… I’m just opposed to spending half of your valuable practice time on it.
Only practice team strategy for the recommended amount of time, or less.
4. Scrimmages / Small Sided Games
Scrimmages and small-sided games are very important to include in every basketball practice plan.
What’s the point in your players learning how to do a crossover with great technique if they don’t understand when to use it in a game?
Technique is important, of course… but allowing kids to practice when to use it is just as important.
This doesn’t mean letting them loose in a 5-on-5 game every practice…
Most of the game-play in a youth practice should be “small-sided”.
Small-Sided Games (SSG’s) have fewer participants on each team than a normal game. (1v1, 2v1, 3v3, etc.)
There are many benefits to using small-sided games with your players:
More Touches
More Space to Practice Moves
More Opportunities to Score Points
and many more
Small-sided games result in the players developing quicker and having a lot more fun!
If you have more than one ring and basketball available, play multiple small-sided games!
Another thing I love to do in scrimmages or small-sided games is incorporate rules to work on different skills.
For example, one of my favorite rules is the “no dribble” rule, which forces kids to read the play and make cuts to get open.
Without this rule, you’ll find it’s common for a youth player to take 5 or 6 dribbles with their head down before throwing a wild hook shot at the ring while 3 of their teammates stand around wide open.
5. Cool Down
The cool down section of your training should consist of a couple of minutes of slow jogging and walking up and down the court and then a few minutes of static stretching.
This allows the body to decrease in temperature and begin to flush out the waste products (lactic acid), amongst other things.
The stretching part of the cool down is a great time to talk to the players. We might talk about an upcoming game/tournament or how we felt practice went.
Recommended Practice Plan Structure
Now that you understand each section of practice, let’s work out how much time during practice should be dedicated to each section.
The first thing you’ll need to decide is if you’ll be implementing any team concepts like offenses, defenses, or set plays. If so, I still recommend only spending the listed amount of time on it.
If not, I recommend adding the extra minutes to skill work.
The following is how I generally divide up the minutes depending on the length of practice time you have.
60 Minutes Dynamic Warm-Up/Body Movement – 10 minutes Skill Work – 25 minutes Team Strategy – 10 minutes Scrimmage/SSG – 10 minutes Cool Down – 5 minutes
90 Minutes Dynamic Warm-Up/Body Movement – 10 minutes Skill Work – 45 minutes Team Strategy – 15 minutes Scrimmage/SSG – 15 minutes Cool Down – 5 minutes
120 Minutes Dynamic Warm-Up/Body Movement – 10 minutes Skill Work – 60 minutes Team Strategy – 20 minutes Scrimmage/SSG – 20 minutes Cool Down – 5 minutes
This structure combines the technical learning of the skill with the practical application of the skill.
Too many practices overlook teaching players when to use skills.
3 Sample Basketball Practice Plans
7 – 10 Years Old (60 Minute Practice)
Disclaimer: This training session has been designed for a half-court, as most teams this young only have access to half the court to train on.
Practice Goal: Bringing the ball up the court against pressure.
Warm-Up (0-10 Minutes)Dynamic Warm-Up
Run each of the following to half-court and back:
1. High Knees – Bring knees to waist height while running.
2. Butt Flicks – Flick the rear with your heels as you run.
3. Grape Vine – Face side-on, step with the front leg, alternate stepping in front and behind with the rear leg.
4. High Jumps, Quiet Landing – Run forward, plant with two feet, jump as high as you can, land as quietly and softly as possible.
5. Zig Zag – Run to the right diagonal for a few steps, plant your outside foot, push off and cut to the left diagonal. Repeat.
Dynamic Stretching
Perform through to half-court, jog back to the baseline.
1. Lunges – Take a large step forward, keep the back upright and the hips straight, slowly drop down until your rear knee is just above the floor.
2. Squats – Take a few steps, stop with feet wider than shoulder-width apart. Keep the back straight, stick out the rear end, and squat down until the thighs are parallel with the ground.
3. In to Out – Take a few steps, lift right knee to waist height. Keep the hips pointing forward, and bring the knee from pointing forwards, to pointing sideways. Drop the foot back down, take a few steps, and repeat with the left knee.
4. Toe Grab – Take a few steps, put your right heel on the ground out in front of you, keeping your right leg straight. Bend down and grab onto your toe. Hold for two seconds, stand up, and repeat after a few steps with your left foot.
Run Throughs
Run each to half court and back.
1. 50% Speed
2. 70% Speed
3. 80% Speed
4. 90% Speed
5. 95% Speed
Skill Work (10 to 35 minutes)
Retreat Dribble Drill (10 to 20 Minutes)
Setup:
Pair the players up (similar skill level). One basketball between two players. Spread out around the court.
Instructions:
Have the player with the ball jog and dribble in any direction. The other player acts as the defender.
At any moment, have the defensive player sprint and stand directly in front of the offensive player.
Upon this cue, the offensive player shall plant their front foot, push off it hard, and hop back to create space!
Have the offensive player change the direction they’re dribbling in.
The defensive player chases the offensive player, and steps in front of them again.
After 30-45 seconds, have the players switch jobs.
Coaching Points:
The defensive player isn’t trying to steal the ball, or truly pressure the offensive player! They are only there to help show the offensive player when they should be making this move. They are helping the offensive player learn.
1v1 Dribbling Drill (20 to 35 minutes)
Setup:
Pair each player with a similarly skilled teammate. Split the court into two playing with an imaginary line between the baskets (otherwise known as the split line, use cones to mark if you wish).
Instructions:
Starting on the baseline, the offensive player must dribble the ball across the half-court line.
If the defensive player steals the ball, they must give it back to the offensive player.
If the offensive player loses control of the ball or goes out of bounds, they must retrieve it and start again where they last had control of the ball.
Team Strategy (35 to 45 minutes)
Three Options:
1-4 Press Break
Man-to-Man Defense
5-Out Motion
Scrimmage/SSG (45 to 55 minutes)
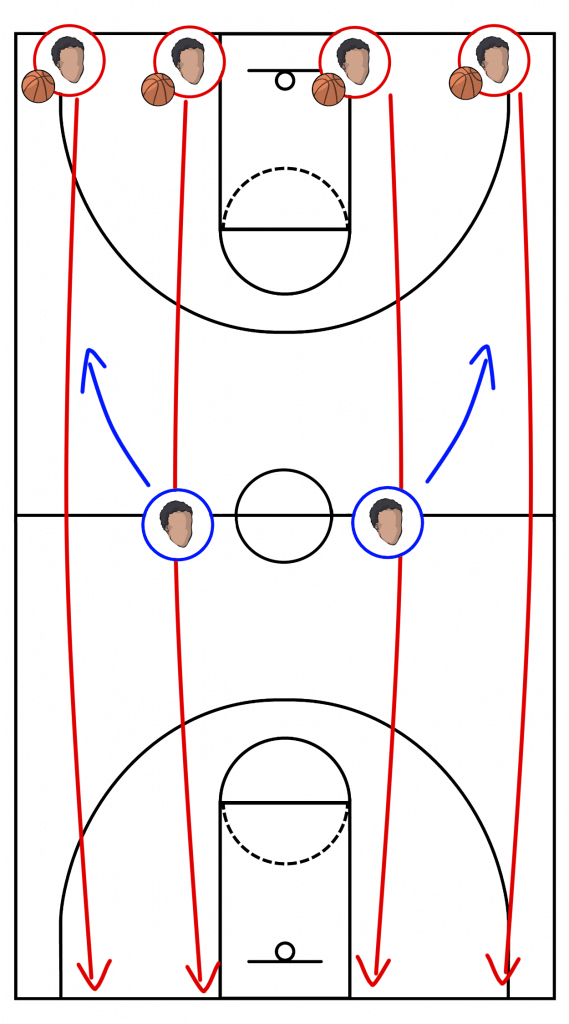
3-on-3 “Touchdown”
Setup:
The offense starts with the ball, out-of-bounds on the baseline. They must inbound the ball, and dribble and pass it to half court.
Instructions:
If the defense gets the ball, the game stops, and they become the offense.
The game begins again out-of-bounds on the baseline.
Once the offense get the ball to half court, they must place it on the ground, on the half-court line.
Another offensive player (who didn’t place the ball on the ground) must sprint to retrieve the ball. They then turn around and look to score on the basket.
Once the ball has been placed, the defensive team must all turn around and touch the baseline with their hand.
Coaching Points:
As coach, give limited feedback during the game! If you see a certain mistake three times in a row, give advice quickly, but spend most of your time observing. How they perform in this small-sided game should inform how you design your next training session!
Cool Down (55 to 60 minutes)
Jog to the other end of the court and back.
Walk to the other end of the court and back.
Sit down, and do some static stretches.
The cooldown stretching gives the coach some time to have a conversation with the players about training, and potentially some quick information about the next opponent.
11 – 14 Years Old (90-Minute Practice)
Disclaimer: This training session has been designed for a full-court.
Pre-Training Talk (-15 to -10 minutes)
Before your time on the court begins, share a very clear goal for training with the players. Each training session should have a purpose. For a 90-minute training session, there is enough time to practice two “goals for training”.
Example goals:
Passing Decision-Making
Transition Defence
Foam Rolling (-10 to 0 minutes)
Once kids are 11 or older, I highly recommend that each player owns a foam roller for use before training.
Teenage years are renowned for growing pains, and as coaches, we can help our players by dedicating the last 10 minutes before entering the court to foam rolling.
They’re very cheap, and if a player forgets theirs, they can use their own basketball.
Roll each area for 20 seconds each:
Glutes
Between the back and the outside of the upper leg.
Outside of the upper leg.
Between the front and the outside of the upper leg.
Front of the upper leg.
Inside of the upper leg.
Calf (lower leg)
Warm-Up (0 to 10 minutes)
Dynamic Warm-Up
Run each of the following to half-court and back:
1. High Knees – Bring knees to waist height while running.
2. Butt Flicks – Flick the rear with your heels as you run.
3. Grape Vine – Face side-on, step with the front leg, alternate stepping in front and behind with the rear leg.
4. High Jumps, Quiet Landing – Run forward, plant with two feet, jump as high as you can, land as quietly and softly as possible.
5. Zig Zag – Run to the right diagonal for a few steps, plant your outside foot, push off and cut to the left diagonal. Repeat.
Dynamic Stretching
Perform through to half-court, jog back to the baseline.
1. Lunges – Take a large step forward, keep the back upright and the hips straight, slowly drop down until your rear knee is just above the floor.
2. Squats – Take a few steps, stop with feet wider than shoulder-width apart. Keep the back straight, stick out the rear end, and squat down until the thighs are parallel with the ground.
3. In to Out – Take a few steps, lift right knee to waist height. Keep the hips pointing forward, and bring the knee from pointing forwards, to pointing sideways. Drop the foot back down, take a few steps, and repeat with the left knee.
4. Toe Grab – Take a few steps, put your right heel on the ground out in front of you, keeping your right leg straight. Bend down and grab onto your toe. Hold for two seconds, stand up, and repeat after a few steps with your left foot.
Run Throughs
Run each to half court and back.
1. 50% Speed
2. 70% Speed
3. 80% Speed
4. 90% Speed
5. 95% Speed
Skill Work (10 to 55 minutes)
3v2 Around the Key (10 to 20 minutes)
Setup:
One offensive player on each block (side of the keyway), one starts behind the FT line. One defensive player starts under the front of the basket, and the other starts two steps directly in front of him.
Instructions:
Coach passes the ball to any of the offensive players.
A game is played until the offense scores or the defense has the ball (or the ball goes out of bounds)
Everybody chooses a new place to start, and the game begins again when the coach passes the ball.
Coaching Points:
When you’re coaching this drill, make sure to focus upon the decision making of their passing. We have clearly told the players what the goals of training are, and we must coach to that. If you give all kinds of different advice to the players, it’ll be difficult for them to take it all in.
‘Call Names’ 3v3 (20 to 35 minutes)
Setup:
Depending on numbers and space, play a 3v3 game in the full court, or two 3v3 games in each half-court.
This is a normal 3v3 game, with an extra rule to force the players to make passing decisions while they’re dribbling, not after they’ve finished dribbling.
Rule:
The ball-handler must call the name of the teammate they’re passing the ball to either (a) before passing the ball, or (b) before they pick up their dribble.
If a player passes the ball or picks up their dribble before calling the name of a teammate to pass to, it is a turnover!
1v1 Chase Down (35 to 45 minutes)
Setup:
Pair the players up into similar speed levels. The offense starts a few steps onto the court, either on the left or right side of the court. The defense starts a step or two behind.
Depending on the speed of the defensive player and the speed dribbling ability of the offensive player, you’ll need to adjust where they begin.
Instructions:
The coach blows his whistle, and the offense begins speed dribbling towards the basket at the opposite end.
The defense has to sprint and get in front of the offensive player.
Play until either the offense scores or the defense has the ball (or the ball goes about of bounds).
Balance the Floor 3v3 (45 to 55 minutes)
Rules:
If you’re below the free-throw line when a shot is attempted, go for the rebound!
If you’re above the free-throw line when a shot is attempted, sprint back onto safety!
When either team has the ball, it is a normal game of 3v3.
Instructions:
Once a shot is taken, the offensive players must either:
(b) Sprint back towards the half-court line if they’re above the FT line
(a) Sprint to the basket and attempt to make a rebound if they’re below the FT line.
If the defense gets the ball, the drill stops, and everybody freezes. If the offense gets the ball, they may shoot it again and continue to play.
Once the defense gets the ball (and everybody freezes), the coach can observe how the offense (who have just become defense) have ‘balanced the floor’.
Team Strategy (55 to 70 minutes)
Three Options:
4-Out 1-In Motion
Run and Jump Defense
Princeton Offense
Scrimmage/SSG (70 to 85 minutes)
Play a full-court game, with as many players as you have!
Ideally 5v5, but 4v4 or 3v3 would work too.
To help the game express the goals of training that we have been working on (passing decision-making, transition defense), we will add an extra rule.
Rule: If you shoot the ball, you must touch the baseline before rejoining the play!
This rule puts more pressure on defensive transition than a normal game, and therefore they’ll have to do a better job to be able to prevent an easy fast-break basket for the opponent.
The momentary 5v4 advantage for the offense also allows more opportunities to display their passing decision-making.
Cool Down (85-90 minutes)
Jog to the other end of the court and back.
Walk to the other end of the court and back.
Sit down, and do some static stretches.
The cooldown stretching gives the coach some time to have a conversation with the players about training, and potentially some quick information about the next opponent.
15 – 18 Years Old (120-Minute Practice)
Disclaimer: This training session has been designed for a full-court.
Pre-Training Talk (-15 to -10 minutes)
Before your time on the court begins, share a very clear goal for practice with the players. Each basketball practice should have a purpose. For a 120-minute session, there is enough time to practice three ‘goals for training’.
Example Goals:
1v1 Finishing
Full Court Man to Man
Defensive Rebounding
Foam Rolling (-10 to 0 minutes)
Once kids are 11 or older, I highly recommend that each player owns a foam roller for use before training.
Teenage years are renowned for growing pains, and as coaches, we can help our players by dedicating the last 10 minutes before entering the court to foam rolling.
They’re very cheap, and if a player forgets theirs, they can use their own basketball.
Roll each area for 20 seconds each:
Glutes
Between the back and the outside of the upper leg.
Outside of the upper leg.
Between the front and the outside of the upper leg.
Front of the upper leg.
Inside of the upper leg.
Calf (lower leg)
Warm-Up (0 to 10 minutes)
Dynamic Warm-Up
Run each of the following to half-court and back:
1. High Knees – Bring knees to waist height while running.
2. Butt Flicks – Flick the rear with your heels as you run.
3. Grape Vine – Face side-on, step with the front leg, alternate stepping in front and behind with the rear leg.
4. High Jumps, Quiet Landing – Run forward, plant with two feet, jump as high as you can, land as quietly and softly as possible.
5. Zig Zag – Run to the right diagonal for a few steps, plant your outside foot, push off and cut to the left diagonal. Repeat.
Dynamic Stretching
Perform through to half-court, jog back to the baseline.
1. Lunges – Take a large step forward, keep the back upright and the hips straight, slowly drop down until your rear knee is just above the floor.
2. Squats – Take a few steps, stop with feet wider than shoulder-width apart. Keep the back straight, stick out the rear end, and squat down until the thighs are parallel with the ground.
3. In to Out – Take a few steps, lift right knee to waist height. Keep the hips pointing forward, and bring the knee from pointing forwards, to pointing sideways. Drop the foot back down, take a few steps, and repeat with the left knee.
4. Toe Grab – Take a few steps, put your right heel on the ground out in front of you, keeping your right leg straight. Bend down and grab onto your toe. Hold for two seconds, stand up, and repeat after a few steps with your left foot.
Run Throughs
Run each to half court and back.
1. 50% Speed
2. 70% Speed
3. 80% Speed
4. 90% Speed
5. 95% Speed
Skill Work (10 to 70 minutes)
‘Read the Help’ (10 to 20 minutes)
Setup:
Spread the offensive players out to both ends of the court. Each player should have a basketball. To work on right-handed finishing, line the offensive players up, outside the 3pt line, in line with the right-hand side of the key-way. One player begins on the left block.
Instructions:
The first player in line should stand in triple threat position. To quickly begin their dribble, they throw the ball down towards their right-hand side, and drive to the basket.
The extra player on the left block will give one of three different signals, to inform the driving player which finish they should attempt.
If the player on the left block runs and stands directly underneath the basket, the offensive player should make a powerful move, directly to the basket, and finish as high as possible.
If the player on the left block runs and stands between the driver and the basket, outside of the charge circle), the driver should shoot a short ‘floater’ over the top of the defender’s head, without running into them (if your court has no charge circle, have them stand a 4-5 feet in front of the basket).
If the player on the left block runs across the keyway to the right block, the driver should make a ‘change of direction’ move with their footwork, and finish on the left-hand side of the basket. An example of this type of move would be a ‘euro-step’ or a ‘pro-hop’.
1v1 ‘Ball on Back’ (20 to 30 minutes)
Setup:
The defender starts by standing on the 3pt line, facing the basket. The offensive player stands behind the defender and places the ball upon the defenders back.
Instructions:
The drill begins when the offensive player takes the ball off the defensive player’s back.
Play until either the offensive player scores or the defensive player gets the ball.
The defender facing away provides the offensive player an advantage, which they can take with a fast, decisive move to the basket!
2v2 ‘Rugby’ (30 to 45 minutes)
Setup:
The ball starts out of bounds on the baseline.
Instructions:
The offensive inbounder must pass the ball into the court to his teammate.
After this first pass, the offensive team may only pass backwards.
The goal is to get the ball into the key-way at the other end of the court.
The defensive team must work on having a player closely guarding the ball. His teammate should be behind the line of the ball, narrowing the space that the offensive player has to dribble.
3v3 ‘Hockey’ (45 to 60 minutes)
Setup:
This is a game of 3v3 in the full court, with one extra rule which allows the defense to apply more full-court pressure.
Rule:
Borrowing from Ice Hockey’s ‘off-side’ rule, the offensive ball-handler must be the first offensive player to cross the half-court line. Before the ball is dribbled across the half-court line, no other offensive player may be in the front half of the court.
This prevents offensive players from sprinting ahead for easy long passes, and allows the defense to practice their full-court defense more effectively.
Find, Hit, Get (60 to 70 minutes)
Setup:
Two players start on the top corners of the keyway (offence), and another two players start on the blocks (defence).
Instructions:
Coach shoots the ball from the foul-line.
Once the ball is shot, all 4 players can move to rebound.
Upon the shot, the two defensive players yell: “FIND!”, and run towards the offensive players. “HIT!”, and make contact with the offensive players. “GET!”, and attempt to rebound the ball.
Whichever team gets the ball becomes offence, and attempt to score on the basket the ball was just shot upon.
Players rotate positions after either team has scored.
Team Strategy (70 to 90 minutes)
By the time your players are 15 or older, they’ll need a couple of set plays to score with.
If you do not already have a few plays up your sleeve, check out this link below.
28 Basketball Plays to Dominate Any Defense
When practicing set plays, make sure to use all the players you have available!
5v0 might make your plays look great, but they won’t look great once you get to the game!
Practice your plays with defenders.
To begin with, have them not steal the ball or try and blow up your play, but make sure you build towards practicing your plays against a live defence!
If you only have 8 players at training, 3 defenders is better than 0 defenders!
Scrimmage/SSG (90 to 115 minutes)
With 3 different focuses for this training session, we can use small-sided games or 5v5 scrimmages to apply what we have learned to a game!
3v3 Small-Sided Game (90 to 100 minutes)
To emphasize finishing on the basket, we will change the scoring system!
Play either until a certain score, or for an amount of time.
Scoring System:
Score inside the bottom half of the keyway= 3 points.
Score inside the top half of the keyway= 2 points.
Score inside the 3pt line, but outside of the keyway= 1 point.
3pt Basket = 0 points, but the opponent’s score goes back to 0.
Making mid-range baskets only worth 1 point will encourage players to keep driving, and not settle for pull-up jump-shots.
Creating a large consequence for the defense giving up a made 3pt shot will cause them to close out harder, creating more driving opportunities for the offense.
5v5 Scrimmage (100 to 115 minutes)
To focus on full-court defense and rebounding, we introduce two simple rules to influence how the game is played.
Rule 1:
Once the defense first gets the ball (on a made basket, a rebound, or a steal), the player who has the ball must place it upon the ground. Another teammate shall run across and pick up the ball, and the game shall resume. The new defense cannot defend the ball until it has been picked up by the other team. This gives the defense a chance to set up their full-court defense, on every change of possession.
Rule 2:
If the offensive team gets an offensive rebound, they get a “power-play”. They have a free chance to score, without any threat of losing the ball. Once the defense has the ball (on a rebound or a steal), the game stops, and the offense get the ball back.
Coaching Points:
We recommend that you play mini-games, and coach in between each game. Play until either team has scored two baskets. After the mini-game, bring the teams in, and coach them for 30-45 seconds. Make substitutions, and send them back out onto the court!
Coach in dot-points, not paragraphs.
Cool Down (115 – 120 Minutes)
Jog to the other end of the court and back.
Walk to the other end of the court and back.
Sit down, and do some static stretches.
The cooldown stretching gives the coach some time to have a conversation with the players about training, and potentially some quick information about the next opponent.
Conclusion:
The biggest thing I want you to take away from this article is that you need a basketball practice plan for every practice.
A planned practice is more efficient, your players will improve quicker, and you’ll be a far better coach.
How to Structure a Youth Basketball Practice – Rookie Mentor
Being a youth basketball coach can be one of the most exciting and fulfilling jobs for a person to have. Coaches get the opportunity to teach young kids how to not only play basketball but more importantly, how to teach kids life lessons that will last a lifetime.
When structuring a youth basketball practice consider; your team goals, alternative skill development drills that vary from the previous session, your coaching philosophy, rewarding hustle and focusing on the fundamentals whilst not pointing out every mistake. Winning at youth level should not be what drives coaching decisions at practice.
Not many things in life give you the ability to make positive and long lasting impressions on young kids. Kids love basketball! Many kids live and breathe basketball. They love to learn it, play it and watch it. Read on to see how you continue to grow their love of basketball through practice.
How Do You Develop a Practice Plan?
A practice plan is essential and will help create a structure for your practices. This ensures that there isn’t wasted time when transitioning into drills.
Once your players get a feel for how practices are structured your practices will run more smoothly. The practice plan should include everything from specific drills with coaching points to even scheduling water breaks.
When planning for practice, the ability and level of the team should determine how long each practice should be.
For beginning players, the practice should not be longer than 60 minutes. Intermediate players should practice for 90 minutes and advanced players should be in the gym for 120 minutes.
These practice time guidelines will allow coaches to be able to maximize player effort without experiencing player burnout as the season progresses.
As coaches, we should promote when kids are playing multiple sports. When deciding on the length of your practice you should be aware of kids that have other obligations.
Try to schedule your practices with that in mind and avoid overworking your players.
“Trust me, setting things up right from the beginning will avoid a ton of tears and heartache…” – Kobe Bryant
Start with a Team Building Conversation (5%)
To begin practice, coaches should bring the team together to talk about a value or characteristic that the program would like each player to subscribe to.
Have the players engage with one another about different topics of why a team is successful. This is a great chance to teach valuable lessons that align with your coaching philosophy (or developing philosophy!).
Depending on the make-up of the team and player personalities, the coach can choose to lead the conversation or allow the players to lead it themselves. Having this conversation whilst stretching works well.
Have A Dynamic Warm-Up (5%)
A youth basketball warmup routine should allow the players to warm-up for practice along with learning different aspects of the game.
Coaches may overlook warmups and expect players to show up ready to begin but warmups can be a major learning opportunity for players whilst also preventing injury.
Warm-ups are important because they set the tone of the effort level of the practice. As the coach, you should push your players from the beginning of practice to work hard and this all starts during warm-ups.
Skill Development (60%)
The most important part of a youth practice is skill development. Skill development at the youth level consists of ball handling, passing, shooting and footwork. This part of a youth practice should be physically intensive and focus on creating a game-like atmosphere.
Coaches should emphasize on their coaching points selected during the development of the practice plan. At this point of practice, players’ mistakes should be corrected more frequently than any other point in practice.
Work On Defense; NO Zone! (15%)
All practice plans should include a defensive session. Youth players need to learn the concepts of how to play man-to-man defense.
At the youth level, many coaches dedicate a lot of practice time to playing zone defense. If the goal is to win youth basketball games and tournaments then playing a zone defense will probably work. But, the goal of youth sports should always be skill development and being able to play man to man defense at a high level is an essential skill for all basketball players.
Zone defense creates bad habits that are hard to correct when players move up to a more competitive level. Man to man defense principles can transfer into any other type of defense so it is of utmost importance that youth players are able to understand it at a young age.
Teach Offensive Concepts (10%)
It is important for youth players to learn the basics of a motion offense. Avoid pattern offenses or set plays. Players should learn how to play the game on a deeper level and not just be robotic and go through the motions.
Coaches should introduce new offensive actions that players can utilize while on offense. Short term, it may look chaotic and disorganized but long term, coaches will see progress on offense once players become more comfortable.
Building confidence and basketball IQ is the most important part at this point of practice.
End with Competitive Games (5%)
The end of each practice should include some type of competitive game. Split the teams up and give out a consequence to the losing side. While fun is the focal point of youth sports, a competitive spirit still needs to be instilled within the players.
Tips for Having a Good Basketball PracticeBring positive energy to every practice and have fun!
The coach sets the tone of the practice. Youth coaches should work to create a positive image of basketball for all kids.
You will have kids that are less skilled or athletic than others but it is still important to keep the positive energy flowing. Do not be the reason why a kid chooses to quit!
Do not point out every mistake
As a coach, you want all kids to be successful but sometimes we need to take a step back and let them make mistakes in order to learn.
Mistakes are going to happen. Allowing them to correct their own mistakes will help build their confidence and is a more effective tool than stopping practice every time one of your players does something wrong.
Emphasize your coaching philosophy values often
As we talk about later, players pick up on what you decide to emphasize throughout practice. A coach should be pointing times when a player makes a play that aligns with your philosophy. Since your philosophy translates off the court, you are also teaching valuable life lessons.
If you’re coaching philosophy is still developing – that’s okay!
Focus on the fundamentals
Not every drill needs to be this spectacular show that makes players work on multiple skills all at once. Sometimes it is best to keep it simple and work on the fundamentals.
Take time to teach the small things like how to make a proper ball fake or a reverse pivot. As kids get older, the fundamentals are what separates an average player from a great player.
Always reward hustle
Let a player know when he makes a good hustle play. Coaches need to pay attention to the small details during practice and praise the players that make the extra effort.
For example, when a player dives on the floor for a loose ball, make a big deal out of it. When it comes time to play a game, the moments that separate teams are the small details.
A hustle play that earns them an extra possession could be the difference in a close game. Win or lose, at the youth level you should always reward hustle and hard work.
The most talented player on my team will sit the bench for the one that works the hardest at practice. In many cases the most talented youth players are jumped by the hard-working ones. Players with a good attitude about working hard are the players I want on my team.
Give your team a lot of opportunities to scrimmage
The best learning happens in basketball when players get a chance to play. They learn how to deal with game situations and how to make adjustments on the fly.
Allowing your players to scrimmage uninterrupted by the coach will give the ability to learn how to play the game on a deeper level.
Once the scrimmage is completed, have the players reflect on the things they would have done differently. This allows for great coaching and learning opportunities.
Create game-like situations
Players need to be able to build their basketball IQ and coaches need to begin the process at the youth level.
Creating game-type situations during practice is going to help players become better all-around. It will help them understand the game on a deeper level.
You don’t have to use a scrimmage-type drill to create a game-like situation. Make players run sprints and shoot free throws. Emphasize that when they are playing they will be tired and the importance of using their legs to get lift on their shot.
If you do scrimmage, use a score clock and set at time. You can set parameters for the scrimmage and then let the players go. Have them make their own decisions, call time outs and be their own coaches.
This is a great way for them to learn what it is like to manage a game and will give them more insight when they are in the game.
What Drills Should You Run?
Youth coaches should utilize drills that are time effective and support skill development.
Explaining drills for the first time will take up valuable practice time but coaches need to ensure that the focus and emphasis is communicated to the players.
Some of the most effective drills for youth players are the most simplest and will provide more time for players to focus on their development.
Some coaches like to run the same drills at each practice to cut down on the time they take to explain each drill. Personally, I like to mix up the drills that my players run. This keeps things fresh and fun for the players. Like I said earlier, we don’t want them to turn into robotic players so changing drills each practice is a positive way to teach them how to stay focused and locked in during practice.
Touch the Line (Warm-Up):
To start the drill, all players line up on the baseline. The coach then calls out a spot on the floor (ie: “Elbow”, “Block” etc.) and players begin moving towards that spot on the court performing while an action (ie: high knees, butt kicks, defensive slides etc).
Weave Dribbling:
Line up three cone lines with the first cone starting on the baseline and moving towards half court.
One line of cones should be 1-2 feet apart and other lines have cones that get increasingly spread out.
Players line up behind the first line of cones with a ball. Each player then weaves in and out of the cones while dribbling the ball performing a crossover dribble.
Once each player has dribbled through each line of cones three times.
For more advanced teams and players, the coach can mix in certain ball handling moves (ie: between the legs, in/out dribble etc.).
Partner Passing:
This drill is performed in pairs with each group having one ball to start.
Each group will stand 5-7 feet apart and pass the ball back and forth performing a different pass each time (chest pass, bounce pass, overhead pass). Coaches should focus on players using a proper passing technique.
As time progresses and the players are getting more advanced. The drill can transition into running while passing and catching. Adding a second ball to the drill will add another level of difficulty to this drill.
Form Shooting:
After being instructed on the proper shooting technique, players each have a ball and find an area in the gym away from each other. The coach will then talk through each step of a proper form shot pausing for each player to perform that step.
This drill will progress each practice to eventually shooting with a partner at a hoop without the coaches verbal prompts.
SHELL Drill (defense):
For beginning players, this is an essential drill that should be in each practice plan.
The first time players are performing this drill, there should be three offense players and three defensive players on the top of the key and the two wings.
The ball should start at the top of the key and each player should move to the correct defensive position.
One player guarding the ball while the two wing defenders are in a “gap” help position. The coach then instructs the offensive player to pass the ball. The defense should then adjust to the new ball position. The focus of the coach needs to be on correct defensive positioning and making sure the players are jumping towards the ball while it is in the air.
Coaches should focus on building communication during this drill. Players should be taught what to say how to communicate and it should be an expectation every time this drill is on the practice plan.
This video from the Junior NBA is a great example of how the Shell drill works.
Shooting Competition:
Split the players into two equal-sized teams. Players then line up at a spot on the court and take turns shooting while counting all of their makes.
The coach can utilize a timer or the first team to certain number of makes to determine the winner of the drill.
The losing team then performs a conditioning or strength drill.
Proper form should be used and is the coaching emphasis while running this drill. At the youth level, players may try to go as fast as they can and lose focus on using a proper shooting form. Focusing on having players use a proper from will assist them with translating a proper form into a game situation.
Dribble Relay:
Split the team into two equal sized teams and have them compete in a dribble relay race. Players should be dribbling as fast as they can. Mistakes should be expected but with time you will see an improvement in their ball handling skills.
Hustle Drill:
This is a good drill to end practice with!
Have the entire team line up on the baseline and one player will go at a time. The coach rolls the ball out and the player must sprint to get the ball before it goes out of bounds on the other baseline. They should dive for the ball if needed.
Once they get the ball, they speed dribble back to the baseline they started at and make a layup. (Have teammates cheer for each other and promote togetherness)
Read here how you can motivate and help develop your young female athletes.
What Are The Goals of Youth Basketball?
Youth basketball can present a lot of different challenges that coaches must learn to navigate. Coaches are often looked at as heroes and role models that people reflect back on their lessons learned long into their adulthood so it is important for a coach to determine their values and goals when deciding to take on the role of a coach in a youth basketball program.
The first and most important goal of youth basketball is providing a fun experience for kids! Players should be having fun while practicing and competing with one another. An emphasis on having fun will play a major factor in a players decision of whether or not they choose to proceed to the next level.
The next goal of youth basketball is developing the skills and fundamentals of the players. Winning at the youth basketball level should not take precedence over the development of skills and fundamentals.
Parents and coaches need to be able to see the bigger picture and think about the progression of skills rather than the win/loss column during the youth years. When a player leaves practice they should leave with a sense of accomplishment and belonging.
Establish Your Basketball Coaching Philosophy
Before you have your first practice, you will need to establish a coaching philosophy that reflects your priorities and establishes what you will emphasize as a coach. A coaching philosophy will guide your decision making throughout the season.
Kids pick up on the coaches behavior. It is important to always follow through on your coaching philosophy.
If you are prioritizing sportsmanship, but during the first game you get a technical foul for screaming at a referee. You show your players that sportsmanship isn’t actually what you prioritize, thus losing the ability to emphasize it with effectiveness for the rest of the season.
During my youth basketball career, my coach always emphasized hustle and playing hard. We knew that if we were not giving it our all of the court during practice and then we would be sitting on the bench. The emphasis of hustle and playing hard allowed my teammates and I to understand what was expected of us at all times.
As the coach, what you decide to emphasize is completely up to you.
All coaches view the game in a different way and not all coaching philosophies are the same. Whatever is decided needs to be reinforced and communicated during practice, drills, games and whenever you are together as a team. After a while, you will see your players hold each other accountable for the values outlined in your coaching philosophy.
A coach’s philosophy doesn’t always have to be all about basketball. For example, one of my coaching philosophy values is to “never turn one mistake into multiple mistakes”.
This value has just as much meaning on the court as it does off. By instilling this value on the court, players will begin to translate these lessons to their lives off the court.
“There are five fundamental qualities that make every team great: communication, trust, collective responsibility, caring and pride. I like to think of each as a separate finger on the fist. Any one individually is important. But all of them together are unbeatable.”
Coach K – Mike Krzyzewski
Keep Reading:
Do You Need a Degree to Coach High School Basketball?
How Many Players Should Be On A Youth Basketball Team?
What is the Best Sports Video Editing Software & Apps?
In Summary: How to Structure a Youth Basketball Practice?
When structuring practice, coaches should choose drills that make practice fun! Remember, the main goal of youth basketball is not winning but to develop fundamentally sound players.
Cheers,
Daniel
Basketball training in elementary grades.
Prepared by the teacher of physical culture Rylkov G.V.
Since the 2002-2003 academic year, along with the current comprehensive program, several alternative physical education programs have been introduced for students of general education schools. And so, working on a complex program, I decided to use one of these alternative programs,
which is based on one of the most massive and popular sports among schoolchildren - basketball, but can only be used in elementary school starting from the 2nd grade, since the comprehensive curriculum for teaching this sport does not provide for elementary school, although passing the section "Outdoor games" schoolchildren master some skills in possession of the ball. A certain role in my decision was also played by the fact that our elementary school works according to experiment 1-4, and therefore I, as I work and in grades 2-3, have to look for and solve something different, new. Their program material of the alternative program, I used in my work two educational sections "basic knowledge" and "Special training", and included them in the section "Outdoor games" for grades 2-3. And now in my work in this direction began to include three stages in teaching this sport: Stage 1 - 2-3 classes Stage 2 - 5-8 grades Stage 3 - 9-11 grades Why this sport and not another I chose in my work. Firstly, basketball has become a traditional sport at school for a number of years. Secondly, I myself used to be engaged in game types and basketball is more familiar to me. And thirdly, the technical and tactical actions inherent in basketball are fraught with great opportunities for the formation of vital motor skills and the development of children's physical abilities. But I will dwell in more detail on teaching basketball in elementary grades. Starting from the 2nd grade, students master throws, catching, passing small rubber balls to a partner, stopping in motion on a sound signal and various exercises that develop motor qualities. We study all these elements in different ways, but the most acceptable one is through games, for example, “Ball to a Neighbor”, “Passing the Ball in Columns”, “Ball to a Neighbor”, etc. Also in the lessons I use small sports equipment, mostly for personal use, these are small rubber balls , cubes, weighted bags. Performed exercises with these objects in walking and running, on the spot, in the lid, throws and catching in pairs, students develop the skills that they need later when handling a basketball. Starting to study some techniques, I introduce the guys to the markings of the basketball court and give them various tasks “Walking along the indicated lines”. To do this, I prepare for them the pace of movement "Hourglass", "Reel", "Snake", etc. In the class II program, I included the player’s stance, the player’s movement in the stance, stop on a sound signal and various sets of exercises with small and large balls. For the harmonious development of the body and coordination of movements, we perform exercises with both the right and left hands, perform jumps on both the right and left legs, and then we complicate the exercises. I start training from the player’s stance, explain why a stance is needed in the game and show what position should be in the stance: legs half-bent, arms in front of the chest, and I give exercises for training. 1. Line up. Crouching to jump out and land on half-bent legs, legs shoulder-width apart, one set forward. 2. Sit down in a line, jump out and land in a standing position. Immediately after landing on bent legs, run to the opposite sideline. Use the rack in outdoor games "Sparrows and Crows", "Day and Night", etc. Movement. There are many varieties of movements, but first we learn running facing forward in a straight line, then we master running with a change in direction and speed. After that, we learn running sideways, backwards and their varieties. The basic element is the position on half-bent legs and balance, which is ensured by the half-bent legs of the arms in front of the chest.
Training exercises: 1. Running around the hall on half-bent legs with a sliding touch of one, then with both hands of the floor along the whistle. 2. Oncoming relay races with touching lines and objects on the floor. 3. Running circles with hand touching the line of the circle. Relay races with running circles. When conducting games and exercises of a technical nature, I use lighter balls, and heavier balls in general educational exercises. While walking at an average pace, and then when running, we execute the “Stop” command after which the students stop in a wide step position. With the help of various general developmental exercises with small and large balls, we study movements with balls. The same exercises are for the children a means of developing motor qualities.
To master the techniques of the game I use lead-up exercises: 1. Large ball in both hands at chest level. Throwing the ball up and catching it, you can clap your hands behind your back. 2. The same as exercise 1 but with catching after the ball bounces off the floor at different heights6 at the level of the knee, waist, head. 3. Ball on the floor in front of the student. Bend over and put your hands on the ball. Repeat several times. 4. Same as exercise 3, but put your hands on the ball, grab it with your fingers and press it to your chest, straighten up, bend over again, put the ball on the floor, straighten up. 5. Exercises in pairs with the ball. 6. Throw the ball over your head, straighten your arms and catch the ball, pulling your arms to your chest.
In the third grade, students learn to stand, stop by jumping, catch and pass the ball with both hands from the chest from a place, with a reflection from the floor and backboard. The main task of teaching basketball in grade III is to study the basics of the game technique and consolidate the acquired skills in outdoor games and special exercises. In the course of basketball lessons, I use various types of walking in a squat and half-squat position on the entire foot, on the toes and lateral arches of the foot, jumping with a push of both legs (in a squat and half-squat), changing the direction of movement (straight, back, left, right), alternating them with walking. Then I give a run from various starting positions, sitting, kneeling, alternating slow running with accelerations and stops in the position of a wide ball. After that, we perform various exercises for the muscles of the arms and legs.
Jump stop. By stopping, the student must cancel the forces of inertia and take a position from which he can start in any direction. The basic element is the position on bent legs with a variable body weight on the back standing leg. Exercises for learning. 1. Building in 1 line. Alternately in the line, jump in place with a stand with the leg extended forward, squat on the standing leg behind with the hand touching the floor next to it, also on the other leg. 2. In a column, one by one, moving around the hall, make stops on sound signals. 3. The game "Tag" (in pairs, or in groups) performing stops with the arrival. The driver catches up with them and tries to overpower them. Catching and passing the ball with both hands from the chest while standing still. The main element during catching is the position of the hands, reproducing the shape of the ball. Exercises with passing and catching the ball are performed in the player's stance. Exercises for learning. 1. In ranks of 4-5 people. In front of each line is a driver. The players take a stand. Hands at face level, brushes reproduce the shape of the ball. The driver alternately puts the ball into the hands of the players, having received the ball, the player lowers his hands to his chest and holds in the position from which the transfer is made. 2. Standing in line. The driver alternately throws the ball to the players, doing this from 2-3 m with one hand from below so that the ball flies at face level. The player extends his arms and catches the ball with a step towards.
Dribbling with the right and left hand in a straight line. The main element is the position of the forearm and elbow of the hand leading the ball, which, as if trying to take a position below the hand, are ahead of the hand. This makes it possible to follow the ball far down and meet it early with a brush, as well as control the ball.
Exercises for learning. 1. Formation in 2 lines. From a stand on strongly bent on strongly bent legs, imitation of dribbling. Start moving down with the elbow and forearm and end with the hand. The leg is extended forward, the same-named hand performing the lead. 2. Building in a line. Dribbling the ball in place with a change in the height of the ball bounce. The stance is of the same name, the fingers of the hand performing the lead are directed forward. 3. Leading in place with the right and left hand in the right-handed and left-handed stance. During the lessons, I give students various preparatory exercises with the ball, which develop certain motor qualities, such as speed, agility, and also use various outdoor games "Sniper", etc. Teaching basketball from primary school has a positive result, after all. At this age, a certain base of skills and abilities is laid, and already in the further study of the game, it is easier for students to master tactical and technical elements and techniques. From my own experience, I can say that by carrying out this form of work, we have achieved good results in regional basketball competitions, where we win prizes.
Elementary School Basketball Training Plan | Outline of physical education classes (Grade 4):
Basketball
Planning institute Training
for primary school children
Training (plan)
Time
goal
9000
5
Preparation for work
Interview with players
Interview on healthy lifestyle (healthy lifestyle)
5
Warm
Game "Salki-Jump"
Players are kneaded, receiving a positive charge for further work
- Tell us what the phrase "live a healthy lifestyle" means
- Explain to your students why it is important to play sports and spend time actively.
Warm up
Game "Salki -jumpers"
9000 5 minutes
- Mark the players
- Choose one of the players by the wage
- All players, including the driver, move around the designated area only by jumping on two legs
- After tagging the player with the driver, the coach interrupts the game for a few seconds so that the players can see the new driver, and then the game continues with two chasing players
- The game continues until there is one uncaught player left on the court Important! Jumping tag is a great way to warm up and prepare players for the main part of the session. Make sure that the players move around the court in the way that you have appointed and strictly on command.
Development of basic skills
Mat Care
9000 2 50 minutes
DOSTICTION OF THE 25 seconds)
9000 9000 9,000 with ball in hand
- The player throws the ball up with both hands and catches it at the moment when the ball starts to go down
- The height of the toss depends on the player's confidence in handling the ball
- The exercise can be performed synchronously, on the coach's command or independently
Important! Hand-eye coordination develops, players learn to confidently throw and catch the ball at different heights.
Clapping the ball (1 set of 25 seconds)
- The player is on the court with the ball in his hands free hand
Important! Develops a sense of confidence in handling the ball. The exercise allows you to warm up the hands and fingers, prepare for further work.
Juggling the ball (2 sets of 25 seconds)
- The player is positioned on the court with the ball in his hands - Throwing the ball from hand to hand at face level, then at waist level, on arms bent at the elbows, working with the fingertips
Important! Develops a sense of confidence in handling the ball. The exercise allows you to warm up the hands and develops the sensitivity of the fingers. See to it that the players pass the ball from hand to hand with the "pads" of their fingers and as often as possible.
Spinning the ball around the body (15 spins in each direction)
- The player is on the court with the ball in his hands
- After completing the required number of repetitions, the player begins to perform the exercise in the opposite direction.
Important! Develops a sense of confidence in handling the ball. The exercise allows you to warm up the hands and develops the sensitivity of the fingers. Require players to spin the ball around their torso as quickly as possible without losing control of it.
Spin the ball around the head (15 spins each way)
- The player is on the court with the ball in his hands
- The player holds the ball at face level and begins to transfer it from hand to hand around the head
- After completing the required number of repetitions, the player begins to perform the exercise in the opposite direction.
Important! Develops a sense of confidence in handling the ball. The exercise allows you to warm up the hands and develops the sensitivity of the fingers. Require players to spin the ball around their heads as quickly as possible without losing control of it.
Ball programs
Band of the ball transfer from the chest (3 series of 15 programs)
- players are located on the site in their hands by the opposite the wall
- determine the point on the wall, the point on the wall, they determine the point on the wall, the wall. to be hit with the ball
- Players take a step towards the pass, release the ball from their hands with a whipping movement of the hands, turning them so that the thumbs are pointing down and the index fingers are pointing exactly at the target, arms are fully extended
- After the ball bounces off the wall, the players catch the ball with their hands in front of their chest with open palms
Important! Make sure that the players maintain their balance when passing and catching the ball, straighten their arms when throwing, and point their thumbs down and their index fingers at the target. The ball must spin in the opposite direction when passing.
Throw
Imitation throw technique (2 series of 15 throws)
- Players position on touchline without ball
- From basketball stance (legs bent, elbow of throwing arm down), players imitate throwing motion by pushing up and fully extending throwing arm
- Players control technique after the throw (arm fully extended at the elbow, hand “closed”, index and middle fingers pointed at the ring)
- Hold this position until the coach gives the command “Stop”
Important! The coach must demonstrate the correct throwing technique, and the players repeat after him.
Throws in pairs (2 series up to 8 points)
- Players form in pairs
- Stand in a column opposite the ring, take one ball in a pair, throw
take turns counting the total number of goals scored
- After the throw, the player picks up the ball, passes it to a teammate and stands behind
- The competition continues until one of the teams (pairs) scores the required number of hits.
Important! Players must follow the technique of throwing. Make sure that the players support each other in case of a miss.
Footwork and conditioning
Jump stop (2 platforms)
- Divide the platform into 4-5 parts and cones0003
- Players stand in several columns on the end line
- At the signal of the coach, the first players from each column start moving forward and make a jump stop in front of the cones
- The coach gives the command and the players start moving forward and stop in front of the next cone
- Thus, moving from front to front, the players make 4-5 stops, turn around and wait for their teammates. Next, the exercise is performed in the opposite direction.
- After the exercise is completed by the first line of players, the second line starts to move, and so on.
Important! When stopped, the players must keep their balance in a low stance. Perform the exercise strictly according to the coach's signal.
Team game
10 minutes
Carriage of balls in pairs (1-2 games)
- Players form pairs on the personal line
- Stand side by side and pinch the ball at hip level, arms up
- Without supporting the ball with their hands, the players start moving forward to the center line and back away, being careful not to drop the ball
- If the ball falls, the players pick it up
- For a change, during the second series, players can hold the ball at shoulder level
Important! This fun exercise teaches players how to work as a team, support each other and enjoy the process.


 Repeat.
 They are helping the offensive player learn.
 They must inbound the ball, and dribble and pass it to half court.
 Repeat.
 If the offense gets the ball, they may shoot it again and continue to play.


 Before the ball is dribbled across the half-court line, no other offensive player may be in the front half of the court.
 The new defense cannot defend the ball until it has been picked up by the other team. This gives the defense a chance to set up their full-court defense, on every change of possession.
 Winning at youth level should not be what drives coaching decisions at practice.
  Intermediate players should practice for 90 minutes and advanced players should be in the gym for 120 minutes.
 This is a great chance to teach valuable lessons that align with your coaching philosophy (or developing philosophy!).
 Skill development at the youth level consists of ball handling, passing, shooting and footwork. This part of a youth practice should be physically intensive and focus on creating a game-like atmosphere.
  Man to man defense principles can transfer into any other type of defense so it is of utmost importance that youth players are able to understand it at a young age.
 A coach should be pointing times when a player makes a play that aligns with your philosophy. Since your philosophy translates off the court, you are also teaching valuable life lessons.
 When it comes time to play a game, the moments that separate teams are the small details.
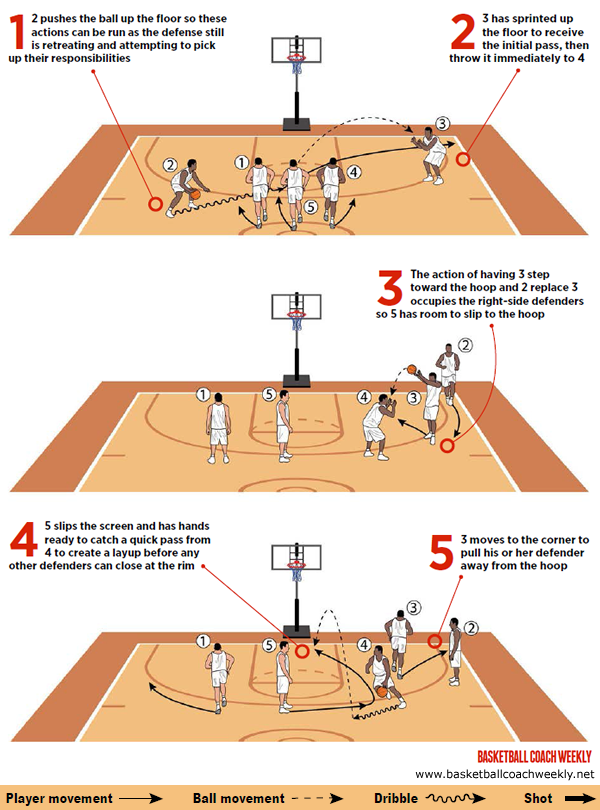 This allows for great coaching and learning opportunities.
 The drill can transition into running while passing and catching. Adding a second ball to the drill will add another level of difficulty to this drill.
 The coach then instructs the offensive player to pass the ball. The defense should then adjust to the new ball position. The focus of the coach needs to be on correct defensive positioning and making sure the players are jumping towards the ball while it is in the air.
 At the youth level, players may try to go as fast as they can and lose focus on using a proper shooting form. Focusing on having players use a proper from will assist them with translating a proper form into a game situation.
 When a player leaves practice they should leave with a sense of accomplishment and belonging.
 The emphasis of hustle and playing hard allowed my teammates and I to understand what was expected of us at all times.
  I like to think of each as a separate finger on the fist. Any one individually is important. But all of them together are unbeatable.”
 And so, working on a complex program, I decided to use one of these alternative programs,
 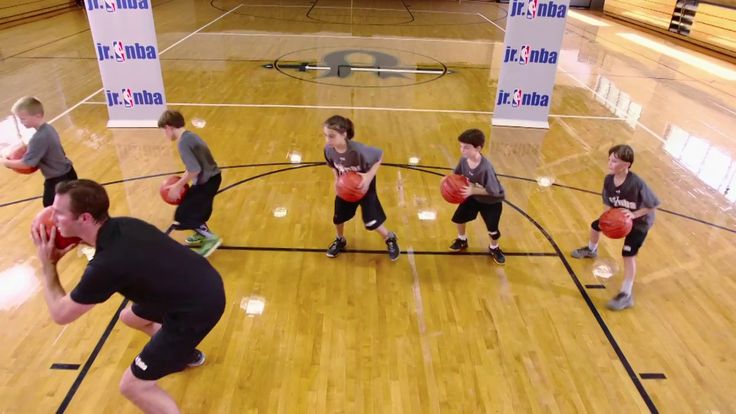 Firstly, basketball has become a traditional sport at school for a number of years. Secondly, I myself used to be engaged in game types and basketball is more familiar to me.
 Immediately after landing on bent legs, run to the opposite sideline. Use the rack in outdoor games "Sparrows and Crows", "Day and Night", etc.
 After that, we perform various exercises for the muscles of the arms and legs.

 25 seconds
 Make sure that the players move around the court in the way that you have appointed and strictly on command.
  The exercise allows you to warm up the hands and fingers, prepare for further work.

 The ball must spin in the opposite direction when passing.