Home » Misc » How to separate basketball goal poles
How to separate basketball goal poles
How To Disassemble A Basketball Hoop [In-Ground & Portable]
We are reader-supported. When you buy through links on our site, we may earn an affiliate commission. Learn more
by Sportszpro
So, you’ve got a basketball hoop in your driveway that you would like to remove or replace? Perhaps you are relocating to another house, or the hoop is simply not in a good spot in your yard. Whatever your reasons are, you probably already know that you have to disassemble the hoop, right?
But is it even possible to take down your basketball hoop? If yes, how do you do it?
Below are the steps on how to disassemble a basketball hoop with simple tools you probably already have in your home.
Table of Contents
Can You Disassemble A Basketball Hoop?
How To Disassemble A Portable Basketball Hoop
Step 1: Spray liquid wrench on the nuts
Step 2: Remove the hardware
Step 3: Disassemble the pole
Step 4: Remove anchoring material
Step 5: Separate the poles
How to Disassemble an In-Ground Basketball Hoop
Step 1: Lookout for buried utilities
Step 2: Remove all the hardware
Step 3: Dig into the bottom of the pole
Final Words
Can You Disassemble A Basketball Hoop?
Yes, you can. However, the task can be quite laborious, especially if your basketball pole is fixed to the ground using concrete. But with the right tools, you can easily disband your basketball hoop.
How To Disassemble A Portable Basketball Hoop
Looking for tips to disassemble your portable basketball hoop?
Whether you have a Lifetime, Spalding, or little tikes’ basketball hoop, below are steps on how to take it apart.
Step 1: Spray liquid wrench on the nuts
If the nuts and bolts holding the hoop in place have some rust, you can spray some liquid wrench on them. Then, leave the liquid to sit overnight.
Step 2: Remove the hardware
Get a ladder and climb up to the top of the basketball pole. Then, remove the screws securing the hoop’s backboard plus rim in place using a screwdriver. Make sure to store the equipment in a secure plastic bag.
Step 3: Disassemble the pole
Next, simply take apart the basketball pole, adjustment mechanism, and the extension arm. Again, put these fixtures in a secure bag.
Step 4: Remove anchoring material
Some basketball hoops require that you fill them with water or a heap of sand to keep them stationary. Simply pour out the anchoring material by carefully tipping over the hoop.
Step 5: Separate the poles
When it comes to disassembling a portable basketball hoop, you use the drop method to separate the poles. You simply drop the pole on a hard surface until it separates into two pieces.
How to Disassemble an In-Ground Basketball Hoop
The process of disassembling portable basketball hoops is simple. But with an in-ground hoop, it’s not. Here is how to go about it.
Step 1: Lookout for buried utilities
First, check for any buried utilities like electric, gas, or internet cable where your basketball hoop is fixed.
Step 2: Remove all the hardware
Start by removing the rim and the backboard from the top portion of your basketball hoop. You simply loosen the nuts and bolts. Next, take apart the extension arm and pole.
Step 3: Dig into the bottom of the pole
Dig on each side of the pole using a shovel and sledgehammer until you reach the bottom of the concrete. Then, try rocking the basketball pole back and forth to loosen it.
Final Words
With a portable basketball hoop, it is pretty easy to disassemble. However, if your basketball hoop is anchored to the ground using concrete, you have to do some digging to remove it. Now, if you find this a lot of work, you can always hire a professional.
Read Related:
How To Install In Ground Basketball Hoop
How To Lower A Basketball Hoop
How To Adjust Lifetime Basketball Hoop
How To Install A Basketball Backboard To A Pole
How to Remove a Basketball Pole in 7 Steps (Guide)
Do you have an old in-ground basketball pole on your court that needs to be replaced or removed? Maybe its an eye-sore, or it’s in a bad spot. Or do you have a great in-ground basketball hoop and you are moving to a new house and want to take the hoop with you?
Either way, if you have an in-ground (mounted in concrete) basketball pole, it may seem like an almost impossible task to remove it, but don’t worry. It is possible with some simple engineering and a little elbow grease, to remove an inground basketball pole.
Unless you own or rent a backhoe or a bulldozer to knock the poll over, this can be a little labor-intensive so if your not up for the challenge and hard work you may want to hire someone to do this for you, but if you have basic DIY skills and don’t mind a little digging, then you can definitely do this job.
Quick Navigation
My Personal Experience
When I was a young kid, we had a great basketball hoop on our driveway that we used all the time. My father got a job transfer and we had to move, but we wanted to take the great hoop with us to our new house. I can still remember my father using a method similar to the one I will describe here to remove that basketball post. We took that basketball pole and installed it in our new house and used it for many years after that.
I have also had some experience in removing old fence posts. The method I will describe below is very similar and can really work for any type of post or pole that is cemented into the ground.
Resources You’ll Need
Below is a list of things you may need to remove the basketball pole:
Phone number of the local utility company (if you have inground utilities).
One or more helpers – the more helpers the better. You will be digging and you will also need lots of hands and strength to bring the pole gently to the ground.
A shovel.
Safety goggles.
Sledgehammer – if you are going to relocate the pole, you will need this to break the old concrete off of the pole.
How to Remove a Basketball Pole: A Step by Step Guide
The following are some general steps on how to remove an in-ground basketball pole. Keep in mind that this is a labor-intensive process and that basketball poles can be extremely heavy. Please use caution and make sure that the area surrounding the pole is clear. Use your helpers to try and gently bring the pole down.
While there are many ways to remove a pole set in concrete, the following method, in my opinion, is the one that requires the least amount of tools and resources. While it may take a little longer, you will not need tools like a jackhammer, bulldozer or other heavy equipment.
One last note before we start. If you would like you can remove the backboard and rim before you start. This will lighten the pole and make it easier to lower down once it is loosened and possibly prevent damage to the backboard and rim. Keep in mind that if you do remove the backboard you will need helpers to unfasten it and lower it down to the ground.
Step 1: Check for buried utilities.
If you have any buried utilities in your area such as gas, phone, electric, internet or cable, it is very important to ensure that you do not hit any of them when digging. Most cities provide free service to check for buried utilities before you dig. If you have any doubt call your local utility companies and ask them if they can mark all the buried services near your work area before you start digging.
Step 2: Clear the area.
Ensure that the area around the basketball pole is clear. Make sure people are out of the way and move any vehicles or other things that can be damaged.
Step 3: Begin digging.
Begin digging on each side of the pole next to the playing surface. See the diagram below.
Where to dig around the basketball pole. Photo by Melissa Medina
Step 4: Dig to the bottom of the pole.
Continue digging the holes until you reach the bottom of the pole and concrete. It will probably be at least 2 to 2.5 feet below the surface.
Step 5: Rock the pole back and forth.
Once the holes are dug. Get your helpers and begin pushing the pole back and forth in the direction of the holes that you have dug to try to loosen it. Be careful, because once it loosens, it is possible that it will fall to one side or the other.
Step 6: Walk the pole down to the ground.
Once it is loose enough to fall over, you and your helpers can slowly walk the pole down to the ground.
Step 7: (Optional) Remove the concrete.
If you are going to relocate the pole, take your sledgehammer and hammer the concrete on the bottom of the pole to crack and remove it from the pole. Be sure to wear your safety goggles for this part as there will be lots of debris flying around.
Additional Resources
There is a method in which you can use a truck and a tow rope to pull the pole down. This video shows how that can be done. This method may be faster but keep in mind that this method can be dangerous and you could risk damage to your truck if the pole falls on it.
If you are not going to reuse the pole, another option that can make the job a little easier is to use a reciprocating saw with a metal cutting blade and cut the pole off four or five feet from the ground. This requires some intense metal cutting and the use of a power tool, so this method may not be for everyone.
If you do choose to cut the pole first, please take all safety precautions. Make sure that you know how to use the tool and that you wear proper safety equipment at all times. Remember when you cut the pole it is going to fall like a tree, so make sure the area is clear and that it won’t hit anyone or anything.
Final Words
Removing a basketball pole can be difficult, but it is something that can be done with a little hard work and some help from friends and family. Remember to use caution, ensure the space is clear and make sure you use helpers, this is not a one-person job. Once you have that basketball pole removed you can relocate it or put in a brand new top of the line hoop if you want.
Have you ever removed a pole or post set in concrete? Do you have any other tips or advice? We’d love to hear from you, so please leave your comments if you would like.
High standards for high sport
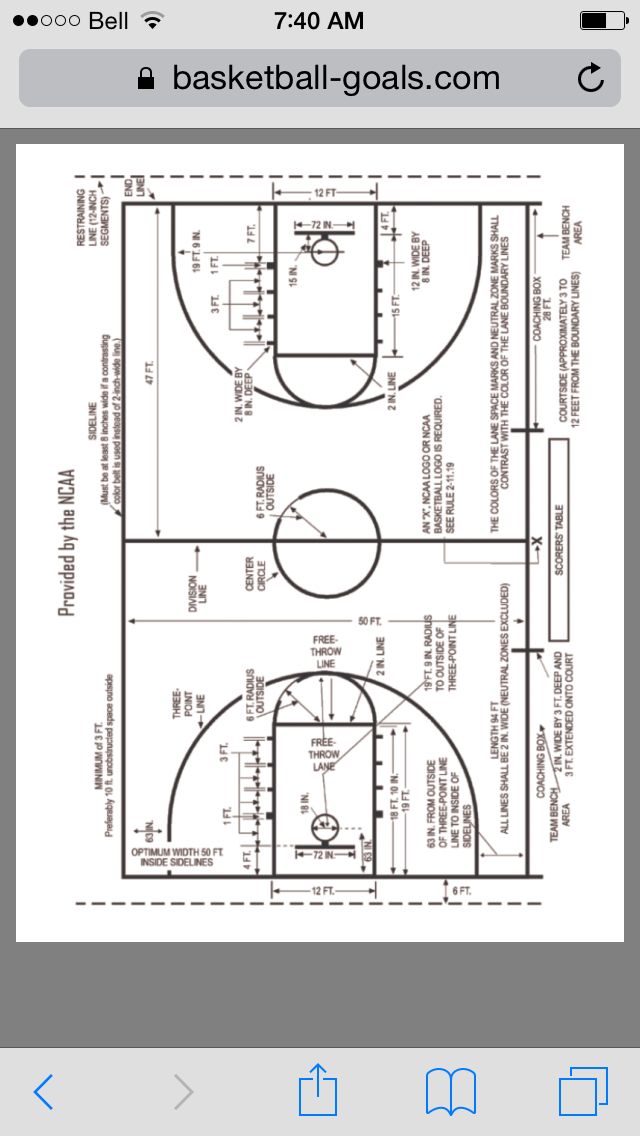
Basketball is equally exciting at professional and amateur levels. However, if at home or in the yard you can hang a ring made with your own hands from improvised materials, then official games and training use equipment made in accordance with strict standards.
Fig. 1. Emblems of the NBA and FIBA
Regulations are drawn up by the two main sports organizations: FIBA and NBA. The standards of the first are used in international competitions, including world championships. FIBA recommendations are taken into account in the production of backboards, baskets, nets, marking on the sites.
FIBA recommends
The main attribute of the game is a basketball hoop with a backboard. This is a construction of a support with upholstery, a rectangular canvas - a shield, a metal rim and a mesh. Durable materials are used for production:
hard wood;
shatterproof tempered glass.
Standard size - 1.8 x 1.05 m. Fluctuations in length no more than 3 cm, in height - a maximum of 2. The lower part of the shield should be at a height of 2.9m above the floor.
Fig. 2. Backboard Standards
The basketball hoop is made from steel. Rim thickness - 16–20 mm. Design color is orange. The inner diameter is 45–45.9 cm. The mesh is attached to the ring in 12 places. Sharp edges, cracks, chips, dents, other irregularities that can injure the player are not allowed.
The fastening of the ring to the shield must be such that the pressure on the hoop is not transmitted to the protective shield. There should be no contact between the ring and the shield. The upper edge of the ring is placed parallel to the floor at a height of 3.05 m. The discrepancy is only 6 mm.
Basketball net is made from durable white cord. In length, it should be 40-45 cm. The upper part is usually more rigid than the lower one. This is necessary so that the net does not overlap on the ring, does not get confused, allowing the ball to fall freely down.
NBA recommendations differ
The National Basketball Association is slightly conflicting regarding standards and centimeters. The differences are as follows:
from the floor to the lower edge of the shield - 2.75 m;
from the lower edge of the shield to the ring - 0.31 m.
Board markings
The markings are available in black and white. However, the color is not chosen at the whim of the organizers of the competition. White is used when the shield is glass. Black - if the surface is painted in a light tone. Line width - 50 mm. The size of the inner rectangle is 59 x 45 cm. Deviations in length are allowed no more than 20 mm, in height - 8. There is a ring at the base of the rectangle. The height from the lower edge of the shield to the ring is 148–150 mm.
Examples of standard boards
Fig. 3. Basketball backboard
SportStandard presents basketball backboards with and without hoops, made of Plexiglas and painted wood. Designs comply with FIBA and NBA standards, can be used for games and training. For sports competitions, the shield art is optimal. 091800 size 1800 x 1050 mm. For training, a smaller design, for example, art. 091700.
Sports equipment, including nets for basketball goals, is easy to order with delivery in Samara and any cities of Russia. Just call SportStandard and place an order!
Similar articles
Basketball hoop: history and modernity
Choosing a good backboard for a backyard basketball court
Purpose and selection of basketball nets
Nylon cord or metal chain - which is better for a basketball hoop net?
All for basketball court equipment
Water polo equipment
All articles
Basketball court equipment | Musecube
Basketball is one of the most popular sports among adults and children. The team game takes place on a special site equipped with the necessary equipment. The main elements are the basketball net, the backboard and the hoop. The basket is usually equipped with a net, but it tends to tear, so on the playgrounds they sometimes get by with only a ring installed on the shield.
Basketball stand
Depending on where the court is equipped and for whom it is intended, one or another of its types is selected. All models can be divided into two types:
Amateur.
Professional.
Amateur basketball stands, in turn, are divided into children's and adults'. To interest a child in this sport, you need a bright and colorful stand. It must be adjustable in height so that it is possible for children to get into the basketball hoop.
Adult models can be height adjustable. Their maximum height must comply with NBA standards. Racks for the street are usually made from a profile pipe and concreted into the ground. Such models have a low cost and therefore they can often be found.
Professional Racks
Professional players need equipment made to NBA standards. Such racks can be both stationary and mobile.
Stationary are usually made without shield and basket, so they can be selected separately. Removal is usually up to 2 meters.
Collapsible racks consist of several elements that are bolted together. Such structures are easy to transport, store and, if necessary, reassemble. They are used both outdoors and indoors. The collapsible design allows you to save space in the gym and use the room for other sports. Models made of lightweight material simplify the process of mounting and moving racks.
Mobile Basketball Stand
Can be used for practice or competition. In terms of its reliability, it is not inferior to the stationary model. At the base, the structure has a lot of weight, so it will not tip over during the game.
Racks must meet the following requirements:
High strength and reliability.
No protrusions that could injure players.
Outdoor models must be coated with an anti-corrosion compound.
Professional models must meet NBA requirements.
Ring
Basketball ring securely fastens. It is made in the form of a durable steel circle covered with mesh. The hole diameter of the circle is 47-45.7 centimeters according to the standards. The thickness of the rim is 1.6-2 cm. The ring itself is usually painted in a bright color, often orange.
The bottom surface has elements for mounting the mesh. Since professional basketball players often reach for the basket, wanting to put the ball straight into the basket, the bindings need to be secure so as not to injure the players. Fasteners must not have gaps or sharp edges.
The ring is attached to the shield at some distance. This allows you to differentiate the load exerted on these two elements.
Models are available as conventional fixed and shock-absorbing models. The latter have the ability to deviate a short distance and then return to their place. This happens when a player hangs on the ring while making a throw. The hoop must withstand sufficient static load.
Basketball backboard
Basketball backboard is available in a rectangular shape and is mounted on a post or wall. The International Federation determined its dimensions - 1.80 m * 1.05 m. If the site is equipped indoors, from the floor to the bottom line should be exactly 2.90 m. The same dimensions are valid for outdoor areas.
The game requires two backboards, on both sides of the court. Their surface must be resistant to multiple ball impacts and cannot reflect light. For the manufacture of a basketball backboard, tempered glass or wood is used.
The shield has a color frame around the edges. The inner rectangle is also marked. Its dimensions: 61*45.7 cm.
Net
It is designed so that after hitting, the ball is briefly delayed when passing through the basket.


 Again, put these fixtures in a secure bag.
 You simply loosen the nuts and bolts. Next, take apart the extension arm and pole.
 Or do you have a great in-ground basketball hoop and you are moving to a new house and want to take the hoop with you?
 We took that basketball pole and installed it in our new house and used it for many years after that.
 Please use caution and make sure that the area surrounding the pole is clear. Use your helpers to try and gently bring the pole down.
 Most cities provide free service to check for buried utilities before you dig. If you have any doubt call your local utility companies and ask them if they can mark all the buried services near your work area before you start digging.
 Be careful, because once it loosens, it is possible that it will fall to one side or the other.
 This requires some intense metal cutting and the use of a power tool, so this method may not be for everyone.
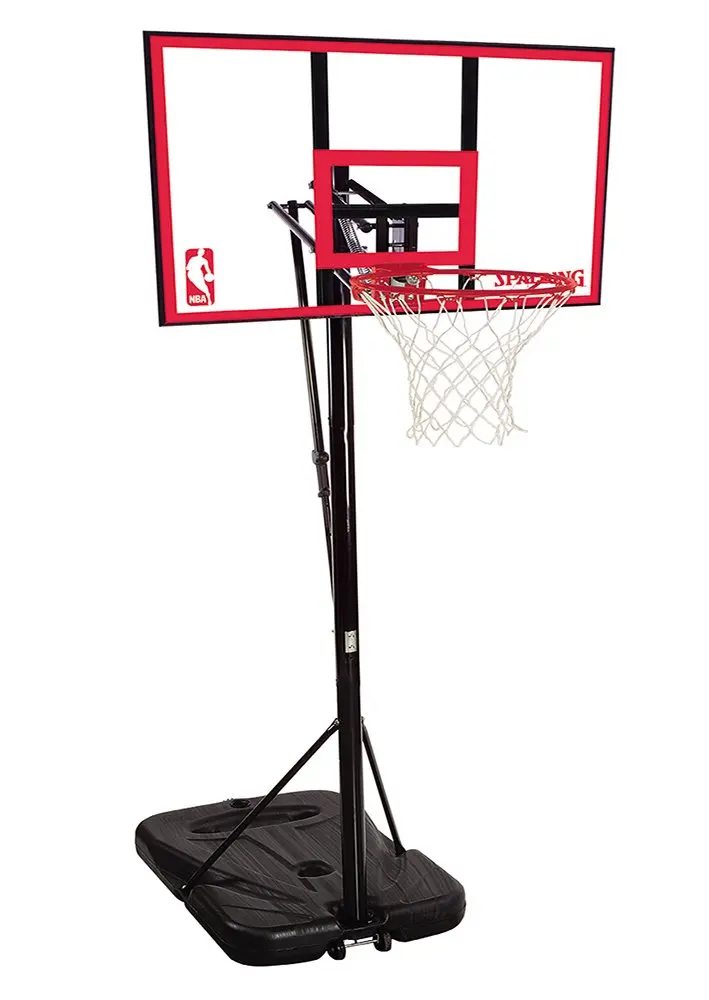

 This is necessary so that the net does not overlap on the ring, does not get confused, allowing the ball to fall freely down.
  3. Basketball backboard
  The team game takes place on a special site equipped with the necessary equipment. The main elements are the basketball net, the backboard and the hoop. The basket is usually equipped with a net, but it tends to tear, so on the playgrounds they sometimes get by with only a ring installed on the shield.
  Such models have a low cost and therefore they can often be found.
 The latter have the ability to deviate a short distance and then return to their place. This happens when a player hangs on the ring while making a throw. The hoop must withstand sufficient static load.