Home » Misc » How to set a basketball pole in concrete
How to set a basketball pole in concrete
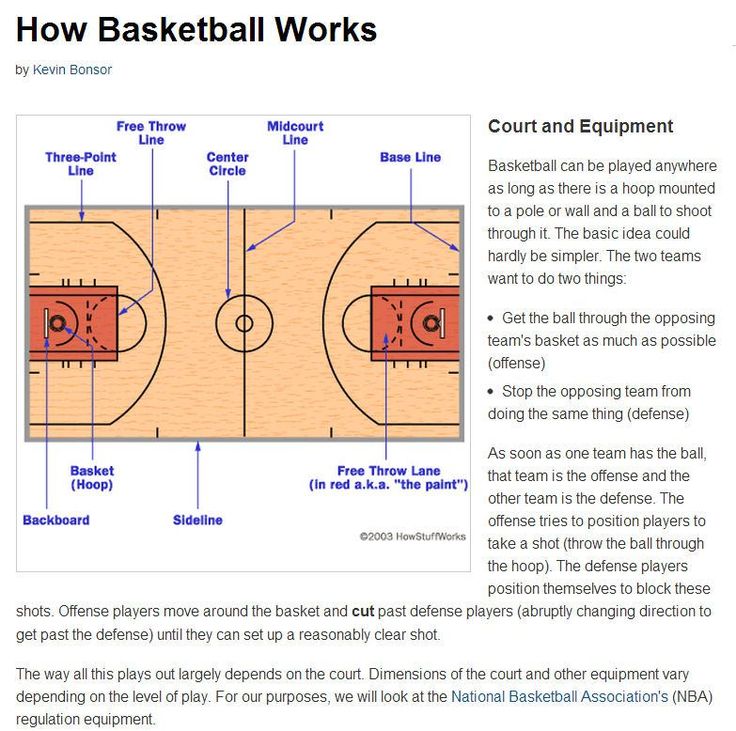
How To Install an In-Ground Basketball Hoop
How To Install an In-Ground Basketball Hoop
Factors to Consider When Buying a Basketball Hoop
How to Install a Basketball Hoop In-Ground
Why Should You Have a Professional Install Your Basketball Hoop?
Choose Superior Play Systems® for Your Basketball Hoop Installation
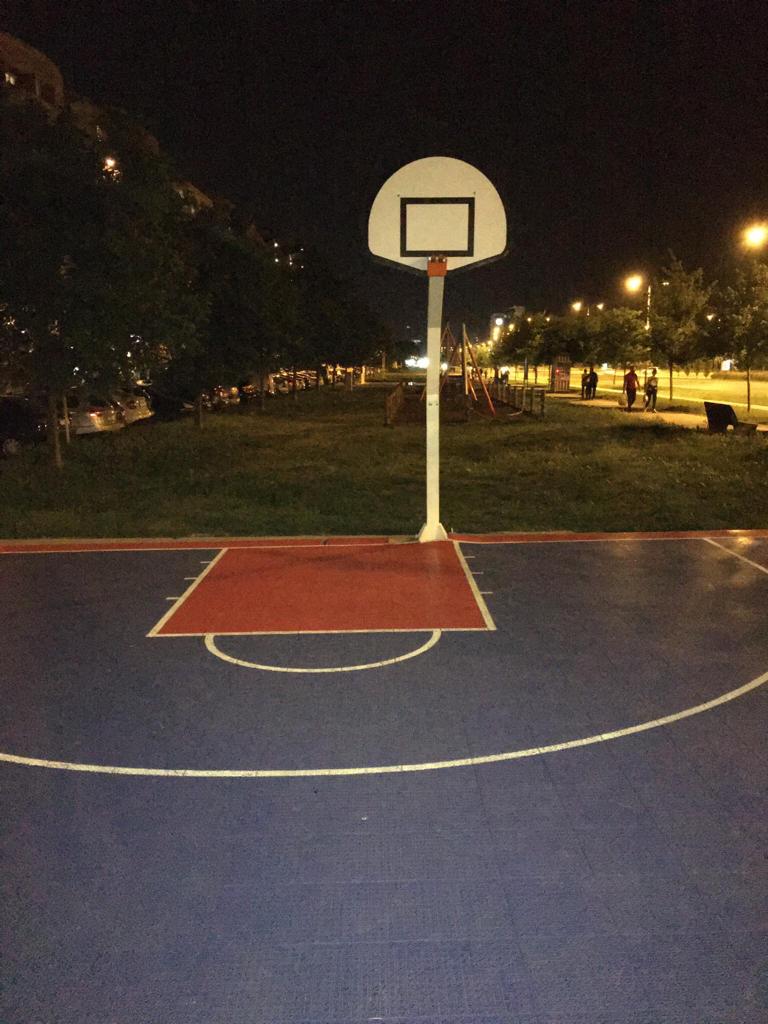
If you and your family love basketball, you may be dreaming of having your own hoop right in your yard. There are several different types of basketball hoops available, but an in-ground system offers the most stability and professional-level play. Here’s everything you need to know when shopping around for a basketball hoop, how to install a basketball hoop, and why you should consider professional installation.
Factors to Consider When Buying a Basketball Hoop
When you’re looking to buy a basketball hoop for your home, there are many things to consider, including where you’ll install your basketball hoop and what type you’ll need. A basketball hoop can be a big purchase and a big decision for your property, so you’ll want to make sure you get the best kind for your family and install it in the best location. Here are some of the most important things to think about before you buy your basketball hoop:
1. Choosing a Seller
An in-ground basketball hoop is a large purchase, so you’ll want to make sure you choose the right seller. The best sellers are those that offer post-purchase support such as installation and customer care. Superior Play Systems® is the safest and most trusted name in play and offers high-quality in-ground systems from PROformance Hoops®. When you purchase your basketball hoop from us, we’ll work with you to provide a seamless installation process that gets your family on the court in no time.
2. Location
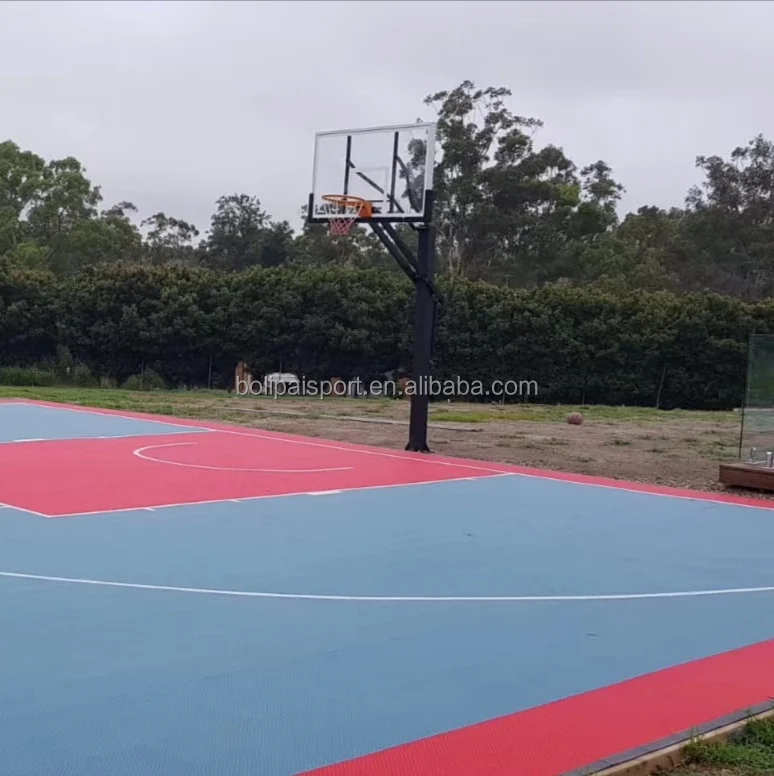
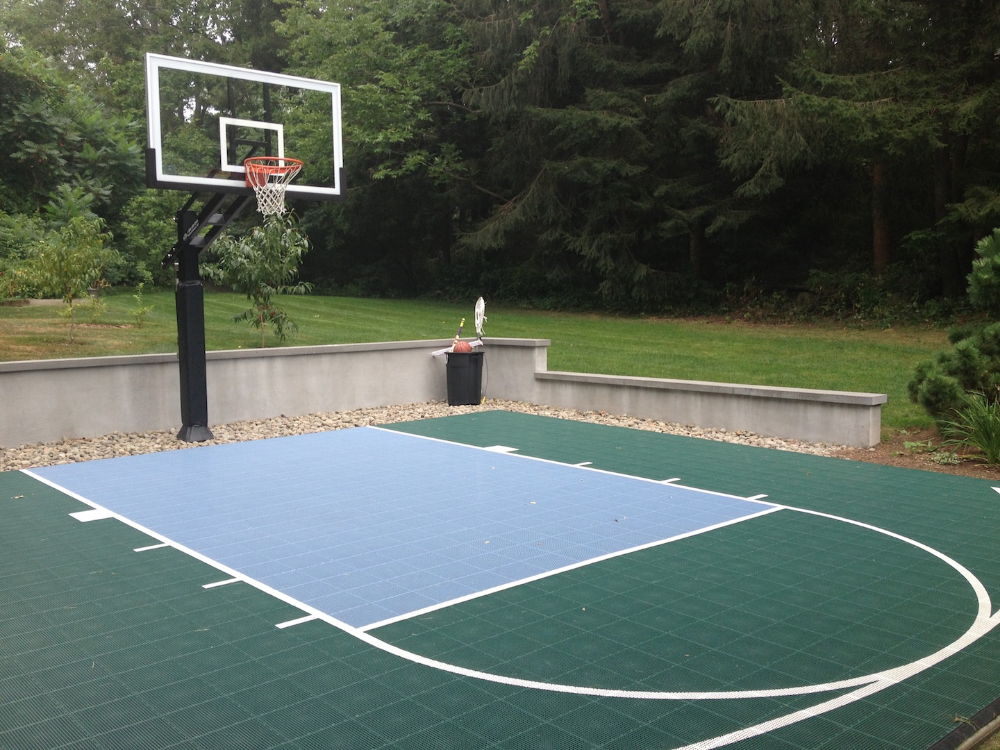
One of the most important factors to consider is selecting the location for your new basketball hoop. The most popular choice for a basketball hoop placement is in a driveway, but you should make sure that you have a level driveway, as it’s much harder to play when the driveway is on an incline. If you have a larger backyard and enough room in the budget, you may want to consider a dedicated area or even a full-size basketball court. Just be sure that you have a patio or paved area — a basketball just doesn’t bounce in the grass. The hoop should not be hanging over the street to keep players safe. It’s also a good idea to check for any local and neighborhood ordinances or homeowner’s association rules for any restrictions on basketball hoop installation or placement.
3. Backboard Size
The size of the backboard on a basketball hoop can affect the shot opportunities into the hoop, and generally bigger is better here. However, you’ll want to think about the size of your driveway or the place where you are installing the hoop. In a small driveway, a too-large backboard can overwhelm the space, or look out of place. Consider also the level of professionalism you want — if you have a child with aspirations for professional basketball, a 72-inch backboard is regulation size, and would give the best practice for real basketball courts. However, a larger backboard is more expensive and may not be necessary if the hoop’s main purpose is for family recreation.
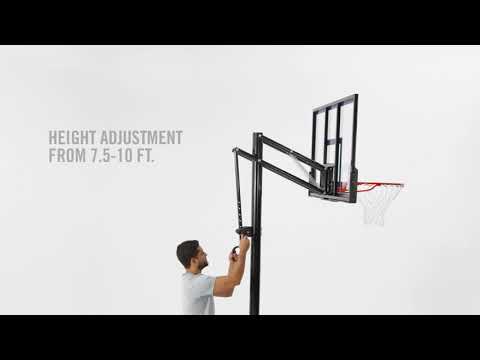
4. Height
You’ll want to think about the height of the basketball hoop before you install, making sure that it fits in with your location of choice. Professional regulation height is 10 feet for a basketball hoop, but just as with backboard size, you may want to go with an adjustable hoop or a shorter hoop if its just for fun. You can also check out hoops with adjustable height so it can grow along with your kids. Also consider the size of the overhang — the distance between the pole and the backboard, making sure to have about 2.5 to 4 feet of overhang available.
5. Type of Pole
Selecting a pole for your basketball hoop may seem simple, but there are actually many choices available. Poles come in both round and square shapes, in sizes between 4 and 6 inches, and either as a single piece or a multi-piece system. Poles are generally made of metal and are either painted or have a powder coating.
6. Net and Rim
Standard basketball setups have an 18-inch diameter rim, with hooks to attach the net. There are two main types of rims available for home basketball hoops — static and breakaway. A static rim stays in place without moving, and is a great option for beginners or as a more economical choice, but should not be used for dunking. If you anticipate some slam dunks on your home setup, a breakaway rim is the best choice. These rims include special springs that flex and absorb the force of the dunk. This protects the safety of the player, as well as the longevity of your basketball setup.
Once you’ve considered all of the options available for your basketball hoop, you can decide what is best for your family and your location. Next, it’s time to purchase the basketball hoop setup and install it in your yard.
View PROformance Hoops® Installation Guides & Owner’s Manuals Here
How to Install a Basketball Hoop In-Ground
You’ve done your research and found the right basketball hoop for your family — now it’s time for the exciting part! Installing your basketball hoop can be a lot of work, but here, we will lay out all of the steps involved. You’ll have your own basketball hoop up in no time and ready for the whole family to shoot some hoops! Consider this your step-by-step basketball hoop installation guide:
Step 1: Choose Your Location and Call Before You Dig
As mentioned in the section on things to consider, one of the most important steps in the basketball hoop installation process is choosing the right location. You may have already picked the location where you want your basketball hoop, but since you’ll need to dig a hole, it is a must that you Call Before You Dig (dial 811) to check for any utility lines. Ask your Superior Play System for more info.
Be sure that you’ve checked with any neighborhood ordinances or homeowner’s association rules on the placement of your in-ground basketball hoop on your property. You should also read all the instructions and check for any manufacturer recommendations for your particular model before you start digging.
Step 2: Dig a Hole
You’ll need to dig a hole where the pole for the basketball hoop will be located. Check with your manufacturer and your specific model for recommendations on how to dig the hole, and how big it should be. You can dig by hand with a shovel, or use an auger or other digging equipment. See owners manual for specific instructions.
Step 3: Pour the Concrete
Once you’ve dug the hole, you’ll secure the basketball hoop pole in the ground with poured concrete. Some models simply have a single pole that you pour the concrete around. If this is the case, have someone — or two people — hold the pole level while another pours the concrete around it. More commonly, there is a rebar-mounted anchor that you’ll set into the concrete after it’s been poured. Either way, as you’re pouring the concrete, make sure to regularly agitate it with a shovel to remove any pockets of air.
To finish off, smooth out the top of the concrete with a trowel, and make sure everything is level. Clean off any excess with a damp towel or sponge. Now, you’ll have to leave the cement to dry for at least 24 to 48 hours. For the first few hours, keep checking the cement to make sure that the pole hasn’t shifted and isn’t leaning. Correct the pole if necessary and keep re-checking until the cement has hardened. Wait on the rest of the assembly until the cement has dried and hardened completely.
Step 4: Raise the Pole
If your basketball hoop setup is simply a pole in the cement, you can skip ahead to the backboard. But if your setup includes a mounting anchor, it’s time to assemble and raise the pole. Each model is a little different, so be sure to follow the directions for your specific unit. If you have an adjustable-height type of basketball hoop, you’ll assemble the lift mechanism and support arms according to the directions.
The post will likely be very heavy and may require a few people to lift it into place. Take any necessary safety precautions, and have your team lift up the pole so that it matches up with the anchor piece in the cement. Make sure that the post is level, and use the bolts to secure it into place. Leveling nuts should also be a part of the setup — adjust these as necessary to make the pole completely level.
Step 5: Attach the Backboard
In some basketball hoop setups, the backboard is attached before the pole is raised, but with many upscale models, you’ll attach it after the pole is secured. Note that the backboard is also generally very heavy, and it may take several people working together to lift it up and get it installed. Make sure you have a few extra helpers around and take precautions for safe lifting.
Have several of your helpers lift the backboard up in place to the support arms, while another person secures it to the support mount. Each model is different, but there may be other support arms or cross braces to attach at this point. Follow the directions to get all of the right parts securely in place.
Step 6: Install the Rim and Net
When the backboard is fully attached, it’s time to add the basketball rim and net. The rim will simply get bolted to the backboard in place. If you’ve opted for a breakaway rim, there may be some extra assembly required. With the rim attached, you can then loop the net around each of the hooks on the rim to have your net fully installed.
Step 7: Finishing Touches
By this point, your basketball hoop is almost ready to play! There are just a few extra steps to fully finish and customize your setup, some of which are optional. Some upscale models have extra padding that you can attach around the corners of the backboard, and around the pole. These are generally optional touches, but can ultimately protect the safety of any players, preventing bumps and bruises, or other injuries when accidentally bumping into the basketball hoop.
If you have an adjustable-height basketball hoop, you can now adjust to the desired height for your family. It may be necessary first to place it at the regulation 10 feet so that you can mark the height on the pole or use provided height stickers. Measure the height of the rim to check for accuracy. Now it’s ready to adjust to whatever height you want to use — with the height stickers, it’s easy to see at a glance where to adjust the mechanism.
If you have any additional accessories, such as court lighting, now is the time to install these. Follow the manufacturer’s instructions for any accessories to get them installed properly. Depending on the size of the area where you install your hoop, you may want to paint court lines on the pavement. This is totally optional, but if you choose to paint lines, pressure wash the area first to ensure you have a clean surface for the paint to adhere to. Measure out where the lines need to be and mark off with painter’s tape. Paint in your lines and remove the tape. Now you’re truly ready with your very own basketball court! Gather up the family and get ready to play!
Why Should You Have a Professional Install Your Basketball Hoop?
If following these basketball hoop installation tips and steps has your head spinning, you’re not alone. Even in today’s DIY culture, installing a basketball hoop yourself can be a bit involved. If you decide that installing the system yourself is just a little too much, why not let the professionals handle it? With professional installation, you’ll save yourself a lot of time and hassle.
Consider the amount of time necessary to complete the installation process yourself. Even if you follow every direction exactly, the process still involves at least two days of work. And any delays in the process or simple mistakes can drag it out even longer. Even the research and preparation work can take more time than expected.
Installing an in-ground basketball hoop can also take a lot of tools and specialized equipment. Digging a hole large enough for the basketball hoop post is not easy to do by hand, and if you don’t have an auger or backhoe, you may need to rent equipment to complete the task. This can add time and expense to the project. Consider also the fact that you will need extra adults around to help. Raising the heavy pole and lifting up the backboard require at least three to five adults, so you’ll need to convince family, friends or neighbors to help out, possibly spending money on food and drinks to feed and thank your crew.
Attempting a project of this scale can lead to a lot of aggravation, especially if you lack the proper tools or underestimate the amount of time and effort necessary to complete the project. Even when everything goes right, the amount of time and effort required for a project of this scale can simply be frustrating.
Having a basketball hoop in your yard should be about fun, not frustration. And having a professional install your hoop means you can get to the fun part much faster. When you buy your basketball hoop from Superior Play Systems®, you get some of the best equipment on the market as well as white-glove installation services. The experience and expertise of the professionals mean they can get the job done faster and easier than you could on your own, and you know it will be done correctly the first time.
Choose Superior Play Systems® for Your Basketball Hoop Installation
If you’re shopping around for a basketball hoop for your family, come to Superior Play Systems® and experience the best in expertise and customer service. Our experts can help you every step of the way, from selecting the right equipment for your needs to scheduling professional white-glove installation services. To get started, contact Superior Play Systems® today — we can answer any of your questions and help you find the right basketball hoop for your family. Shop our equipment online or use our search tool to find the closest showroom where you live. Come experience our top-quality equipment and superior customer service in person!
How To Install Your Own Inground Basketball Hoop
Home > Guide to Hoops / Goals > How To Install Your Own Inground Basketball Hoop
If you love basketball and want to practice your shots any time of the day, purchasing your own basketball hoop is the best option.
There are a number of different basketball hoops available, but in-ground hoops are a better option because they provide you with stability and professional-level experience.
There is a lot to consider when purchasing a basketball hoop e.g. choosing the right seller, the perfect location, the ideal backboard size and the type of pole etc.
If you are having trouble knowing what suits you best, check out our Home Hoops Guide.
Know what you want, but don't know where to find it? Check out some high-quality stuff here.
This article is a step-by-step guide on in-ground basketball hoop installation.
Before You Begin with The First step, Keep A Few Things In Mind
Find a suitable ground where you can fit your basketball hoop. The area must ideally be flat and paved e.g. driveways. The ideal scenario should be to have enough space to accommodate your hoop and the number of players.
Overhang is the distance between the pole and the backboard, and affects how much room you have to land after you shoot layups. For good balance and safety, 2 feet to 4 feet of overhang is ideal. Anything greater than that could cause shaking because the weight of the backboard would
be suspended too far.
Take into consideration the position of the sun when installing your basketball hoop. Face the hoop towards the north, so the sun does not get in your eyes.
Make sure the goal is at least 20 ft. (7m) from any overhead power lines, and no overhead power lines are within a 20 ft. (7m) radius of the goal.
Make sure you have enough room to shoot 3pt shots at tops, wings and corners. If you want to have a regulation three point line as well as some room behind it, 28 - 30 ft from the pole is what you need. For a full three-point arch, you need around 40 ft of width.
Before you dig a hole, you must contact Call Before You Dig (dial 811) to check for any underground power, gas, telephone, water and other utility lines.
Digging the perfect hole for your basketball hoop is vital.
The most important thing to keep in mind is that the hole is deep enough, and of the right size, so the metal bars that form the anchor fit perfectly. This will provide stability to your basketball hoop.
You can dig by hand with a shovel, or use an auger or other digging equipment.
The hole should be 48" to 50" (1.2 m - 1.3 m) deep and 16-18" (0.4 m - 0.5 m). Follow the instructions manual to check the exact measurements required for the hole.
Remember, a strong foundation is your key to success!
2. Pour The Concrete
Now that you have dug the hole, the next step is to pour the concrete.
Installing an in-ground hoop would require 10-14 60lb bags of concrete, but it is recommended that you buy an extra bag or two just in case you need them.
Mixing the concrete can be a tricky procedure. You need to make sure that the right amount of dry concrete and water is used. If the mixture is too thin, it will lack the strength required to hold the pole, and if it is too thick, you will struggle to fill voids.
For a 60lb concrete bag, 1.9 liters of water is PERFECT!
To prepare the concrete mix, pour dry concrete in a container and create a depression at the center of the dry mix. Add water, and mix thoroughly until it's firm enough. Do not allow the mix to sit for a long period of time or it might dry out.
Fill half of the hole with concrete, and insert steel bars inside. Make sure the bars are properly aligned. Once the bars are aligned, fill the hole with concrete and level it using a trowel tool. Make sure the surface is smooth and there are no pockets of air.
When the above is done, place the assembled anchor in concrete, and push it down the concrete solution. It must be fixed deep enough so it provides stability to the basketball hoop.
It is important to make sure the assembled anchor is completely level!
Give the concrete at least 72 hours to cure, in case the weather is warm. For cooler surroundings, wait an extra day or two.
3. Fix The Main Pole
In-ground basketball hoops come with one-piece, two-piece and three-piece poles. A one-piece pole is highly recommended because it minimizes vibration and shake. It is also rust and corrosion resistant.
A 4"-6" diameter pole provides excellent performance and stability. Shape-wise, square poles are preferred over round ones because they are more rigid.
A 7-gauge thickness on the pole is preferred over 11-gauge because the former is the STRONGER choice. A thicker pole provides you with a better playing experience. It is stronger, causes less shake, and provides greater durability and professional experience.
Fixing a pole depends on the type of anchor being used.
There are two types of anchors used in in-ground basketball hoops: the threaded j-bolt and the hinge anchor system.
The latter is easier to install.
With a j-bolt anchor system, you will have to lift the pole above the anchor, position it rightly, and then bolt it down to the j-bolt anchor. This process will require greater physical effort as you will have to go up and down a ladder to attach the backboard,
extension arms and the hoop.
The hinge ground anchor system, on the other hand, is simpler to install, and does not require much physical effort. You can assemble the pole, extension arms and the backboard on ground, and then align the pole using the hinge mechanism. The pole is then placed
in an upright position, and secured with a bolt.
A huge advantage of the hinge ground anchor system is that it can be easily moved from one place to another. When you move, you can take the fully-assembled pole with you and relocate it without much hassle.
Do not forget to follow the instructions manual.
4. Install The Backboard
There are three main types of backboards: acrylic, tempered glass, and polycarbonate. For a professional experience, tempered glass is the BEST CHOICE!
Out of the three, the tempered glass provides the best bounce and spin. It is also shatter proof, and therefore safe.
Acrylic backboard is suitable to use in public places. However, it does not provide the same bounce and spin as the tempered glass backboard.
In some basketball hoop setups, the backboard is already attached to the pole, but for hoops with a separate backboard, there are a few things that one must keep in mind before installation.
Since the backboards are heavy, it is advised to use additional manpower to lift and install the backboards, while taking safety precautions. Lift the backboard up in place to the support arms, and secure it to the top mount.
5. Install The Rim And Net
Choosing the best rim for your hoop is another important step. This piece of the system absorbs the greatest physical impact, and therefore, must be durable.
A breakaway rim is recommended. It consists of a hinge and spring at the point where it attaches to the backboard, and can bend downward when a player dunks. It is DURABLE.
Once you have chosen the perfect rim, installing it would not be much of a problem.
All you have to do is fix it with screws to the backboard. Then loop the net around each of the hooks on the rim to have your net fully installed, and you are all ready to SHOOT!
Hire A Professional To Do The Job
If you have prior experience in installing a basketball hoop, or doing similar work, you might consider installing the hoop yourself.
However, hiring a professional to do the job can save you from damages, injuries and unpleasant situations since installing a basketball hoop requires a number of tools, and expertise.
Consider this: if you are going to install it yourself, you will have to buy or rent the tools, request for additional manpower, and the overall process will likely be slower than when done by a professional.
Knowing that you have spent quite a lot of money on purchasing the setup, you would not want to risk damages to save a few dollars.
Need Help?
Contact us if you have any questions, need help with installation or need any help choosing a basketball hoop. Our experts are here to help.
What do you think? Let us know by leaving your comments, suggestions, and questions...
How to equip a basketball court in the country or in the yard
Basketball develops the child's physical abilities - coordination, endurance, develops strong-willed qualities, concentration, attentiveness and teaches non-standard thinking. Professionals recommend sending a child to the basketball section from the age of 8-9, but outside the city or in the yard, you can “chase the ball” from an early age.
I myself equipped a basketball court in my country house and now I am ready to share the secrets of its arrangement. I'll tell you what you need to do, how to choose the right equipment and how to care for it.
Prepare basketball court surface
To create a basketball court in accordance with all the rules, you need to select a flat horizontal surface for it and fill it with concrete. After that, I recommend applying a special rubber coating, like on playgrounds in the yard. There is a more expensive coating option - from rubber.
The coating will provide cushioning - the ball will bounce well.
If it is not possible to organize a special platform, you can simply place a rack or hanging basket on a dirt surface. In this case, the ball bounce will not be so strong. An important requirement for safety: the surface must be flat, without holes and bumps.
The dimensions of the site depend on the features of your yard or plot in the country. A full-fledged basketball court has dimensions of 28 × 15 meters. However, not everyone has the opportunity to build such a site in the country.
It is necessary to take into account the technical features of the game. The three-point line in basketball is 6.75 meters from the hoop. Therefore, it is necessary that the size of the site be at least 10 × 13 meters. If you are not going to train three-point shots, a 5 × 5 meter court will do.
Mark out
The second step is to mark up. It is important to use paints of contrasting colors. It is better to buy paints with a high content of rubber or polymer.
If you are equipping a basketball court for children, make the markings bright so that they cheer you up and attract attention. For the game of teenagers and adults, it is better to immediately apply technically correct markings.
Place a small fence or protective net on the site. Thanks to them, you do not have to constantly run after the ball to the other end of the site.
Buy stand or backboard
It is difficult to answer the question of what is better - a basketball stand or a backboard. It all depends on taste, tasks and opportunities. Each of these types of equipment has its pros and cons.
There are two types of racks: mobile and static. The static one is mounted in the ground.
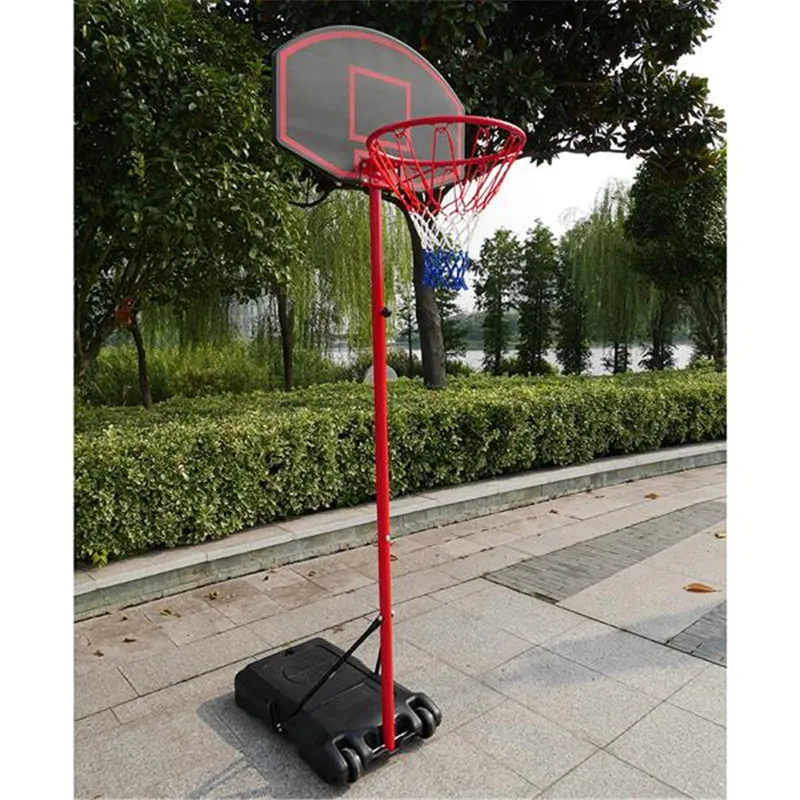
The base of the mobile rack is filled with sand or water - for stability. The main advantage of a mobile rack is that it can be moved from place to place. This is convenient when there is no dedicated basketball court or if you are going to play other games in this area, such as tennis or football.
The main requirement for racks is their stability. It will be much more comfortable and safer to play if you are sure that the stance will withstand a blow of any force.
Pay attention to the materials from which the racks are made. A static rack will be outdoors throughout the year, which means it must be made of reliable materials. It is better to buy racks from well-known manufacturers. So, the American companies Spalding or Royal Fitness guarantee high quality, durability and safety.
Basketball backboards can be made in the country with your own hands from a board, chipboard or plywood remnants. If this option does not suit you, you can purchase semi-professional or professional options in stores.
There are four types of materials from which the shield surface is made: composite, polycarbonate, acrylic and tempered glass. The first one is the cheapest. It is intended for entry-level players. Now manufacturers offer a large selection of colors. A carbonate backboard will provide a good bounce of the ball. An acrylic shield is bought to hold competitions or intense games.
The mobile stand can be moved, so it is suitable for a playground in the country and for those who want to play other games besides basketball
Shields and racks made of tempered glass look solid. They will be appreciated by experienced basketball players
Pay attention to rings
You can buy cheap rings, but I don't recommend doing that. In a year they will deteriorate and you will have to buy new ones. Basketball hoops from Spalding and Royal Fitness are made from quality metal that won't rust in the rain.
The ring must have a springy structure - no rigid attachment to the shield.
According to NBA rules, the ring must be fixed at a distance of about three meters from the ground. For a game with the participation of younger students, it can be hung lower so that it is not very easy to hit it, but at the same time it is quite possible.
Choose rings made from high quality metal to last for many years. For a game involving adults and teenagers, metal chain rings are suitable. They are distinguished by durability and strength.
Know what types of basketballs exist
Success in the game depends on the basketball.
They are divided by size. Size 7 is for men, 5 for women. Even smaller balls are bought for children. The size 6 ball is suitable for street ball or street basketball where the game is played on half the field.
You also need to take into account where you will play the ball: on the street or in the hall. The street ball has a stronger bounce, it is harder and more wear-resistant, but the indoor ball is more convenient to hold in your hands.
It is important to pay attention to the composition of the basketball. Well-known companies use complex polymer compositions for its production. The more expensive the ball, the more complex the polymer composition. The quality of the material determines how comfortable it will be for the players to hold the ball, what kind of rebound it has from the floor and from the bow of the ring.
Another important nuance: do not forget to purchase a pump with any needle.
If you want the ball to have good grip and bounce well, you need to choose polymer models from world famous manufacturers
Proper care
Professional athletes are ready to play in any weather, but amateurs are better off not following their example. If you don't properly store, use and care for your basketball arsenal, its lifespan will be shortened. Humidity will ruin the ball and all equipment, so you can’t leave them outside during rain and snow.
Balls should be stored only in a dry and ventilated room at a temperature of 10 to 20 °C.
Before winter storage, water must be poured out of the base of the mobile rack, and then removed from the street. If you don't feel like doing this every time, fill the rack with sand. Then it will not need to be constantly moved. Basketball stands from Royal Fitness can be left outside in the winter.
Points to remember when setting up a basketball court
The area needs to be determined. The classic version - 28 × 15 meters - is not suitable for everyone. For a dacha, a 5 × 5 meter area will be enough if you want to train three-point shots.
Don't forget the markup. It should be in a contrasting color. Bright colors will interest children and cheer them up.
It is necessary to install a protective net so as not to constantly run after the ball to the other end of the area.
If the shield is stable, then it is safe. A mobile stand from a well-known manufacturer will also not let you down, and it can be moved around the site.
When choosing a basketball, you need to focus on the players. For games involving children and adults, balls of different sizes are needed.
If you want a basketball ring that doesn't rot in a year and you don't have to spend money on buying a new one, choose rings from well-known manufacturers made of high quality metal.
Don't forget about care. Do not leave equipment and inventory on the street. Racks need to be removed to the house for the winter.
Construction of bases for sports fields for football and rugby fields
Support the project
Download the database in one archive playgrounds (volleyball, basketball, handball, mini-football), tennis courts and field hockey fields
For the construction of sports fields with artificial coatings use different types of bases. Typically, based on play characteristics, solid bases made of concrete or asphalt concrete.
Substrate Requirements:
- Concrete or an asphalt concrete base is built in the form of a "single roof".
- Recommended base slope - lateral, 0.5%. Slopes along the length of the court are not allowed, since this causes the height level of the game grid to change in relation to supply lines.
- Basic condition - flatness finished cover. The gap under the 3 m rail in any direction must be no more than 3 mm.
- Thickness concrete or asphalt pavement - 10-12 cm.
- Concrete or asphalt concrete pavement must be free of potholes, cracks, protrusions, dirty stains and dust.
Concrete base construction:
grounds.
Zero cycle includes binding, stakeout and topographic survey of the site; development and removal of soil to the dump; preliminary ground planning with slope assignment 0.8-1%; soil rolling with a self-propelled roller until compaction 350-450 kgf/cm 2 . Fine planning of compacted soil with a laser-guided planer or manual ground planning.
2. Laying drainage pipes along the perimeter of the tennis court in accordance with the project.
3. Device underlying layers of the base of sand with a thickness in a dense body of 150-200 mm with shedding water, from crushed granite with a thickness of 150 mm in a dense body, fractions of 20-40 mm and 10-20 mm with thermally bonded geotextile separating layers with overlapping rolls 30 cm.
4. Waterproofing polyethylene film 200 microns, overlapping of film edges at joints not less than 0.5 m. The joints are glued with adhesive tape. Mandatory waterproofing of concrete ends.
5. Laying reinforcement road grid.
6. Concrete work.
Installed and beacon rails are fixed after 2.0-2.5 m. Concrete B 25 (M 300) is laid with a thickness layer 120-150 mm. For grouting concrete surfaces, it is recommended to use zatirochnye (mosaic-grinding) machine type Splitstone. Forbidden “ironization” of concrete, surface repair with mortar compositions. Cannot be applied hardeners and concrete hardening accelerators.
7. Cutting temperature seams.
Temperature seams for the concrete base of the open area are cut with cards, the seams are filled with sealant.
8. Installation of plastic spillway trays.
The construction of an asphalt concrete base involves the following steps:
1. Preparation ground base. Foundation preparation includes the following activities: removal of vegetative soil, soil planning with a given slope (the slope is at least 2.5 cm for every 3 m of length) and sealing. Soil if necessary should be treated with special means for the purpose of sterilization in order to avoid germination fauna.
2. For ensuring reliable stability of the structure on the planned ground a layer of sand, crushed granite, or gravel is laid with a degree of compaction not less than 95%.
First layer - coarse or medium fraction, second layer - fine fraction, the third layer of ASG (screening) of fine fraction.
3. Installation asphalt mix.
Asphalt concrete the mixture is laid in two layers with a total thickness of at least 8 cm (one layer of at least 4 cm). Asphalt concrete mixture is used high-quality, fine-grained, hard. The type of binding agent is bitumen. After the completion of the asphalt work, at least 14 days must elapse before laying the coating - the degassing period. Watering the surface with cold water speeds up the degassing process.
4. Installation of plastic spillway trays.
5. Installation side stones. Additionally, during the construction of a concrete base for sports sites, it is necessary to take into account the installation of embedded elements of various racks, sports ground fencing and foundations for lighting poles.
Unlike other sports fields, based on playing characteristics, solid foundations are not recommended for platforms for rugby and football.
Base requirement:
- Stability and evenness of the base: field slope - less than 1% (recommended slope 0. 5-0.6%), field evenness - ±10 mm above or below the 3-meter rail in any direction;
- Drainage system.
Option No. 1
1. Ground preparation bases:
- binding, breakdown, approximate top survey of the site;
- development and moving the soil to the dump by a motor grader and a forklift;
- preliminary soil planning with a motor grader and a forklift;
- rolling soil with self-propelled smooth vibratory rollers 1.5 t up to compaction 350-450 kgf/cm 2 ;
- processing soil with chemical reagents - sanitation of the soil;
- finishing planning of compacted soil with a laser-guided planner or soil planning by hand.
2. Device (cutting) drainage ditches, laying a drainage pipeline with a diameter of 100 mm (ceramics).
3. Installation of permeable membranes.
4. Installation and compaction of crushed stone of granite grade 1200 fraction 20-40 mm in layers of 50 mm with a total thickness 250 mm.
5. Installation and compaction of crushed stone of granite grade 1200 fraction 5-20 mm in layers of 50 mm total 150 mm thick.
6. Installation and compaction of granite screenings (fraction 2-5 mm) with a layer thickness of 50 mm.
7. Installation plastic spillway trays along the perimeter of the field, installation of sand traps.
8. Installation of onboard stones.
Option no. 2
1. Preparation ground base:
- binding, breakdown, approximate top survey of the site;
- development and removal of soil to the dump by a motor grader and a forklift;
- preliminary soil planning with a motor grader and a forklift;
- rolling soil with self-propelled smooth vibratory rollers 1.5 t up to compaction 350-450 kgf/cm 2 ;
- processing soil with chemical reagents - sanitation of the soil;
- finishing compacted pound planning by a laser-guided planner or soil planning by hand.
2. Device (cutting) drainage ditches, laying a drainage pipeline with a diameter of 100 mm (ceramics).
3. Installation of water-permeable membranes.
4. Installation and compaction of crushed stone of granite grade 1200 fraction 20-40 mm in layers of 50 mm total 150 mm thick.
5. Installation and compaction of crushed stone of granite grade 1200 fraction 5-20 mm in layers with a total thickness 120 mm.
6. Installation and compaction of granite screenings (fraction 2-5 mm) with a layer thickness of 30 mm.
7. Installation separating waterproof geotextile.
8. Installation cushioning pad BROCR F24. Substrate provides coating stability, resistance to temperature changes environment, excellent drainage properties.
9. Installation plastic spillway trays along the perimeter of the field, installation of sand traps.
10. Installation of onboard stones.
Use BROCK F24 underlays in the field base system allows to reduce the thickness of the crushed stone "pie" and reduce the total cost tulle construction, including artificial grass cover.

 If you have a larger backyard and enough room in the budget, you may want to consider a dedicated area or even a full-size basketball court. Just be sure that you have a patio or paved area — a basketball just doesn’t bounce in the grass. The hoop should not be hanging over the street to keep players safe. It’s also a good idea to check for any local and neighborhood ordinances or homeowner’s association rules for any restrictions on basketball hoop installation or placement.
 However, a larger backboard is more expensive and may not be necessary if the hoop’s main purpose is for family recreation.
 You’ll have your own basketball hoop up in no time and ready for the whole family to shoot some hoops! Consider this your step-by-step basketball hoop installation guide:
 Check with your manufacturer and your specific model for recommendations on how to dig the hole, and how big it should be. You can dig by hand with a shovel, or use an auger or other digging equipment. See owners manual for specific instructions.
 For the first few hours, keep checking the cement to make sure that the pole hasn’t shifted and isn’t leaning. Correct the pole if necessary and keep re-checking until the cement has hardened. Wait on the rest of the assembly until the cement has dried and hardened completely.
 Leveling nuts should also be a part of the setup — adjust these as necessary to make the pole completely level.
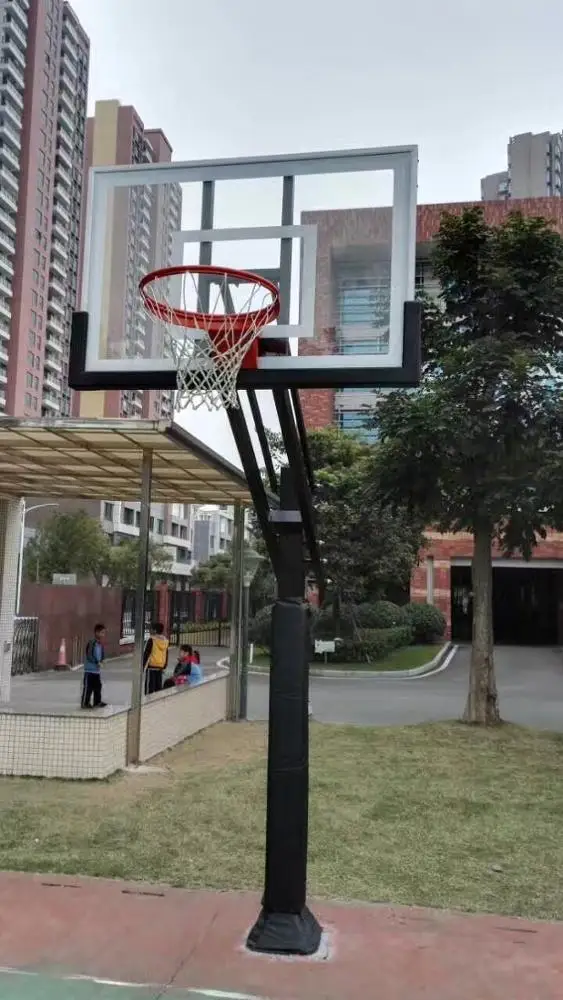 If you’ve opted for a breakaway rim, there may be some extra assembly required. With the rim attached, you can then loop the net around each of the hooks on the rim to have your net fully installed.
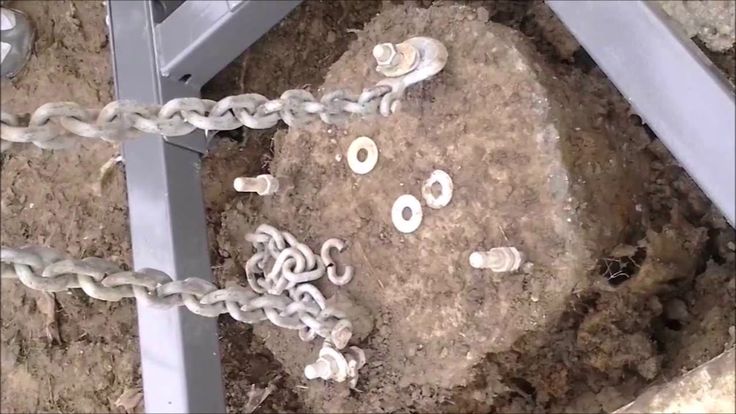 Now it’s ready to adjust to whatever height you want to use — with the height stickers, it’s easy to see at a glance where to adjust the mechanism.
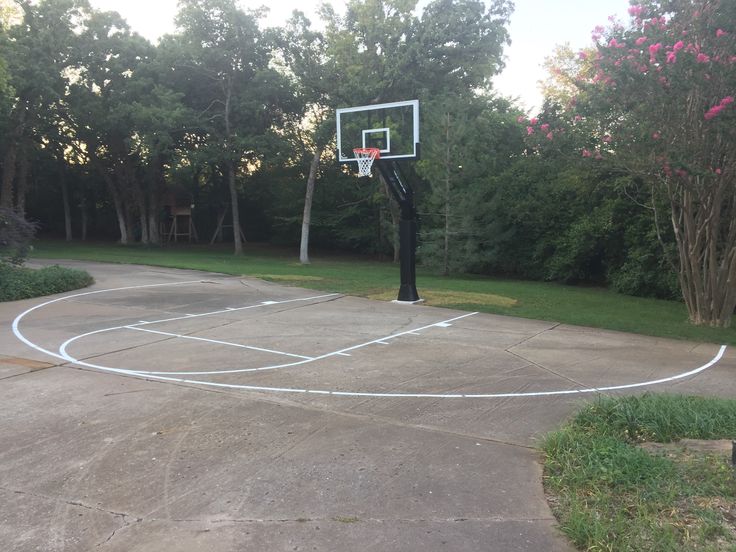 Even in today’s DIY culture, installing a basketball hoop yourself can be a bit involved. If you decide that installing the system yourself is just a little too much, why not let the professionals handle it? With professional installation, you’ll save yourself a lot of time and hassle.
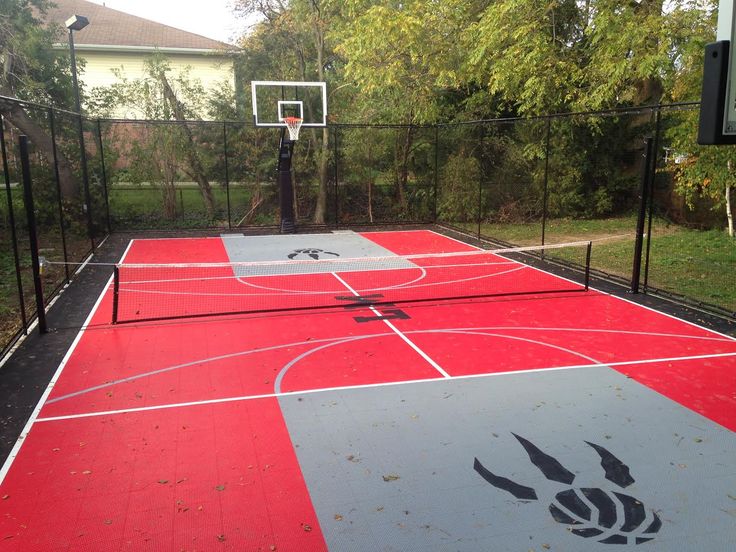 Raising the heavy pole and lifting up the backboard require at least three to five adults, so you’ll need to convince family, friends or neighbors to help out, possibly spending money on food and drinks to feed and thank your crew.
 For good balance and safety, 2 feet to 4 feet of overhang is ideal. Anything greater than that could cause shaking because the weight of the backboard would
be suspended too far.
For good balance and safety, 2 feet to 4 feet of overhang is ideal. Anything greater than that could cause shaking because the weight of the backboard would
be suspended too far.
 If the mixture is too thin, it will lack the strength required to hold the pole, and if it is too thick, you will struggle to fill voids.
 For cooler surroundings, wait an extra day or two.
 This process will require greater physical effort as you will have to go up and down a ladder to attach the backboard,
extension arms and the hoop.
This process will require greater physical effort as you will have to go up and down a ladder to attach the backboard,
extension arms and the hoop. It is also shatter proof, and therefore safe.

 After that, I recommend applying a special rubber coating, like on playgrounds in the yard. There is a more expensive coating option - from rubber.
 The main advantage of a mobile rack is that it can be moved from place to place. This is convenient when there is no dedicated basketball court or if you are going to play other games in this area, such as tennis or football.
  The first one is the cheapest. It is intended for entry-level players. Now manufacturers offer a large selection of colors. A carbonate backboard will provide a good bounce of the ball. An acrylic shield is bought to hold competitions or intense games.
  For a game with the participation of younger students, it can be hung lower so that it is not very easy to hit it, but at the same time it is quite possible.
  Well-known companies use complex polymer compositions for its production. The more expensive the ball, the more complex the polymer composition. The quality of the material determines how comfortable it will be for the players to hold the ball, what kind of rebound it has from the floor and from the bow of the ring.
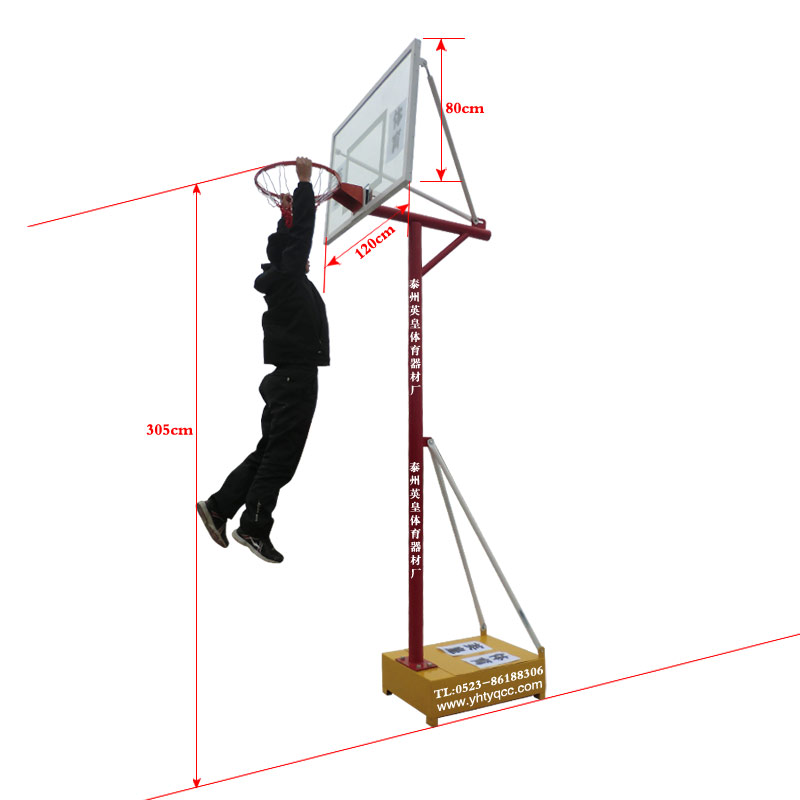

 Typically, based on play characteristics, solid bases made of concrete or asphalt concrete.
  Fine planning of compacted soil with a laser-guided planer or manual ground planning.
  Forbidden “ironization” of concrete, surface repair with mortar compositions. Cannot be applied hardeners and concrete hardening accelerators.
 5-0.6%), field evenness - ±10 mm above or below the 3-meter rail in any direction;