How to paint a basketball
Can You Paint A Basketball?
Most people think that painting a basketball is difficult, but it’s not really that hard. All you need are some basic supplies, like paint, a ball, and a canvas. You can also find helpful paint tutorials online if you’re new to this activity.
Source: youtube
Can You Paint A Basketball
Paintball is an extremely popular sport that can be enjoyed by people of all ages. It requires very little equipment and can be played outdoors. However, one thing that you will need to prepare for before playing is the painting of your ball.There are a few things that you will need in order to paint your basketball properly: Remove covers, clean the surface, apply base coat and then apply topcoat.
Here are some tips on how to do each step: To remove covers from your ball, you will need a sharp object such as a knife or scissors. Make sure that you do not scratch the surface of the ball while doing this! Next, use a damp cloth to clean the ball nicely.![]() Do not use any harsh chemicals or water in this step as it could damage it further. Apply a base coat using a brush or spray paint. Make sure that you cover the entire surface of the ball with this layer.
Do not use any harsh chemicals or water in this step as it could damage it further. Apply a base coat using a brush or spray paint. Make sure that you cover the entire surface of the ball with this layer.
Apply topcoat using a brush or spray paint once again, making sure to cover all areas of the ball except for the hole where the air valve is located.
Remove Covers
If you want to paint a basketball, you’ll need to remove the covers. This is usually done by removing screws or nails that hold the cover in place.
Remove the cover on the fuel tank
The first step in removing a cover is to remove the cover on the fuel tank. This cover must be removed in order to refill or replace the fuel. If you don’t have access to a wrench, you can use a screwdriver to pry off the cover.
Pry off covers on other components
Once you have removed the cover from the fuel tank, you can also pry off covers on other components such as air filters and coolers. By doing this, you will make it easier for you to access these parts and fix them if necessary.
Use a key or a tool to remove stubborn covers
If a cover is very stubborn, it may be helpful to use a key or another tool to loosen it up before trying to remove it using your hands.
Clean Surface
No matter how good your skills may be, it’s impossible to paint a basketball if the surface is dirty. Make sure all the dirt and dust has been cleaned away before starting to paint, or the final product will not look as good.
- Cleaning the surface before painting will help to ensure a smooth finish.
- Use a mild soap and water mixture to clean the area thoroughly.
- Allow the area to dry completely before applying any paint or sealant.
- Be sure to use proper protective equipment when painting, such as gloves, goggles, and a dust mask.
- Always allow your freshly painted surface to dry completely before using it in an environment where children or pets are present.
Apply Base Coat
Yes, you can paint a basketball. It’s not as easy as it looks, but with a little practice you’ll be able to produce a professional looking finish. The first step is to apply a base coat of paint to the ball. This will cover any imperfections and provide a foundation for the paint layers that follow. Next, add one or more layers of paint using a brush or spray can. Be sure to evenly disperse the color throughout the ball so that it looks uniform from end to end. Finally, take care in removing the finished product. Use a sandpaper or cloth towel to gently remove any excess paint, then allow the ball to dry before storing it away.
Apply Basecoat
Basecoat is the first step in painting a basketball. It provides a protective coating that will keep the paint from chipping, peeling or fading.
Use The Right Tools
To apply basecoat effectively, you need the right tools. Basecoat is best applied with a brush, but can also be applied with a sprayer or roller.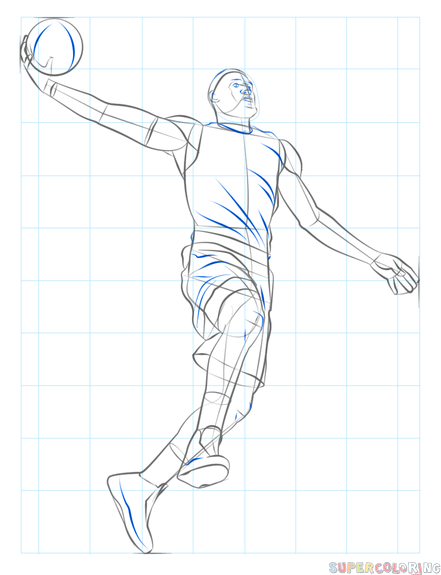
Work Quickly
Basecoat needs to be applied quickly so it can dry before the paint starts to fade or chip.
Don’t Overdo It
Basecoat should not be used excessively – too much will lead to uneven coverage and excessive wear on your paint job.
Apply Topcoat
Painting a basketball is not as hard as it sounds and can be a great way to exercise your creativity. If you have an old basketball, painting it is the perfect project for you.
You don’t need any special supplies to paint a basketball; all you need are some paints and brushes. To get started, wash the ball well and dry it off. Next, use a coat of primer to ensure that the ball will not chip or peel in the future.
Once the primer is dry, begin painting using one of the many colors available. When you’re finished, let the paint dry completely before attaching any decals or designs to the ball. Finally, if you want to keep your painted basketball simple, simply seal it with a topcoat and you’re done! If you’d like to add additional details or effects, there are plenty of products available on the market to help you do just that.
No matter what kind of design you choose for your painted basketball, having fun while exercising your creativity is sure to pay off in dividends!
Preparing The Basketball
Begin by cleaning the basketball thoroughly with soap and water. Wipe down any dirt or dust that may have accumulated on the ball. If the ball has a glossy finish, apply a coat of sealant to help protect it from blemishes and scratches.
Paint the ball using your chosen color(s). Let the paint dry completely before handling or playing with the basketball again. For a more personalized look, you can add decals or designs to your basketball after painting it. To increase durability, you can also coat your basketball in a layer of silicone after painting it to keep it in good condition.
Remember to use a light touch when applying paint to avoid ruining the surface of the basketball! Be sure to allow plenty of time for your painted basketball to dry before playing with it again–it might take up to two weeks for optimum results.
Paint Process
Yes, you can paint a basketball! Although it may not be the most popular art form, painting a basketball is actually quite simple. All you need is some paint, a basketball and some imagination.
Paint Begins To Flow
The paint process starts with the application of a primer. The primer is designed to cover the surface of the object that you are going to paint and make it easier for the paint to flow.
Paint Is Applied
Once the primer has been applied, the next step in the paint process is to apply the paint. The paint will be sprayed onto the object from a can or bottle, and it will be very thick and gooey.
Paint Gets Applied Again
After the paint has been applied, it needs to dry. This can take several hours or even days depending on how thick the coat of paint is and how hot the weather is outside.
Finish Of Painting Process
Once the paint has dried, you will need to finish up by applying a topcoat if you want your painted object to look shiny and new. Topcoats are also very important because they protect the original color of your object from fading over time.
Sanding And Finishing
Yes, you can paint a basketball! First, you’ll need some supplies: a paintbrush, white paint, a black or dark color and a basketball. Next, find an area that’s smooth and free from cracks or bumps. If the surface is too rough, you’ll likely damage the ball while painting it. To sand the ball, start by using very fine sandpaper. Work your way up to a more aggressive paper as you go. When the ball is completely sanded down, spray it with matte sealer to protect it from weathering and scratches. Finally, use a paint brush to apply the desired color of paint.
- Sanding and finishing is one of the most common automotive tasks that you will need to do. This process is used to smooth out the surface of your car or truck, and it can be done with a variety of sandpaper types and finishes.
- When you are sanding, it is important to use the right type of sandpaper for the job at hand.
 You should use fine-grit sandpaper when you are trying to smooth out small imperfections in your vehicle’s finish, and you should switch to coarser grits when you want to remove larger amounts of material.
 - It is also important to use the correct finishing products when you are completing this task. Some people choose to use waxes or sealers as a final step, while others opt for a clear coat of paint.
- There are a few factors which can affect the outcome of your sanding and finishing project. These include the condition of your car or truck’s finish, the grit size that you are using, and how well you clean your work area before beginning each step.
- A well-executed sanding and finishing project will give your car or truck a new look and feel – it is an essential part of restoring old vehicles or adding new protection against weather damage.
To Recap
Yes, you can paint a basketball. However, it will take some practice and patience to get the results you desire. Start by drawing your ball outline on paper first, then identify all of the important features such as the rim, hoop, and backboard.
Once you have a good idea of what you’re working with, begin painting by using various colors and techniques to create realism and depth. Remember to stay patient and enjoy the process.
Painted Basketball - Etsy.de
Etsy is no longer supporting older versions of your web browser in order to ensure that user data remains secure. Please update to the latest version.
Take full advantage of our site features by enabling JavaScript.
Find something memorable, join a community doing good.
(1,000+ relevant results)
-
-
-
-
-
-
-
-
-
-
-
-
-
-
-
-
-
-
-
-
-
-
-
-
-
-
-
-
-
-
-
-
-
-
-
-
-
-
-
-
-
-
-
-
-
-
-
-
-
-
-
-
-
-
-
-
-
-
-
-
How to Draw a Basketball: 12 Steps "),$('
'). insertBefore("#newsletter_block_main"),ia(!0),b=document.getElementsByClassName("scrolltomarker"),a=0;a
In this article:
basketball ball icon
Realistic basketball
Additional articles
Sources
This tutorial will tell you how to draw a basketball. You will learn how to draw a simple basketball icon as well as a more realistic version. Let's start!
Steps
-
1
Draw a perfect circle. You can use a protractor or compass to trace around it and draw a perfect circle. Draw a circle with a pencil, and then circle the line with a marker.
-
2
Draw a straight vertical line.
-
3
Draw two curved vertical lines.
-
4
Color the picture.
Advertising
-
1
Start by sketching a perfect circle. Use a pencil to lightly draw a perfect circle.
-
2
Add lines to show the actual shape of the ball. You can draw it in perspective.
-
3
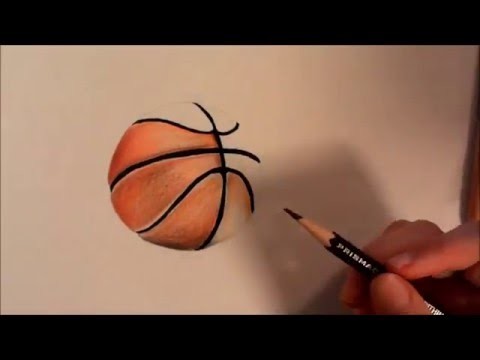
Start coloring the drawing. First select a base color.
-
4
Continue coloring. Select a color slightly lighter than the base color. Paint the bright areas of the ball with it, this will depict the glare of light.
-
5
Mix colors.
-
6
Add dark shadows. For the most realistic drawing, add shadows and shades. Thus, the basketball will look like a sphere.
-
7
Draw four lines on the ball. Two lines, horizontal and vertical, simply follow the shape of the ball. The other two, curved, depict the shape of a ball.
-
8
Color the background.
Advertising
Tips
- You might want to look at a real basketball or a photo of it.
- You can draw a perfect circle by tracing a compass or other round object such as a cup.
- If you want to draw other objects, plan their location in advance.
- Basketball 75 cm in circumference or approximately 23 cm in diameter.
Advertising
Warnings
- Don't worry if it's not perfect. Fine art is partly interpretation.
Advertising
What will you need
- Pencil
- Black marker
- Paper
- Orange paints (dark and lighter shades of the base color)
- Stencil, protractor or compass (optional)
Sources
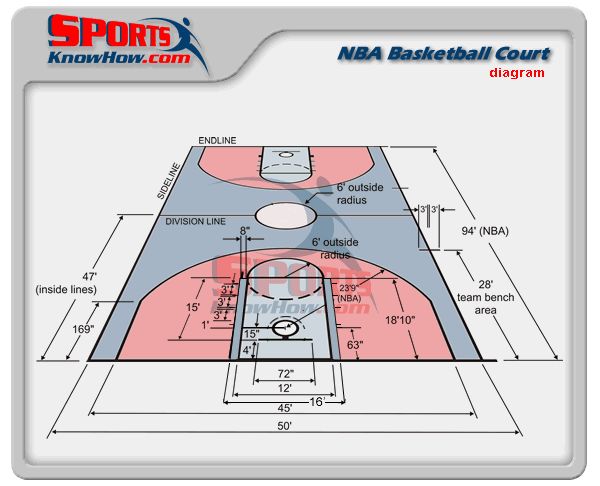
- Dimensions of basketball courts and equipment, for reference on proportions.
About this article
In other languages
How to draw a basketball - Wiki How English
This guide will tell you how to draw a basketball. You will learn how to draw a simple basketball icon as well as a more realistic version. Let's start!
This page has been viewed 18,160 times.
Advertisement
How to Draw a Basketball Step by Step Drawing Tutorials
Basketball is the only mobile equipment required to play the game of the same name. Basketball has become an American icon; in fact, it is the only major sport that originated entirely in America.
Basketball is a relatively young sport. In 1891, a physical education teacher at a college in Massachusetts was instructed to develop a new game "for the amusement of schoolchildren in the winter." The teacher organized eighteen young people into two teams and appointed team captains for each.
The first basketball game was played with a soccer ball; the targets consisted of half-bushel-sized peach baskets that hung at each end of the gymnasium. During the game, the guys scored only one point.
The first basketball baskets had bottoms; The referees were supposed to pick up the balls when the basket was made. By the early 1900s, the first string nets were being used. Early basketballs were made from leather, which worked well on indoor courts but was damaged by the asphalt surface of outdoor courts. K 19In the 90s, most consumer basketballs were made from rubber or other durable materials to alleviate this problem.
Did you know? Warm basketballs bounce better than cold ones because materials are more flexible in warm conditions. Professional basketball should be able to bounce about four feet when dropped from a height of six feet. Today, basketball is a symbol of both the sport and athletics in general.
Dive into the game and hone your skills with this easy, step-by-step basketball lesson. All you need is a pencil, a piece of paper and an eraser. You can also use markers, crayons, crayons or whatever to shade your finished basketball!.
If you liked this tutorial, see also the following drawing guides: Guitar, Soccer Ball, and Teddy Bear with Heart.
Basketball Step by Step Instructions
1. Start by drawing a circle. This outlines the shape of basketball.
2. Draw a curved line across the basketball, not in the center but close to one side. This is the first edge of the ball or recessed lines.
3. Draw another curved line going in the opposite direction and intersecting the first one at a perpendicular angle. This is the second edge of the ball.
4. Draw a curved line from the side of the basketball to a vertical curved line, forming another edge.
OTHER EASY DRAWING GUIDES:
5. Continue the edge drawn in the previous step on the other side of the vertical line, attaching it to the edge of the ball on the opposite side.
6. Next, draw a curved rib line below the horizontal line, extending from the side of the ball to the vertical rib line.
7. Continue the line on the other side of the vertical edge, continuing towards the ball.