Home »
Misc »
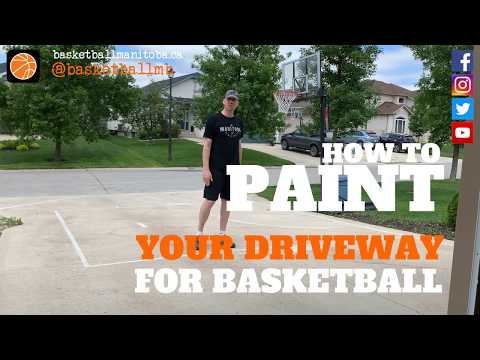
How to paint basketball court lines
How to paint basketball court lines
How to Paint a Basketball Court
Most hoop lovers are content with a full court to play in, but most will agree that it’s a different feeling when you play in a good-looking court. Not only will it prolong your sneakers’ life span, paint and design on a basketball can inspire spirit and pride. What’s more, it also boosts teams’ morale, and for designs inherent to a community, it does give your place an identity. This article will provide you with tips and tricks on how to paint a basketball court and more.
What Materials are Used to Paint a Basketball Court?Both indoor and outdoor basketball courts are subject to a lot of wear and tear. So at some point, you will have to replace or redesign how the floor looks. For wooden floors or wood tiles used in outdoor gyms, you won’t need to replace them as often. The same cannot be said, though, about outdoor courts.
Outdoor basketball courts are subjected to heat, rain, snow, and everything in between. In extreme conditions, paint should be reapplied every couple of months or so.![]() Most experts recommend acrylic paint to finish an outdoor basketball court. What are some of the reasons acrylic is the best type of paint to use for basketball courts?
Most experts recommend acrylic paint to finish an outdoor basketball court. What are some of the reasons acrylic is the best type of paint to use for basketball courts?
Perhaps the most important reason is that acrylic is made with specially-graded silica sand that prevents slippage. A slippery basketball court because of poor choices in the type of paint can be perilous and may cause injuries. Applying acrylic paint court surfaces make them aesthetically very pleasing while being easy to construct and maintain. Additionally, acrylic paint is resistant to common chemicals.
For other materials to paint a basketball court, you will need rollers (4 inches and 9 inches), pads, and trays. You may also need assorted art brushes, paint can opener, latex gloves, paint cups, duct tape, painter’s tape, and caution tape. During the project, you may need a water hose, pencil or chalk, and measuring tape.
What Kind of Paint Do You Use on a Basketball Court?As pointed out earlier, the most recommended type of paint for outdoor basketball courts is acrylic. Acrylic has some properties that make it best for traction while adding to the basketball floor’s aesthetic value. What’s more, acrylic is essentially fade-resistant, easy to repair, waterproof, and highly durable.
Now, there are other kinds of paint that you may use on a basketball court. Some may suggest rubberized paint for concrete basketball courts or perhaps epoxy paint. Generally, both rubberized and epoxy paint are considerably more expensive than acrylic paint, so the latter is more popular as paint used in a basketball court.
How Do You Paint a Three-point Line on a Basketball Court?Marking and painting the three-point line is one of the more difficult paint jobs you can do on the basketball court. The three-point line is long and shaped like an arc, so it’s easy to mess up if you don’t know how to go about with it.
The first thing that you need to do is look up the dimensions of the three-point line. It would be up to you to adopt the regulation distance of the three-point line, whether the high-school, college, or pro dimensions.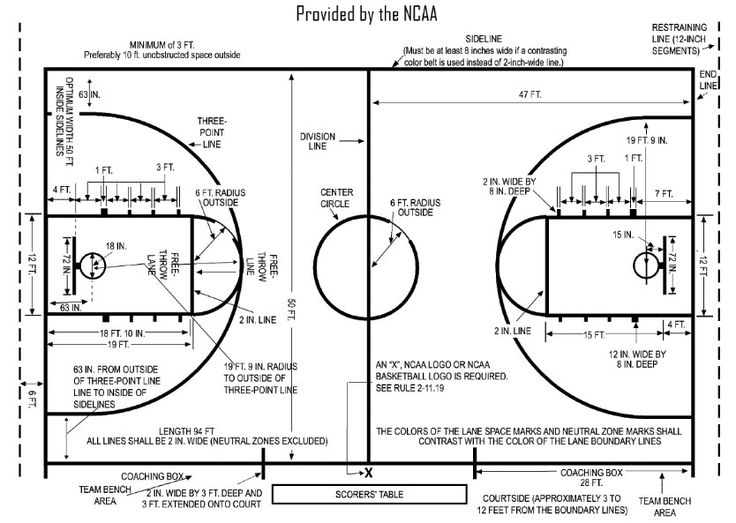
After determining the dimensions, the next thing you need to do is to create a makeshift compass. One method of doing it, and perhaps the easiest, is grabbing a string. One end should be at the bottom of the basket and have someone hold the other end with chalk. Drag the chalk with the string across to mark the three-point line. You can paint the line with acrylic paint by merely following the chalk lines.
In the NBA, the three-point line does not have the same distance all around. If you want to simulate an NBA three-point line’s appearance, it will be a little bit more complicated than just tracing an arc from one corner to the other.
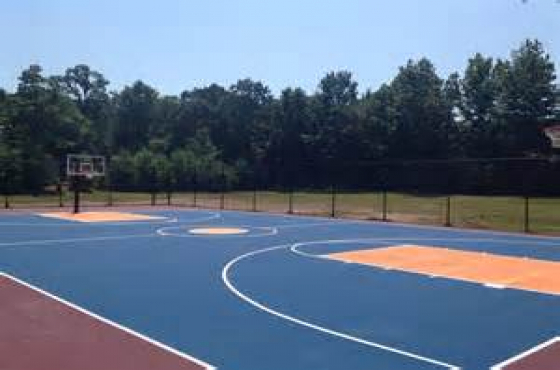
What is the Best Surface for Outdoor Basketball Court?If we are talking about outdoor basketball courts, two surfaces are preferred– concrete and asphalt. Other options for the base material for an outdoor basketball court are crushed stone and modular bases. With that being said, most outdoor basketball courts are either concrete and asphalt.
Honestly, it would boil down to personal preference in choosing between the two. In most cases, concrete is the better choice if you consider the cost of maintenance and repair. When done right, a concrete base material for a basketball court is basically maintenance-free. On the other hand, asphalt will deteriorate over time considering the freeze/that cycles, but unlike concrete, it is less likely to sustain cracks.
Now, how do you decide whether to go for concrete or asphalt? It depends on several factors. Relatively, both concrete and asphalt are incredibly strong surfaces, with the former potentially lasting 40 years with proper care and the latter for around 15-20 years. Other factors that contribute to the durability are proper application, thickness, and supporting materials.
As for appearance and functionality, asphalt provides an even surface than concrete. It would also be easier for the joints since it is not as hard as concrete. On the other hand, concrete is essentially non-slip. As we have pointed out, deciding which one is better comes down to personal preference.
As it stands, whether you choose to have a concrete or asphalt base material or surface, both will require upkeep to lengthen its service years. Resurfacing the material at least once a year may help prevent holes and cracks from developing, thereby lessening the risk for injuries. Sealcoating will also help the weather or rough play from ruining the surface, and applying sealant provide moisture resistance, reducing the need for repairs in the long run.
Here is a rundown of the differences between a concrete and an asphalt surface basketball court:
- Asphalt is the cheaper option than concrete.
- Concrete is more challenging to install than asphalt.
- Asphalt does not last as long as concrete, more so if it’s not correctly built and installed.
- An asphalt surface is more even and softer than concrete, which makes it easier for the joints.
- Post-tension concrete basketball courts are a type of concrete that adjusts to tension to prevent cracks.
 While that is way more expensive, it may be one of the smartest choices as an outdoor basketball court surface.
Additionally, there is a considerable difference in using premium acrylic paint and its standard counterparts. The standard acrylic paint typically has a 1-year warranty while the premium has up to five years. However, the most significant difference is that the premium acrylic paint has a life expectancy of up to 30 years compared to the standard’s five years.
What’s the Average Cost to Paint a Basketball Court?Like any construction project, the cost of painting a basketball court depends on several factors. Naturally, the bigger the court is, the more expensive the project. How much does it cost to paint a basketball court? A generous estimate, which means at the low end of the spectrum, may cost around $16,000, including the installation of the hoop.
However, not many of us can afford to hire a contractor to do the work. That is why when you consider how much it costs to paint a basketball court, it would be better off to do it yourself than hire someone to do it for you.
If you or the community already have a basketball court in place, you will save a lot of money doing the project yourselves. At most, you will only need to buy $100 worth of top-notch acrylic paint, or even as low as $50 for acrylic paints with lesser quality. There will be other expenses thrown here or there (like tapes and markers), but that still dwarfs the cost of hiring a contractor to do the job.
5 Tips on How to Paint a Basketball Court1. To ensure that the entire project goes smoothly, pay attention to smaller details such as the materials and how you want the court to look. Sort the materials, piling them by how similar the items are. If you can, make a diagram to follow the pattern that you’d like as to the appearance of the basketball court.
2. Before applying the primer, make sure you wash the whole basketball court clean with a power washer and a broom. If you don’t have access to a power washer, a hose with a powered nozzle will do. Broom the court afterward to make sure it is clean and let the surface dry completely. Drying time may vary depending on the temperature and humidity. This is not the time to be impatient.
3. After the area dries completely, apply a clear primer to the surface. Use rollers to do this.
4. If you want to take it to the next level and paint some center court logo design, we recommend making a stencil out of poster board. Trace the outline over the poster board and cut out certain sections. Another method uses the grid system where you use the grid or squares as a guide for sketching the image. This is not for everyone, but if you have an artist in your midst, it’s worth a try.
5. Paint the lane in a different color than the lines to add that authentic look and feel. And remember, basketball lines are approximately two inches wide, so don’t vary the sideline, baseline, and centerline width.
Wrapping Things Up: How to Paint a Basketball CourtBasketball courts, whether indoor or outdoor, need retouching and a repaint every once in a while.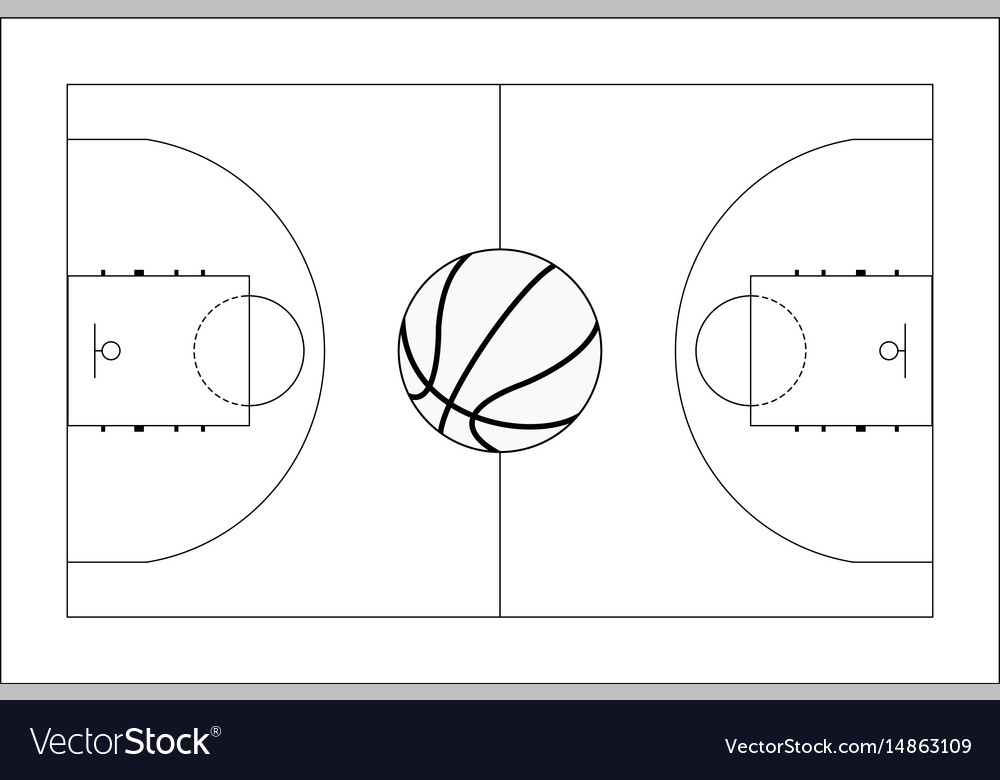 For outdoor basketball courts, repainting may come more often than the elections since these courts are subject to harsh weather.
The most recommended type of paint for outdoor basketball courts is acrylic. Acrylic paint is made with specially-graded silica that essentially makes it slippage-free. It is also excellent to look at and is available in dozens of colors. Moreover, acrylic paint is resistant to common chemicals.
Acrylic paint is available in standard and premium variants. Standard acrylic paints cost less, but the premium alternative may be the smarter choice in the long run. It has a more extended warranty (five years compared to one) and typically outlasts its standard counterpart in terms of life expectancy (30 yrs to five yrs).
Now, when you’re given a choice between asphalt and concrete as base material or surface in an outdoor basketball court, which should you choose? Most experts would recommend concrete and rightly so.
Concrete is generally more durable and virtually a non-slip surface.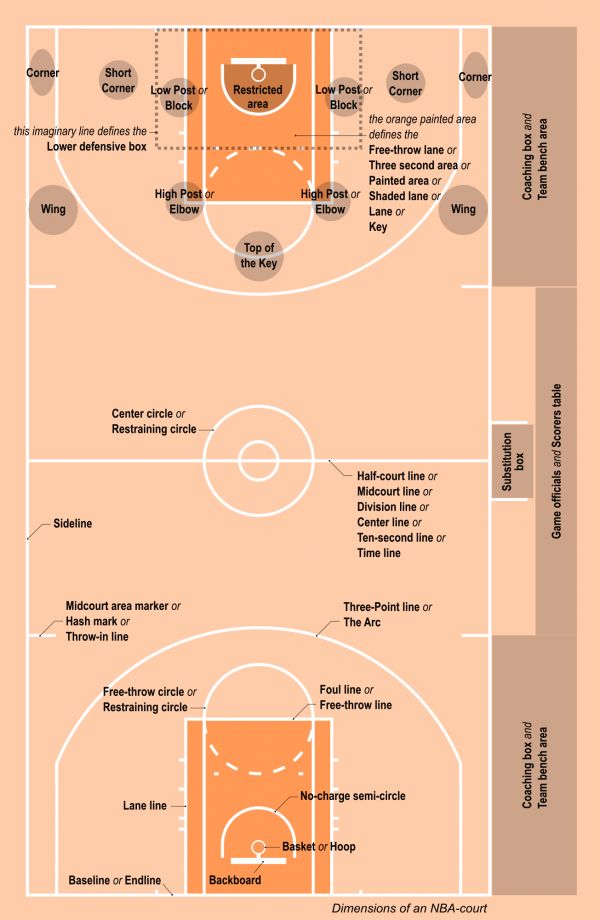 Asphalt has a more bouncy feel and typically costs less to install. However, concrete trumps asphalt when it comes to years of service because some well-built concrete surfaces may last as long as 30 years. Post-tension concrete is an even better, albeit expensive choice. This type of concrete surface “adjusts” to any tension to prevent cracks. It is definitely a smart choice, considering the amount of money you would save in the long haul.
Well, if you had no idea how to paint a basketball court, we hope that this article pointed you in the right direction. Sometimes, these kinds of projects are not to be taken too seriously. If done with friends and the people in your community that care and love basketball, it is definitely an excellent way to build camaraderie while having fun doing manual work.
If you found this post helpful, you’re definitely going to like our other basketball FAQ articles here.
More interesting basketball FAQ posts here:
> How Many Laps Around a Basketball Court is a Mile?
> How Many Yards is a Basketball Court?
> How to Install a Ground Basketball Hoop?
> How Many Square Feet is a Basketball Court?
How To Paint A Basketball Court: Tips And Tools
Have you ever wanted to paint your basketball court? You might be asking yourself, “How hard could it be?” Well, don’t worry because we are here to help! Many steps go into painting a basketball court.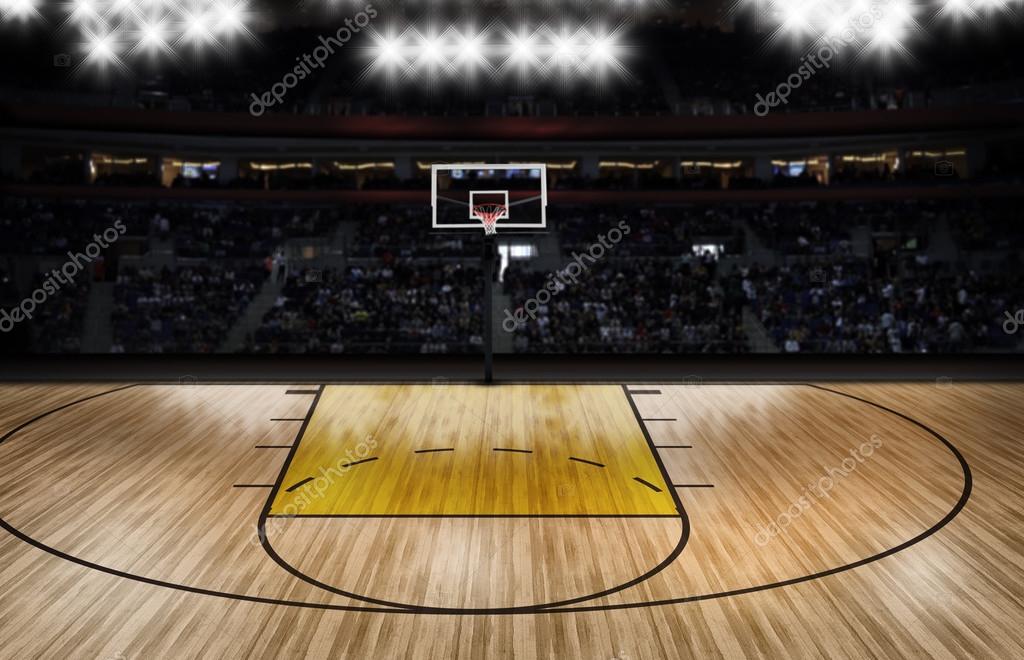 We will talk about paint and tools needed, the time required, and how much the project costs. So if you’re looking for some inspiration on how to paint your basketball court then this article is for you!
[powerkit_toc title=”Table of Contents” depth=”1″ min_count=”4″ min_characters=”1000″]
What Tools and Material Do I Need to Paint a Basketball Court?
Here is a list of paint and tools you will need to paint your basketball court. And how to use them:
- Paint for the Floor. We recommend a paint that is made specifically for floors.
- Brushes to apply paint on wall/floor itself. Can be either Purdy brand paint brushes or Graco paint sprayers. We recommend getting both but if budget is an issue then just get one! If using a paint sprayer make sure it can handle latex-based paints otherwise it won’t work well with water-based paints.
- Paint Trays to put paint in. Usually comes with a paintbrush and paint sprayer kit.
 The paint trays can also be used as a place to mix the paint before applying it to your wall/flooring too!
 - Roller Frame (for a paint tray if painting flooring). If you don’t want to use paint trays then roller frames are your next best option. They can hold more paint than the average paint tray. So they will speed up sometimes when covering large surfaces like basketball courts.
- Tape or Blue masking tape (something that is easily removable because you will need to take it off from certain areas). There are other types of blue tape but make sure whatever type you get.i It’s high quality so peeling them off won’t damage your floor underneath. Also having a roll of this for between coats helps a lot during the painting process! The clear tape will work fine but we recommend getting blue painter’s tape. Because it’s easy to see when applying it on different surfaces which makes it a lot easier. Painters tape also works great for paint stenciling!
- Drop cloths.
 We recommend getting drop cloths at least two times bigger than what you think you might need. Just in case paint splatters or you paint in more than one area!
 - Paint Scraper. This is to remove paint from the floor if it has chips/scratches. If the paint on your court doesn’t have any chips then this step can be skipped!
- Gloves (if painting walls). You don’t want paint all over your hands while trying to paint the wall, trust us!
- Sprayer Bottles for water base paints. These are great because they allow for a very smooth finish when spraying paint onto basketball courts and other surfaces that require fine detail work. We recommend getting these with adjustable nozzles so if you need finer spray control during application you will have it at your disposal! There are three main types of paint sprayers and they are HVLP paint sprayers, airless paint sprayers, and turbine paint sprayers.
- Masks/respirators for the paint fumes. These come in handy if you’re painting indoors or just working with lots of dust during your project.
 We do not recommend doing this job without one unless you want to feel super sick after finishing your basketball court! Also, make sure that whatever kind of mask/respirator you get is approved by OSHA (The Occupational Safety and Health Administration). They should also be NIOSH certified as well.
 - Bucket for water. You will need this when cleaning paint trays and brushes plus it helps keep everything nice and clean during application.
- Paint thinner (used after painting has already dried on wall/flooring). Some paints like epoxy paint don’t come off easily without using something that breaks down their surface tension, which is what paint thinners do! We recommend getting one specifically designed for floor coatings too because they are made from different ingredients than regular paint thinners. Keep in mind that paint thinner is very flammable and should always be kept away from open flames, paint sprayers, paint trays/lids (if the paint in them has dried up), etc.

- Paint Trowel (for mixing paint on the ground). This can also be used to scrape excess paint off of walls if needed!
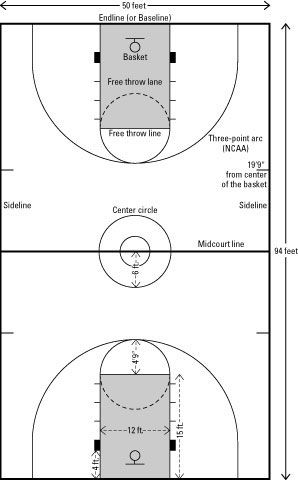
What Are the Lines & Areas in a Basketball Court?
- Boundary Lines – you should first start with the outline of the basketball court. The dimensions vary from one basketball court to another but you can find the average dimensions of a basketball court.
- Midcourt Line & Circle – the midcourt line is the center of the court and it divides both baskets. This will be important if you paint lines that act as one-and-one free throw areas, which are used in high school basketball games to decide who gets two shots!
- Free-Throw Line – the free-throw line is used when players are shooting foul shots during basketball games. You can paint it in if you would like to do so but keep in mind that these lines have different dimensions depending on the rules of each league or game being played!
- Three-point Line – the three-point line is one of the most famous lines in basketball because it determines how far a player has to be behind the paint or key area before they can shoot and get three points.
 We recommend painting this if you plan on using paint stencils, which we will touch upon later!
 - Paint Area – the paint area is exactly as it sounds, the paint or key area! This paint line will be important for various reasons.
What Kind of Paint do You Use on a Basketball Court?
There are many paint options to choose from when painting a basketball court. The paint you use will depend on the paint’s durability, cost, and how much time it takes for paint to dry.
- Latex Paint (water base) – if you plan on using latex paint then we recommend either getting Behr or Kilz brand paints. These two brands have great reviews online since they do not take long to dry, don’t leave horrible smells while drying like oil-based paints can sometimes do (they’re also both very cheap!).
- Oil-Based Paints (not recommended if your floor is concrete) – these should only be used if there isn’t any other option because once applied they stay wet longer than water-based paints but that’s also a negative because the paint will get on everything!
- Epoxy Paint – great paint for outdoor surfaces, highly recommended if you’re painting over concrete or asphalt.
 It’s also very durable and holds up well to foot traffic so it won’t fade away easily. This paint dries fast but the only downside is that it costs more than your average paint from Home Depot/Lowe’s does.
How Long Does it Take to Paint a Basketball Court?
Depending on what paint you use, paint can take anywhere from a few hours to overnight.
Using Latex Paint
Latex paint dries in under an hour but it will be tacky for about 45 minutes afterwards so make sure that all surfaces are covered before painting over them! If the paint is left out too long then it may start to dry up which means your court won’t look good when finished with paint stencils/lines because they’ll peel off or chip away easily if applied after dried-up paint.
Using Epoxy Paint
Epoxy paint takes around 15+ hours of drying time depending on how thick the coat was initially and how many coats were used. This type of paint is much more expensive than regular latex paints though, plus taking into account other factors like paint equipment and paint costs, a basketball court would cost around $1000 to paint with epoxy paint.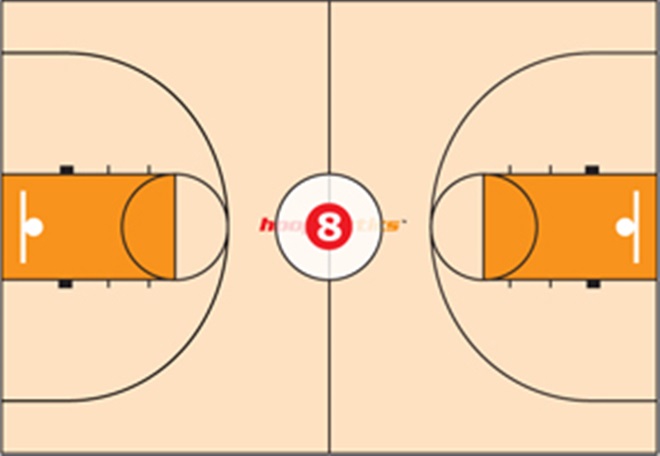
Using Oil-based Paints
Oil-based paints should only be used if there isn’t any other option. Because once applied they stay wet longer than water-based paints. But that’s also a negative because the paint will get on everything! Oil-based paint takes at least 24 hours of drying time so we recommend applying it overnight or before you go out for the day. Since one mistake can mess up your entire project! This type of paint is much cheaper compared to epoxy though (around half the price).
Cleaning Up!
The longest part about painting (and it’s not as bad as you might think!) is cleaning up after yourself! Make sure that all brushes are cleaned out well or put in water if they’re disposable! Oh, and make sure there isn’t any leftover paint stuck inside your sprayer because this can cause paint to clog up and ruin paint equipment.
Extra Tips on Painting a Basketball Court
- Start small with paint application when using stencils until you feel comfortable with applying them all around your basketball court (we recommend practicing in an area where they can be removed without disturbing the real paint job).
 Once painted we recommend waiting at least 24 hours before removing any paint left behind by stencils.
 - If the paint has dried before you are finished using stencils. Then use paint thinner to remove the paint until all that is left behind are your stencil marks!
- Always apply an undercoat first. This will help the paint stay on better and prevent it from flaking off too quickly if there’s excess paint or foot traffic after drying time. You can also prime with spray paints but for walls, priming isn’t necessary. Because of how thick they usually are (we recommend doing so only when painting over other kinds of surfaces).
- Do not put any basketball equipment in areas where paint has already dried – keep them away to avoid stains/damage! Also don’t forget about shoes either, especially since paint gets everywhere! Wait at least 24 hours before walking on paint that has dried.
- Put an easy-to-remove paint drop cloth down first (painters’ plastic or garbage bags work great for this!).
 And make sure you’re wearing clothes you don’t care about because paint can get everywhere!
Conclusion
We hope that this blog has been helpful and provided you with paint tips for how to paint a basketball court! We recommend using latex paint unless there is no other option because it dries the quickest. Keep in mind all of these paint tools and materials will cost over $1000. So we also suggest practicing before doing your actual project.
Good luck with painting your basketball court!
Here are Some of our Favourite Basketball Sneakers
Here we will be giving more of an opinion, rather than facts. Are the sneakers worth the price that they are being sold at? Should you upgrade from your current sneakers, depending on what boots you own? What features stand out on these sneakers? If any. Does it do the job? Speed, control, stability etc. Depending on your needs/preferences. We can also mention its durability, if we have collected enough data on the specific sneakers.
What did we expect vs. what we got. Is it maybe overrated/underrated?
Elite
Here’s our pick from the very best of the bunch.
Pro
On your way to the pro leagues? Here’s our pick.
Beginner
Want something to start with? Have a look at our pick.
Steve Farrugia
I'm the 24-year-old former footballer, who could have gone pro was it not for my knee injury! Never heard that before, have you? Jokes aside, my life nowadays really revolves around work, fitness, watching A LOT of sports and spending time with the ones I love (add blogging to that!).
Similar Posts
Basketball court markings: standards and norms
Author of the article
Khvatkov Dmitry
Consultant in the production of rubber coatings
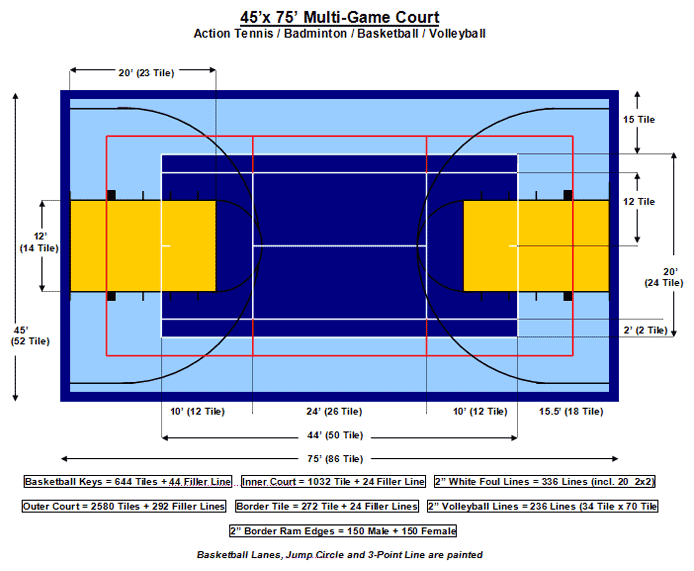
Basketball field marking requirements are approved by the FIBA standard. The site must be flat with a hard surface, free of bends, cracks and other obstacles.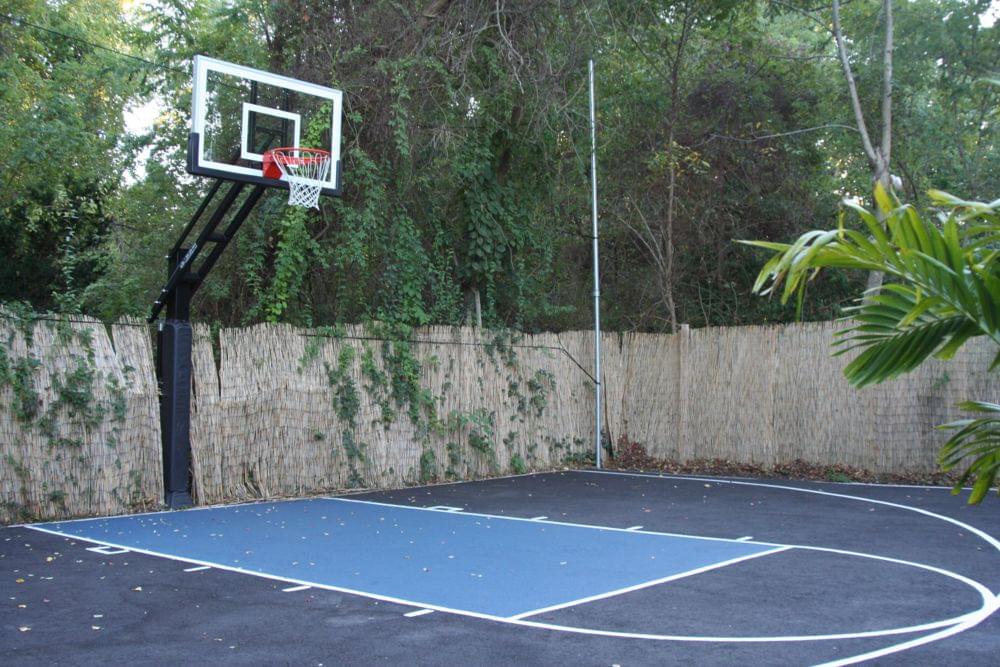 The accepted dimensions of the field are 28 m long and 16 m wide. By NBA standards, the field is slightly larger: 28.7 m (94' ft) long and 15.3 m (50' ft) wide.
Areas not intended for international competitions may differ from accepted standards (for public use, in schools or universities, etc.) and usually vary from 20 to 28 m in length and from 12 to 16 m in width.
Basketball Court Marking Standards
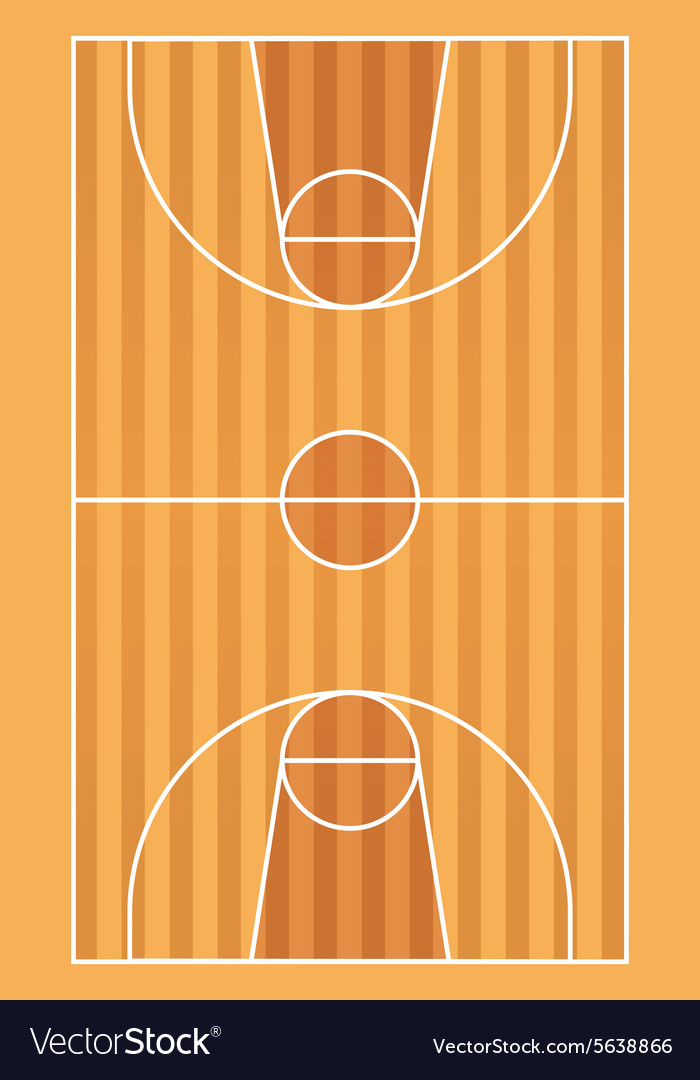
Basketball court markings are conventionally divided into 5 components:
- Boundary lines. They are located along the perimeter of the site and set its size. The lines that run along the field are called side lines, and those that are behind the baskets are called front lines.
- Central line. Divides the court in half parallel to the front lines.
- Central zone. It is a circle and is placed in the middle of the center line, and, accordingly, in the center of the entire field.
- Three-point line. It is a semi-ellipse and is located around the shields on both sides of the field.
 It limits the close range.
 - Free throw line. It is located in front of the boards parallel to the front line and is limited on the sides by paint lines.
The standard line width is 5 cm. All outlines and lines must be of the same color (usually white) and be clearly visible from anywhere on the court.
Common lines
Common lines are used to limit the playing area of the court. The side lines (along the field) according to FIBA standards should be 28 m long, and the front lines - 16 m. For public areas, deviations from the accepted standards are allowed. Typically, basketball courts in schools or gyms are made from 20 m long and 12 m wide.
Central lines
The center line is parallel to the front and divides the field exactly in half. According to the standards - it should extend beyond the side lines by 15 cm on both sides.
In the middle of the center line there is a circle with a diameter of 3.6 m, which limits the central zone of the field.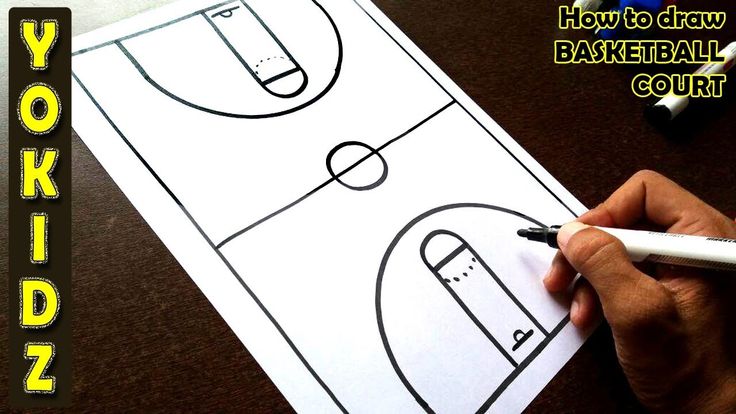 In this zone, the ball is played at the beginning of the game.
Three-Point Line
Three-Point Lines are located around the backboards on both sides of the field and consist of two straight lines 2.9 long9 m and a semicircle. Straight lines run perpendicular to the front at a distance of 0.9 m from the side lines. Despite the fact that visually the distance from the ring to the side of the three-point line seems to be less than to its central part, the distance from the backboard to any point is 6.75 m.
Penalty lines
Penalty lines limit the nearest area at the backboard. They consist of a trapezoid and a free throw zone.
Despite the name, the "trapezium" is a rectangle (until 2009year it really was a trapezoid), which is located under the shield. Its dimensions are 5.8 meters long and 4.9 meters wide. The shield is located at a distance of 1.575 m from the end line in the middle of the site. In front of the backboard, at a distance of 1.25 m, there is a semicircle that limits the area for picking up the ball.
At a distance of 4.225 meters from the backboard, the trapeze zone ends and the free throw zone begins. It is a semicircle with a diameter of 3.6 m (like the central circle).
Paint zone lines
These lines are serifs on both sides of the trapezoid (parallel to the sidelines). They limit the areas for players who are fighting for the ball during a free throw.
Zones on the basketball field
The basketball court is divided into zones using markings. Each zone has its own specific rules.
Center circle
The center circle is used as a separate kick-off area at the start of the game. One representative from each team stand in a circle from their side and fight for the ball in a jump, after it is dropped by the referee. All players are exclusively on their side of the field, except for one who rebounds on the opponent's side.
Neutral zone
The peculiarity of this zone is that as soon as the player of the attacking team with the ball crosses the center line and is on the side of the opponent, he cannot pass the ball to the player of his team who is on the other side of the field (i.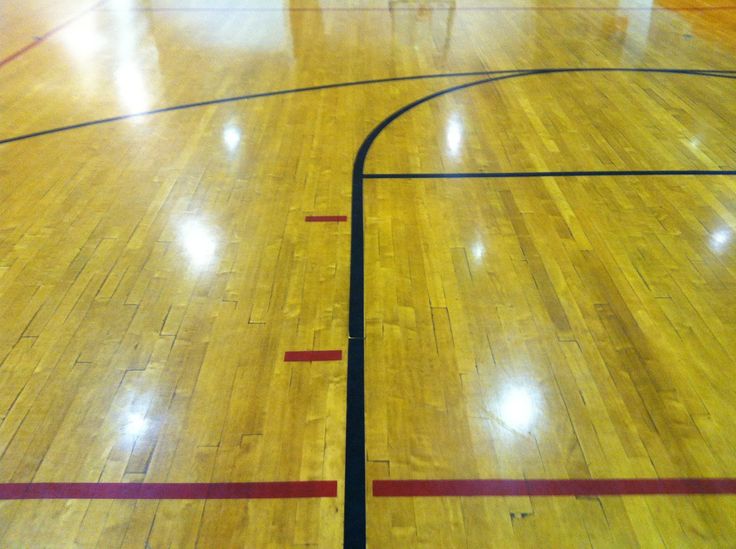 e. behind center line on your side).
Three-point zone
The three-point line limits the near zone of the shot. Hitting the basket from outside the basket brings the team three points. If the throw was made inside the zone, then it brings two points.
Three-second zone
This is the zone in close proximity to the ring. It is called three-second, since the player of the attacking team cannot be in it for more than three seconds. Most balls are thrown in this zone, so when attacking, it provides maximum protection.
Free throw area
In controversial situations, a free throw is provided from this area. The player of the attacking team must score the ball without stepping over the line of the trapezoid. At the same time, the players of both teams are not in the three-second zone. They take up positions along the paint lines on the sides of the trapezoid and may not step outside the lines until the free throw shooter has shot the ball.
How to mark a basketball field?
Basketball field markings, whether it is an international competition court or an open-air amateur field, are best applied using special equipment. This will ensure the long life of the coating, the lines will not clog and will promote fair play.
You can order the marking of a basketball court in Moscow and the Moscow region from Rezkom. We will measure the premises and develop a design project for the field so that it complies with generally accepted rules and is convenient for operation. For more details, you can contact our manager by phone 8-495-64-24-111.
how to open? How to equip it?
Each of us can create a professional basketball court. However, this will require huge financial investments, hiring specialists and a large room.
This article is written for owners of schools, sports complexes and other similar establishments. And also for parents who have a huge house or cottage. Those who want to build a basketball court in them.
We will look at all aspects of creating a field for this sport. We will tell you where to place the judges and how to draw the markings. And also about many other things.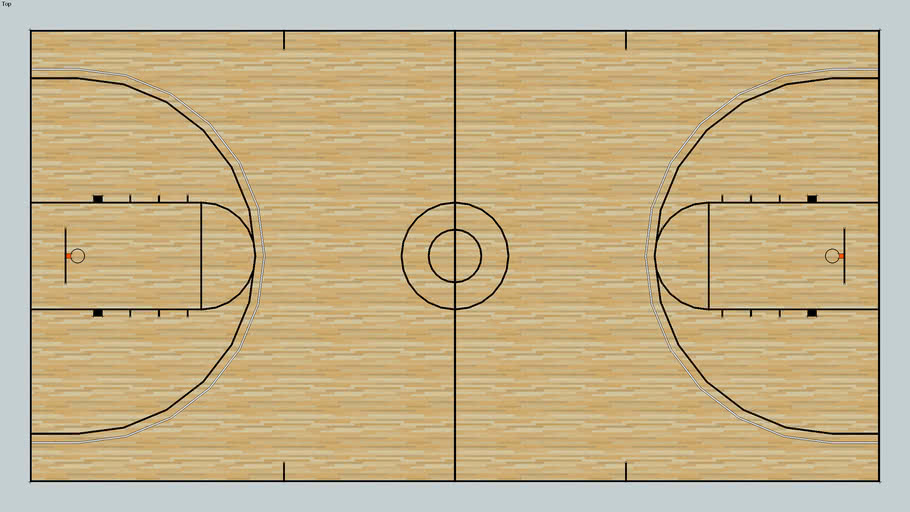
The International Basketball Federation has created uniform requirements for all venues for this sport. If you create a field that complies with the regulations, you will be able to hold professional competitions on it. And even rent out your space. Moreover, both for games and for tournaments.
How large should a basketball court be? The basketball field must be made in the shape of a rectangle. It must have a hard surface. The latter can be made from wood or other materials.
The basketball court must be free from unnecessary objects. Only 2 racks should be located on it. 2 shields. 2 baskets for balls. And also markup. Chairs, benches and other things on the site should not be.
Requirements for the dimensions of the basketball court
The Basketball Federation has uniform requirements for the dimensions of the court. According to them, the field must be 28 m long and 15 m wide.
The Basketball Federation also allows competitions to be held on smaller courts.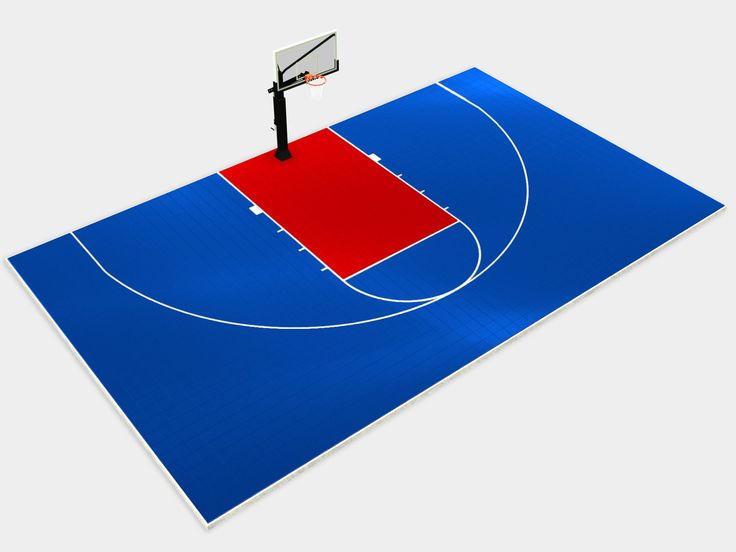 With a length of 26 m. And a width of 14 m. Competitions for young athletes can be held on such sites.
Deviations from the established minimum dimensions (26 m long and 14 m wide) are not permitted.
If your court is less than 26 meters long and 14 meters wide, it will not be suitable for professional competition. The same applies to fields that are over 28 meters long and over 15 meters wide.
Height requirements for basketball courts
The room where the basketball court will be located must be high. The ceiling must be at least 7 meters above the floor. If it is low, then it is not worth creating a basketball court in such a room. Because it will be unsuitable for professional games.
Basketball Court Lighting Requirements
The area where you plan to place the basketball court must have good lighting.
Each part of the field must be highlighted. And it's equally bright. So that the players of both teams can see the baskets, the posts and each other. Otherwise, they will collide during the competition.
The light on the basketball court should not be too bright either. Otherwise, he will blind the athletes. And also prevent the referees from watching the game.
What lines should be on the basketball court?
Each basketball court must be marked. It is important that each part of the site is marked with the same color paint. Preferably white.
Each marking line drawn on the field must have the same dimensions. Its width must be at least 5 centimeters.
That is, it should not be so that in one part of the field the marking lines are "thick". And in the other they had a small width.
The marking lines must be clearly visible to the players and referees. If you do not draw them brightly enough, then it will be impossible to play on such a basketball court. It will not be allowed to be used for competition.
What should the front and side lines be?
The edges of the basketball court area behind the baskets must be marked with 2 front lines.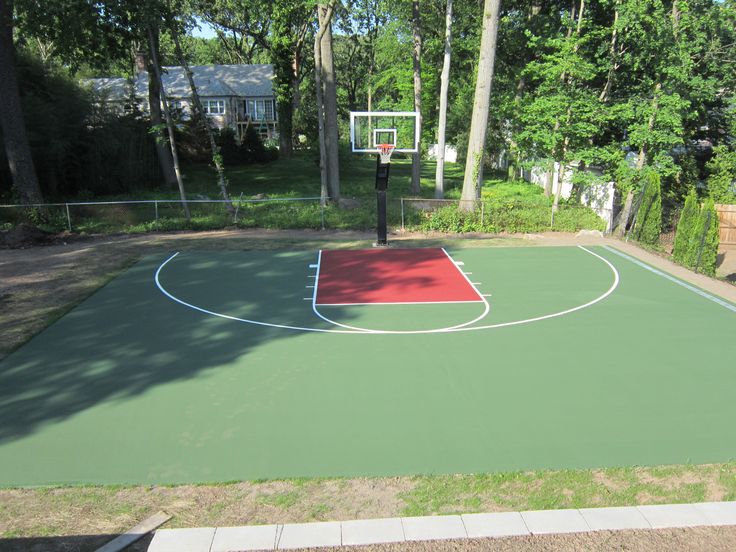
The areas of the field, which are located along the length of the court, must also have marking lines. They are called lateral.
As we have already said, there should be no foreign objects on the site. We are talking about tables for judges. As well as benches for spare players.
If you plan to place the substitutes' bench, this must be done off the field. At a distance of at least two meters from its edges. The same applies to referee tables.
Where is the center line drawn and how is it drawn?
The central part of the basketball court must also have markings. It must be drawn in the middle of the field.
The center line starts from the side lines and runs to the center.
It may protrude slightly from the side of the field. But no more than 15 centimeters.
What should the free throw lines be?
In the area of the zones with basketball baskets of both teams, a special area for free throws is drawn.
It must be located at a distance of 5.8 meters from the left side of the field. The penalty area line must be at least 3.6 meters long.
For a free throw, the basketball player will stand in the middle of this area.
Restricted areas
Each basketball field has special "restricted areas". They are highlighted with special "front" marking lines. And also outlined by lines for free kicks.
Additional lines are drawn from the front marking lines in the restricted area. They go in different directions.
Front lines must be placed three meters from the penalty area.
The front lines are part of the special restricted areas. They can be painted in different colors. However, the marking lines must match the hue of the circle that is drawn in the central part of the field.
More about free throw areas Free throw areas are also classified as restricted areas. on the basketball court they are deliberately increased.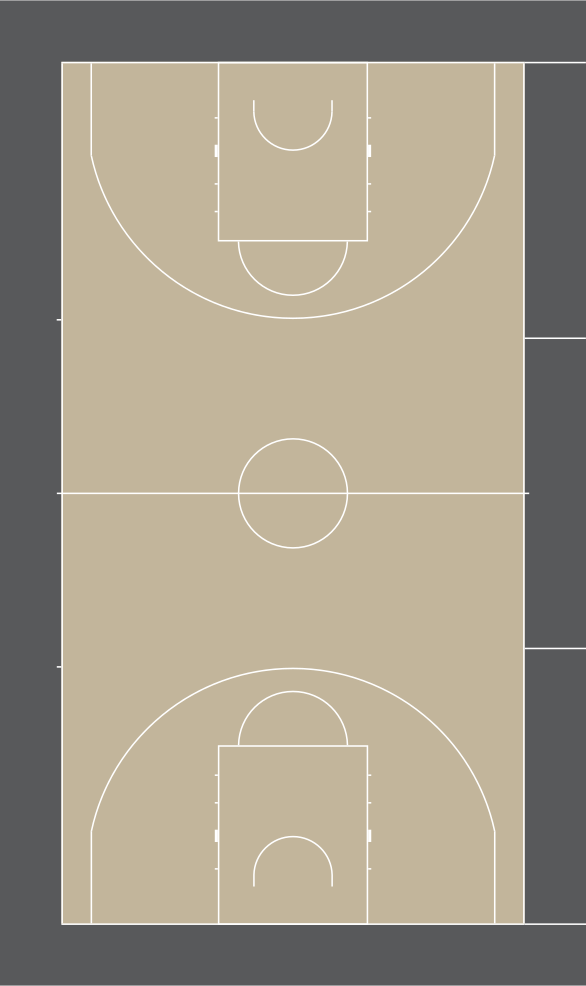 Semicircles of marking are placed next to them, the radius of which is 1.8 meters.
After that, a dotted line is drawn in the circles. They outline the inside of the penalty area.
In the picture below you can see the penalty areas. Players shoot for the basket in these areas.
How should the center circle be marked?
A circle must be marked in the center of the basketball field. Its radius must be at least 1.8 meters.
The color of the circle must be the same as the bounded areas.
3-Point Shooting Area
Basketball players can shoot 3-point balls from almost anywhere on the court. Except the one next to the basketball hoop.
2-Point Shooting Area When athletes shoot balls into the opponent's basket from next to it, the team is awarded two points. The area next to the opponents' ring is also classified as restricted.
The area around the teams' basketball hoops has 2 marking lines. They are placed parallel to each other.
The 2-point zone is next to the player's team's basket. In the area that is opposite the zone with the ring of the second team.
The 2-point zone is located 6 meters from the center line of the field.
Also, the area for a two-point shot is limited by a special circle. Its radius is 6.25 meters. When a player enters this zone, his goals are classified as two-point goals.
On successful throws from outside this area, the team receives 3 points.
In the picture you can see the areas of the field where the shots are classified as three points.
If a player throws the ball from the central and side zones, he brings the team 3 points.
What should be the bench areas?
Players from both teams are allowed on the basketball field. However, not on the site itself, but outside it.
You need to place a shop for players in a special area. It should be highlighted with a special white line. And be outside the field of play.
The length of the markings for the players' bench must be two meters. And the width is 5 meters.
Outline the team bench so that all players can see where people are sitting. And did not encounter them during intensive movements across the field.
Where should substitute players sit?
Athletes preparing to change players must sit between the team benches. Replacement basketball players must sit on special chairs.
Seats should be small. And do not stick out during the games. Otherwise, it will interfere with the teams on the field.
Substitute placement rules have been developed by the International Basketball Federation. They must be observed without fail when building a basketball court. Otherwise, you will not be allowed to compete on it.
What should be the place for judges?
Your task is to make sure that the judges have the most comfortable seats.