Home » Misc » How to release the ball in basketball
How to release the ball in basketball
How to grip the basketball and use your hands for a perfect release
How you grip the basketball is critical to a consistent release.
There are so many details that go into holding the ball and using each of the hands in order to become a great shooter.
If you can get consistently close to an optimal grip and release, then you stand an excellent chance of developing repeatable form.
Use these details to start to develop your own system of drills to isolate the habits, and layer drills. Or skip to the front of the line and get my my proven system of drills in my SHOT DEVELOPMENT SYSTEM – PURE RELEASE.
THE GOAL OF THE HANDS
As I’ve mentioned in other posts, our goal when we shoot is to create as much Positive Power in the shooting motion as possible. Positive power is any energy that is straight up and in line with the hoop.
Since it is your hands that are actually TOUCHING the basketball, it is going to be critical that we create as much positive power with our hands as we possibly can.
We want to avoid the shooting hand pushing the ball off line in one direction and the guide hand pushing the ball off line in the other direction, and then trying to perfectly synchronize those two motions to create positive power. It is POSSIBLE to do, that but the MORE you have compensate, the harder it will be to be consistent.
Instead, try to build a one-handed release with one hand pushing the ball towards the target.
Need help creating positive power but have no idea how to do it? Want to build a true one-handed release? CLICK HERE TO GET MY SHOT DEVELOPMENT SYSTEM – PURE RELEASE.
START BY MEASURING YOUR HAND
This is one of the key building blocks that so many people miss. They build their shot around assumptions, or theory, but not their actual body.
Start by gripping the ball with your shooting hand wide and your thumb comfortably spread out. Place your index finger (pointer, forefinger) on the air valve of the ball. Then place the ball on your hip so that you have your guide hand free. With your guide hand, measure the distance from the tip of your index finger to the tip of your thumb. Then compare that distance to the tip of the index finger and the tip of the pinkie.
I
‘ve measured over 10,000 players hands over the years at camps, clinics, and my own personal workouts. I’ve found that 90-95% of players, when they grip the ball with a wide thumb, the index finger is the middle of their grip. About 5% of players might find that the center of their grip is in between the index finger and the middle finger.
I’ve never had anyone grip the ball correctly and find that the middle of their grip is the middle finger. If you do, make sure that the thumb is spread out wide. If the thumb isn’t wide, your hand won’t be as big as it could be, and won’t control the ball as well as it could.
Need help isolating this important skill, then learning to apply it into games? Click here for my SHOT DEVELOPMENT SYSTEM – PURE RELEASE and get all the drills you need to build the habit!!
MIDDLE OF THE HAND UNDER THE CENTER OF THE BALL
Once you know where the middle of your hand is, we need to work to get the middle of the hand under the center of the ball.
Just like in billiards, the ball will go in the opposite direction of where force is applied to it. If your hand applies force to the very bottom of the ball, the ball will go straight up in the air. And if we apply force near the bottom of the ball but slightly to the right side, the ball will go up but slightly to the left – even if we try to lift straight up in the air. Same thing on the other side – if your hand is slightly on the left side of the ball it will push the ball slightly to the right.
Our goal is to get the middle of the shooting hand under the center of the ball at the release of the ball. To make that easier, we want to get the middle of the shooting hand under the center of the ball at the set point. We may not be able to do this perfectly, but the closer we can get, the more accurate we have a chance to be.
Need some drills for getting your shooting hand under the ball? Then need to learn how to layer drills so you can apply the habit at game speed? GET MY SHOT DEVELOPMENT SYSTEM – PURE RELEASE.
SHOOTING HAND FINGER PARALLEL TO THE TARGET LINE
This is one of the most overlooked keys to shooting. The angle of the finger on the middle of the ball.
Coaches tend to refer to getting the “elbow in” without realizing why it matters. But let me say this first – the position of the ELBOW doesn’t really matter, the elbow isn’t touching the basketball. We can, however, use the elbow as a cue to get the finger into correct alignment. So saying “elbow in” isn’t WRONG, it just doesn’t fully cover the issue.
When a player can get the finger of their shooting hand parallel to the target line, it will remain on the very bottom of the ball throughout the wrist snap. If the finger isn’t parallel to the target line, it will eventually come off the middle of the ball as the wrist snaps, and push the ball off line.
Also be aware that you can get your “elbow in” too much. It is most common/natural for a right handed shooter to let their elbow relax outward, and the finger to come out of alignment in one direction, but it is equally bad to get the elbow “too far in” and have the finger be out of alignment in the other position.
Do you have a tendency to push the ball off line on your release? Click here to start building a Pure Release.
GUIDE HAND COMING OFF THE BALL AT THE SET POINT
Once the shooting hand is in the correct position, we can focus on getting the guide hand off the ball.
Players and coaches both need to remember that if the guide hand pushes at all, it will push the ball off line. Even if the motion that the guide hand makes appears to push the ball FORWARD, it will push off line since it is on the side of the basketball. The only way you can truly push the ball on line is from the middle of the ball, and there isn’t enough room for two hands there.
So the role of the guide hand is to simply help hold the ball stable in the shooting hand as the two hands lift the ball. At triple threat position, a player needs the guide hand to play a role in holding the ball, otherwise the ball will fall out of the shooting hand. Same thing as the player lifts the ball – if the guide hand is removed when the ball is at chest height, the ball will fall out of the shooting hand because it isn’t under the ball yet.
The guide hand needs to support the ball until the shooting hand can fully get underneath the ball and support it by itself. That occurs around the set point. And that is when the guide hand should start to come off the basketball, though it might not actually release from the ball until a fraction of a second later.
Does your guide hand push the ball off line? Need a progression of drills to help with this? MY SHOT DEVELOPMENT SYSTEM WILL TEACH YOU ALL THE DRILLS I DO WITH MY PRO PLAYERS
GUIDE HAND ON THE SIDE OF THE BALL
The positioning of the guide hand on the ball will play a large role in how easily or how well it can come off the ball.
Keep this in mind… it is POSSIBLE to get the guide hand off the ball or even make shots from ANY hand position. But our goal is to make the movement as simple as possible, because SIMPLE IS REPEATABLE.
So our goal is to find the most simple position that the hand can assist in the lifting motion, but not interfere in the shooting motion. I encourage players to hold the ball so that the guide hand is on the very side of the basketball with the fingers pointed at the ceiling when the ball is at the set point. From that position, all the guide hand has to do it come off the ball a fraction of an inch, and it is out of the way and passive in the shooting motion.
If a player grips the basketball with the guide hand towards the top or front of the ball, the guide hand will need to make a bigger move to release from the ball. The bigger move means more time, and more room for error.
Now, it may be necessary at times to catch the ball with a larger separation in the hands because a catch was challenging and needed to be more secure. But understand that makes the SHOT slightly more challenging. We can work on the skill of catching the ball better, but there will always be some variability in the hand position on catches just because catching and shooting are two different skills, with two different ideal hand positions. Continue to work on the habit of simplifying your hand position, not intentionally making it more difficult.
Need help getting your guide hand off the ball cleanly? CLICK HERE TO GET THE HELP YOU NEED TO MAKE MORE SHOTS.
WHY DOES IT LOOK LIKE SO MANY PEOPLE SHOOT OFF THEIR MIDDLE FINGER?
This is a common question and requires a deeper understanding of shooting form.
First of all, no one’s shot will be perfect, especially in game situations. And being “perfect” doesn’t mean you’ll make every single shot, just like being “imperfect” doesn’t mean you’ll miss every shot. Being better will simply give the shooter a BETTER chance of making each shot.
In order to simplify the shooting motion as much as possible, I’d like a player to get the middle finger under the middle of the ball at the set point, then lift the ball straight up in the air so that both sides are being lifted evenly, and then releasing off the finger that is the middle of their hand.
But many players appear to release the ball off their middle finger? Why?
The shooting motion is short and violent. The wrist is snapping quickly and there is a lot of variability in how the ball leaves a players hand from shot to shot. Even two swishes can come off a great shooter’s hand differently.
This is why I concern myself far more with the position of a player’s hand at the set point, rather than the release.
Secondly, most players don’t hit a perfect position creating ONLY positive energy. They start off with the shooting hand slightly on the right side of the ball (as a right handed shooter) and start the shooting motion pushing the ball slightly to the left. Then, as they lift the ball, the shooter rotates their hand under the ball so that their middle finger is under the center of the ball, more hand is on the left side of the ball, and finish pushing the ball to the right.
This happens all the time, but that small rotation is something we want to try to either minimize or eliminate from the shooting motion.
Have you struggled to be able to do this in games? It might be because you never layered drills so that you could APPLY what you were learning. Finally break the habit once and for all with my SHOT DEVELOPMENT SYSTEM – PURE RELEASE.
HOW DO I BUILD THESE HABITS WITH MY NBA CLIENTS?
Building habits in the grip and release requires attention to detail and patience.
I focus on isolating the habit that needs work. In many cases, this can look like standing close to the rim, taking as much time as needed on each shot, and holding the correct position for a couple of seconds before shooting.
From there, as a player gets better at the new, isolated skill, I will start to layer in other drills to make the situation more like a game. The more their habits progress, the more layers I add.
It is a process that takes a lot of experience, so it is difficult for me to explain in a single blog post.
That is why I created my Shot Development System “Pure Release”. All the drills that I use with my NBA players, laid out in order in video form. Stop guessing what to work on. Start getting results.
You get:
60+ Videos of drills and tips
2 hours of video content
Everything laid out in order to remove the guesswork
Life-time access
You can get “Pure Release” by CLICKING HERE.
Shooting a Basketball - How to Get Your Shot Off Quicker Like Stephen Curry
The Internet's #1 Website for Basketball Camps, Resources and Learning Products
|
Member Login
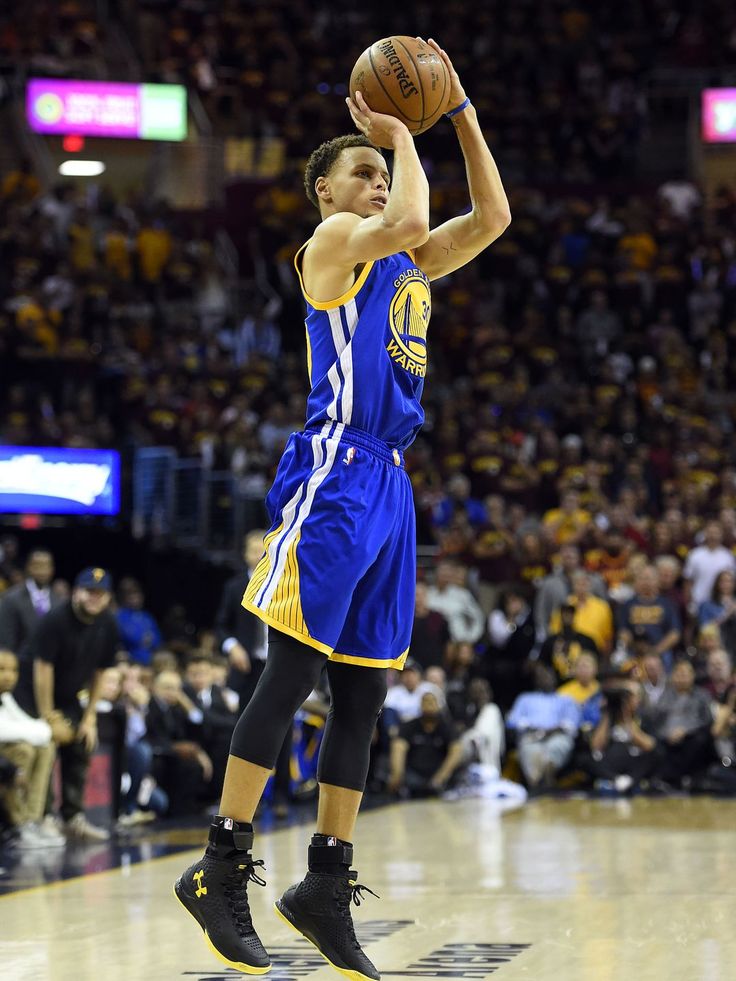
If you watched any of the NCAA Men's basketball tournament this spring, you'll know Stephen Curry is the guard that torched the nets as he led the Davidson Wildcats to the Elite 8 and a near upset of the eventual NCAA champion Kansas Jayhawks. One thing you'd notice right away is that Stephen has one of the quickest shots in the college game. If you gave Stephen a millisecond to shoot, you'd see the ball splashing through the net.
Now, you may be wondering how the heck can I shoot the ball that quickly or how can I teach my players to do that.
Developing a "quick shot" is all about eliminating wasted movement and excess motion.
Picture by
Dave Hogg
The higher you go in competitive levels, the more intense the defensive pressure you will face which makes it very important to be able to shoot more and more quickly without sacrificing any of your accuracy.
Here are seven keys to developing a quick shot release:
Be prepared before you catch the ball.
Every time you catch the ball, your knees should be bent and your feet should be aligned with the basket a split second before you catch the ball. So now all you have to do is catch and go right up with your shot.
On the other hand, if you catch the ball and then bend your knees, that is excess motion and wasted time. This gives your defender extra time to block your shot.
Along the same lines, you should cut with your knees bent...
Reggie Miller and Richard Hamilton are two examples of NBA players who are great at moving without the ball and getting their shot off quickly. If you watch them on TV, they always cut off screens with their knees bent. So when they get open, they only have to catch and shoot.
Bottom line, always have your knees bent and feet ready before you catch the ball.
Provide passers with a target near your shot pocket.
Your shot pocket is the place you put the ball before going into your shot motion.
Having great passers on your team can help you get your shot off quicker. To help them give you more accurate passes, you should always provide them with a hand target right at your shot pocket.
If you're moving in your shot-hand direction, then your target can be your exact shot pocket. If you are moving in the direction of your off-hand, you should provide a target as much in line with your shot pocket as possible and use your off hand to get the ball over to the pocket as quickly as possible.
This is pretty subtle, but the idea is that rather than reaching over to bring the ball over with your shooting hand, you are emphasizing the force of the off-hand on the ball to deliver it to the proper position. Even though you are catching the ball with both hands, you will find that you're gaining a split second of quickness by developing this off-hand-force habit.
Put the ball in shot pocket immediately.
The quicker you can move the ball in your shot pocket, the quicker you can shoot. This takes practice!!
You need to practice moving the ball into you shot pocket off the catch and off the dribble. This takes thousands and thousands of practice repetitions.
You need to practice catching the ball, then quickly and fluidly moving the ball directly into your shot pocket. If you fumble the ball, then the defense has an extra split second to contest your shot. This is a very subtle movement you must practice over and over.
Eliminate wasted movement in your shot delivery.
When you catch the ball, it should go immediately into your shot pocket, and then you should go right up into your shot from there.
You should not put the ball in your shot pocket and then dip your knees or move the ball downward. The ball should go straight up, along with the rest of your body (legs, hips, etc).
Any such excess motion adds time to your delivery, plus it is doing nothing positive for your shot. The simpler your motion, the more it is continually upward from your loaded stance, the quicker your shot will be.
Shoot just before the top of your jump.
Shooting a split second before the top of your jump improves quickness, too. If you wait until the very top, that may be all the time needed for a quick defender to get up for the block.
Try dipping rapidly
Another concept that can sometimes help players is to dip rapidly as you're catching the ball.
To get your shot off as quickly as possible from your jump stop, you should work on a rapid dip into a squared-up jump stop rather than a leap that gets you into the air and covers distance. This dipping technique involves a sudden crouch into your jump stop, catching the ball in your shot pocket as it returns from a dribble, and springing right up into your shot. It is a sudden delivery that gives the defender hardly any time at all to react to your shot.
Think shot, shot, shot.
One way to improve all the areas above, is to be in the new triple threat position every time you touch the ball, the triple threat of "Shot, Shot, Shot. " In other words, any time you touch the ball, you have the ball in your shot pocket, your eyes on the rim, and your feet and stance loaded in case you have an opportunity to take a good shot.
Note that this doesn't mean that you should shoot every time you touch the ball. No, that wouldn't make much sense; but you should be ready to shoot every time you touch the ball. You will find it much easier to move from that readiness into a pass or dribble than to transition from a passing or dribbling expectation into a shot-ready mentality.
Related Products & Helpful Resources
One Motion Shooting Video
Basketball Shooting Camps
Basketball Shooting Workouts
Recommended Shooting Resources
Subscribe to our free monthly newsletter to receive new drills, plays, scoring tips and coaching strategies,
plus three free eBooks with over 270 pages of our favorite basketball drills and plays!
Subscribe to our free monthly newsletter to receive three free eBooks with over 270 pages of content!
Special exercises for teaching basketball technique
I offer a set of special exercises for teaching the technique of basketball elements. The exercises are aimed at developing the basic techniques in basketball, as well as developing speed and agility on the basketball court. We will divide these exercises for basketball into 2 categories:
The 1st category of exercises and relay races will be aimed at honing the most common techniques that are used in basketball.
The 2nd category of exercises will help you develop agility and speed on the court, you will move and think much faster when you master all the described maneuvers.
Exercises for the development of basketball technique:
Stances and movements
Catching and passing the ball
Dribbling
Double step
Retrieving the ball
Basketball basic move video training
Basketball speed drills:
Super Shuttle
Zigzag
Shuttle with ball transfer
Square
Exercises for basketball
While playing basketball, the player needs to constantly accelerate and quickly jerk in different directions at distances from 1 to 20 meters, the basketball court will not allow for more. So great results in the 100m do not always lead to the same success when trying to run into a fast break. Much more important will be the ability to quickly "switch" between running forward and backward, left and right. Combining agility training with classic speed training will have a huge impact on your playing ability. As a result, you will not only be able to cover the distance from one ring to another much faster, but you will also be able to direct the remaining energy to perform other specific basketball elements, such as a jump, feint or throw.
Stands and movements
Jump rope in motion.
"Shuttle" run backwards.
"Fraction" in place, on signal - acceleration.
Tunnel relay (players stand in a column one at a time. Players take turns to crawl under the feet of the whole team).
Relay "Skiers" (standing on two sheets of paper, the player moves forward. Option: you can move by rearranging the sheets).
Relay "6-9-12" ("shuttle" run: odd players in the team arrange the cubes at a distance of 6, 9 and 12 m, even ones collect them).
Relay "Face to face" (move, standing facing the partner on his feet).
Relay "Cuttlefish" (movement in emphasis on the hands behind, the ball on the stomach).
"Kangaroo" relay (jumps on two legs to the conditional line, holding the ball with your feet, throw into the ring, back jumps in the same position).
The outdoor game "Mirror" (move in pairs, one of which is the leader, in different ways, facing each other, and repeating all the actions of the leader).
Outdoor game "Pair leapfrog" (movement in pairs, jumping over the back of a leaning partner).
The mobile game "Day and Night" (at the signal "Day!", the players perform basketball movements, at the signal "Night!" they freeze. Whoever moves is out of the game).
Relay - cuttlefish (ball on the stomach, hands point-blank behind) Game - double leapfrog (jump over partner's back)
This game requires 2 people. From the start line to the conditional obstacle, move by jumping over each other. Then a turn and in the opposite direction.
Catching and passing the ball
Throw the ball up, clap in front of the chest (behind the back, in front of the chest and behind the back, push up, crouch, turn 360°) and catch the ball.
Hold the ball over your head, release it behind your back, turn around and catch it.
Legs apart, ball behind the back; with a rebound from the floor, move the ball under your feet forward.
Passing two balls on the spot and while moving in pairs.
Passing the ball while lying on the back of one of the partners.
Passing the ball at a short distance between partners at maximum pace.
Passing the ball in opposing columns.
Running in a circle in a clockwise direction, passing the ball to a neighbor; on a signal to change the direction of movement.
Passing the ball on the move in threes with a change of place (“eight”).
Passing the ball in threes with a screen 3 x 3, 4 x 4.
Pick Up Object Relay (toss the ball up and collect as many objects from the floor as possible).
Passed - sit down relay (the captain stands opposite his column and passes the ball to the players who must catch the ball, return it to the captain and sit down).
Outdoor game "Race of balls in a circle" (players are arranged in a circle, having previously calculated for "first-second", the balls are with the captains of the "first" and "second"; on a signal, the balls are passed to the players of their number until they hit the captain).
Outdoor game "Ball in the center" (players form a circle and pass the ball to each other; two drivers try to intercept the ball).
Mobile game "10 passes" (players are combined into two teams, each of which tries to make 10 passes in a row between its players, the second team tries to intercept the ball and start passing it between the players of its team).
The mobile game "Shtander" (the leader throws the ball up, calls any of the names of the players (at this time the players scatter), shouts: "Stop!". The one whose name was called must catch the ball and, without leaving the spot, try to hit ball to a nearby player).
Simple drills for basketball without dribbles, turns with the ball, etc.
Technique of passing the ball to a partner with two hands from the chest and passing with one hand from the shoulder
The simplest and at the same time reliable way of mastering the ball is considered to be catching the ball with two hands. The preparatory phase of the exercise for basketball goes like this: if the ball flies towards the player at chest or head level, you should stretch your arms towards the ball, with fingers and hands that are not tense, forming a kind of funnel, somewhat larger than the girth of the ball. The main phase: at the moment of contact with the ball, you need to grab it with your fingers, bringing your hands together, and bend your arms at the elbow joints, thereby pulling the ball to your chest. The final phase: after receiving the ball by the player, the body again moves slightly forward; the ball, sheltered from the opponent by spread elbows, is taken out in a position of readiness for subsequent actions.
Catching the ball with one hand. When the game situation does not allow reaching the flying ball and catching it with both hands, you should catch the ball with one hand.
Preparatory phase: the player extends his arm in such a way as to cross the flight path of the ball (the hand and fingers are not tense). The main phase: as soon as the ball touches the fingers, the hand must be taken back - down, as if continuing the flight of the ball (automated movement). Finishing phase: the ball must be supported with one hand, then firmly grasped with both hands so as to be ready to proceed immediately.
Ball Dribble - Basketball drills
With markers, hoops.
In place with a squat.
With one hand in an emphasis lying.
Jumping forward on one leg.
On the wall with one hand and alternately with both hands.
In pairs towards each other from the sidelines of the court, exchange balls in the center.
During the "shuttle" run.
In the direction indicated by the teacher's gesture, stop on signal.
With the pronunciation of the number that the teacher shows with his fingers.
In groups of 5-6 players within the 3-second zone, each trying to knock the ball away from the other player.
On the gymnastic bench.
Sitting on a gymnastic bench, moving forward.
While changing from a column of one to a column of four.
With transfer from behind, stop, continue dribbling.
Relay race.
"Snake" relay (driving the ball "snake" between pins in pairs, holding with free hands).
Train relay (the first player circles the ball around the post, comes back, the second one joins him, then they continue to dribble together, then three, etc.).
And the most mobile exercises for basketball are the well-known Salki with dribbling” (the driver with the ball tries to touch the players running away from him with his hand. The driver is forbidden to walk with the ball and throw the ball at the players).
High dribbling technique
Dribbling with a transfer behind the back
Dribbling is a technique that allows a player to move the ball around the court with a wide range of speeds and in any direction. The dribble allows you to get away from a tight defender, get the ball out from under the shield after a successful fight for the rebound and organize a swift counterattack. With the help of dribbling, you can put up a barrier to a partner or, finally, distract an opponent who is guarding a partner for a while, in order to then pass the ball to him for an attack.
In all other cases, dribbling should not be abused, so as not to reduce the speed of counterattacks and not disturb the rhythm of the game. The dribbling is carried out by successive soft pushes of the ball with one hand (or alternately right and left) down and forward somewhat away from the feet.
Double step
After a partner pass.
While running nearby, take the ball from the teacher's hands, throw after a double step.
Dribbling, double step, passing the ball to a partner instead of throwing.
Throws into the ring in pairs, triplets, fours after a double step.
Passing in a pair of two balls in motion with a double step and a throw into the ring.
Dribbling, passing back to a partner who takes a double step and throws into the ring.
Team competition (players attack different rings after dribbling and double step, counting team hits aloud).
Double step and ring shot
Retrieve the ball
Passing the ball in a double jump, positioned on both sides of the backboard.
Rebounding balls in pairs (players try to pick up and throw the ball into the ring).
Outdoor game "Fight for the ball" (players stand in circles and pass the ball to each other. Several drivers move between circles and try to intercept the ball. The one who caught the ball announces a change of circles. The one who was left without a circle becomes the driver).
Outdoor game "Get rid of the ball" (players are united into two teams that stand on opposite sides of the area where the balls are located. The task of the players is to throw all the balls to the opponent's area).
Methodology for teaching the basic technique in basketball to elementary school students
Exercise for developing speed - Super Shuttle
-Starting position - on the front line under the ring -Start moving to point "A" in a protective stance and a quick dash from “A” to “B”, we pay attention to minimizing the turnaround time -From point “B” with an added step in a protective stance, move to the starting position -Jump and touch the shield (well, or the ring). -Again in a defensive stance, move to "C" -Turn and jerk from "C" to "D" -Additional step in a defensive stance, return to the starting position -Jump and touch the shield or ring
Exercise for training - Zigzag
- Place 4 markers, it can be absolutely
any things: chips, balls, stones, etc.
The main thing is to spread them on the same line at
a distance of about 3 meters from each other -Now stand in the middle between the first and
with the second cone, measure 3 meters to the side and
be sure to put another marker
(after that you will need to put 3 more markers). - Perform a dash to the first marker - then
in a defensive stance move to the left - when you get to the marker
- step forward in a defensive stance to the right -After the last marker, perform a short jerk (3-5 meters)
Such exercises for basketball as a zigzag must be performed 6-8 times, a break is the time until you reach the start.
Exercise - shuttle with the transfer of the ball
-So, we start the movement from the front line (START). The ring is on your left. -Dash to point "A" and receive a pass from the coach (partner) -Immediately give the pass back, turn around and dash to the endline "B" -At point "B" jump out and touch the backboard, net or rings -After landing, we run out to the perimeter again, we get a pass and return it back -Again, a dash to the ring, a jump, we return to the coach, we receive a pass and now we don’t give it back -Turn around and perform a quick dribbling to the ring and finish with a lay-up or dunk.
Exercise square - psychological training in basketball
These exercises for basketball should be performed for 60-90 seconds. Then you can switch roles. For starters, 2-3 sets will be enough, and then move on to 4-6 sets with a 1-2 minute break. If you are training a group of players, then change them every 60 seconds.
This exercise combines the training of both physical and psychological condition. It is interesting to see how often a tired player is unable to remember the number of the vertex to which he should run.
Basketball coaching hacks: how to score goals for beginners
Even if you are a novice basketball player, we will not give you a training plan, but we will tell you why the ball flies anywhere but into the ring and into your hands. It's all about technique: even with regular training and perseverance, novice adults and children often make simple mistakes. It's a shame, let's fix it. Below are 11 life hacks on how to hone your technique to increase the likelihood of a goal for your team.
Basketball Shot Rules for Beginners
1. Hands up
In pursuit of the attacker, raise your hands, even if you are standing with your back to the pass, and even more so if the ring is in front of you. Your raised hands will increase the chance of intercepting the ball from the opponent by 2 times. Don't overlook this little thing!
2. Make shield rolls
Even Tim Duncan did not neglect them! A square is drawn on the basketball backboard. If you are standing opposite the ring, then aim at the middle of the upper part of the square, if you are standing on the side, then at the corner. If you hit this square, then the ball is at 90% of cases will fall into the ring. The law of physics and no cheating!
3. Look at the ring, not at the ball
Practice driving the ball with your hand, not your eyes, develop tactile control. Your eyes should be on the hoop while dribbling and be aware of the position of your body in relation to the hoop. Then you will be able to take the correct posture, and the throw will be effective.
4. Dribble with the balls of your fingers only
The palm should not touch the ball, only the pads of the fingers. Dribbling should become familiar to you, like an extension of your hand. Then you can change its trajectory at any time and you will have more chances to score goals. Practice with the ball constantly.
5. Throw with one hand
If you throw the ball with two hands, you reduce the chance of hitting the basket. All the efforts of the throw are in one hand (in the right for right-handers, in the left for left-handers). The other hand only holds the ball, the leading one holds it with the fingers, not the palm.
6. Do not jump when protecting the ring
Jumping is the main mistake of rookie defenders. To intercept the ball and block the shot, simply stick out your hands. When you are in a jump, the attacker will easily bypass you.
7. Don't look back
When you dribble, don't look back, but dribble and aim for the ring, focus on shooting (or passing to another player on your team).
8. Bring the throw to automatism
Incorporate the most basic basketball techniques into your training plan and bring the shot to automatism. Throw first from a distance of half a meter from the ring, gradually increasing it. Learn to throw the ball so that it hits the hoop without touching the edge.
Throw the ball with all fives and jump
Throwing Rules:
Head in the center of the body - if tilted, accuracy is lost.
Look at the ring: mentally build a trajectory. If you are far away, the ball flies in a curved curve with a maximum height of 2 meters above the hoop.
A strong hand is in front and throws, a weak hand is on the side and directs, only holding the ball. The elbow of the throwing hand must be in line with the ring.
The ball must rest on the fingers without touching the palm. The fingers are as far apart as possible and grab the ball.
Throwing arm bent 90 degrees, forearm perpendicular to the floor. If you bend less, then you get not a throw, but a throwing of the ball horizontally.
The main thing in the throw is the position of the body and its balance. Place your feet apart and parallel to each other: it is important to orient them in the middle of the basket. Then the direction of the body during the jump will coincide with the direction of the throw, and the ball will fly straight into the ring. When the feet are uneven, the ball flies in the wrong direction or does not reach (although the throw was normal).
Take a deep breath and release as you exhale.
How to hold the ball and shoot in basketball
How to throw correctly: straighten your arm, point your wrist up, and with your hand set the ball to rotate in the opposite direction from the flight. The ball should seem to "roll" off your fingers.
9. Copy masters and play as a team
Watch professional basketball games and try to copy the movements of your favorite players in training. And be sure to conduct game sparring - this will allow you to develop more techniques.
10. Do not throw in a straight line
The higher the arc of the ball, the greater the chance of a goal and the less chance of blocking by the opponent.


 Then place the ball on your hip so that you have your guide hand free. With your guide hand, measure the distance from the tip of your index finger to the tip of your thumb. Then compare that distance to the tip of the index finger and the tip of the pinkie.
 I encourage players to hold the ball so that the guide hand is on the very side of the basketball with the fingers pointed at the ceiling when the ball is at the set point. From that position, all the guide hand has to do it come off the ball a fraction of an inch, and it is out of the way and passive in the shooting motion.
 Continue to work on the habit of simplifying your hand position, not intentionally making it more difficult.
 All the drills that I use with my NBA players, laid out in order in video form. Stop guessing what to work on. Start getting results.
 If you gave Stephen a millisecond to shoot, you'd see the ball splashing through the net.
 So now all you have to do is catch and go right up with your shot.
 To help them give you more accurate passes, you should always provide them with a hand target right at your shot pocket.
 This takes thousands and thousands of practice repetitions.
 " In other words, any time you touch the ball, you have the ball in your shot pocket, your eyes on the rim, and your feet and stance loaded in case you have an opportunity to take a good shot.
 The exercises are aimed at developing the basic techniques in basketball, as well as developing speed and agility on the basketball court. We will divide these exercises for basketball into 2 categories:
  So great results in the 100m do not always lead to the same success when trying to run into a fast break. Much more important will be the ability to quickly "switch" between running forward and backward, left and right.
 Then a turn and in the opposite direction.
 The one whose name was called must catch the ball and, without leaving the spot, try to hit ball to a nearby player).
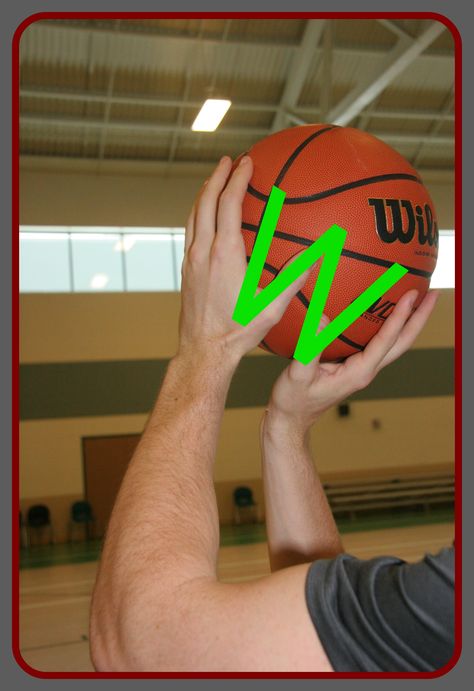
 The driver is forbidden to walk with the ball and throw the ball at the players).
 Several drivers move between circles and try to intercept the ball. The one who caught the ball announces a change of circles. The one who was left without a circle becomes the driver).
 Don't overlook this little thing!
 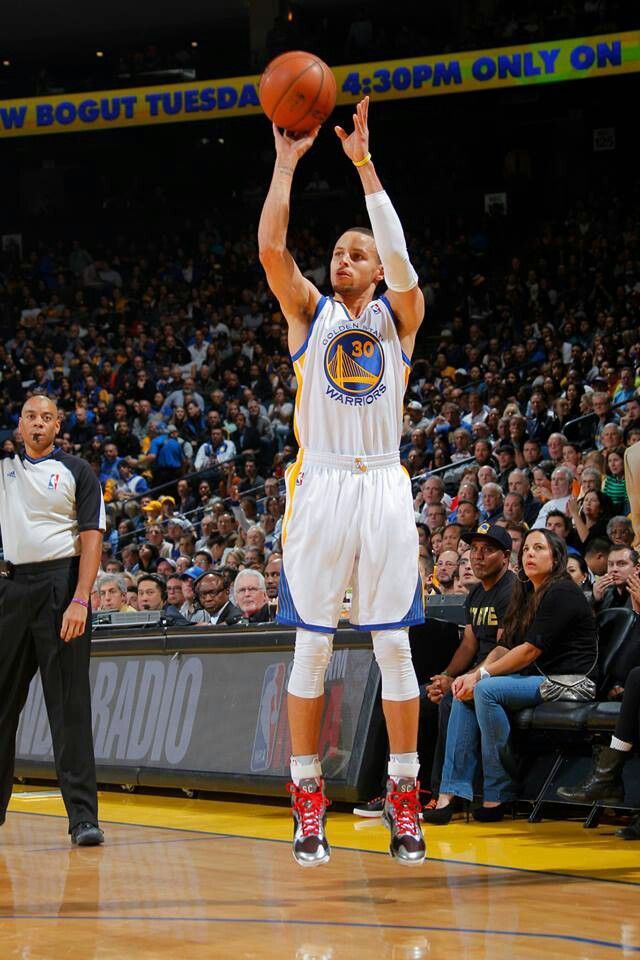 Practice with the ball constantly.
  Learn to throw the ball so that it hits the hoop without touching the edge.
  Then the direction of the body during the jump will coincide with the direction of the throw, and the ball will fly straight into the ring. When the feet are uneven, the ball flies in the wrong direction or does not reach (although the throw was normal).