Home » Misc » How to tie basketball shoes without laces showing
How to tie basketball shoes without laces showing
How to Tie Basketball Shoes
So you just bought a brand new pair of basketball shoes, and you laced them up and went straight to the court to play a few games. However, when you got back home you noticed your feet and ankles were sore and you had a few blisters on your feet.
These are all problems from having your basketball shoes improperly laced. Knowing exactly how and why you should lace your shoes properly for basketball can ensure you are playing at your peak performance, and also stave off injury.
Quick Navigation
First Things First
When you are looking for the best way to tie your basketball shoes, there are a few things to consider:
Are you playing in a sanctioned game or a pick-up game?
Does the way your shoes look matter to you?
Do you have wide feet?
These are all things that will matter in the final decision on how to tie your shoes and should be considered. While the first method on our list below will work for any of these situations, the other methods should be considered as well.
Trial and error to see how your feet react to different lacing and tying are paramount. Every person has a different preference for how their shoes should feel, so we suggest experimenting to find exactly what works for you.
Method #1 – The Old School
If you are looking for a good all-around way to tie your shoes, this is simple and decently effective. Your mom probably showed you how to tie your shoes this way when you were a little kid, and there is a good chance you still tie at least some of your sneakers this way today.
All you need to do is lace them in the normal crisscross pattern all the way to the top of the shoe. If you are wearing high tops, make sure you go all the way up to the top of the shoe, providing that extra ankle support.
This method works great for quick pickup games at your local park, or when playing with your friends. It could be used in a proper game situation, but there are better options.
Most people know how to lace and tie this knot, but if you don’t, this video will teach you how:
Method #2 – The Sasquatch
If you have extremely wide and large feet, this is the method for you. You will lace them exactly the same as the old school, starting at the bottom eyelets. The difference here is you will skip the next set of eyelets, giving you more room in the shoes for your larger feet.
You will still need to tie them as tight as you can comfortably, but this should provide an easier fit for your wider than average feet. Don’t forget to go to the top of your high tops. Don’t skip any sections on the high top upper, as you don’t want to run the risk of a sprained ankle.
Check out this video to see this lacing technique in action:
Method #3 – The Competitor
The last method is for those of you who play basketball competitively. This means at a high level, be it a church league, high school, college, or even professionally.
You will want to tie them as you did in Method #1, starting at the bottom and lacing up in a crisscross pattern. However, once you reach the top of your high top sneakers, you will want to lace the very top eyelet reverse (lace from outside to inside) and leave it loose. It should look like you have two bunny ears, one on each side.
After that, you will want to finish normally, except taking the criss crossed laces at the end through the bunny ears and pulling tight before tying. This will give you the absolute most support and protection against injuries.
To get a better understanding of this method, check out this video:
Tips and Tricks
Making sure the bottom of your shoes stay clean and clear of any debris is just as important as lacing and tying them properly. So after you leave the gym and head home, make sure you take the time to scrub the bottom with soap and water to keep your soles nice and clean to prevent injury.
The last tip we have for you is to always double knot your shoes. This will ensure that they don’t come loose and cause a tripping hazard. The knot is what holds the entire shoe firmly against your foot, giving you the most stability. Given its importance, make sure it is as strong as possible with a double.
Final Words
Don’t go into a game with your shoes laced halfway and tied loosely. You are just asking for a twisted ankle or worse. Take the time out to tie your shoes correctly and keep your feet and ankles in the best shape they can be.
Do you have a specific way you tie your basketball shoes? Let us know in the comments below!
How To Tie Basketball Shoes (3 Different Ways)
I was seven years old the first time I learned to tie my shoe by myself. It was one of the happiest days of my life because I felt I achieved something. It was my dad who taught me how to tie my shoe. The reason why he taught me to tie my shoe is that he was tired of bending his knees every time I loosen the tie on my shoe.
When I grew older, I realized that learning to tie my shoe is essential because this skill I’ve learned will be used every day in my life. I used this skill in many circumstances in my life, especially when I started to fall in love with basketball.
There are injuries that you can encounter because of improperly lacing up your basketball shoes. Knowing the correct way of lacing up your shoes will bring the best out of you. Plus, it will prevent you from getting some serious injuries.
What To Consider?
1 What To Consider?
2 Different Ways To Tie Your Basketball Shoes
3 How Tight Should Your Basketball Shoes Be?
4 Final Words
There are a few things you need to consider before picking what method you will use. These are things to consider:
How many minutes would you play?
Do you have wide or large feet?
Are you playing an organized game or a pickup game?
Do you feel any pain in your ankle lately?
Will you consider to play at your highest level?
These are a few things you probably need to consider before choosing what method you will use to tie your shoes. Lacing up your shoe isn’t just lacing up your shoe. Consider the lacing of shoes as your priority as well because mistakenly laced shoes can cause injuries.
Try our different methods below and see what your feet would feel. People have diverged preferences for how their shoes should feel, so we cannot come up with a conclusion on what your feet should feel when you try one of each method. Try experimenting some of these methods to see which of these methods works perfectly for you.
Different Ways To Tie Your Basketball Shoes
These are the different ways to tie your basketball shoes. Each distinct ways have different purposes. The first method we’ve featured was the basic and can be used in any situation but try to consider the other methods to see what works well for you.
Method #1 – The Basic
If you wanted a simple method and easiest way to learn to tie your shoes, this method is the one you should consider. Probably this was the method taught by your mom or dad when you are a little kid. You can use this method in any situation and can compatible with any lace-up basketball shoes.
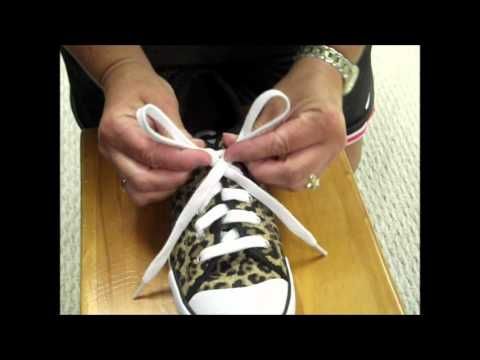
We called it “the basic” because the method is a piece of cake. All you need to do is to lace it in a crisscross pattern to the top of the shoe. Tie a basic knot and make a bunny ear with each lace. Crisscross the loops, tuck one under the hole that has been created, and then pull.
This method is adequate for street basketball games, pickup games, or when playing with your friends. You can use it in an organized game, but there are other best options below.
Check the video below if you have no idea what this method is:
Method #2 – Wide Feet Method
If you have wide and large feet, then this method is basically for you. You will lace them like the basic. Start at the bottom eyelets on the way to the top eyelets. The only difference here is you will skip one set of eyelets. Doing this method will give your large feet more room in the shoes.
Make sure to tie them in a comfortably tight manner. It should be tight so the knot won’t lose easily, but it should be also comfortable so your feet won’t get irritated while running on the floor.
Check the video below to see how this method was done:
Method #3 – The Ultra Lock
This method is for basketball players who play in an organized game. An organized game means playing in a 12 minutes quarter game. It could be a college basketball game, intramural games, or even professionally.
First is to tie them like in method #1, start at the bottom eyelets and lacing it in a crisscross pattern up to the top eyelets. When you get to the top, place it on the other side and pull it through, and you will have one bugs bunny ears, one on each side. Cross the laces, and put it through each bugs bunny’s holes.and then pull it nice and tight. Then tie the shoe like you normally do. This method will give you strong support and protection on your ankles. It will prevent you from getting severe injuries.
Check the video below for a concise instruction of this method:
How Tight Should Your Basketball Shoes Be?
A poorly tied basketball shoe can put you at risk of injuries. Basketball will test your physical strength. You will do a lot of jumping and changing direction at a very high speed. Plus, you will run around the court for many minutes.
Your basketball shoes must be properly laced up to prevent serious injuries. It should be enclosed and tight to ensure that your risk of getting an ankle sprain is lessened. Aside from making sure your lace is tight, consider making sure to tie your shoe where you are comfortable. In other words, lace your basketball shoe as tight as possible where you feel comfortable and safe at the same time.
Final Words
Never enter the court without correctly lacing your shoes. It will affect your game and prevent you from playing at your best. Improperly lacing up your shoe can cause you many unwanted injuries. Injuries could be severe or mild. Make sure to take time to tie your shoe before playing. It will keep your feet and ankles unharmed.
Do you have your unique way of tying your basketball shoes? If so, please let us know in the comments section below!
Spread the love
Slamdunk Journal :: How to lace basketball shoes
It is very important to lace up basketball shoes correctly.
It is very important to properly lace up your basketball shoes. The laces hold the shoes in place for optimal support. Improper lacing can lead to blisters, twisted ankles, and even foot injuries.
There are over five different types of lacing, all of which provide a comfortable fit for your foot type.
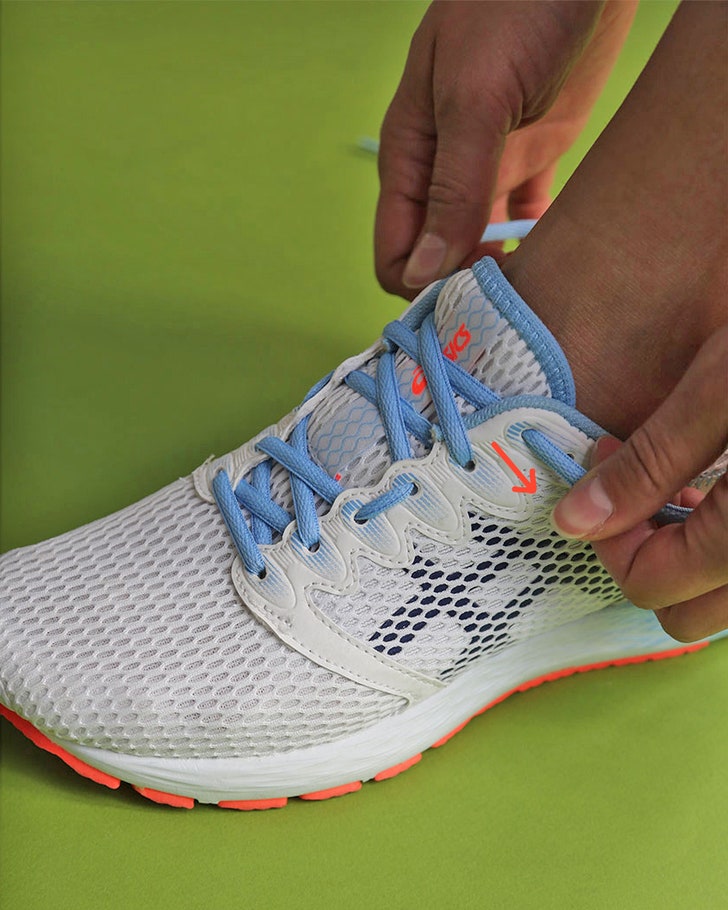
Butterfly Stitch
This style of lacing is ideal for people who have wider toes and a narrower back. Women who play basketball often find that this style will help them fit their shoes better.
For this type we use the standard criss-cross method until we reach the eyelet closest to the last shoe. In the penultimate eyelet, we will pass the lace through the top and make small loops on each side of the hole. Then we pass the second lace through these loops and pull the lace tightly.
This style of lacing creates a tight collar at the ankle so the shoe sits snugly in place. When the laces are tight, you tie them in the standard way.
Double lace
This method is often used by women and men whose feet are wider in front than at the heel.
For this lacing we need 2 sets of laces. The short ones are perfect. One set to lace up the bottom of the eyelets and another for the top. The standard transverse lacing method is used on both the bottom and top of the shoe. Leave the bottom of the laces looser when you tie them to fit the width of your foot.
Tighten them at the top so that the ankle collar fits snugly.
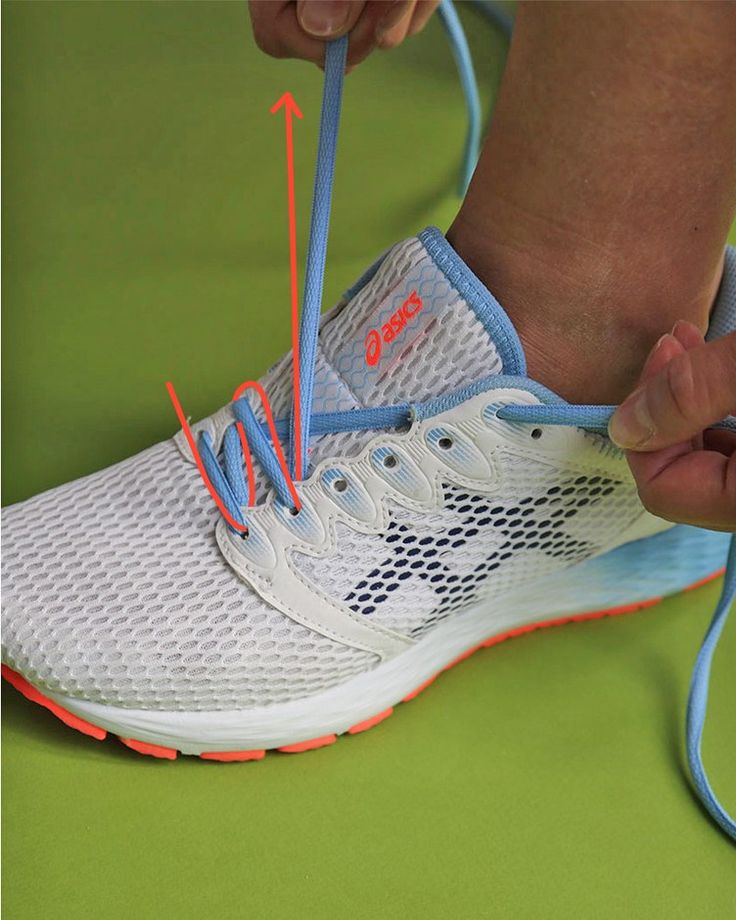
Skip lace
The lace style is great for relieving pain in the top of the foot.
Using the standard crisscross lacing method, lace up the shoe from the beginning to the third hole. For the next two eyelets, move the laces straight up and through the holes without crossing them. From the fifth loop we continue the standard cross-lacing method.
Lace Splay
This is the ideal lacing technique for people with high arches.
Divide the string into segments of equal length. Start at the bottom and insert one end into the eyelet and then go straight through the shoe to the other hole. This will allow the lace to form a straight line on the shoe.
Now use another piece of string and draw a stripe on the eyelet just above the last one used. Then we move the lace straight to the next hole without crossing the shoe. Move this lace to the next hole without crossing the shoe. Now we continue to create stripes, alternating one lace after another.
When we get to the end, we'll just tie it up as usual.
Trouble Spot Lacing
If you have hammer toes or similar foot problems, this lacing method can relieve pressure in those areas of the foot.
Take two-thirds of the cord length in one hand and one-third in the other. Using the longest part of the lace, we create a strip of the desired diagonal by threading it into the opposite eyelet so that it is over the tongue and in reverse order, but already under the tongue strip. Repeat this system until you reach the top. Then we will tie, as usual.
How tight do you tie basketball shoes?
Shoes should be laced tight enough to feel close to your foot. It should not allow your heel to move up and down when walking, running or jumping.
How to tie basketball shoes without showing the laces?
Tie the shoes in the usual way and tuck the laces under the tongue of the shoes so that they are not visible. Always tie your shoelaces in a double knot so they don't come undone.
What is the best way to lace up basketball shoes?
Traditional lacing is the best way to lace up your shoes. We cross one lace over the other until we reach the top of the shoe, and then we tie them with a double knot so that they do not come undone.
Sometimes we think that if we had the most expensive pair of basketball shoes, we would have less pain in our feet and the shoes would stay on our feet better. But we just need to learn how to adapt to the shoes we wear.
The type of shoe lacing you use will depend on your feet, the style of play you play and the shoes you wear.
By trying different lacing styles and techniques, you can find ways to improve your shoes and reduce foot pain.
Slamdunk.su
How to lace up sneakers very nicely?
May 22, 2019
Sneakers are shoes for sports and daily wear. This is a unique shoe in which every detail is thought out, even insignificant at first glance. This type of sports shoe is characterized by an elastic sole, the use of breathable materials, an ergonomic insole, a spectacular design, a durable heel counter and reliable laces. Did you know that simple laces can be laced in a very unusual way? How to do it right, you can find out in this article.
Main features of laces for sports shoes
At first glance, it seems that laces are not the most basic component of any shoe. However, without this detail it is impossible to wear your favorite sneakers. This accessory appeared at the beginning of the twentieth century, which greatly simplified the wearing of shoes. Previously, instead of this part, special fasteners were used - buttons, buckles.
Laces are pieces of thin rope of a certain length that are threaded through holes in the shoe and are designed to hold it on the foot. Accessories are made from artificial and natural materials. They have tips made of plastic, silicone and metal, which are located at the ends of the laces. This greatly simplifies the lacing process, and also prevents the product from fraying.
Items related to
Converse Chuck Taylor All Star Lo black M9166 8 500 rubles Available sizes: 8.5, 9, 9.5, 10, 10.5
Converse Chuck Taylor All Star Lo white M7652 8 500 rubles Available sizes: 4, 4.5, 5, 5.5, 6, 6.5
Converse Chuck Taylor All Star Lo M9697 navy 8 500 rubles Available sizes: 3, 4, 4.5, 5, 5.5, 6.5, 7.5, 8, 8.5, 9, 9.5, 10, 10.5, 11, 12, 12.5
How to lace up your sneakers without having to tie your laces: basic techniques and variations
Not every person knows that there are many types of lacing. Many people know the most banal option. However, there are many options for tying shoelaces: from simple ways to intricate weaves. These lacing options are suitable for different types of shoes.
The original way of tying shoelaces, twisting them with each other, threading them into special holes on shoes allows you to stand out from the crowd, attract the attention of others. Below are the most popular lacing options, as well as their pros and cons.
Cross method
This method has long been recognized as a classic, since it is one of the most popular among sports shoe lovers. Even a small child can master a simple zigzag lacing method. It is for this reason that kindergarten teachers and parents teach kids to tie shoelaces using this method.
To lace the sneakers in this way, it is necessary to pass the tie from the inside through the bottom holes. After that, the ends of the ties are brought out, crossed with each other and again carry out similar movements with the second pair of holes. Manipulations are repeated over and over again until the final tying of the laces. As a result, the lace, which was tied in this way, is located almost on the outside, so it does not rub the legs. This method has one minor drawback - it is possible that the sneakers will collapse.
One of the variants of the cross method
The main difference between this option and the one that was considered earlier is that the laces are inserted into the holes from top to bottom, crossed from the inside, and then brought out again and crossed again. The main advantage of this method is the high speed of lacing. Other advantages of the method are ease of lacing, reduced wear. It is only suitable for sneakers with a pair of holes. Otherwise, the upper ends of the laces will be directed to the inside of the shoe, which will provoke some inconvenience during tying.
European lacing method
This method has another name - a ladder. The lacing technique has some differences from the previous methods. Despite this, it is lighter and faster.
The sequence of operations is as follows:
pull the tie out through the bottom holes of the sneakers;
for example, the right end is threaded crosswise and taken out through the hole on the opposite side;
second (left) - output in the same way, bypassing one hole;
actions alternate until the completion of tying shoelaces.
The main advantages of this method are that the shoes laced in this way are very tight to the foot, and the tying process does not take much time. The lacing also looks neat. If a person has injured the lower limb and it is necessary to quickly remove the shoes, the laces tied in this way are easy to cut. The disadvantage of this option is that the large distance between the holes does not look very nice.
How to tie your shoelaces beautifully: straight or rectangular lacing
This popular method is only suitable for pairs of shoes that have an even number of holes. The main distinguishing feature is that there is no diagonal lacing on the inside.
Procedure for tying shoelaces this way:
the lace is pulled inside the bottom holes of the shoe;
the right end is lifted from the inside of the sneaker, after which it is first threaded into the right and then into the left hole;
the left side of the lace is brought out in the same way, skipping one hole;
manipulations are repeated until the tying is completed.
A simpler and more understandable way of rectangular lacing has been developed, which looks like this:
pre-lace is inserted through the hole in the bottom of the shoe;
after that, the left end rises up inside the sneaker, and then it is pulled through the left hole first;
then the left end is pulled through the right hole;
the same end of the lace must be brought out through the right hole, and then pulled inside the left one;
similar actions are performed to the very top;
the second part of the lacing needs to be lifted up and out through the last hole;
after completing all the manipulations, it remains only to adjust the length of the laces.
If a pair of shoes is distinguished by the presence of five holes on each side, then this method can be slightly modified. For example, you should skip the bottom pair of holes. In any part of the lacing, make a cross stitch, make a diagonal tie or double stitch on the second pair of holes in the sneaker.
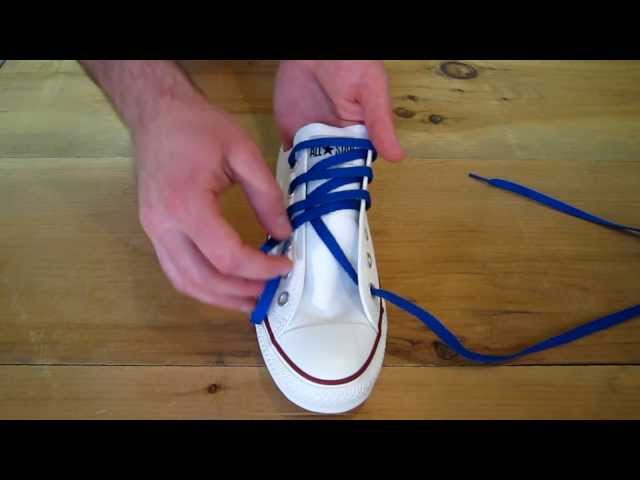
Method to hide laces in sneakers
A method that allows you to hide the knot during lacing, makes it possible to neatly lace up the sneakers. In this case, the ends of the lace should be hidden inside the shoe. This is the most spectacular option that has no drawbacks for shoes that have a pair of holes. Despite this, some difficulties may arise when tying shoelaces. In addition, the seal that appears after tying brings some discomfort while wearing shoes.
As for the lacing procedure, it has some common features with the rectangular method. In this case, there is one significant difference - one end must be made shorter than the second. After the lacing procedure is completed, both parts of the lace are hidden inside the sneaker. The main feature of the method is that the left side is left unlaced, while the right side is fully laced. The last step in the lacing procedure with this method is to tie both parts of the accessory on the left side of the shoe.
Lacing for those who are going to travel or hike
This option allows you to provide excellent tightness of the shoe. The lacing technique is as follows:
initially the lace is passed from the inside to the outside;
after that, the left end is pulled into the upper hole of the sneaker, and then into the one on the right side;
further, both laces rise up, stretch inward through one hole and are brought out to the opposite side and stretched higher;
at the end of the lacing procedure - both ends are on the same side, and then they are tied into a knot.
At first glance, the result of lacing does not look pretty enough. However, this type of lacing makes it possible to prevent various insects from crawling inside the shoe, clinging to branches, snags and other unwanted obstacles. This effect is achieved thanks to tight lacing.
Roman version
This method has an aesthetic appearance, but some difficulties may be noted when tightening the laces.
The lacing procedure has the following sequence:
one lace is pulled through the left hole of the shoe, after which it rises vertically and goes out of the hole;
the upper end of the accessory is inserted into the lower hole on the right side, and the lower end at this moment is inserted into the upper one;
after that, the lower part of the lace should be pulled up two holes, and then to the opposite side, again up one level;
the other end is pulled immediately two levels up, while skipping one hole;
then the ends that were crossed are raised one level higher and tied into a small knot.
Lacing method "Ladder"
This option is preferred for those who want to lace up their sneakers in an unusual way. You need to immediately pay attention to the fact that the chosen method is characterized by the complexity of execution. In addition, it will be extremely difficult to tighten the laces more tightly. Despite the difficulties, this option looks very impressive. The method is suitable for high models of shoes or sneakers with long laces.
The sequence of actions is as follows:
laces lead out from the inside;
their ends are lifted and passed into the holes located at the top;
then they must be crossed among themselves and threaded under the vertical sections;
is then lifted a step up, passed through the holes, and then crossed again;
manipulations are repeated until the lacing is completed.
Method called "Butterfly"
Many people are interested in the answer to this question: are there ways to lace up sports shoes if the ties are of insignificant length? The answer is simple - there is such a method, and it is called "Butterfly". This option is characterized by an unusual look.
The lacing procedure consists of the following steps:
the lace is passed inside;
then it is pulled vertically, after which the tie is brought out;
after crossing the ends are pulled into the next pair of holes;
the actions performed are repeated again to the top.
In the case of an odd number of holes, the lacing procedure ends with the crossing of the laces, with an even number, the lacing comes out without intersecting.
Method "Double helix"
Consists of these steps:
the tie comes out of the left hole and enters into the right one;
The left side of the lace is inserted into the right hole, and the right side comes out of the left.
The advantages of this method are accuracy, speed and ease of lacing.
nodal
This method creates another knot at each level, thus forming a strong contraction. The technique consists of the following steps:
the tie is pulled from the inside through the bottom holes;
its ends are connected, divorced in opposite directions;
they are displayed in the same way as the first row: from the inside to the outside.
Methods for tying shoelaces on shoes with different numbers of holes
If there are four holes on the sneakers, you can use the cross-tie method. We also apply the method in the form of even strips.
The most common types of sneakers are products with five holes. In this case, the technique "Knot or loopback" is suitable.
Lacing in the form of a lattice or web is applicable for sneakers that have six holes. For effective lacing, you can use thin ties.
To improve the appearance of old sports shoes, it is enough to purchase new laces and choose the most suitable lacing method. It depends on the personal preference of the individual.
Watch the TOP video: 5 ways to lace up your shoes beautifully

 This means at a high level, be it a church league, high school, college, or even professionally.
 So after you leave the gym and head home, make sure you take the time to scrub the bottom with soap and water to keep your soles nice and clean to prevent injury.
 It was my dad who taught me how to tie my shoe. The reason why he taught me to tie my shoe is that he was tired of bending his knees every time I loosen the tie on my shoe.
 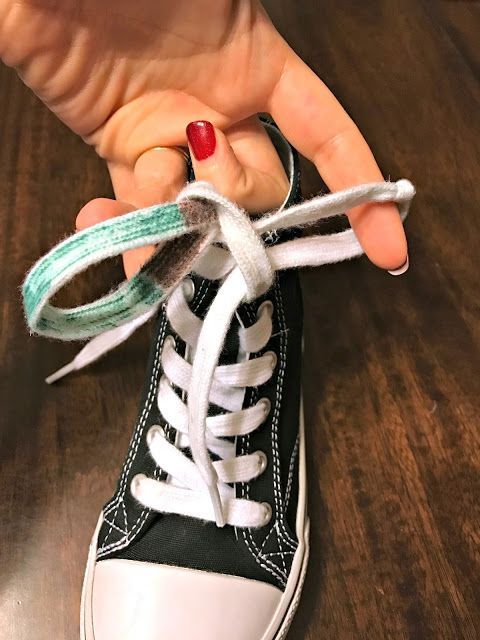 Lacing up your shoe isn’t just lacing up your shoe. Consider the lacing of shoes as your priority as well because mistakenly laced shoes can cause injuries.
 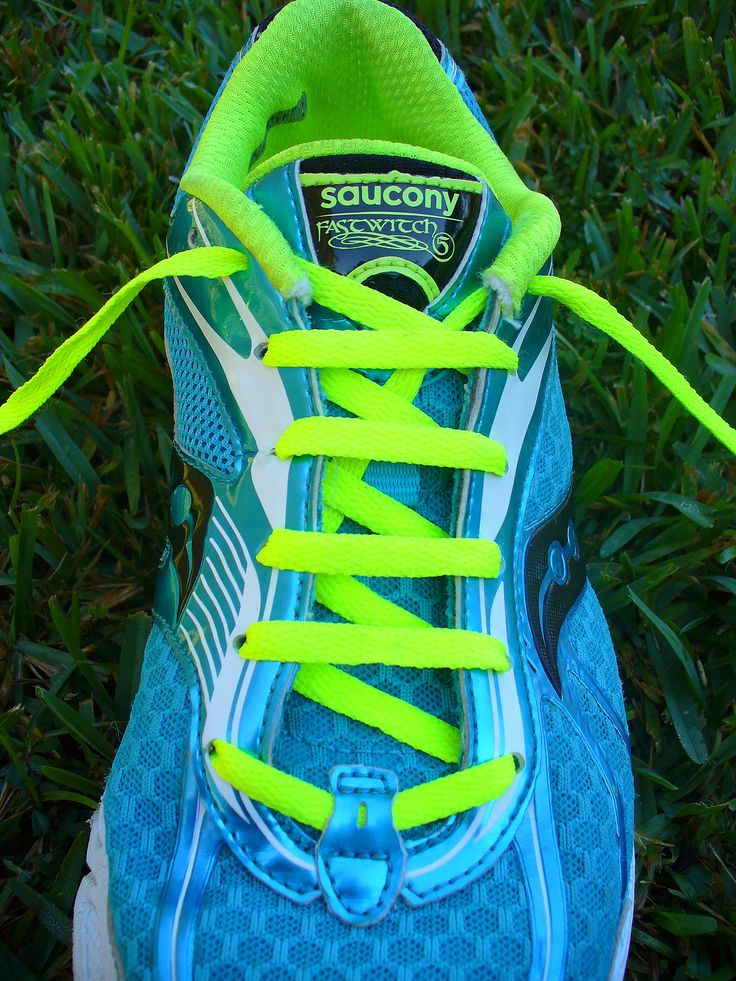 You can use this method in any situation and can compatible with any lace-up basketball shoes.
 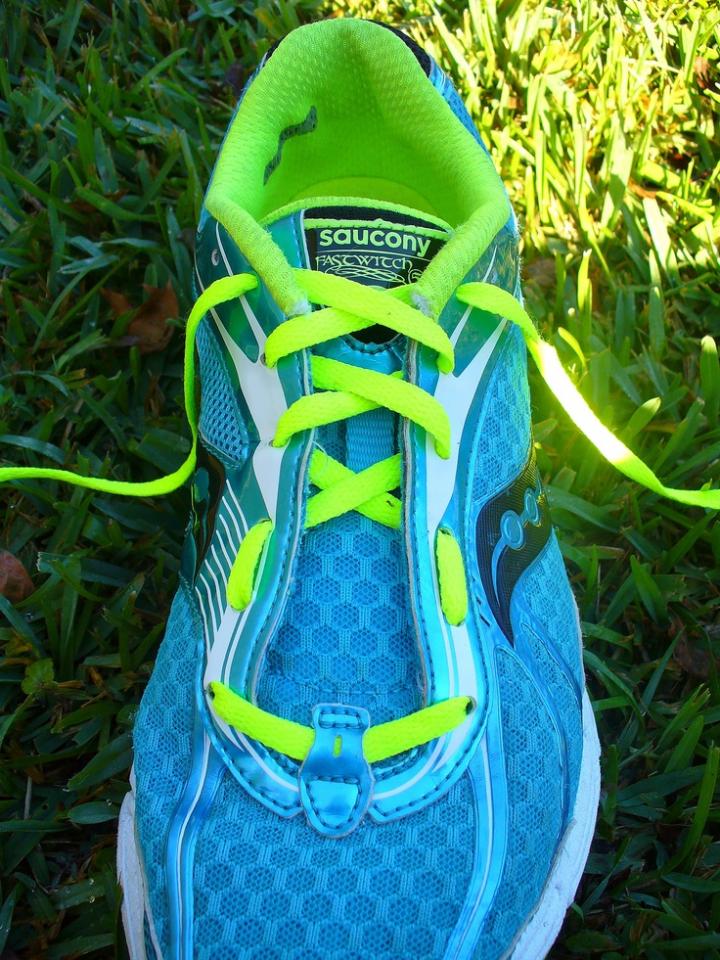 It should be tight so the knot won’t lose easily, but it should be also comfortable so your feet won’t get irritated while running on the floor.
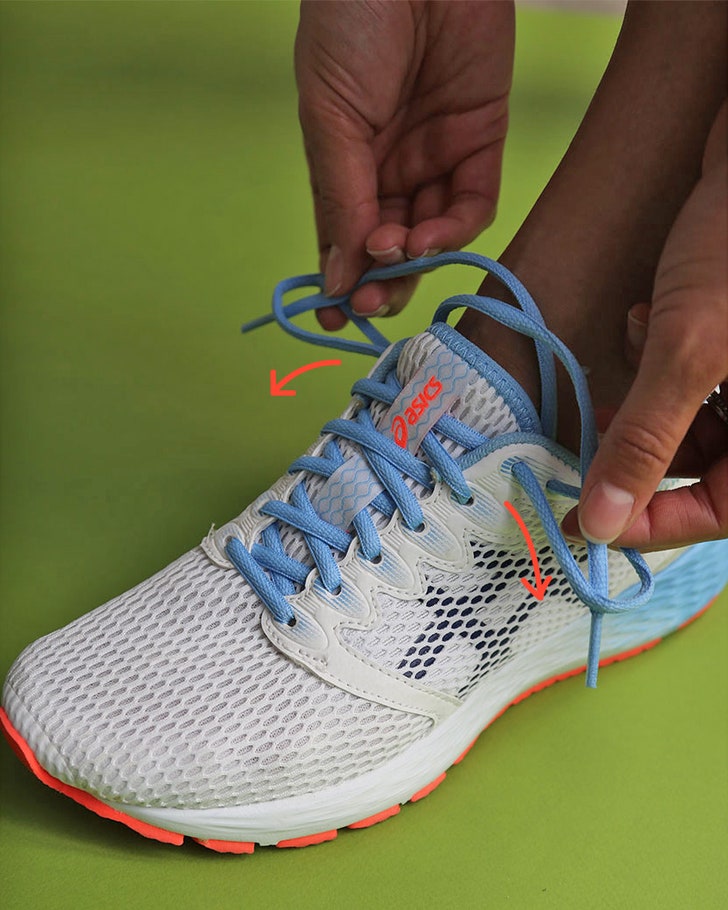 Basketball will test your physical strength. You will do a lot of jumping and changing direction at a very high speed. Plus, you will run around the court for many minutes.
 Start at the bottom and insert one end into the eyelet and then go straight through the shoe to the other hole. This will allow the lace to form a straight line on the shoe.
 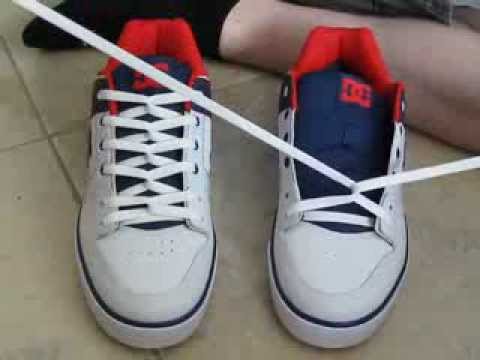 Then we will tie, as usual.
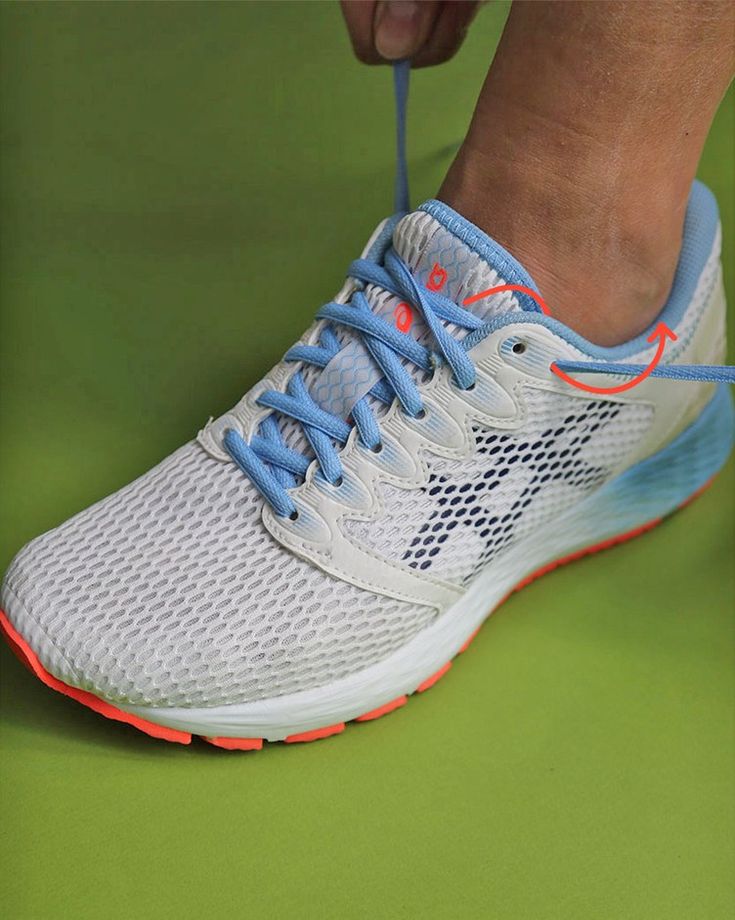
 Previously, instead of this part, special fasteners were used - buttons, buckles.
  Many people know the most banal option. However, there are many options for tying shoelaces: from simple ways to intricate weaves. These lacing options are suitable for different types of shoes.
 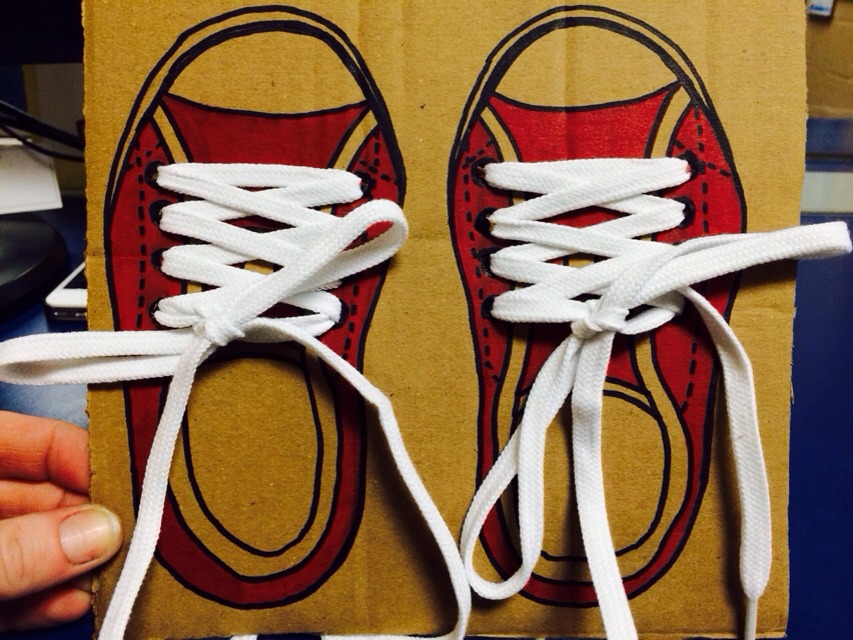 Manipulations are repeated over and over again until the final tying of the laces. As a result, the lace, which was tied in this way, is located almost on the outside, so it does not rub the legs. This method has one minor drawback - it is possible that the sneakers will collapse.
 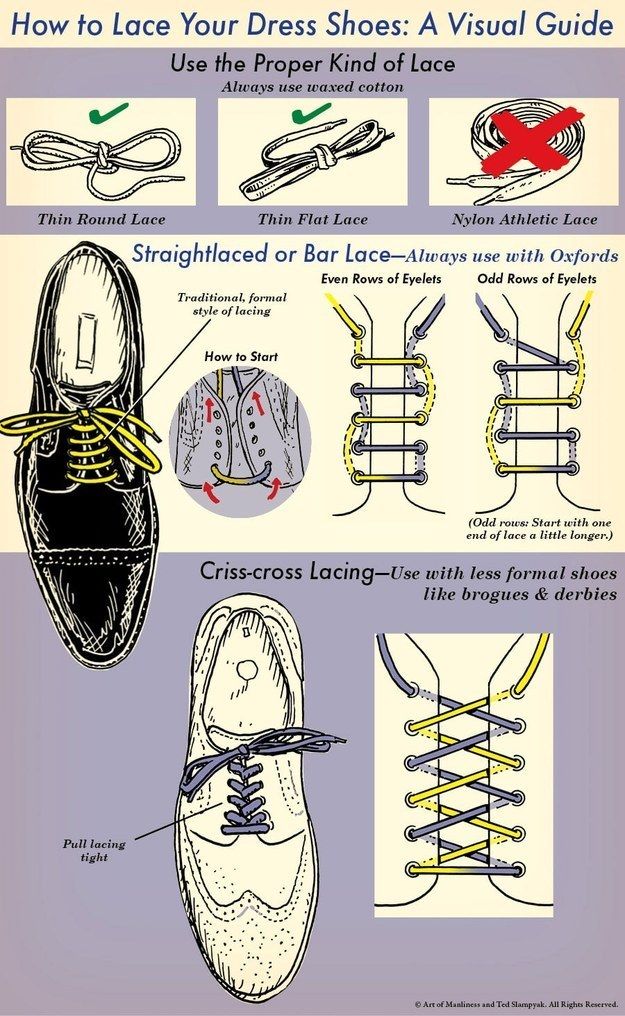 Despite this, it is lighter and faster.
 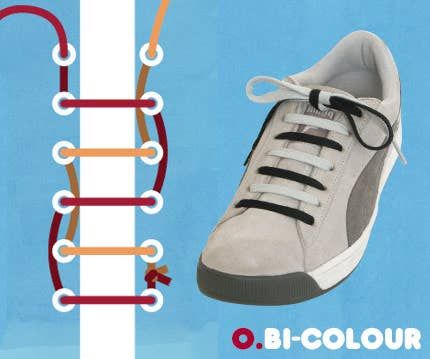 The main distinguishing feature is that there is no diagonal lacing on the inside.
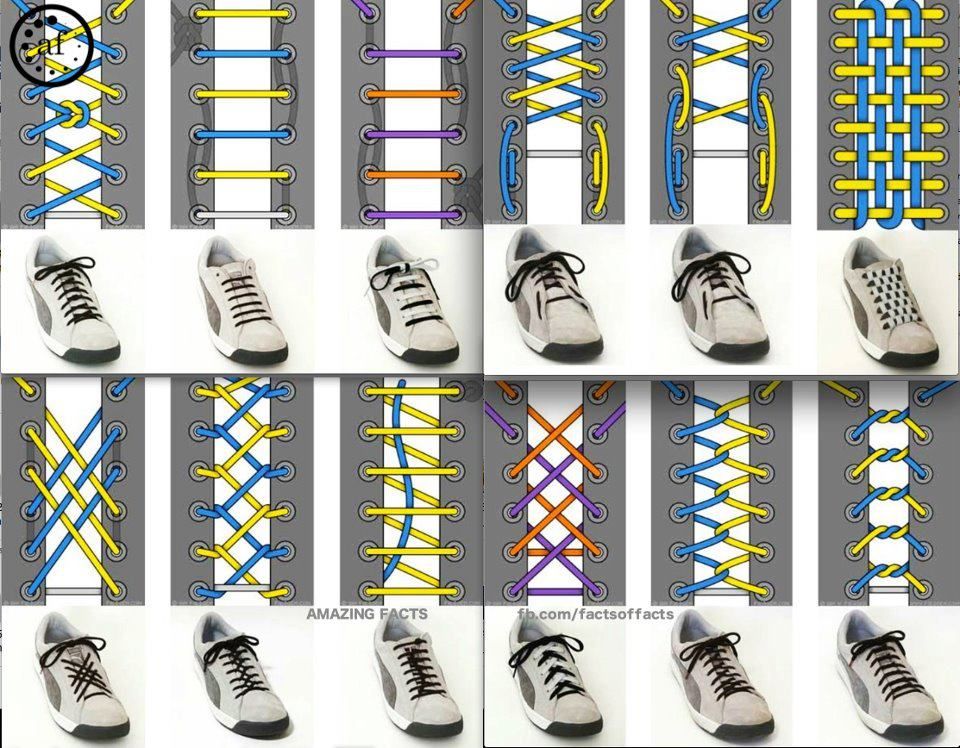
 After the lacing procedure is completed, both parts of the lace are hidden inside the sneaker. The main feature of the method is that the left side is left unlaced, while the right side is fully laced. The last step in the lacing procedure with this method is to tie both parts of the accessory on the left side of the shoe.
 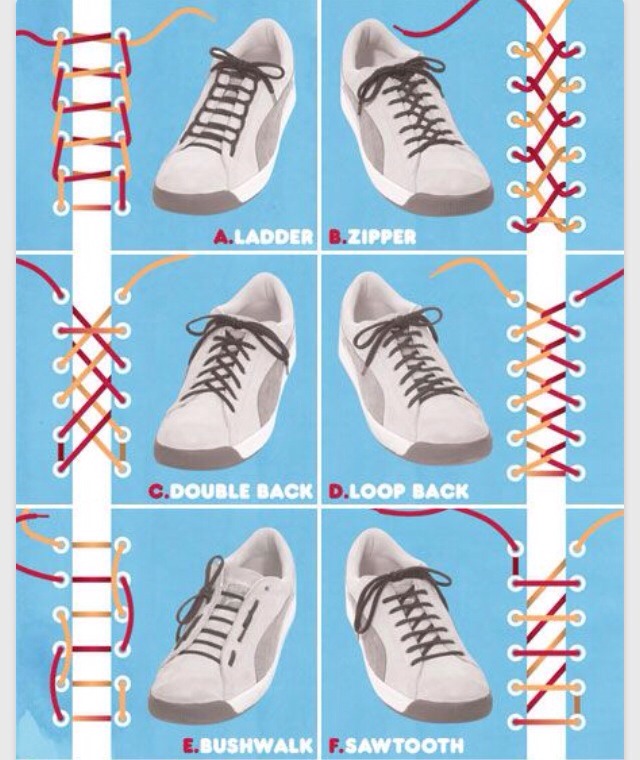 However, this type of lacing makes it possible to prevent various insects from crawling inside the shoe, clinging to branches, snags and other unwanted obstacles. This effect is achieved thanks to tight lacing.
 This option is characterized by an unusual look.
  The technique consists of the following steps: