Home » Misc » How to get quicker on defense in basketball
How to get quicker on defense in basketball
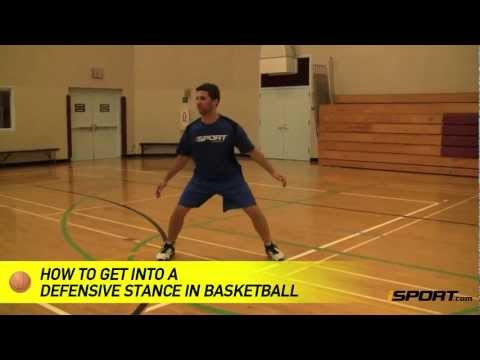
Increase Your Speed on Defense | Basketball
Effective basketball defense maneuvers require strength in several key muscle groups, but they also require situational awareness, fast reflexes, and strong hand-eye coordination. In order to take a basketball defense strategy to the next level, it’s a good idea to perform drills and maneuvers that exercise both strength and skills at the same time.
But first, what skills and strengths are required to increase speed and elevate both team and personal defense? Here are a few key focus areas.
1. Leg strength: defense positions are often low and stable, which means they depend on strong quads, strong hamstrings, and power in the core. While in a lowered position with high tension in the quads, basketball players still need to maneuver quickly across the court. In the video below, the basketball players will execute a shuffling exercise that will help them increase speed while staying balanced and in control.
2. Speed while dribbling: Maintaining high speed and ball control at the same time takes practice. Running drills, both with and without the ball, can help a defense player keep up with a running partner as he or she moves across the court.
Passing speed and accuracy: Passing drills and running drills are both core aspects of solid defense. Exercises like those in the video can help basketball players increase ball handling speed while staying low and strong in the core.
In the video embedded below, Trevor Theismann of Kbandstraining.com leads a group of athletes through a set of partner-based defense drills. Notice that the basketball players are wearing Kbands resistance training bands attached securely to their upper legs. These bands provide additional tension that can support training goals and help athletes gain strength in the quads, hamstrings, hip flexors and core. The bands are attached with secure straps and positioned so the long band connects the legs at the back and the short band connects in the front.
When they’re ready to begin the first defense drill, the basketball players have already warmed up and are prepared to control their technique and position to gain explosiveness.
Defense Drills: Defensive Shuffle
To gain the benefits of the first defense drill, basketball players should focus and body position and control over speed. Like the athletes in the video, basketball players should drop down in the core and position their body weight in their upper legs. This is followed by a shuffling lateral motion down the court in which the legs stay wide, the body stays low, and the feet never come in contact.
As two partners complete this move facing each other and shuffling in a parallel motion, they should pass the ball back and forth at chest level. If executed correctly, this defense move should challenge hand-eye coordination, body control in the lower core, and the athlete’s ability to maintain awareness and focus on more than one skill simultaneously. Watch how the athletes in the video stay low and work to keep their feet and knees apart during the move.
After completing the first defense drill, the basketball players move to the side of the court and begin a partner chase exercise. One partner gains a head start and runs down the court without a ball. The second partner pursues while keeping the basketball under control. As in the earlier defense drill, the Kbands add an element of challenge to the move for both partners, since they tighten the running stride and increase tension in the hamstrings and quads.
Defense Drills: Side Shuffle with No Basketball
Now the basketball players return to the center of the court and repeat the first part of the defense drill, but this time they increase speed and leave the basketballs on the side line. With their hands free, they can focus fully on maintaining speed and control in the legs and lower core. Once again, note how they work to keep their body positions low and their knees far apart, even as they increase speed.
Defense Drills: Partner Chase with No Basketball
As the basketball players finish the first defense drill, they move to the wall again for a repeat of the partner chase exercise. But this time they can increase speed since they aren’t using a ball during the drill. Instead, one partner runs down the line and the other runs to keep pace, while both of them work against the resistance of the Kbands. The basketball players maximize the benefits of the drill if they increase speed quickly and maintain control at the beginning and end of the track.
Defense Drills: Final Notes
One of the most important aspects of a tight defense during any game situation is the body’s ability to maintain control while basketball players increase speed. A strong defense play involves a low body position that can move laterally at very high speed without losing balance, which can easily happen if the feet get too close together. Also, when the feet and knees move into toward the centerline, the body position tends to rise up, and a strong defensive stance should stay low and should always be built on a stable base.
As you watch the video, pay close attention to the body positions of the players who seem the most stable, light-footed, and fast during the side-to-motion across the court. Note the control they maintain over their arm motion as well as the path of their feet. As basketball players and teams complete this drill on their own courts, they should monitor each other’s body position and help each other stay low and controlled. Coaches and players should observe the progress of all team members, both while passing the ball and while moving through the drills with hands free.
Better Basketball Defense - Drills and Tips for Improving...
Skip to content
If they don’t have lateral quickness, defenders are doomed. This applies to all sports, and basketball is no exception. A defender who is slow laterally will be easily juked and left looking silly on the court. And let’s face it, nobody wants to look silly.
Most athletes focus on linear speed, and they often neglect lateral speed and quickness. I’m here to help you get quicker when moving from side to side so you can play better basketball defense.
Hip Mobility
Restricted hip mobility is the number one thing that will limit your lateral quickness. You absolutely need to have adequate mobility in your hips. This can be relatively simple to accomplish. Try this:
Step 1 – Foam roll your quads, IT bands, glutes and adductors
Step 2 – Stretch your quads, hip flexors, hamstrings, IT bands, glutes and adductors
Step 3 – Perform 2 sets of 10 repetitions of each of the following exercises:
Bridges (5-second holds)
Fire Hydrants
Scorpions
Straight Leg High Kicks (Frankensteins)
Side Leg Swings
Mountain Climbers (knee outside the elbow)
Backward Hip Rotation Walk
Lateral Movement Strength
Focusing on lateral movement strength in the weight room yields tremendous benefits. A few simple exercises will help you quickly improve lateral movement as a defender. Here are the top three weight resistance exercises you can do to improve your lateral movement.
1. Side Lunges: Holding either a dumbbell or a kettlebell against your chest (like a Goblet Squat), take a big step out to the side, push your hips out in the same direction, sink into a squat position with the other leg still straight, and explosively push back up to your starting position. You can perform all reps on one side before switching, or alternate sides. Complete 3 sets of 8-12 repetitions.
2. Side Squat Walk: Holding either a dumbbell or kettlebell against your chest, assume a squat position. Walk laterally, maintaining a low hip level and tight midsection. Keep your torso tall and erect and your head forward. Walk for either a set distance or for 10-12 steps in each direction. Perform 3-4 sets of 10-20-yard Side Squat walks in each direction, resting 1 minute between sets.
3. Lateral Sled Drags: Using a weight sled (Prowler or other type), attach a harness, TRX or other form of handle to pull the sled. Don’t load the sled too heavily, but don’t make it too easy to pull either. Pull the sled using lateral movement for about 90 feet. Start by dragging the sled at a walking pace and increase it to a lateral sprint. Perform 3-4 sets with one-minute rest between.
Footwork and Plyometric Drills
The last piece of the puzzle when improving lateral movement is to work on your explosiveness and footwork. What good does it do to mobilize and gain movement strength if you lack explosiveness or are tripping over your own feet? These simple drills will have you moving smoothly and quickly in no time.
Agility Ladder, 2 In, 2 Out
The 2 in, 2 out drill is a classic and it’s excellent for improving lateral footwork.
Using an agility ladder, begin on one side.
The foot nearest the ladder always steps first.
Beginning with the inside foot, step into the first square of the ladder. Follow with your second foot.
Leading with the same foot, step out of the ladder with both feet.
Your opposite foot is now the lead foot for stepping into and out of the next square. Your feet should never cross!
Sets/Reps: Repeat this pattern in a smooth and controlled manner twice through the ladder, resting 30 seconds between sets. Don’t worry about speed in the beginning. Just try not to get your feet tangled or snag the ladder.
Skaters
This plyometric exercise is also a footwork and balance drill, but it will help you improve your lateral movement capabilities. Beginning on one foot, jump sideways to the opposite side (if on your right foot, jump to the left), and land on the opposite leg. Jump with as much power as you can. Repeat this movement side to side as explosively as possible.
Sets/Reps: 3×20 (10 each direction)
Side-to-Side Shuffle
Set up two cones about 5 yards apart. Beginning at one cone, assume a low position and shuffle sideways to the other cone. When you reach it, shuffle back to the first cone. Begin this drill slowly, focusing on keeping your hips low and square and moving your feet smoothly.
Sets/Reps: 2×5, with 1 minute rest between sets
Partner Mirror Drill
This may be one of the best exercises to help basketball players develop lateral quickness and improve their reaction time. In a 5-yard space, stand facing your teammate. One of you is the lead, the other is the shadow. Within the 5 yards, the lead moves laterally, changing direction as he or she feels like it, while the shadow tries to mirror every move.
Sets/Duration: 6×10-20 seconds (3 as lead and 3 as shadow), with 1 minute rest between sets.
20-Yard Short Shuttle
The traditional 5-10-5 version of this drill is often used to test football players. However, for the purpose of improving lateral quickness, you will perform a 5-5-5-5 version. Set up two cones 5 yards apart. Starting at Cone 1, sprint laterally to the opposite cone, touch the line, and sprint laterally back to the first cone. Touch the line and repeat until you have covered the distance four times for 20 yards.
Sets/Reps: 3-5 sets, resting 1 minute between
Read More:
Improve Quickness With Lateral Speed Drills
Basketball Quickness Drills with the San Antonio Spurs
Basketball Med Ball Drills for Speed and Quickness
Improve Quickness With Lateral Speed Drills
[cf]skyword_tracking_tag[/cf]
Share This Story!
MOST POPULAR
If they don’t have lateral quickness, defenders are doomed. This applies to all sports, and basketball is no exception. A defender who is slow laterally will be easily juked and left looking silly on the court. And let’s face it, nobody wants to look silly.
Most athletes focus on linear speed, and they often neglect lateral speed and quickness. I’m here to help you get quicker when moving from side to side so you can play better basketball defense.
Hip Mobility
Restricted hip mobility is the number one thing that will limit your lateral quickness. You absolutely need to have adequate mobility in your hips. This can be relatively simple to accomplish. Try this:
Step 1 – Foam roll your quads, IT bands, glutes and adductors
Step 2 – Stretch your quads, hip flexors, hamstrings, IT bands, glutes and adductors
Step 3 – Perform 2 sets of 10 repetitions of each of the following exercises:
Bridges (5-second holds)
Fire Hydrants
Scorpions
Straight Leg High Kicks (Frankensteins)
Side Leg Swings
Mountain Climbers (knee outside the elbow)
Backward Hip Rotation Walk
Lateral Movement Strength
Focusing on lateral movement strength in the weight room yields tremendous benefits. A few simple exercises will help you quickly improve lateral movement as a defender. Here are the top three weight resistance exercises you can do to improve your lateral movement.
1. Side Lunges: Holding either a dumbbell or a kettlebell against your chest (like a Goblet Squat), take a big step out to the side, push your hips out in the same direction, sink into a squat position with the other leg still straight, and explosively push back up to your starting position. You can perform all reps on one side before switching, or alternate sides. Complete 3 sets of 8-12 repetitions.
2. Side Squat Walk: Holding either a dumbbell or kettlebell against your chest, assume a squat position. Walk laterally, maintaining a low hip level and tight midsection. Keep your torso tall and erect and your head forward. Walk for either a set distance or for 10-12 steps in each direction. Perform 3-4 sets of 10-20-yard Side Squat walks in each direction, resting 1 minute between sets.
3. Lateral Sled Drags: Using a weight sled (Prowler or other type), attach a harness, TRX or other form of handle to pull the sled. Don’t load the sled too heavily, but don’t make it too easy to pull either. Pull the sled using lateral movement for about 90 feet. Start by dragging the sled at a walking pace and increase it to a lateral sprint. Perform 3-4 sets with one-minute rest between.
Footwork and Plyometric Drills
The last piece of the puzzle when improving lateral movement is to work on your explosiveness and footwork. What good does it do to mobilize and gain movement strength if you lack explosiveness or are tripping over your own feet? These simple drills will have you moving smoothly and quickly in no time.
Agility Ladder, 2 In, 2 Out
The 2 in, 2 out drill is a classic and it’s excellent for improving lateral footwork.
Using an agility ladder, begin on one side.
The foot nearest the ladder always steps first.
Beginning with the inside foot, step into the first square of the ladder. Follow with your second foot.
Leading with the same foot, step out of the ladder with both feet.
Your opposite foot is now the lead foot for stepping into and out of the next square. Your feet should never cross!
Sets/Reps: Repeat this pattern in a smooth and controlled manner twice through the ladder, resting 30 seconds between sets. Don’t worry about speed in the beginning. Just try not to get your feet tangled or snag the ladder.
Skaters
This plyometric exercise is also a footwork and balance drill, but it will help you improve your lateral movement capabilities. Beginning on one foot, jump sideways to the opposite side (if on your right foot, jump to the left), and land on the opposite leg. Jump with as much power as you can. Repeat this movement side to side as explosively as possible.
Sets/Reps: 3×20 (10 each direction)
Side-to-Side Shuffle
Set up two cones about 5 yards apart. Beginning at one cone, assume a low position and shuffle sideways to the other cone. When you reach it, shuffle back to the first cone. Begin this drill slowly, focusing on keeping your hips low and square and moving your feet smoothly.
Sets/Reps: 2×5, with 1 minute rest between sets
Partner Mirror Drill
This may be one of the best exercises to help basketball players develop lateral quickness and improve their reaction time. In a 5-yard space, stand facing your teammate. One of you is the lead, the other is the shadow. Within the 5 yards, the lead moves laterally, changing direction as he or she feels like it, while the shadow tries to mirror every move.
Sets/Duration: 6×10-20 seconds (3 as lead and 3 as shadow), with 1 minute rest between sets.
20-Yard Short Shuttle
The traditional 5-10-5 version of this drill is often used to test football players. However, for the purpose of improving lateral quickness, you will perform a 5-5-5-5 version. Set up two cones 5 yards apart. Starting at Cone 1, sprint laterally to the opposite cone, touch the line, and sprint laterally back to the first cone. Touch the line and repeat until you have covered the distance four times for 20 yards.
Sets/Reps: 3-5 sets, resting 1 minute between
Read More:
Improve Quickness With Lateral Speed Drills
Basketball Quickness Drills with the San Antonio Spurs
Basketball Med Ball Drills for Speed and Quickness
Improve Quickness With Lateral Speed Drills
[cf]skyword_tracking_tag[/cf]
Share This Story!
Page load link
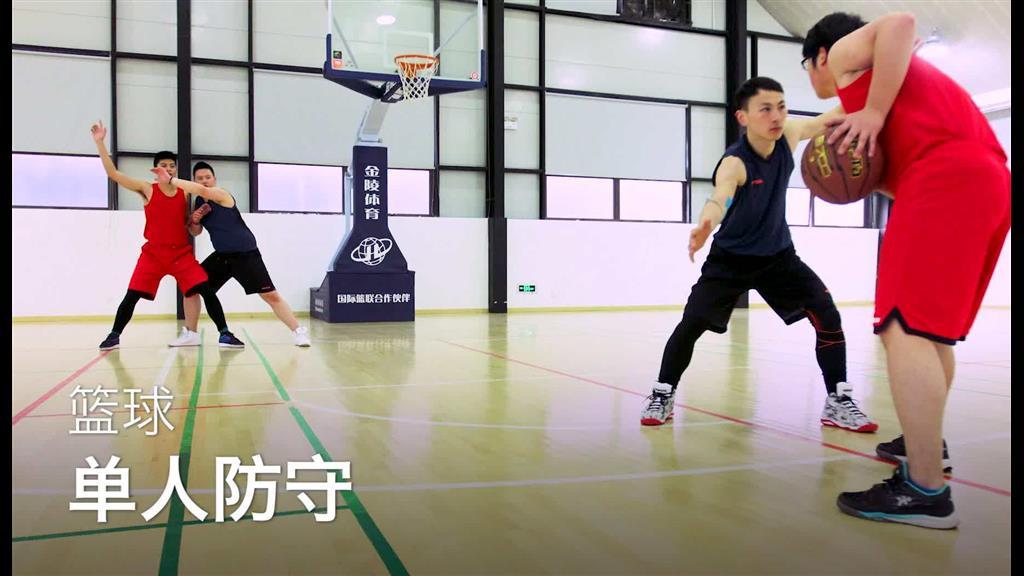
Training to improve protection
Training to improve protection
Learning how to move in defense.
1. Move in a defensive stance diagonally backwards. After 3-5 steps, turn around and change direction. Then do the same diagonally forward. 2. Do the same but add hand movements. The far hand works to protect against the transfer, the near hand imitates the capture of the ball. 2-3 sets of 5 diagonals forward and backward.
DETAILS : Increase and decrease your movement speed. Keep your back, don't jump in the move. The back leg drags along the floor.
CHIPS : Emphasis on the first step, it must be fast and taken with the lead foot.
Improving protective actions.
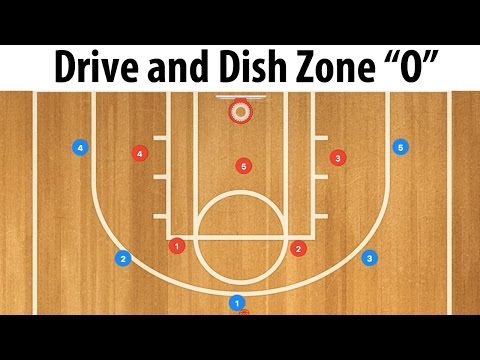
1. Five attackers stand on the perimeter and pass the ball to each other, each of them has a defender. Defenders must change their stance and shift to the correct position depending on the ball. 2. The same, but with active defense, try to intercept or take the ball away. 3. At the signal of the teacher, the player with the ball goes into the aisle. For 30 seconds, then change roles, 3 times.
DETAILS : Defenders must always see the ball, keep their distance, actively use their hands.
CHIPS : The drill will be especially effective if performed without fouls.
Improving protective actions.
1. Stand opposite each other with a partner. The attacker stands still and performs turns, moving the ball to the side. The defender reacts to the attacker's movements and moves accordingly, making defensive movements with both hands in front of the ball. 2. The defender tries to knock out or take the ball away from the attacker. 30 seconds each, 3 sets.
DETAILS : Low stance, keep distance, back straight.
CHIPS : The drill will be especially effective if performed without fouls.
Improving protective actions.
One player (playing) has the ball, two other players - a defender and an attacker. The striker makes movements (forward / backward, right / left), trying to get a pass from the player with the ball. The defender plays in a closed stance, covering the passing line, making it difficult for the attacker to receive the ball. If the pass is still passed, then the attacker must perform turns (one circle forward or backward) and give a reverse pass to the playing along, and the defender must actively interfere with him, try to knock out or take the ball away. 30 seconds in each role, 3 times (change in a circle).
DETAILS : The defender must always have a view of the ball, keep his distance, actively use his hands. The attacker must perform turns without running.
Learning the basic defensive stance.
From a standing position, take a protective stance at the signal. At the next signal, return to the starting position. 10-15 times.
DETAILS : Feet slightly wider than shoulder width and parallel, arms in line with legs, shoulders relaxed, arms half-bent, palms open towards attacker.
CHIPS : The stand must be very stable. To check this, you can knock a little.
Improving protective actions.
1. Three attackers stand in a triangle and pass the ball to each other, each of them has a defender. The defensive stance varies depending on the ball. If your player has the ball, then a parallel stance with active hand work; if the ball is in the possession of a nearby player (in one pass), then a closed stance with overlapping of the transfer line; if the far player has the ball (in two passes), then the stance is open. 2. The same, but with active defense, try to intercept or take the ball away. For 30 seconds, then change roles, 3 times.
DETAILS : Defenders must always see the ball, keep their distance, actively use their hands.
Learning how to move in defense.
Get into a protective stance and move around: 1. Small steps to one side and the other. 2. Small steps to one and the other side with greater speed. 20-30 seconds each exercise.
DETAILS : Leading foot turned slightly in the direction of travel, the "back" foot does not approach the leading, the distance between the legs is maintained.
CHIPS : Emphasis on the first step, it must be fast and taken with the lead foot.
Learning how to move in defense.
1. Move backwards in a defensive stance in a zigzag from the beginning to the middle of the court, quickly, without stopping. Come back with an easy run. 2. Do the same in alternation with acceleration. Start with 2-3 times, and later increase the number of times or distance.
DETAILS : Keep your back, don't jump in the move.
CHIPS : Emphasis on the first step, it must be fast and taken with the lead foot.
Learning how to move in defense.
Move in a protective stance: 1. Back and forth, adding a normal run every three steps. 2. In one direction and in the other, adding the usual run at the command of the coach. 20-30 seconds each exercise.
DETAILS : Leading foot turned slightly in the direction of travel, the "back" foot does not approach the leading, the distance between the legs is maintained.
Improving protective actions.
1. Stand opposite each other with a partner. The attacker dribbles the ball in place with cover, the defender tries to knock out or take the ball away. If he succeeds, then the defender gives the ball back to the attacker. 2. The same, but the attacker moves left and right along the line in 3-5 steps. 3. The same, but the attacker moves diagonally back and forth in 3-5 steps. 30 seconds each, 3 sets.
DETAILS : Keep your distance, back straight.
CHIPS : The drill will be especially effective if performed without fouls.
Learning how to move in defense.
Stand opposite each other in protective stances with a partner. One makes movements, the other repeats after him: 1. The host moves in one direction and the other, makes various movements with his hands (raises and lowers). 2. The leader moves in one direction and the other, sometimes adding a normal run. 30 seconds each, 3 sets.
DETAILS : Increase and decrease your movement speed. Keep your back, don't jump in the move. The back leg drags along the floor.
CHIPS : Turn on your imagination, perform different movements.
Learning how to move in defense.
Accelerating forward 1/4 of the landing, at the end of a step with active work of the hands - moving sideways in a protective stance - again accelerating forward with a step and so on. 3 sites.
DETAILS : Keep your back straight, low stance in defensive movements, active arm work
Improving protective actions.
One player (playing) has the ball, two other players - a defender and an attacker. The striker makes movements (forward / backward, right / left), trying to get a pass from the player with the ball. The defender plays in a closed stance, covering the passing line, making it difficult for the attacker to receive the ball. If the transfer still went through, then the attacker returns the ball to the play-by-player and opens again. 30 seconds in each role, 3 times (change in a circle).
DETAILS : The defender must always see the ball, keep his distance.
Exercises for the development of speed of movements
Hello, dear visitors of the site " basketball-training.org.ua "! In today's article we will talk about such an important aspect of basketball training as development of speed . Basketball is a very dynamic game, and basketball players (especially those playing in positions 1-3) have to move a lot, and often at a jerky pace. Jerks, stops, sharp and sudden changes in direction - all this requires good physical fitness and explosive speed.
The exercises that you will learn in this material will improve the speed of movement around the site, the speed and coordination of movements, and most importantly, will allow you to change direction with minimal delays. Let's start a story about the means and methods of developing speed in basketball players.
Training and development of speed
Let's start with the fact that during the game of basketball, the player has to perform jerks and accelerations over short distances (5,10,20 meters), because the court itself will no longer allow it. So great results in the 100m do not always lead to the same success when trying to run into a fast break. Much more important will be the ability to quickly "switch" between running forward and backward, left and right.
Combining agility training with classic speed training will have a huge impact on your playing ability. As a result, you will not only be able to cover the distance from one ring to another much faster, but you will also be able to direct the remaining energy to perform other specific basketball elements, such as jump , feint or throw . But let's get straight to the exercises.
Speed Exercise #1: Super Shuttle
Starting position - on the end line under the ring
Start moving to point "A" in the guard post
U-turn and fast dash from A to B, focusing on minimizing turnaround time
From point "B" with an added step in a protective stance, we move to the starting position
We jump up and touch the shield (well, or the ring).
Back in defensive stance move to "C"
Turn and dash from "C" to "D"
With an added step in a protective stance, we return to the starting position
Jump out and touch the shield or ring
Super Shuttle
The exercise is performed 6-8 times with a 60-90 second break in between. If you are a coach, or just do this exercise with friends, then I suggest a little increase in motivation to do it. As soon as the first player reaches point "A", the second one starts moving. A large number of players can be divided into 2 groups, placed on 2 rings and have a small competition.
Speed Exercise #2: Zigzag
Place 4 markers (they can be absolutely anything: chips, balls, stones, etc.) on the same line at a distance of about 3 meters from each other
Now stand in the middle between the first and second cone, measure 3 meters to the side and put another marker (total you will need to put 3 more markers).
Dash to the first marker - then in guard stance move to the left - when you get to the marker - sidestep in guard stance to the right
After the last marker we perform a short dash (3-5 meters)
Zigzag (wave)
Exercise is performed 6-8 times , a break is the time until you reach the start.
Speed Drill #3: Shuttle with Ball Pass
So, we start the movement from the front line (START). The ring is on your left.
Dash to point "A" and receive a pass from the coach (partner)
Immediately return the pass, turn around and dash to the end line "B"
At point "B" jump out and touch the shield, net or ring
After landing, we run out to the perimeter again, get a pass and return it back
Again dash to the ring, jump, return to the coach, get a pass and now do not give it back
Turn around and do a quick dribble to the basket and finish with a lay-up or dunk.
Shuttle and pass
The exercise is repeated 4-6 times, with a short break (60-90 seconds), or almost without a break - if you are a very tough player! It is better to give the pass from the three-point line, and, as can be seen from the figure, you need to receive it in the area of \u200b\u200bthe line for the free throw.
Speed Exercise #4: Square
To begin your workout, mark out a 6 x 6 meter square (original suggested 6 x 6 yards, which is approximately 5.5 meters). Put some kind of marker in the middle of the square - this will be the starting position
Each of the vertices of the square needs to come up with a name (1,2,3,4 or A, B, C, D). Coach or your partner names the top of the square at random
As soon as the vertex is named, the player makes a dash to it, and the same dash to the starting position, i.e. to the center of square
As soon as the player reaches the center, the coach (partner) names the next peak


 Watch how the athletes in the video stay low and work to keep their feet and knees apart during the move.
 I’m here to help you get quicker when moving from side to side so you can play better basketball defense.
 A few simple exercises will help you quickly improve lateral movement as a defender. Here are the top three weight resistance exercises you can do to improve your lateral movement.
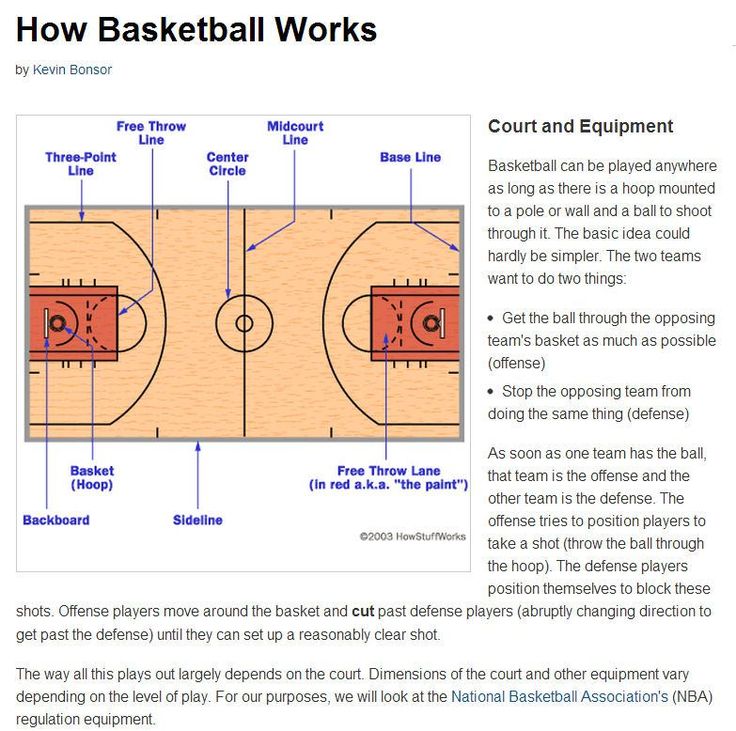

 Beginning at one cone, assume a low position and shuffle sideways to the other cone. When you reach it, shuffle back to the first cone. Begin this drill slowly, focusing on keeping your hips low and square and moving your feet smoothly.
 Set up two cones 5 yards apart. Starting at Cone 1, sprint laterally to the opposite cone, touch the line, and sprint laterally back to the first cone. Touch the line and repeat until you have covered the distance four times for 20 yards.
 I’m here to help you get quicker when moving from side to side so you can play better basketball defense.
 A few simple exercises will help you quickly improve lateral movement as a defender. Here are the top three weight resistance exercises you can do to improve your lateral movement.

 Beginning at one cone, assume a low position and shuffle sideways to the other cone. When you reach it, shuffle back to the first cone. Begin this drill slowly, focusing on keeping your hips low and square and moving your feet smoothly.
 Set up two cones 5 yards apart. Starting at Cone 1, sprint laterally to the opposite cone, touch the line, and sprint laterally back to the first cone. Touch the line and repeat until you have covered the distance four times for 20 yards.
 After 3-5 steps, turn around and change direction. Then do the same diagonally forward. 2. Do the same but add hand movements. The far hand works to protect against the transfer, the near hand imitates the capture of the ball. 2-3 sets of 5 diagonals forward and backward.
  For 30 seconds, then change roles, 3 times.
 At the next signal, return to the starting position. 10-15 times.
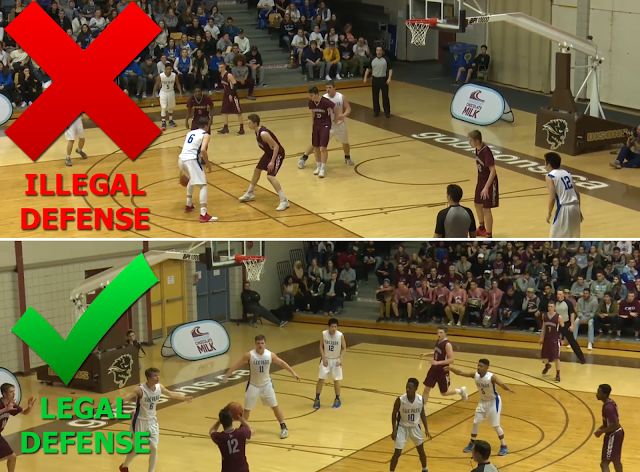
 Start with 2-3 times, and later increase the number of times or distance.
  The attacker dribbles the ball in place with cover, the defender tries to knock out or take the ball away. If he succeeds, then the defender gives the ball back to the attacker. 2. The same, but the attacker moves left and right along the line in 3-5 steps. 3. The same, but the attacker moves diagonally back and forth in 3-5 steps. 30 seconds each, 3 sets.
  The defender plays in a closed stance, covering the passing line, making it difficult for the attacker to receive the ball. If the transfer still went through, then the attacker returns the ball to the play-by-player and opens again. 30 seconds in each role, 3 times (change in a circle).
  Let's start a story about the means and methods of developing speed in basketball players.