Home » Misc » How to improve basketball shooting range
How to improve basketball shooting range
How to Develop Long Distance Basketball Shooting Range
By Jeff Haefner
Would you like to make MORE shots from farther back? Would you like to become a great 3-point shooter?
We have some very effective shooting tips for you...
When extending your range, you need to know about some surefire RIGHT and WRONG ways to get it done.
You need to be very careful because all too often players will try to extend their range and acquire some subtle, yet dead-serious shooting flaws!!
Like this article? Download it as a free PDF! (Download Now!)
The trick is to extend your range while maintaining the EXACT SAME FORM.
There are only TWO ways to increase your range:
INCREASE YOUR PHYSICAL STRENGTH AND POWER.
ADJUST YOUR SHOT MECHANICS FOR ADDITIONAL POWER.
With that said, we'll teach you exactly how to increase your range both ways. It's up to you to decide which method you choose.
Many times, it's best for players to make very small improvements in both areas.
How to increase your physical strength and power for increased range.
The most obvious answer is to start a weight training program. Increasing the strength of your entire body will help. You'll want stronger and more explosive legs, core, wrist, forearms, and triceps.
In addition, by simply practicing more, you will increase the strength of your wrists and forearms. Taking 500 shots a day will increase your strength.
Lastly, you can try using a heavy ball (twice the weight of a regulation ball) and then going back to the regulation size one. Players usually find it easy to shoot from farther out because of the contrast. Wait until at least junior high before working with an oversized or weighted ball.
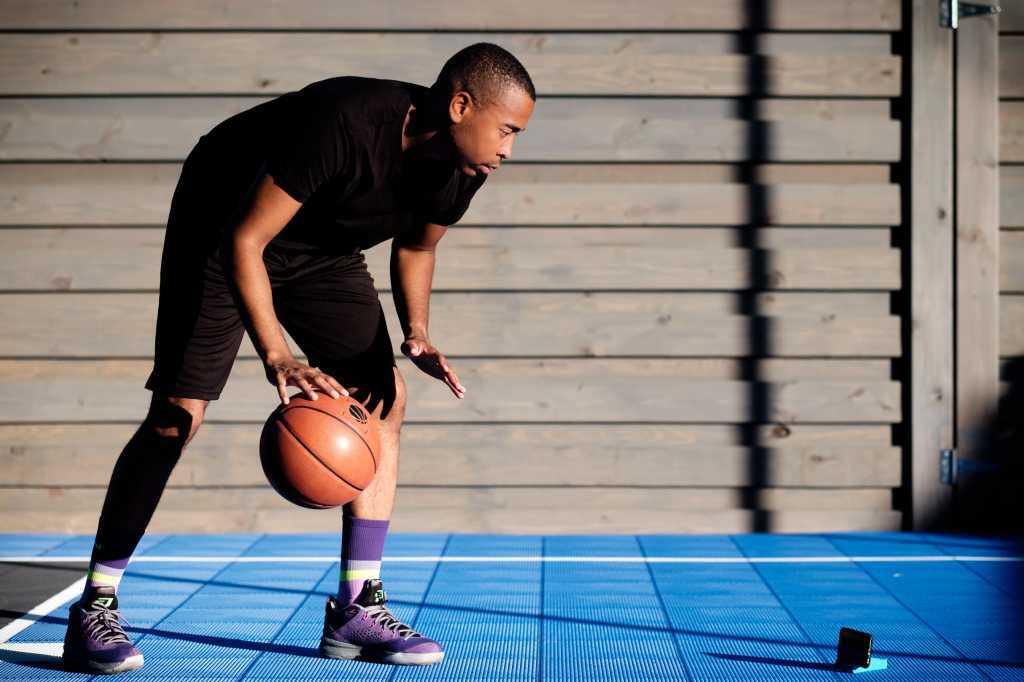
If you use a weighted ball, be sure to practice away from the basket. Do form shooting with one hand. Put your guide hand in the normal position, but an inch off the ball so you're not touching it. Focus on shooting the ball high and far, but do not sacrifice good form in order to do so.
How to adjust your mechanics for additional power.
This can be tricky because changing your mechanics can throw off your shot. Big changes to your mechanics will require you to retrain your muscle memory and you'll need thousands of repetitions to retrain your muscle memory.
In most situations, it's best to make very minor adjustments to your shot delivery.
ADJUSTMENT TECHNIQUE #1
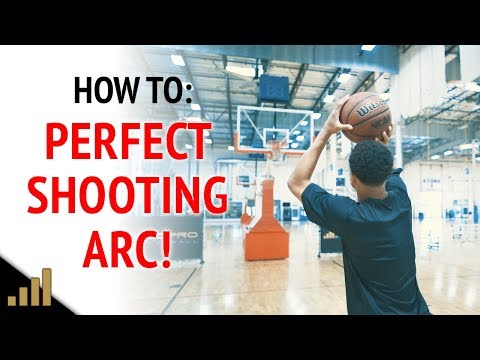
A good technique for developing range is to intentionally shoot the ball all the way over the backboard. This kind of power is achieved through using optimum leg power and releasing the ball a split second before reaching the top of the jump motion. If done properly, then generating enough force to shoot over the backboard, even from beyond the 3-point line, is not that difficult.
Once players realize how much power is available through this motion, they can learn to control it for shooting at the rim. Since this takes less force than shooting over the backboard, players have more confidence shooting from long ranges.
It's important to shoot a split second BEFORE you release the top of your shot. You'll lose tremendous power if you jump, hang, and shoot on the way down. Plus, you just give your defender more time to block your shot.
ADJUSTMENT TECHNIQUE #2
Another effective technique is to drop your elbow. If you watch Steve Nash you'll notice that he drops his elbow when shooting three pointers. If you're going to adjust mechanics, this is a good option to consider because it doesn't alter your delivery mechanics too dramatically.
ADJUSTMENT TECHNIQUE #3
Yet another technique to consider is to try to decrease the time that it takes to get the ball from your shot chamber to your release point. This will add power to your shot and increase your range.
The safest way to increase shooting range
If you want to take the safest route, here's a surefire way to extend your range without sacrificing your accuracy.
Let's say you are proficient at mid-range but you want to become a great 3-point shooter...
The obvious answer is to practice. The question becomes what to practice. Shooting revolves around rhythm and form, so that is where the answer lies.
It might sound strange, but to become a better 3-point shooter, you have to practice a lot, close to the basket. Take 100's and 1000's of shots 12' from the basket. The purpose for this is to really ingrain your shooting form from an area that you can shoot comfortably and have some success. It doesn't make a difference what drills you do or how you practice it, as long as the primary thrust of the work is your form.
Once you have your form ingrained, gradually move back. If you get to a point where you feel the rhythm change or your form start to change, that is the limit of your range. Stay at that spot until your shot feels like it did at 12 feet. Once it feels comfortable again, shoot several hundred shots until it becomes automatic again.
Once it feels automatic again, start to move back until you reach the limit of your range and shoot continually from that spot. Once you feel comfortable from behind the 3-point line, you can start shooting drills that will make you more proficient.
Players struggle from behind the arc because they have to change their shot to get the ball to the basket. This not only makes the shooter inconsistent from the 3-point line, but it affects his shot from everywhere else. Remember, to be a good shooter, you have to take the same shot every time, no matter where you shoot the ball.
Related Products & Resources
Attack & Counter Basketball Workouts - Shooting, Ball Handling, Finishing, Footwork, and More
Baden 28.5" Shooting Basketball
Baden Heavy Training Basketball - 29. 5'
Baden 35" Oversized Training Basketball
Rapid Fire - II - Basketball Rebounding/Return Device
USA Basketball - 3 Tips to Increase Your Shooting Prowess
YOUTH TIPS: The Basic Jump Shot
ADVANCED TIPS: Shooting Routines for Guards
Here are three tips that you can implement right now into all of your basketball shooting drills.
Whether it's shooting off the dribble, off the pass or from the triple-threat, these tips will serve you well as you continue to master new basketball shooting drills and skills.
Keep these in mind as you work on your shot, and with hard work, you can be that sharpshooter that every opponent fears when you step on the court!
Practice Fast, But Not Out of Control
This is the sweet spot for continuous improvement. Practicing basketball shooting drills at a speed that is comfortable is great to first learn the skill. But to improve you need to constantly challenge yourself. If you want different results, do something different.
You are never going to improve substantially by practicing at the same speed. Once you are comfortable with a shooting drill, always strive to do it faster, harder and quicker. Do it in less time, with less dribbles or less steps; etc. Always ensure you're challenged.
To balance this argument, make sure you are not out of control. Making mistakes is a good sign that you are pushing yourself but once your good habits start to fade or your shooting mechanics start to falter, you need to slow down. This could lead to bad habits replacing your good ones or faulty mechanics. Once you develop these bad habits, they are hard to correct. After all, it doesn't matter how quickly you release your shot if it doesn't have a good chance of going in.
Find that sweet spot in continually challenging yourself while staying in control, if only barely. That's the key to continuous improvement.
Footwork is the Base and Basis of your Shot
Your feet really are at the base of your shot and form the basis for the rest of your shot. When players get tired or are shooting out of range, the first symptom is often poor footwork from being lazy or trying to generate that extra power. This leads to bad habits that become harder to correct as the player gets older and they become more engrained in their routine.
Sound footwork ensures you are shooting from a stable platform, are aligned with the target, and gives you rhythm when shooting off the dribble or pass. When your feet are aligned, the rest of your body follows suit. Focus on your feet and your hips and shoulders will follow suit. It's very difficult to have your feet square to the basket and have your hips and shoulders pointing anywhere else.
Low Man Wins
"Low mans wins" is an axiom that holds true for tackling in football, checking in ice hockey and also for many one-on-one scenarios in basketball. Shooting is one of these scenarios, as keeping a low center of gravity allows you to get your shot off quicker and with more control.
Strength and stability in your shot both come from your legs and core. Whether you are making a cut or bracing for your shot, keeping a low center of gravity improves your stability, responsiveness and overall agility. You'll notice players who are fatigued coming into their jump shot are more upright with less bend in their knees and a less athletic stance. What follows is a slower release, since they can't gain their balance as quickly, and the shot falling short, since they can't generate the same amount of power.
Squats, dead lifts and lunges are staple exercises that will enable you to be a "lower" man.
So the next time you're going through a drill, remember to always challenge yourself,you're your shot in motion with good footwork, and low man wins. Have fun and play hard.
Training to improve protection
Training to improve protection
Learning how to move in defense.
1. Move in a defensive stance diagonally backwards. After 3-5 steps, turn around and change direction. Then do the same diagonally forward. 2. Do the same but add hand movements. The far hand works to protect against the transfer, the near hand imitates the capture of the ball. 2-3 sets of 5 diagonals forward and backward.
DETAILS : Increase and decrease your movement speed. Keep your back, don't jump in the move. The back leg drags along the floor.
CHIPS : Emphasis on the first step, it must be fast and taken with the lead foot.
Improving protective actions.
1. Five attackers stand on the perimeter and pass the ball to each other, each of them has a defender. Defenders must change their stance and shift to the correct position depending on the ball. 2. The same, but with active defense, try to intercept or take the ball away. 3. At the signal of the teacher, the player with the ball goes into the aisle. For 30 seconds, then change roles, 3 times.
DETAILS : Defenders must always see the ball, keep their distance, actively use their hands.
CHIPS : The drill will be especially effective if performed without fouls.
Improving protective actions.
1. Stand opposite each other with a partner. The attacker stands still and performs turns, moving the ball to the side. The defender reacts to the attacker's movements and moves accordingly, making defensive movements with both hands in front of the ball. 2. The defender tries to knock out or take the ball away from the attacker. 30 seconds each, 3 sets.
DETAILS : Low stance, keep distance, back straight.
CHIPS : The drill will be especially effective if performed without fouls.
Improving protective actions.
One player (playing) has the ball, two other players - a defender and an attacker. The striker makes movements (forward / backward, right / left), trying to get a pass from the player with the ball. The defender plays in a closed stance, covering the passing line, making it difficult for the attacker to receive the ball. If the pass is still passed, then the attacker must perform turns (one circle forward or backward) and give a reverse pass to the playing along, and the defender must actively interfere with him, try to knock out or take the ball away. 30 seconds in each role, 3 times (change in a circle).
DETAILS : The defender must always have a view of the ball, keep his distance, actively use his hands. The attacker must perform turns without running.
Learning the basic defensive stance.
From a standing position, take a protective stance at the signal. At the next signal, return to the starting position. 10-15 times.
DETAILS : Feet slightly wider than shoulder width and parallel, arms in line with legs, shoulders relaxed, arms half-bent, palms open towards attacker.
CHIPS : The stand must be very stable. To check this, you can knock a little.
Improving protective actions.
1. Three attackers stand in a triangle and pass the ball to each other, each of them has a defender. The defensive stance varies depending on the ball. If your player has the ball, then a parallel stance with active hand work; if the ball is in the possession of a nearby player (in one pass), then a closed stance with overlapping of the transfer line; if the far player has the ball (in two passes), then the stance is open. 2. The same, but with active defense, try to intercept or take the ball away. For 30 seconds, then change roles, 3 times.
DETAILS : Defenders must always see the ball, keep their distance, actively use their hands.
Learning how to move in defense.
Get into a protective stance and move around: 1. Small steps to one side and the other. 2. Small steps to one and the other side with greater speed. 20-30 seconds each exercise.
DETAILS : Leading foot turned slightly in the direction of travel, the "back" foot does not approach the leading, the distance between the legs is maintained.
CHIPS : Emphasis on the first step, it must be fast and taken with the lead foot.
Learning how to move in defense.
1. Move backwards in a defensive stance in a zigzag from the beginning to the middle of the court, quickly, without stopping. Come back with an easy run. 2. Do the same in alternation with acceleration. Start with 2-3 times, and later increase the number of times or distance.
DETAILS : Keep your back, don't jump in the move.
CHIPS : Emphasis on the first step, it must be fast and taken with the lead foot.
Learning how to move in defense.
Move in a protective stance: 1. Back and forth, adding a normal run every three steps. 2. In one direction and in the other, adding the usual run at the command of the coach. 20-30 seconds each exercise.
DETAILS : Leading foot turned slightly in the direction of travel, the "back" foot does not approach the leading, the distance between the legs is maintained.
Improving protective actions.
1. Stand opposite each other with a partner. The attacker dribbles the ball in place with cover, the defender tries to knock out or take the ball away. If he succeeds, then the defender gives the ball back to the attacker. 2. The same, but the attacker moves left and right along the line in 3-5 steps. 3. The same, but the attacker moves diagonally back and forth in 3-5 steps. 30 seconds each, 3 sets.
DETAILS : Keep your distance, back straight.
CHIPS : The drill will be especially effective if performed without fouls.
Learning how to move in defense.
Stand opposite each other in protective stances with a partner. One makes movements, the other repeats after him: 1. The host moves in one direction and the other, makes various movements with his hands (raises and lowers). 2. The leader moves in one direction and the other, sometimes adding a normal run. 30 seconds each, 3 sets.
DETAILS : Increase and decrease your movement speed. Keep your back, don't jump in the move. The back leg drags along the floor.
CHIPS : Turn on your imagination, perform different movements.
Learning how to move in defense.
Accelerating forward 1/4 of the landing, at the end of a step with active work of the hands - moving sideways in a protective stance - again accelerating forward with a step and so on. 3 sites.
DETAILS : Keep your back straight, low stance in defensive movements, active arm work
Improving protective actions.
One player (playing) has the ball, two other players - a defender and an attacker. The striker makes movements (forward / backward, right / left), trying to get a pass from the player with the ball. The defender plays in a closed stance, covering the passing line, making it difficult for the attacker to receive the ball. If the transfer still went through, then the attacker returns the ball to the play-by-player and opens again. 30 seconds in each role, 3 times (change in a circle).
DETAILS : The defender must always see the ball, keep his distance.
Shooting exercises
replica swiss watches
Basketball is a great team game, the team consists of players whose skill is achieved with great effort. The only person who can understand that you are working hard is yourself. Remember, you only get out of the game what you put into it. Give yourself to her without a trace.
Jump shot
In basketball, an outstanding sniper is a piece item. If you want to be a great sniper, all you need to do is just want to be one.
First, you must improve your craft.
This includes having a good coach and years of training. Secondly, you must improve in game mode.
This means that you must perform throwing drills at the same intensity as in the game. It's far better to hit 100 shots in play than 500 sloppy shots that a good defender would never let you make in a game. Finally, you must understand that working on a roll is like investing in a bank. If you don't deposit anything into your account, you won't receive dividends when you need them.
The sniper must have "throw school". When throwing after a dribble, one of the main features is the last hit of the ball on the court, which must be fast and strong so that it bounces higher, right into your hands - this will help you not waste time handling the ball.
Individual Shooting Exercises
Exercise 1 Attention Concentration
Start from a distance close to the ring.
Throw with one hand. Follow correct technique.
Do five from each position. Take a step back and repeat (Fig. 1).
Exercise 2 7 throwing positions and rebound (4 meters)
Jump shot from position 1.
Pick up the ball, dribble quickly to position 7, shoot.
Pick-up, fast guiding back to position 1.
Make 10 rolls.
Repeat the same steps using positions 6 and 2, 5 and 3, 4 (Fig. 2).
Exercise 3 7 shooting positions and a rebound (from behind the three-point line)
1. Repeat the same steps as in exercise 2 (fig. 3).
Exercise 4 Throw after stop
Start from position 1, toss the ball to position
Pick it up, while you have to run around the ball so that you are facing the ring.
Make 10 rolls, then advance to the next position.
Ex.5 Shooting from five positions after a fake move (from four meters or from behind the three-point line)
Start from any position.
On bent knees and with your head up, you do a throw feint, hit the ball one or two with your right hand, stop and jump.
Return to position, throw feint, one or two hits with the ball with the left hand, stop, throw.
At each position, 5 attempts (Fig. 5).
Exercise 6 Jump shots after dribbling
Start the exercise from the center of the field, move to the hoop with dribbling at game speed, after stopping quickly shoot.
The shot must be taken from a middle distance or from behind a three-point arc. Perform the exercise, both on the right and on the left and in the middle of the site.
Use different types of dribbles: fast dribbles, broken tempos, pivots, etc.
Make 5 attempts in each direction (Fig. 6).
Exercise 7 Playing with a virtual opponent
Make a free throw. If you have implemented it, you get one point. If not, then your "opponent" is three.
You make subsequent throws from any position except the three-second zone, imitating the rhythm of the game. Work on different moves and throws. Each of your successful attempts is estimated at the bottom of the point, unsuccessful at two for the "opponent". The game goes to 11 points.
This is a very good exercise to consolidate what you have learned. Try! Improve! (Fig. 7).
Double shots
Dr. 8 2 players, shot and rebound (4 meters or from behind the three-point line)
The drill starts with a good, clear pass. The player who made the pass from under the basket goes to the place of the thrower.
The player in position 1 catches the ball and shoots.
After the shot, the player runs to the rebound and then passes the ball 1 position and so on.
Each player must make five throws. The exercise is performed at a fast pace, but the throws should not be sloppy.
Then move to another position and everything is the same (Fig. 8).
Exercise 9 Two players, throw and rebound (per result)
The exercise is performed as described above.
The player who made the pass tries to interfere with the shot, but does not block.
Game up to 5 hits.
Then we move to another position, and so on. (Fig. 9).
Exercise 10 Two players, throw and rebound, throw feint
The exercise is performed in the same way as the previous one.
The defender who made the pass tries to interfere with the player in position 1, but does not block the shot.
The attacker makes a throw feint and beats the defender.
Performs a short dribble, stops and throws.
Do 5 times each and change position (Fig. 10).
Ex. 11 2 players, shot after stoppage (from four meters or from behind the 3-point line)
The attacker is in position 1, ready to receive the pass.
The player under the basket passes.
After the throw, the attacker waits for the rebound to be made.
The player receives a pass by making a stop, but already in position 2. Then back.
Make 7 throws, two free throws and switch (fig. 11).
Ex.12 Moving shots (from four meters or from behind a three-point arc)
The attacker moves around the perimeter at game speed.
A player passes to the hand farthest from the ring.
The attacker must stop, catch the ball and throw.
Make seven throws, two free throws and change (fig. 12).
Note: The previous exercise has three options.
A) Receive the ball and throw it.
B) After receiving, throwing feint, dribbling in the same direction, throwing.
B) Receives a pass, throw feint, dribbling to the ring in the other direction, stop, throw.
Ex. 13 Various dribbling options and a jump shot
The attacker starts from the center of the field and, dribbling at game speed, moves towards the ring, stops and takes a jump shot.
The player under the basket picks up the ball, the attacker runs to the center of the field, and receives the ball on the opposite flank. Moves with dribbling to the ring, stop, jump shot.
On the right side, dribble with the right hand, on the left - with the left (Fig. 13)
Note: Use speed dribbling, change of pace, transitions, pivots.
Three players, two balls
Exercise 14 Warm-up exercise
One player throws, another passes, a third rebounds.
Thrower becomes rebounder after seven tries.
Passer - thrower. Picking up - passing (Fig. 14).
Note: various options are possible
1) From seven positions (four meters)
2) From seven positions (from behind the three-point arc)
3) From five points with feints to shoot
4) Throw after stoppage
5) Throw and rebound (constant rotation around the circle)
Double throws: using screens
To use the screen effectively, you must read the defender correctly. You must always see the player with the ball and how the defender defends against you. A player who moves well off the ball and knows how to use screens correctly is very useful offensively. When you watch a match that has good players, notice how well they move off the ball. The hardest thing to defend against is a well-moving attacker.
Ex. 15 Screen behind the back and snatch
The player imitates opening and screening behind his back, makes a dash to the corner of the court.
Throw to near hand.
Attacker catches the ball and shoots.
The attacker picks up his shot, passes to a partner and returns to his original position.
Make seven attempts and change (Fig. 15)
Note: do not back away when dashing, turn and run, but do not lose sight of the ball.
Ex. 16 Screening behind the back, "false" screening
1. Attacker starts on the base of the trapezoid and moves up to imitate the screening.
2. After the imaginary breakout runs, the screening attacker rises to the ball and prepares to receive the pass.
3. Having caught the pass, he immediately makes a throw.
4. Make seven attempts and change (Fig. 16).
0005
An attacker imitates a defender on the screen and rises sharply towards the ball.
The player must be ready to receive the ball.
The attacker catches the ball and makes a quick throw.
Make seven attempts and change (Fig. 17)
Exercise 18 Screening the ball carrier, moving away from the ring
The attacker screens the ball carrier.
The ball carrier passes through the screen aggressively.
Instead of pulling back to the hoop (deuce), the screening attacker moves away from the hoop and prepares to receive the pass.
Having caught the ball, he immediately makes a throw.
Make seven attempts, then switch.
Exercise 19 Barrier at the base of the trapezoid - opening to the flank
The attacker takes the player under the ring, breaks shoulder to shoulder through the barrier and makes a dash to the flank.
When catching the ball, the player must turn to the ring.
Use different throw options: just throw, and dribbling to the right or left after a throw feint. Change after five attempts (Fig. 19).
Exercise 20 Screening at the base of the trapezoid - opening into the corner of the court
The attacker leads the player into the three-second zone, pretends to break through to the flank through the screen, the defender starts running around the screener through the three-second zone.
An attacker rushes into the corner of the court and the defender hits the screen.
Next, the same as in the previous exercise (Fig. 20).
Ex.21 Screen at the base of the trapezoid - dash inward
The defender is chasing you, not falling behind until the very screen.
Then you run through the screen as close to the screener as possible and break into the three-second zone or foul line area.


 Put your guide hand in the normal position, but an inch off the ball so you're not touching it. Focus on shooting the ball high and far, but do not sacrifice good form in order to do so.

 Stay at that spot until your shot feels like it did at 12 feet. Once it feels comfortable again, shoot several hundred shots until it becomes automatic again.
 5'
5'

 When players get tired or are shooting out of range, the first symptom is often poor footwork from being lazy or trying to generate that extra power. This leads to bad habits that become harder to correct as the player gets older and they become more engrained in their routine.
 Whether you are making a cut or bracing for your shot, keeping a low center of gravity improves your stability, responsiveness and overall agility. You'll notice players who are fatigued coming into their jump shot are more upright with less bend in their knees and a less athletic stance. What follows is a slower release, since they can't gain their balance as quickly, and the shot falling short, since they can't generate the same amount of power.
  After 3-5 steps, turn around and change direction. Then do the same diagonally forward. 2. Do the same but add hand movements. The far hand works to protect against the transfer, the near hand imitates the capture of the ball. 2-3 sets of 5 diagonals forward and backward.
 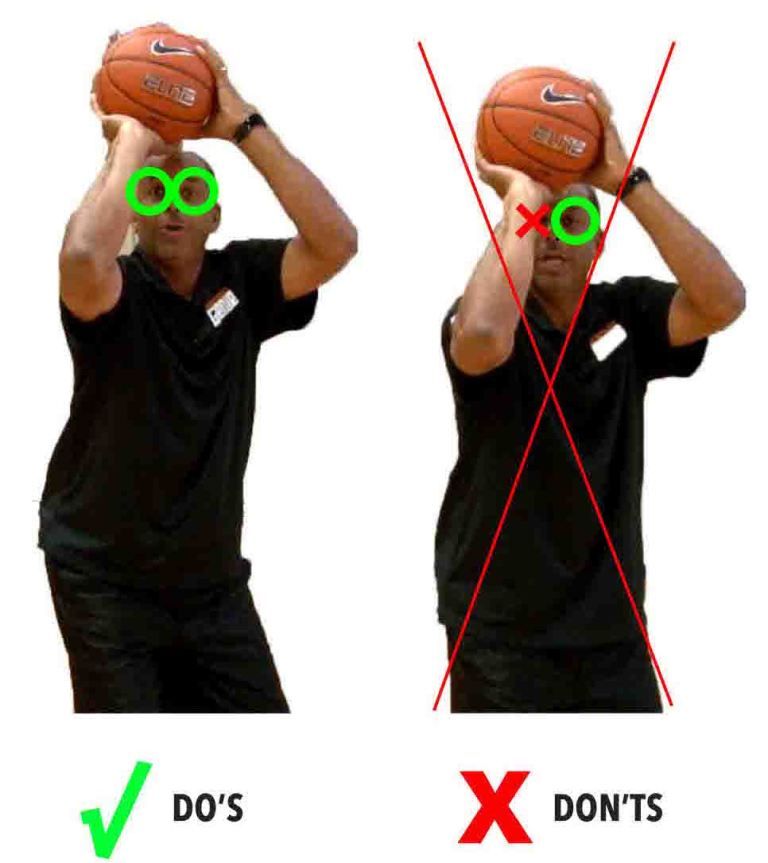 For 30 seconds, then change roles, 3 times.

 Start with 2-3 times, and later increase the number of times or distance.
  The attacker dribbles the ball in place with cover, the defender tries to knock out or take the ball away. If he succeeds, then the defender gives the ball back to the attacker. 2. The same, but the attacker moves left and right along the line in 3-5 steps. 3. The same, but the attacker moves diagonally back and forth in 3-5 steps. 30 seconds each, 3 sets.
  30 seconds each, 3 sets.
  The defender plays in a closed stance, covering the passing line, making it difficult for the attacker to receive the ball. If the transfer still went through, then the attacker returns the ball to the play-by-player and opens again. 30 seconds in each role, 3 times (change in a circle).
  Secondly, you must improve in game mode.
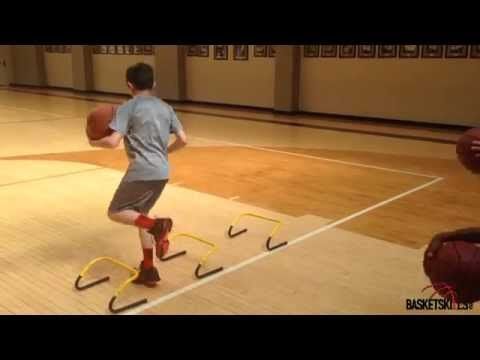

 The game goes to 11 points.
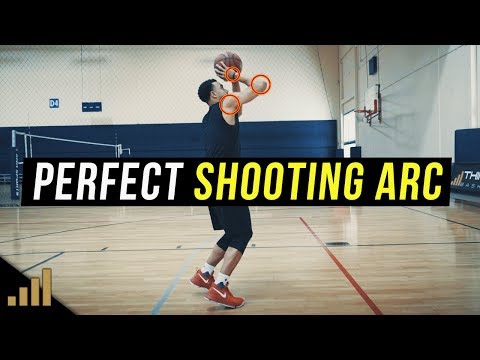
 11).
11).  Moves with dribbling to the ring, stop, jump shot.
  A player who moves well off the ball and knows how to use screens correctly is very useful offensively. When you watch a match that has good players, notice how well they move off the ball. The hardest thing to defend against is a well-moving attacker.