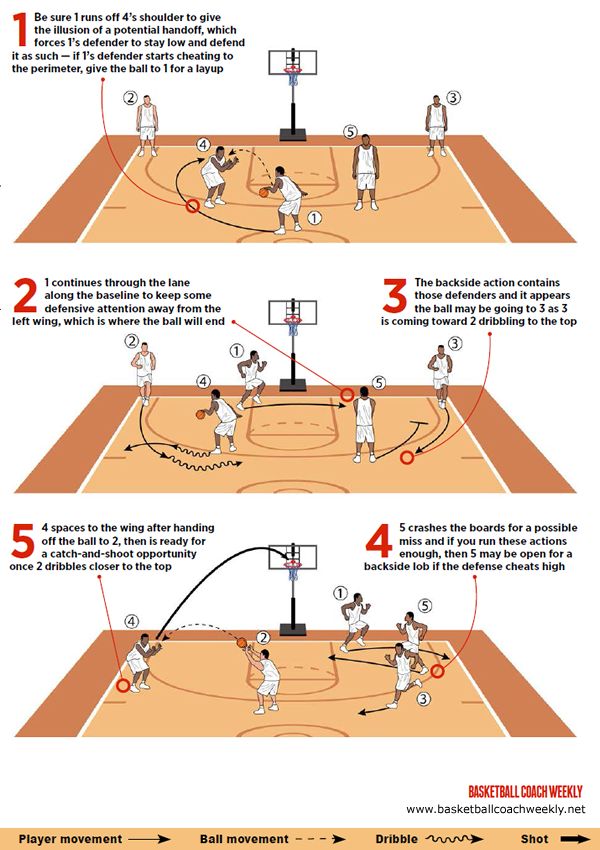
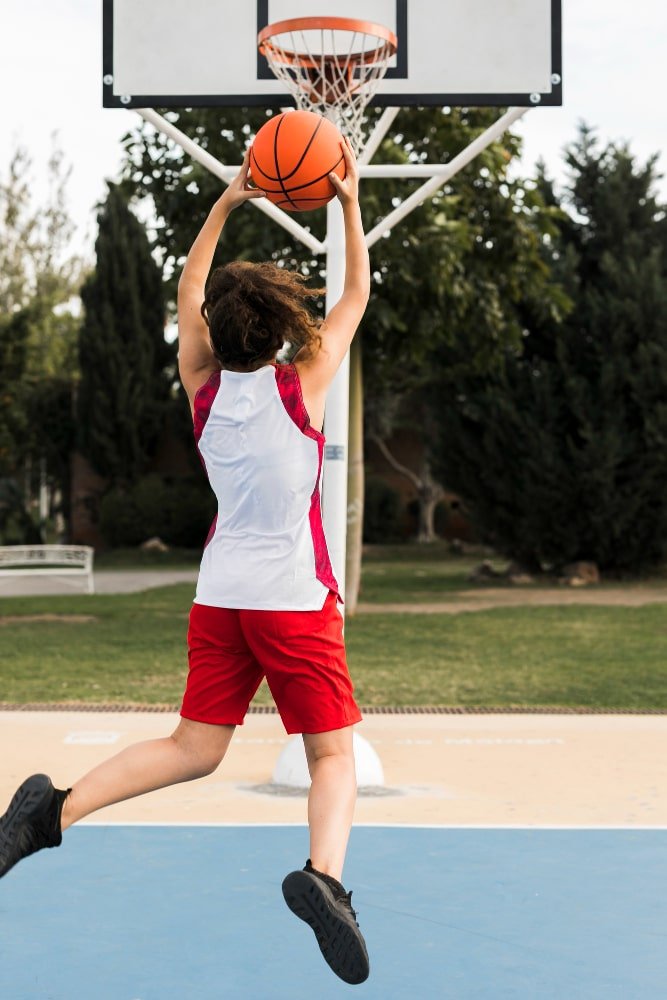
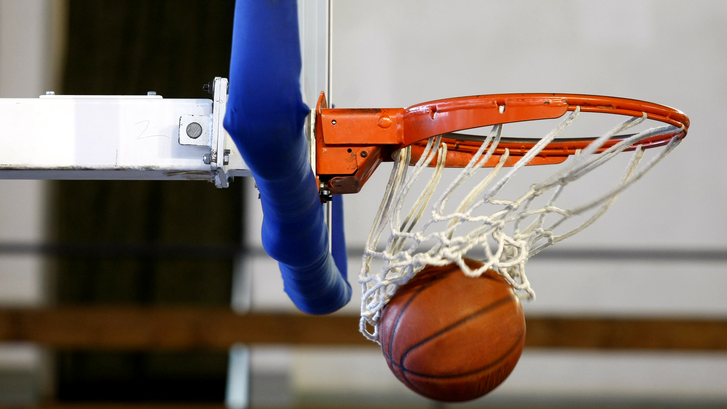
How To Disassemble A Basketball Hoop [In-Ground & Portable]
We are reader-supported. When you buy through links on our site, we may earn an affiliate commission. Learn more
by Sportszpro
So, you’ve got a basketball hoop in your driveway that you would like to remove or replace? Perhaps you are relocating to another house, or the hoop is simply not in a good spot in your yard. Whatever your reasons are, you probably already know that you have to disassemble the hoop, right?
But is it even possible to take down your basketball hoop? If yes, how do you do it?
Below are the steps on how to disassemble a basketball hoop with simple tools you probably already have in your home.
Table of Contents
Can You Disassemble A Basketball Hoop?
How To Disassemble A Portable Basketball Hoop
Step 1: Spray liquid wrench on the nuts
Step 2: Remove the hardware
Step 3: Disassemble the pole
Step 4: Remove anchoring material
Step 5: Separate the poles
How to Disassemble an In-Ground Basketball Hoop
Step 1: Lookout for buried utilities
Step 2: Remove all the hardware
Step 3: Dig into the bottom of the pole
Final Words
Can You Disassemble A Basketball Hoop?
Yes, you can. However, the task can be quite laborious, especially if your basketball pole is fixed to the ground using concrete. But with the right tools, you can easily disband your basketball hoop.
How To Disassemble A Portable Basketball Hoop
Looking for tips to disassemble your portable basketball hoop?
Whether you have a Lifetime, Spalding, or little tikes’ basketball hoop, below are steps on how to take it apart.
Step 1: Spray liquid wrench on the nuts
If the nuts and bolts holding the hoop in place have some rust, you can spray some liquid wrench on them. Then, leave the liquid to sit overnight.
Step 2: Remove the hardware
Get a ladder and climb up to the top of the basketball pole. Then, remove the screws securing the hoop’s backboard plus rim in place using a screwdriver. Make sure to store the equipment in a secure plastic bag.
Step 3: Disassemble the pole
Next, simply take apart the basketball pole, adjustment mechanism, and the extension arm. Again, put these fixtures in a secure bag.
Step 4: Remove anchoring material
Some basketball hoops require that you fill them with water or a heap of sand to keep them stationary. Simply pour out the anchoring material by carefully tipping over the hoop.
Step 5: Separate the poles
When it comes to disassembling a portable basketball hoop, you use the drop method to separate the poles. You simply drop the pole on a hard surface until it separates into two pieces.
How to Disassemble an In-Ground Basketball Hoop
The process of disassembling portable basketball hoops is simple. But with an in-ground hoop, it’s not. Here is how to go about it.
Step 1: Lookout for buried utilities
First, check for any buried utilities like electric, gas, or internet cable where your basketball hoop is fixed.
Step 2: Remove all the hardware
Start by removing the rim and the backboard from the top portion of your basketball hoop. You simply loosen the nuts and bolts. Next, take apart the extension arm and pole.
Step 3: Dig into the bottom of the pole
Dig on each side of the pole using a shovel and sledgehammer until you reach the bottom of the concrete. Then, try rocking the basketball pole back and forth to loosen it.
Final Words
With a portable basketball hoop, it is pretty easy to disassemble. However, if your basketball hoop is anchored to the ground using concrete, you have to do some digging to remove it. Now, if you find this a lot of work, you can always hire a professional.
Read Related:
How To Install In Ground Basketball Hoop
How To Lower A Basketball Hoop
How To Adjust Lifetime Basketball Hoop
How To Install A Basketball Backboard To A Pole
How to Get Rid of Your Old Basketball Goal
For many basketball lovers, having a basketball hoop in their backyard can be a dream come true! Walking out your front door to play basketball whenever you like is amazing.
However, if you’re no longer using the basketball hoop, then it’s simply taking up space and can become a real eyesore. Even worse, it can become dangerous. When it blocks your driveway, front yard or the cul-de-sac, it can lead to accidents or wrecks.
At the end of the day, if no one is using your basketball hoop, then it may be time to remove it. But the first step is figuring out how to get rid of your old basketball goal.
How to Take Down a Basketball Hoop
When you begin the disassembly process, it is best to begin from the top for both safety and ease of use. Always remove all other parts, before attempting to remove the pole.
Remove the net.
Loosen all nuts and bolts that hold up the board.
Remove the board from the pole.
🏀 Pro Tip: Beware of rust and mold! Portable basketball hoops don’t age well. The poles can rust, the net will get worn and torn and the sand or water bottom can get moldy.
Is your goal portable or fixed?
A fixed basketball hoop has been set into the ground while the concrete was still wet, meaning that it is embedded into the concrete. Removing a fixed basketball hoop is a greater challenge than removing a portable basketball hoop and probably best left to a professional.
A portable basketball hoop has its own base that provides support since they are often filled with sand or water. While getting rid of a portable basketball hoop is still pretty cumbersome, it is likely going to be a easier project.
Removing your basketball pole can be a challenge.
In many ways, removing the hoop from the ground represents the largest problem. You may be able to deal with this yourself. But this will likely mean cutting the metal that fixes the pole into the concrete. Then you’ll need to remove the concrete fragments and refill the hole left in the concrete.
Using a sledgehammer to remove your basketball pole.
If you decide to remove the pole, you’ll want to first cut the pole and make sure there are no sharp edges that could potentially cut you. Next, you’ll have to break out the “big guns” – a sledgehammer to help you get rid of your basketball hoop.
If you’ve never used a sledgehammer before, then be prepared for a very loud and demanding workout. The sledgehammer is not for the faint of heart. Therefore, it is best to opt for a professional removal company to handle the removal process for you. Once the concrete has been smashed up and removed, you can fill the hole with new concrete.
Need basketball goal removal near you?VIEW CITIES ❯
Using the cut and file method for basketball pole removal.
Another option is to cut at the base of the pole and then file down the metal pole so that there are no sharp edges. This option may leave behind an unsightly pole remnant in the ground, but at least you’ll avoid the hassle and expense of using a sledgehammer.
Note: Cutting a metal basketball pole yourself is dangerous. We strongly recommended hiring a demolition professional.
Get Professional Basketball Goal Removal Help
If you opt to hire a professional company to remove a portable basketball hoop from your home or office, then you have come to the right place! You can look at other website pricing, but LoadUp is known for offering 20-30% cheaper removal and disposal prices than others.
We also haul away basketball goals that have been cemented into the ground, but ONLY after they have been removed from the cement. We cannot remove anything that is cemented in.
Who can you hire to remove your basketball hoop?
If you are having trouble finding someone to remove your basketball hoop, try doing an internet search for “basketball hoop removal” in your city. Most likely LoadUp is one of the top spots on Google because we are a nationwide removal company that will not only handle lifetime basketball hoop disassembly but also get rid of almost anything for you!
Tired of that old basketball goal?BOOK HOOP REMOVAL ❯
Always think about safety.
Another major concern, and one that is easily overlooked, is whether or not your basketball hoop is near a power-line. If your basketball hoop is near a power-line, you’ll want to check with your utility company regarding safety issues. In the end, the basketball removal cost will depend on the level of complexity involved with the job.
Disposing of Your Basketball Goal
In terms of recycling your basketball hoop, trash pickup or recycling may pick up the backboard and base of the portable basketball hoop, but there is no guarantee. For this reason, it is best to check with your local trash and recycling company and see what their policies are regarding basketball hoops before you decide to go this route.
Likewise, you’ll have to check with your trash and recycling company to see if they will pick up your metal pole, as every recycling company has its own rules. It is quite likely that you’ll have to cut the pole in half before it has any chance of being picked up.
Hiring LoadUp to Take Your Basketball Goal
Getting rid of a basketball hoop, especially an in-ground basketball hoop, can be a time-consuming, stressful, and even potentially dangerous endeavor. At LoadUp, we’ve been removing basketball goals in your area for a while and have the service down pat. We will get rid of your basketball hoop and dispose of it in an environmentally sound fashion.
Hiring LoadUp is the fastest way to get rid of your basketball hoop and for the best price.
Why go through the considerable hassle and expense of removing your old and rusty basketball hoop when LoadUp can do the job for you?
Tired of that rusty old pole?BOOK HOOP REMOVAL ❯
Related Articles from the Trash Talk Blog:
What To Do with My Old Trampoline?
The Ultimate Guide to Moving Checklist
How to Dispose of Broken Exercise Equipment
5 Ways to Dispose of Used Furniture Before Moving and Relocation
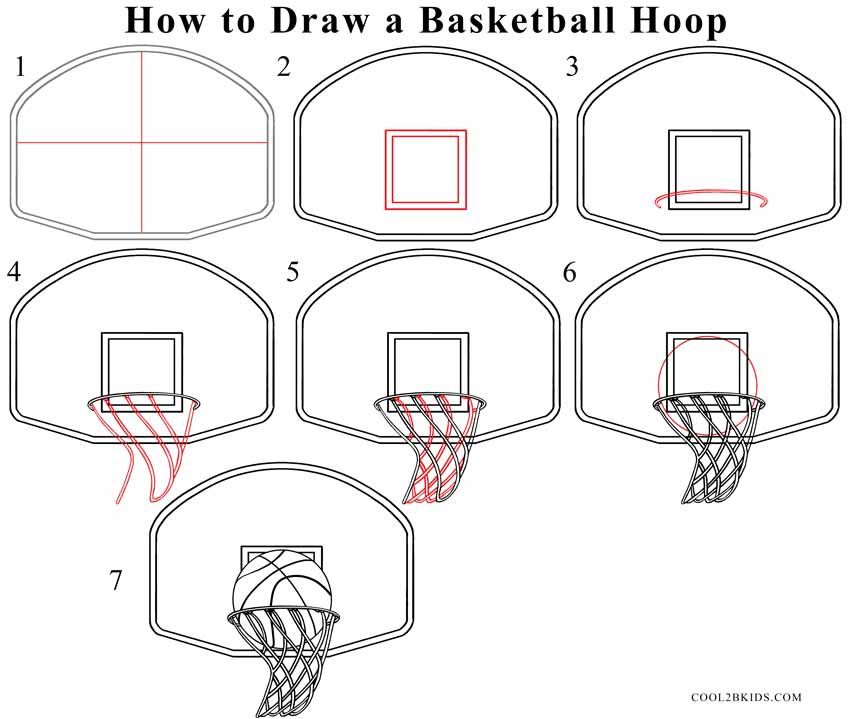
Basketball hoop - how to make a stand with a backboard with your own hands
Love basketball and want to make a hoop? I wanted to make it myself, not buy it, and I ended up making it. It's pretty cheap, especially if you have some of the stuff you need to assemble.
Let's start assembling the basketball hoop with our own hands.
Step 1: Shape the Ring
The first thing you will need is a ring, I made it with 12mm rod, but it doesn't have to be that size. The standard diameter of a basketball hoop is 450 mm.
To make it flat you need something to wrap it around, this thing should be about 400mm in diameter.
I found an old car rim of the right size, you will need to clamp it to the table with a clamp using a piece of wood.
As shown in photo 2, place another clamp a little further from the first with a rod between them.
As shown in photo 3, slowly wrap the rod around the disk, once you wrap the rod and its edges overlap, cut off the straight ends.
Use a clamp to press the ends together, then weld them together.
To complete this part, place the ring on the ground and straighten out all the curves.
Step 2: Frame
Bend a piece of flat metal, mine was 4mm thick.
Weld it to a flat point in the ring.
Cut two rods 320 mm long.
Weld them as shown in the photo.
Drill four holes to match your existing bolts.
If you need a netball ring, you can simply attach it to the pole and skip the rest of the steps.
Step 3: Mesh Staples (Optional)
Show 7 More Images
Do this step if you need mesh. If you need a network, you will have to buy it. This step is not as difficult as it seems.
cut 12 pieces of wire 90 mm long (I would recommend making a few spare parts, as they are easy to ruin.)
bend them in the middle (it doesn't matter if the tips are the same length)
clamp the wire in a vise with a steel rod at one end
bend wire over rod
repeat this with all parts of
retighten the wire wrapped around the rod (see photo)
bend it
repeat with all parts
retighten the wire wrapped around the rod
bend it (at this point you can't just remove the wire from the rod - you will need to slide it to one of its edges and remove it from the edge)
repeat with all parts of
divide into 12 pieces and weld on the brackets
Step 4: Backboard
Cut the board to size. My board does not fit the full size of basketball boards. (the second picture shows the dimensions of a standard shield).
My measurements are 1100mm wide, 700mm high and 25mm thick. (You don't have to be that size.)
Step 5: Paint the Shield
Once you've drawn all the lines on the shield, lay masking tape over them. If you try, everything will look neat.
If you are using MDF, you will need to take care to protect the edges from moisture (as shown in photo 2).
Carefully paint over the areas around the masking tape.
Remove masking tape after enough coats of paint have been applied and the board looks complete.
Step 6: Paint the ring
First you need to sand the metal. I used a grinding disc on a grinder.
The ring must not be black or white, it must stand out from the shield. Usually the ring is painted orange or red.
The easiest way to paint inventory is from a can.
Step 7: Assemble
Put it all together. Screw the ring to the shield, hang a net on the ring.
Step 8: Installation
DIY Basketball Post is great to mount on a garage or house wall, but if you want to mount it on a pole, you can create one too.
I installed my ring in the yard using heavy duty wood screws.
A standard basketball hoop must be placed 3 meters from the ground.
I am not responsible for any damage you cause to yourself or your property - you make your own ring.
Successful throws!
Basketball hoop - how to make a stand with a backboard with your own hands
Love basketball and want to make a hoop? I wanted to make it myself, not buy it, and I ended up making it. It's pretty cheap, especially if you have some of the stuff you need to assemble.
Let's start assembling the basketball hoop with our own hands.
Step 1: Shape the ring
The first thing you need is a ring, I made it with 12mm rod, but it doesn't have to be that size. The standard diameter of a basketball hoop is 450 mm.
To make it flat, you need something to wrap it around, this thing should be about 400mm in diameter.
I found an old car rim of the right size, you will need to clamp it to the table with a clamp using a piece of wood.
As shown in photo 2, place another clamp a little further from the first with a rod in between.
As shown in photo 3, slowly wrap the rod around the disk, once you wrap the rod and its edges overlap, cut off the straight ends.
Use a clamp to press the ends together, then weld them together.
To complete this part, place the ring on the ground and straighten out all the curves.
Step 2: Frame
Bend a piece of flat metal, mine was 4mm thick.
Weld it to a flat point in the ring.
Cut two rods 320 mm long.
Weld them as shown in the photo.
Drill four holes to match your existing bolts.
If you need a netball ring, you can simply attach it to the pole and skip the rest of the steps.
Step 3: Mesh Staples (Optional)
Show 7 More Images
Do this step if you need mesh. If you need a network, you will have to buy it. This step is not as difficult as it seems.
cut 12 pieces of wire 90 mm long (I would recommend making a few spare parts, as they are easy to ruin.)
bend them in the middle (it doesn't matter if the tips are the same length)
clamp the wire in a vise with a steel rod at one end
bend wire over rod
repeat this with all parts of
retighten the wire wrapped around the rod (see photo)
bend it
repeat with all parts
retighten the wire wrapped around the rod
bend it (at this point you can't just remove the wire from the rod - you will need to slide it to one of its edges and remove it from the edge)
repeat with all parts of
divide into 12 pieces and weld on the brackets
Step 4: Backboard
Cut the board to size. My board does not fit the full size of basketball boards. (the second picture shows the dimensions of a standard shield).
My measurements are 1100 mm wide, 700 mm high and 25 mm thick. (You don't have to be that size.)
Step 5: Paint the Shield
Once you've drawn all the lines on the shield, lay masking tape over them. If you try, everything will look neat.
If you are using MDF, you will need to take care to protect the edges from moisture (as shown in photo 2).
Carefully paint over the areas around the masking tape.
Remove masking tape after enough coats of paint have been applied and the board looks complete.
Step 6: Paint the ring
First you need to sand the metal. I used a grinding disc on a grinder.
The ring must not be black or white, it must stand out from the shield. Usually the ring is painted orange or red.


 Again, put these fixtures in a secure bag.
 You simply loosen the nuts and bolts. Next, take apart the extension arm and pole.

 Next, you’ll have to break out the “big guns” – a sledgehammer to help you get rid of your basketball hoop.
 The standard diameter of a basketball hoop is 450 mm.
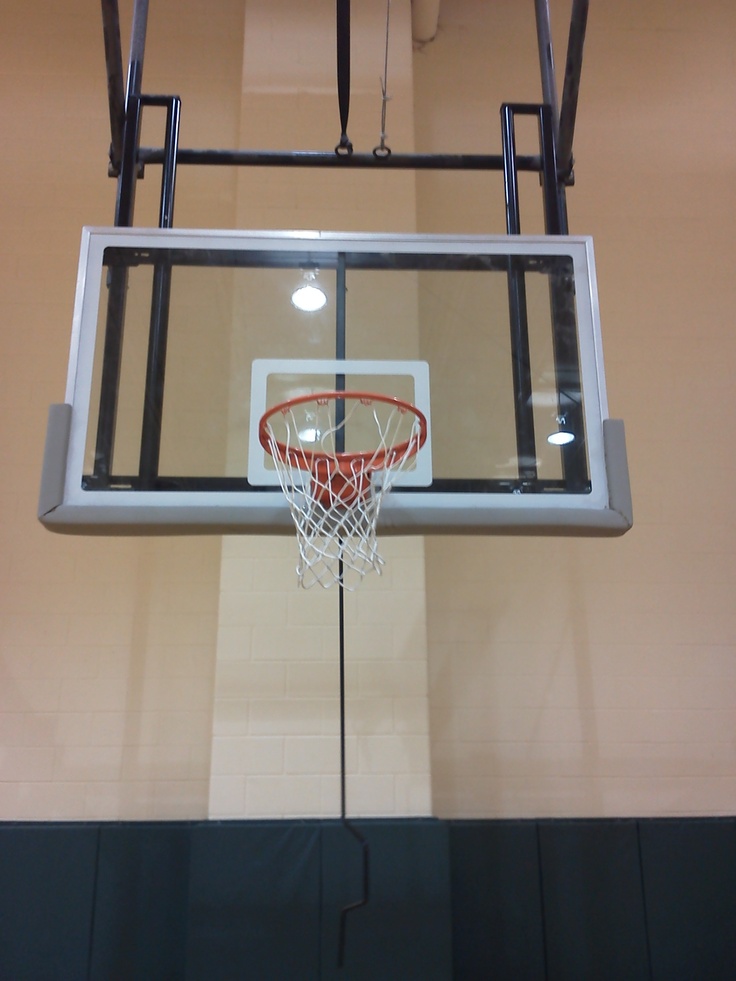
 My board does not fit the full size of basketball boards. (the second picture shows the dimensions of a standard shield).
  Screw the ring to the shield, hang a net on the ring.
  The standard diameter of a basketball hoop is 450 mm.
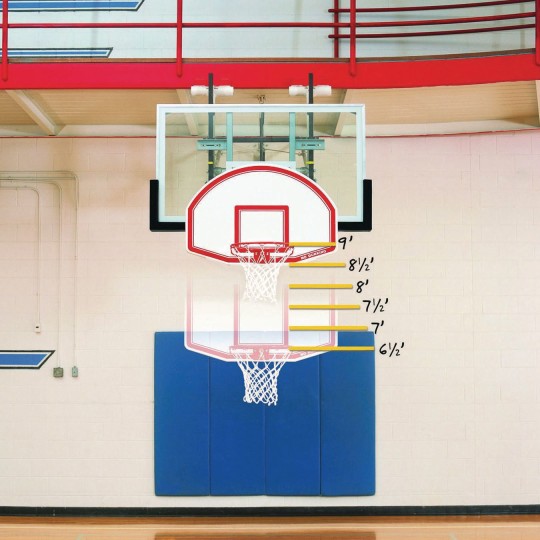
 My board does not fit the full size of basketball boards. (the second picture shows the dimensions of a standard shield).